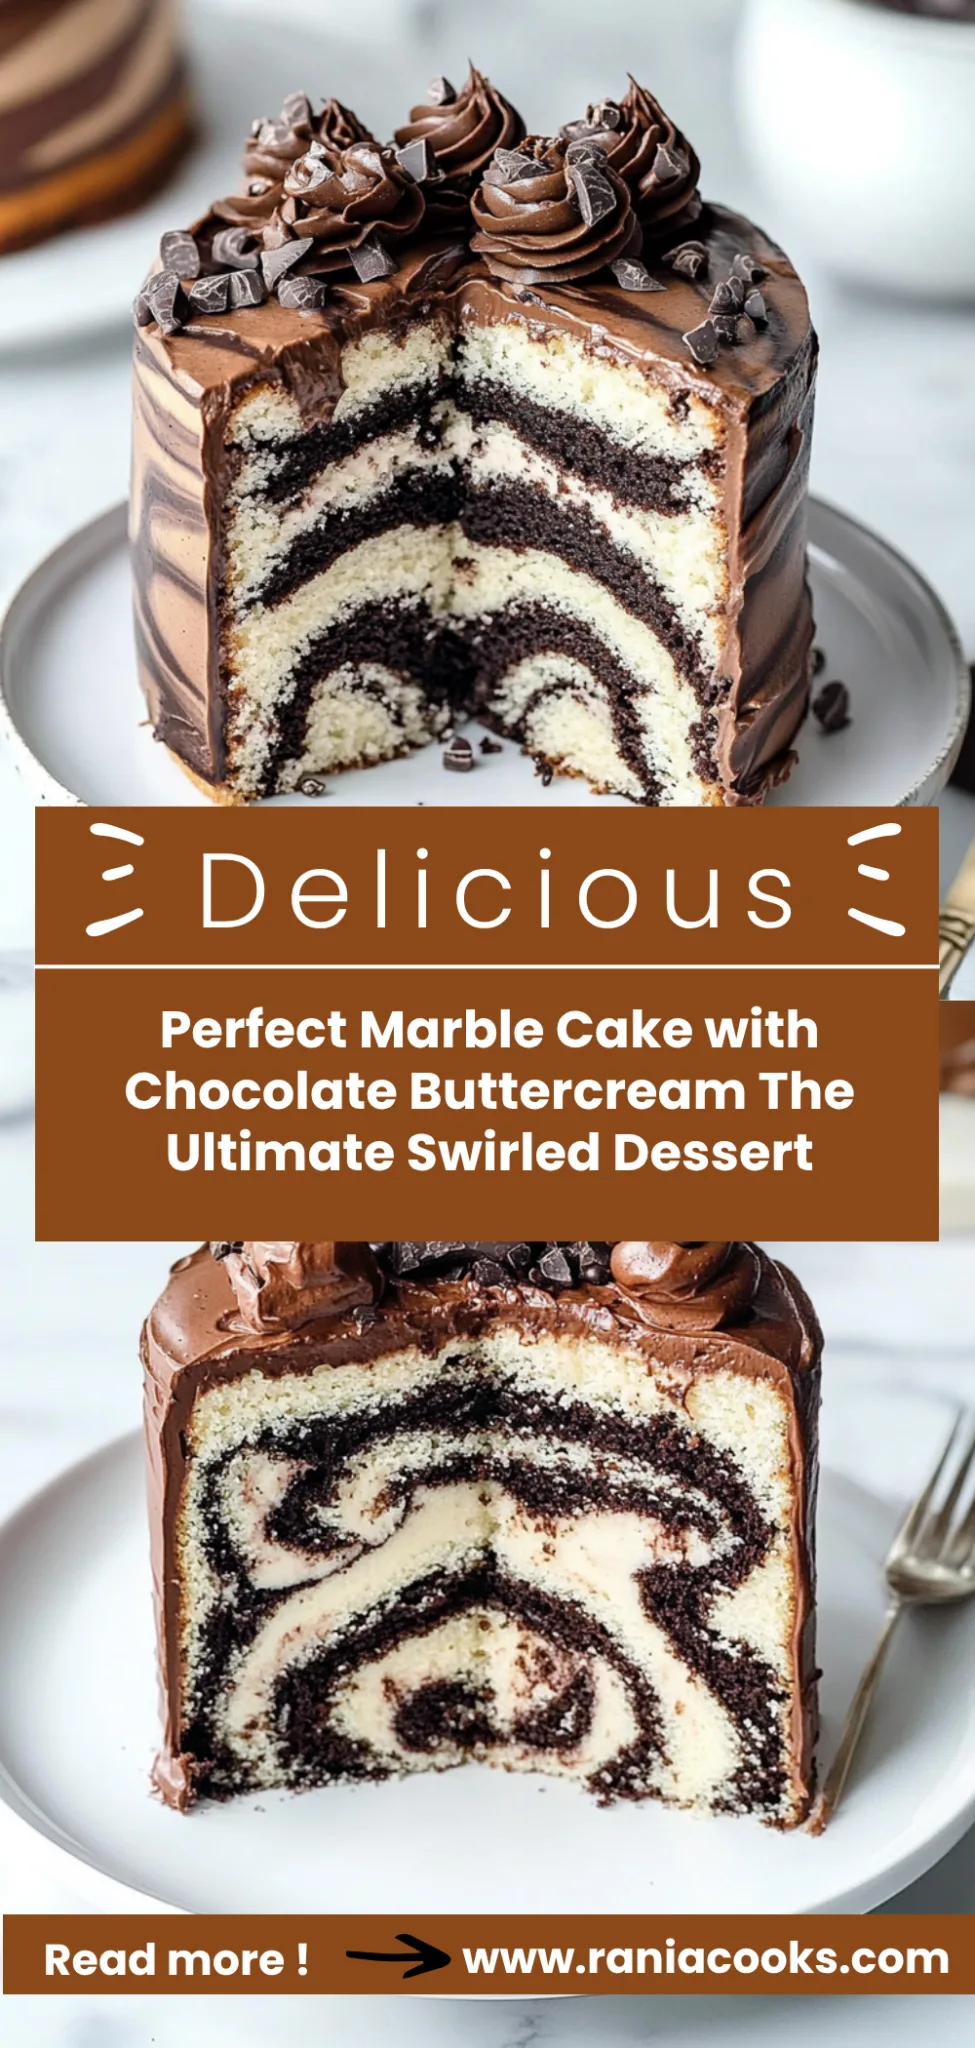
Perfect Marble Cake with Chocolate Buttercream: The Ultim…
There’s nothing quite like slicing into a warm, tender Perfect Marble Cake with Chocolate Buttercream: The Ultimate Swirled Dessert, where rich chocolate and fluffy vanilla flavors collide in a heavenly swirl. Each bite offers a luscious experience that’s moist, decadent, and downright irresistible. I created this recipe during one of those busy weeks when my family craved something sweet but still wanted a treat that packed a protein punch—this cake delivers about 8 grams of protein per slice! It became my go-to dessert for meal prep sessions as it satisfies my sweet tooth while keeping the macros in check.
I still remember the first time I made this cake; it was a rainy Sunday afternoon, and my kids were feeling under the weather. As I pulled the cake from the oven, the aroma filled our home and soon drew my teenagers into the kitchen. “Can we have some now?” they both chimed in unison, eyes wide with excitement. The secret twist is the velvety chocolate buttercream that takes this classic marble cake to another level of decadence. Watching them savor each bite and hearing one of them declare, “This is the best cake ever!” made all the effort worth it—and trust me, they’ve asked for it again every week since!
Ingredients for the Perfect Marble Cake with Chocolate Buttercream: The Ultimate Swirled Dessert
Each ingredient in this dish plays an essential role in flavor and texture. Here’s what you’ll need:
- 2 cups all-purpose flour (sifted): Provides structure and a light crumb to the cake.
- 1 cup granulated sugar: Sweetens the cake while helping it to rise.
- 1 cup unsalted butter (softened): Adds richness and moisture for a tender texture.
- 4 large eggs (room temperature): Binds the ingredients together and contributes to the cake’s fluffiness.
- 1 cup milk (room temperature): Enhances moisture and balances the batter’s consistency.
- 2 teaspoons baking powder: Acts as a leavening agent to help the cake rise perfectly.
- 1 teaspoon vanilla extract: Infuses warm, sweet notes that elevate both flavors.
- 1/2 cup cocoa powder (unsweetened): Delivers rich chocolate flavor that defines the marble effect.
Chocolate Buttercream Ingredients
- 1 cup unsalted butter (softened): Creates a creamy base that enhances the chocolate flavor.
- 3 cups powdered sugar: Sweetens and thickens the buttercream for a smooth finish.
- 1/2 cup cocoa powder (unsweetened): Provides intense chocolate taste that complements the cake beautifully.
- 1/4 cup milk (room temperature): Adjusts consistency for easy spreading over the cake.
- 1 teaspoon vanilla extract: Adds depth of flavor, rounding out the sweetness of the buttercream.
Step-by-Step Instructions
I recommend preheating your oven first since it takes some time to reach the right temperature — this way, the cakes can go straight in once you’re done preparing the batter. Preheat the oven to 350°F (175°C) and while it’s heating up, grease and flour two 9-inch round cake pans thoroughly to ensure your beautiful marble cake comes out easily after baking.
Step 1: In a large mixing bowl, cream together the softened butter and granulated sugar until light and fluffy. This step is crucial because it incorporates air into your batter, giving the cake a lovely texture. Use an electric mixer on medium speed for about 3-5 minutes until you see that airy consistency. I usually find it helpful to scrape down the sides of the bowl halfway through to make sure everything is well combined.
Step 2: Add the eggs one at a time, mixing well after each addition. Stir in the vanilla extract after all four eggs are incorporated. This gradual addition helps maintain that fluffy texture you created earlier. Make sure your eggs are at room temperature; it makes blending easier and creates a more uniform batter.
Step 3: In another bowl, whisk together the sifted all-purpose flour, baking powder, and salt. This step ensures that your dry ingredients are evenly mixed, preventing any clumps of baking powder or salt in your cake. I always sift my flour to aerate it before measuring — this can make a big difference in how light your cake turns out.
Step 4: Gradually add the dry ingredients to the wet mixture, alternating with the milk until just combined. Be careful not to overmix at this stage; you want a smooth batter without lumps but don’t worry if there are a few small pockets of flour remaining. This technique helps keep your cake tender and moist, which is essential for a perfect marble cake.
Step 5: Divide the batter in half. Stir the cocoa powder into one half of the batter until well combined. At this point, I like to use a rubber spatula to fold in the cocoa powder gently; this avoids deflating your batter while ensuring even chocolate flavor throughout that half.
Step 6: In the prepared pans, alternate spoonfuls of the vanilla and chocolate batter. Start with a scoop of vanilla, then add chocolate on top — repeat until both batters are used up. This method builds those gorgeous swirls you’ll see when you slice into your cake later on.
Step 7: Using a knife or skewer, gently swirl the batters together to create a marbled effect. Don’t go too deep; you want visible layers rather than full integration — aim for about three or four gentle swirls per pan for an eye-catching finish.
Step 8: Bake in the preheated oven for 30-35 minutes, or until a toothpick inserted into the center comes out clean. You’ll know it’s ready when it’s golden brown on top and springs back when lightly pressed in the center. Keep an eye on them during those last few minutes — no one likes an overbaked cake!
Step 9: Allow the cakes to cool in their pans for 10 minutes before transferring them to wire racks to cool completely. This cooling period allows them to firm up slightly so they hold their shape better when turned out of the pans — I usually run a knife around the edges before flipping them over just to be safe.
Step 10: In a mixing bowl, beat the softened butter for your chocolate buttercream until creamy. This usually takes about two minutes on medium speed; you want it nice and smooth before adding anything else.
Step 11: Gradually add in your powdered sugar and cocoa powder while continuing to mix until fully incorporated and combined well. The key here is patience — adding too much sugar at once can lead to clouds of powdered sugar everywhere!
Step 12: Add milk and vanilla extract next, beating until frosting is light and fluffy — about another couple of minutes should do it! If it seems too thick, you can always add a splash more milk until you reach that perfect spreadable consistency.
Step 13: Once your cakes are completely cooled, spread a layer of chocolate buttercream on top of one cake layer using an offset spatula for even coverage. Make sure to leave some frosting aside for decorating later!
Step 14: Place the second layer on top carefully so as not to disturb that beautiful frosting you just applied. Frost the top and sides of the entire cake with any remaining buttercream; smooth out any rough spots as desired for that polished look.
Step 15: Decorate as desired; whether it’s simple sprinkles or more elaborate decorations is up to you! I love adding chocolate shavings or fresh berries on top for extra flair.
Step 16: Finally, slice to serve! Enjoy every bite knowing you’ve created something deliciously decadent with rich flavors swirling throughout each slice!
What to Serve with Perfect Marble Cake with Chocolate Buttercream: The Ultimate Swirled Dessert
This dish is already incredibly filling and balanced, but these sides add extra variety and nutrition to round out your meal perfectly.
Fresh Berry Salad: A vibrant mix of strawberries, blueberries, and raspberries tossed in a light honey-lime dressing brings a refreshing contrast to the rich marble cake. The tartness of the berries cuts through the sweetness, providing a delightful balance of flavors. Plus, this salad is packed with antioxidants and vitamin C, making it an excellent choice for boosting overall health — it’s a staple in our house during summer get-togethers.
Garlic Herb Quinoa: Fluffy quinoa cooked with garlic and mixed herbs offers a nutritious base that complements the cake’s flavors without overpowering them. This protein-rich side adds about 8 grams of protein per serving and provides healthy carbs to fuel your day. It’s my go-to option for meal prep as it holds up well throughout the week and pairs beautifully with various dishes.
Avocado Toast with Chili Flakes: Creamy avocado spread on whole-grain toast topped with a sprinkle of chili flakes introduces healthy fats and spice that enhance the cake’s sweet profile. With around 4 grams of protein per slice, this option not only satisfies your taste buds but also keeps you feeling full longer. It’s a favorite for brunch gatherings at our home, where guests appreciate the unique combination.
Cocoa Dusted Sweet Potato Wedges: These baked sweet potato wedges are lightly seasoned with cocoa powder and cinnamon, echoing the chocolatey notes in the marble cake while offering a satisfying texture contrast. Each serving delivers complex carbs along with vitamins A and C, making them both delicious and nutritious. My family loves them as an alternative side when we want to indulge but still keep things balanced!
Storage & Serving Tips
To store your Perfect Marble Cake with Chocolate Buttercream, place it in an airtight container at room temperature for up to 3 days. If you need to keep it longer, wrap individual slices tightly in plastic wrap and store them in the fridge for up to a week. Since the chocolate buttercream can become overly soft if stored with the cake, it’s best to keep the buttercream in a separate airtight container in the fridge for up to a week as well. If you prefer, you can freeze the buttercream for up to a month; just let it thaw in the refrigerator before using.
When reheating, slice the cake and warm it gently in a preheated 350°F oven for about 5–7 minutes to maintain its moist texture. Be cautious not to microwave the cake, as this will make it rubbery and unappealing. For the chocolate buttercream, if you’ve stored it in the fridge, simply let it sit at room temperature until soft enough to spread or re-whip briefly with a mixer for that fresh texture. Avoid reheating the buttercream, as heat will cause it to lose its creamy consistency.
Pro tip: To batch cook this recipe for meal prep, consider making a double batch of marble cake on Sundays and portioning slices into individual containers for easy grab-and-go treats throughout the week. Family members can assemble their dessert bowls by topping slices with fresh fruit or nuts for added variety. For ingredient swaps, try replacing half of the all-purpose flour with almond flour for a gluten-free version or using Greek yogurt instead of milk for extra protein while keeping that moist texture. To ensure your chocolate buttercream stays fluffy during meal prep storage, keep it refrigerated and avoid adding any toppings until you’re ready to serve.
Conclusion
This Perfect Marble Cake with Chocolate Buttercream: The Ultimate Swirled Dessert has become a regular rotation recipe for me, and I make it at least twice a month because it delivers a delightful combination of flavors while being indulgently satisfying at just 350 calories per slice. The use of room temperature eggs and milk ensures a moist and tender crumb that truly sets this marble cake apart from others. Give this one a try this week. I promise it’ll become a regular in your rotation too.