Easter Dirt Cake Casserole
There’s something inherently magical about Easter, a season that brings with it a sense of renewal and joy. The blooming flowers, the chirping birds, and the warmth of the sun all come together to create an atmosphere that’s simply invigorating. But beyond the beauty of nature lies a culinary tradition that has always captivated my heart—desserts that not only satisfy our sweet cravings but also serve as a bridge between generations. One such delightful creation is the Easter Dirt Cake Casserole. This dessert isn’t just about taste; it’s an experience that wraps you in layers of creamy goodness and crunchy surprises, making every bite feel like a hug from an old friend. Trust me when I say this is a dish that will create memories, one slice at a time.
As we gather around the table for this special occasion, there’s something profoundly satisfying about sharing a dish that encapsulates both nostalgia and excitement. The Easter Dirt Cake Casserole brings together rich chocolate flavors with the playful crunch of crushed Oreos, topped off with whimsical pectin-based gummy candies that look like vibrant flower petals sprouting from a garden of chocolate soil. It’s the perfect centerpiece for your holiday gathering—a dessert that not only pleases the palate but also stirs up laughter and joy among family and friends. With its visually striking appearance and utterly intoxicating flavors, this casserole becomes an instant favorite. So roll up your sleeves and let’s dive into creating this beautiful masterpiece!
Easter Dirt Cake Casserole: A Whimsical Delight for Your Easter Celebration
This Easter Dirt Cake Casserole is more than just a dessert—it’s an enchanting treat that combines delightful textures and flavors in one charming dish. It’s so easy to prepare and can be made ahead of time, leaving you free to enjoy your day without any last-minute stress. Imagine pulling out this stunning casserole from the fridge and watching as faces light up with happiness! Each layer tells a story; each bite bursts with flavor, making it truly extraordinary.
Ingredients:
As we embark on this culinary journey together, let’s take a moment to appreciate each ingredient’s role in crafting our Easter Dirt Cake Casserole. Each element plays its part in creating not just flavor but also texture and visual appeal.
- 1 box chocolate cake mix (Any brand will work.) A chocolate cake mix serves as our foundation for this dessert—it’s quick, simple, and delivers consistent results every time. The rich cocoa notes provide that deep chocolaty flavor we all adore while ensuring we have moist cake layers to work with. I often opt for brands that boast rich flavor profiles; those small details elevate your dish significantly.
- 3 large eggs (Room temperature for easier mixing.) Eggs are essential for binding our ingredients together while adding moisture to our cake mixture. Using eggs at room temperature helps them incorporate more easily into the batter, creating a smoother texture without any lumps. If you forget to take them out ahead of time, don’t worry! Just place them in warm water for about 10 minutes before using.
- 1 cup water (Use as instructed on the cake mix box.) Water activates our cake mix ingredients to create that soft crumb we’re striving for in our casserole. Pay close attention to any specific instructions on your cake mix box because they can differ slightly between brands.
- 1/3 cup vegetable oil (Can be substituted with melted butter.) Oil keeps our cake moist while adding richness to its texture. While vegetable oil is neutral-flavored, feel free to substitute melted butter if you’re longing for that buttery goodness—just ensure it cools slightly before mixing in so it doesn’t cook the eggs!
- 1 package cream cheese, softened (8 oz) Cream cheese provides that luscious creaminess in our dessert layer; it’s simply divine! Make sure it’s softened to room temperature; otherwise, you’ll end up with lumps instead of smoothness when you combine it with sugar later on.
- 1 container whipped topping (12 oz) (Like Cool Whip.) This fluffy topping adds airiness to our cream cheese mixture, creating a light texture that’s absolutely delightful against the denser chocolate layers below. If you’re feeling adventurous or prefer homemade options, you can whip heavy cream until stiff peaks form instead.
- 1 cup powdered sugar (Adjust for sweetness preference.) Powdered sugar sweetens our cream cheese filling while dissolving effortlessly into the mixture without any grainy texture left behind—ahh, bliss! Feel free to adjust the amount according to your taste buds; some folks love it sweeter than others!
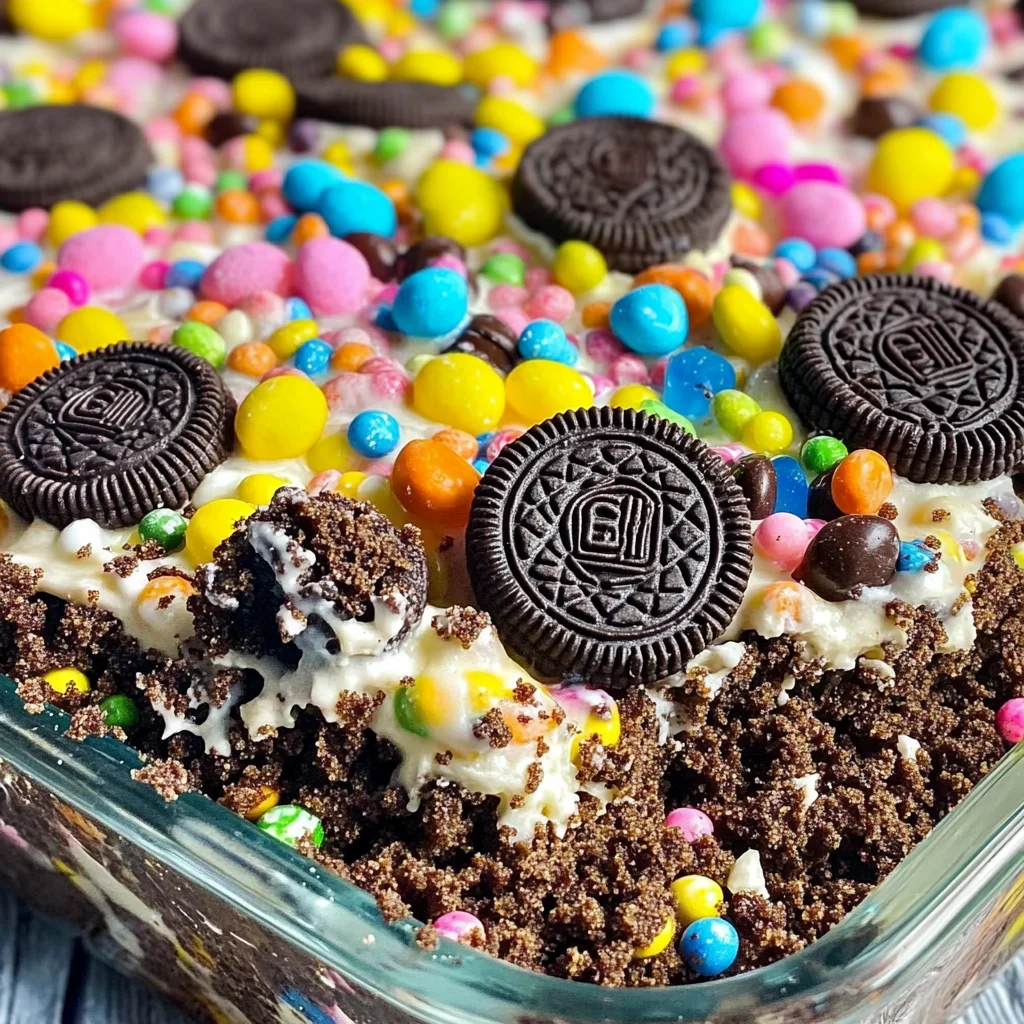
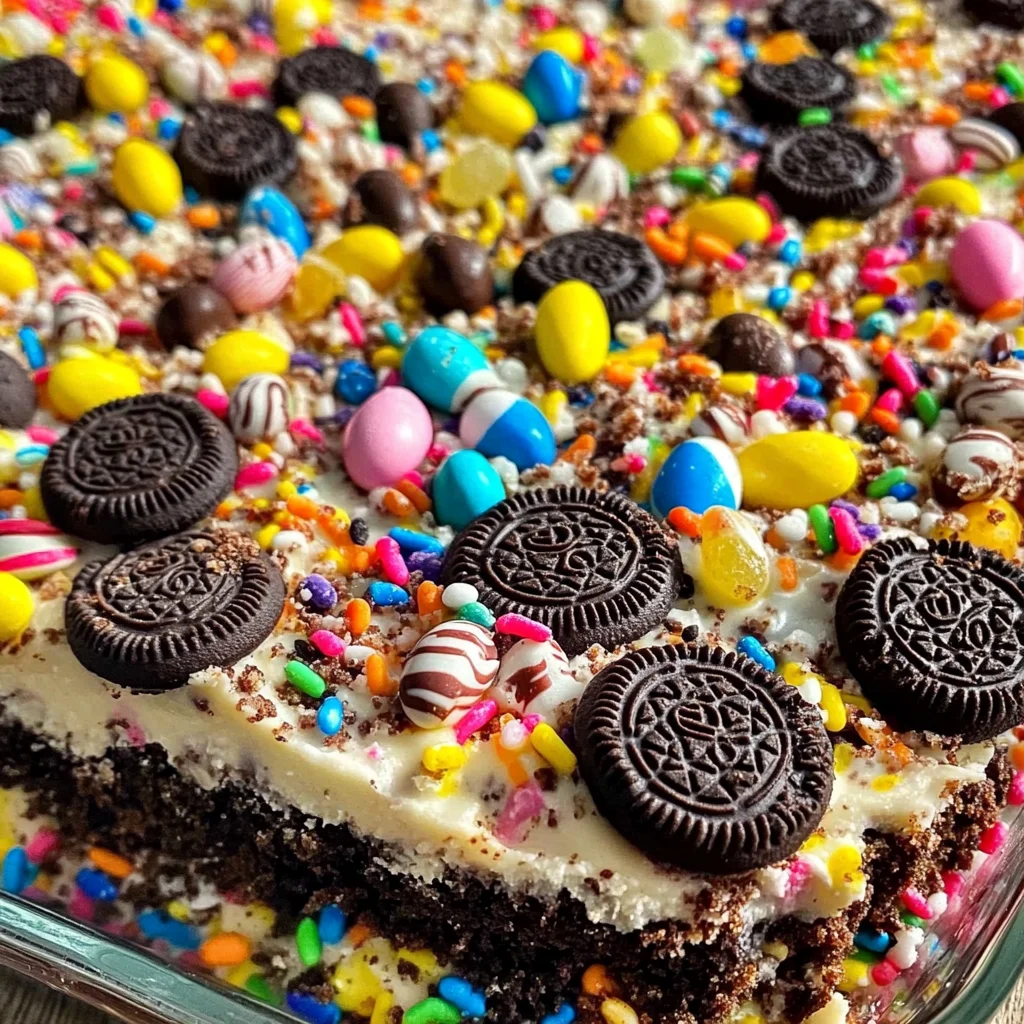
- 1 package Oreos, crushed (about 24 cookies) These iconic cookies are what make this dirt cake so fun! Their crunchy texture contrasts beautifully against the creamy layers above while providing that classic chocolate flavor we crave during festive occasions like Easter. When crushing them, aim for fine crumbs rather than large chunks for visual appeal—you want it to resemble soil after all!
- To taste pectin-based gummy candies These playful little candies are what really bring this dish home! Use as many or as few as you’d like; they add color and whimsy reminiscent of blooming flowers in springtime gardens—just perfect for decorating your beautiful creation!
Equipment You’ll Need:
Before we dive into preparing our masterpiece of an Easter Dirt Cake Casserole, let’s gather some essential tools that’ll make this process smooth sailing! Having reliable equipment at hand ensures everything comes together beautifully without unnecessary hassle.
- Mixing bowls – A set of various sizes is ideal Mixing bowls are vital for combining ingredients efficiently without making a mess! Opt for glass or stainless steel since they’re non-reactive; plus, they help you keep an eye on consistency levels as you mix.
- Electric mixer or whisk – For effortless mixing An electric mixer considerably cuts down on effort when blending your ingredients together smoothly—ideal if you’re whipping up larger batches! However, if you’re feeling nostalgic or want some arm workout fun, whisking by hand works wonders too—just be prepared for some muscle engagement!
- 9×13 inch baking pan – For ideal layering This size is perfect for assembling our casserole since it allows ample space while ensuring even baking throughout; plus, you’ll have plenty left over after serving guests!
- Spatula – Essential for spreading mixtures evenly A spatula comes in handy when layering your delicious components into their rightful places within your baking pan—it ensures everything looks neat while preventing anything from sticking too much!
Now that we’ve got everything ready let’s move onto preparing our fabulous Easter Dirt Cake Casserole!
Step 1: Baking Our Chocolate Cake Layers
First things first: let’s bring our chocolate cake mix to life! Preheat your oven according to package instructions—this step is crucial as starting with proper heat ensures even baking throughout each layer. In a large mixing bowl, combine the chocolate cake mix with three room-temperature eggs and one cup of water—the combination creates an inviting aroma even before baking starts! Add in your vegetable oil next; remember how important moisture is here—it’ll keep those cakes soft once baked! Mix everything together until you achieve a smooth batter without lumps; I often find it helpful to scrape down the sides periodically during mixing so no ingredient feels left behind! Once fully combined and well-mixed—pour evenly into your greased 9×13 inch baking pan—and let those masterpieces bake away per package directions until they spring back lightly when touched—a sign they’re perfectly done!
Step 2: Preparing Our Creamy Filling
While waiting patiently (which can be tough!), let’s whip up that heavenly cream cheese filling that’ll tantalize taste buds beyond belief! In another mixing bowl—or ideally using one from earlier if you’re short on dishes—beat together softened cream cheese along with powdered sugar until luxuriously smooth. This process known as creaming allows air incorporation leading toward lighter textures overall—trust me here: taking time now will pay off later when biting into creamy goodness layered above rich chocolate cake below! Don’t rush through this step since achieving ideal consistency makes all difference regarding mouthfeel later on… Once thoroughly mixed together gracefully fold in whipped topping carefully yet confidently using gentle folding motions so as not deflate too much air created earlier—it should remain fluffy yet cohesive enough blend seamlessly into layers above when assembled later!
Step 3: Assembling Our Easter Dirt Cake Casserole
Now comes arguably my favorite part—the assembly where all those delightful elements come together harmoniously at last! Start by slicing cooled chocolate cakes horizontally into two equal halves; place one layer back inside cleanly washed baking dish before generously spreading half prepared cream cheese filling atop first layer like frosting—that luscious smoothness contrasting deliciously against dense dark chocolate beneath is pure magic unfolding right before eyes! Next sprinkle half crushed Oreos over filling gently creating ‘soil’ layer which provides textural contrast alongside visual appeal—we want people questioning whether they’re diving into dessert or garden scene at first glance here—it’s all about playfulness folks! Repeat layering process again placing second layer atop followed by remaining filling then finish off final dusting freshly crushed cookies across top surface entirely—it should resemble freshly tilled earth ready bloom colorful decorations soon!
Step 4: Decorating Our Masterpiece
Finally… time add those whimsical pectin-based gummy candies transforming ordinary dirt-like surface into vibrant garden wonderland full life & color awaiting eager guests eager enjoy piece artfully crafted just moments ago! Scatter candies wherever inspiration strikes sparking joy through lively colors complementing earthy tones surrounding them beautifully—I encourage creativity here don’t hesitate try different arrangements styles letting personality shine through ultimately making original creation truly yours alone celebrating uniqueness shared among loved ones gathered around table sharing laughter memories created alongside delicious treats served forthwith afterward taking pride knowing made something special everyone will remember fondly long after plates cleaned away…
And there you have it—the journey through crafting an exquisite Easter Dirt Cake Casserole filled with joyfulness love expressed every single aspect preparation process leading ultimately satisfying desserts enjoyed amongst friends family alike creating lasting impressions worth remembering years down line… So go ahead indulge yourself savor every bite knowing put heart soul into bringing such delightful experience life today helping celebrate joyous occasion ahead!
Step 5: Mixing Your Creamy Filling with Love
Now that you have your cake baked and cooled, it’s time to whip up the dreamy filling that will give your Easter Dirt Cake Casserole its signature creamy texture. Begin by placing your softened cream cheese into a spacious mixing bowl. Trust me on this—making sure it’s at room temperature is absolutely paramount for achieving that silky-smooth consistency we all crave. I like to use a hand mixer for this step because it really helps to aerate the cream cheese, but if you’re feeling nostalgic, a good old-fashioned whisk also works just fine. Start mixing on low speed to avoid splattering cream cheese everywhere, then gradually increase to medium speed.
As you blend, slowly add in the powdered sugar. This step is crucial because it not only sweetens your filling but also helps to incorporate air, giving it a lightness that contrasts beautifully with the dense chocolate cake. Mix until everything is well combined—about 2-3 minutes should do the trick. You’ll know it’s ready when the mixture is creamy and fluffy without any lumps remaining. Finally, fold in your whipped topping gently; at this point, be careful not to deflate the airy filling you’ve just created! This folding technique allows you to maintain that delightful lightness while ensuring every bite of your casserole will be profoundly satisfying.
Step 6: Layering Your Masterpiece
Now we’re entering one of my favorite parts of making this Easter Dirt Cake Casserole—the layering! Start with a generous dollop of your luscious cream cheese filling and spread it evenly over the bottom of a large casserole dish; I recommend using one that’s about 9×13 inches for perfect proportions. Then comes the magic moment: take your cooled chocolate cake and crumble it into pieces as evenly as possible. It doesn’t need to be perfect; think rustic charm rather than neat perfection! The crumbled chocolate cake adds an earthy depth and creates a beautiful contrast against the creamy filling.
The art of layering is essential here because each spoonful should offer that delightful mix of textures—creamy, crunchy, and soft all at once! After spreading half of your cake crumbles over the filling layer, repeat this process with another layer of cream cheese mixture followed by more cake crumbles on top. Don’t rush this step; enjoy the process and let your creativity flow! It’s like building a delicious edible sandcastle that will make everyone smile when they see it at your Easter gathering. Once finished, cover your casserole dish tightly with plastic wrap or aluminum foil, ensuring no air can slip in—a critical step for keeping everything fresh.
Step 7: Chilling for Perfection
Now here comes an important part where patience truly pays off: chilling! Pop that layered beauty into the refrigerator and let it rest for at least 4 hours—overnight is even better if you can manage it! Why chill? Well, my friends, chilling allows all those flavors to meld together beautifully; think of it as letting a fine wine breathe before pouring! The cooling process transforms what could be just another dessert into an extraordinary experience where each bite is bursting with flavor.
During this time, the whipped topping firms up slightly so that every slice holds together beautifully when served. This step ensures that each layer melds seamlessly rather than tasting separate—we want harmony here! When you’re ready to serve, you’ll notice that the textures have transformed into something utterly intoxicating—it’s creamy yet crumbly with layers falling apart effortlessly yet holding their form just enough. Trust me on this; skipping out on chilling means missing out on experiencing how these flavors come together in pure bliss.
Step 8: Final Touches Before Serving
Once you’ve allowed sufficient chilling time (and I know waiting can be hard!), it’s time to unveil your masterpiece! Carefully remove the plastic wrap or foil from your casserole dish and prepare yourself for an explosion of flavors as you slice through those layers. Use a sharp knife dipped in warm water for clean cuts—this little trick keeps everything looking pristine and prevents crumbs from scattering everywhere as you serve.
Now comes the fun part—decorating! This Easter Dirt Cake Casserole isn’t just about taste; it’s also about presentation. Sprinkle those finely crushed Oreos generously over the top layer; they should resemble dark soil blanketing a garden bed—a whimsical nod to its namesake! Then scatter pectin-based gummy candies on top—think colorful flowers popping up amidst dark soil—to bring life and festivity to your dessert. These vibrant candies not only add visual appeal but also provide bursts of fruitiness that perfectly complement the rich chocolate flavor underneath.
Finally, take a moment to admire your creation before serving it up! Each slice reveals those enticing layers we’ve worked so hard on, promising a symphony of flavors and textures with every bite. I promise you that not only will this Easter Dirt Cake Casserole become an instant hit at your celebrations, but it will also create memories cherished long after dessert is done—so gather your loved ones around and dig in!
Conclusion:
As we wrap up our journey through the creation of this enchanting Easter Dirt Cake Casserole, I hope you feel as inspired and excited as I do! There’s something truly special about the combination of rich chocolate cake mingling with creamy layers and crunchy Oreo crumbs; it’s like a celebration of textures and flavors dancing together on your palate. The way those gummy decorations bring whimsy to every bite just adds to what makes this dessert not only delightful but unforgettable—a dish that brings smiles and joyful nostalgia around any gathering table.
This recipe is more than just a treat; it’s an experience begging to be shared with family during those cherished holiday moments or simply enjoyed on any day that needs a little sweetness. It captures the essence of togetherness—imagine pulling it out from the fridge after dinner, revealing those luscious layers nestled beneath a blanket of chocolatey goodness. Each spoonful is an invitation to indulge without hesitation; it’s pure comfort food at its finest!
When it comes to serving suggestions, why not pair this beauty with some fresh strawberries or raspberries? Imagine savoring one alongside a steaming cup of coffee for an afternoon pick-me-up, or perhaps after an evening meal when everyone gathers around the table sharing stories and laughter. For an even more decadent experience, try layering some extra crushed Oreos atop each serving for that added crunch!
Feeling adventurous? This recipe is wonderfully adaptable! Want to add a hint of mint? Go ahead! Throw in some mint-flavored gummy candies for a refreshing twist. Or maybe you’re yearning for something fruity? Consider mixing in some crushed pineapple or layering fresh berries between those creamy layers! Whatever variation calls out to you, know that each one will elevate your Easter Dirt Cake Casserole into something uniquely yours. So go forth—try this recipe out, make it your own, share your experiences with friends and family, and let’s keep the magic alive together!