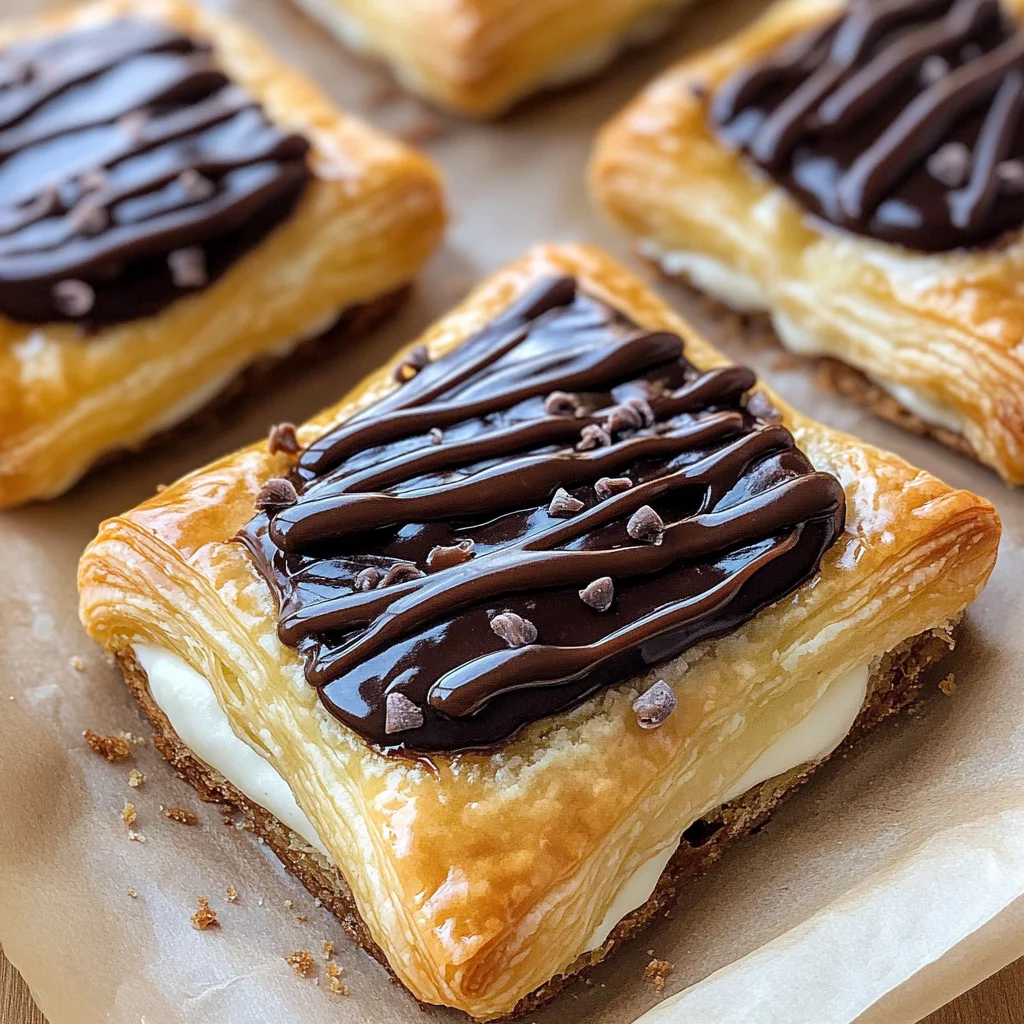
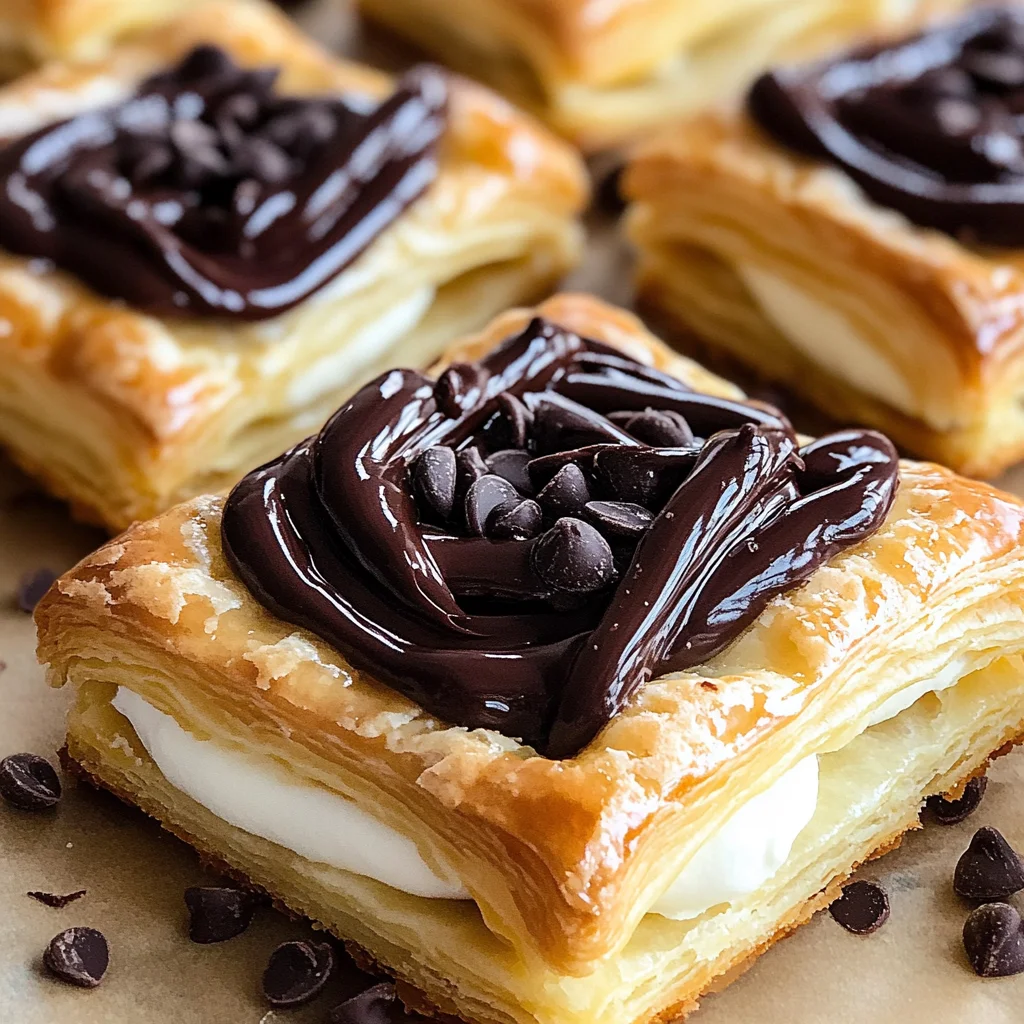
Chocolate Cream Cheese Danish
There are moments in life when the simplest pleasures become profound experiences, and for me, a warm Chocolate Cream Cheese Danish fresh from the oven is one of those magical moments. As I bite into its flaky, buttery layers, I am transported to a cozy café on a rainy afternoon, with the rich aroma of chocolate mingling seamlessly with the subtle tang of cream cheese. This recipe is more than just a delightful pastry; it’s an experience that captures the essence of comfort—one that you can create in your very own kitchen. Each bite tells a story of artistry and love, making this Chocolate Cream Cheese Danish not just a treat but a bridge between cherished traditions and innovative flavors. Trust me; you’ll want to share this revelation with everyone around you!
I’ve always been captivated by how food can evoke memories and emotions. This particular danish holds a special place in my heart, as it reminds me of Sunday mornings spent baking with my family. The joy of rolling out dough, watching it rise in the oven, and then indulging in the warm pastries together is something I cherish deeply. With each layer of flaky puff pastry enveloping a luscious cream cheese filling and topped with silky chocolate ganache, this recipe is sure to create new memories for you too. Whether it’s for a festive brunch or simply to treat yourself after a long day, these danishes will become your go-to dessert that never fails to impress.
Chocolate Cream Cheese Danish: A Divine Indulgence
Let’s embark on this culinary journey together! Making these Chocolate Cream Cheese Danishes might seem like an intimidating task at first glance, but I promise you—it’s surprisingly straightforward and incredibly rewarding. With frozen puff pastry as our base, we’ll layer in creamy filling and rich ganache that will make every bite utterly intoxicating. So roll up those sleeves and get ready to create something truly extraordinary!
Ingredients:
Now that you’re feeling inspired, let’s gather our ingredients! These are the building blocks for our delightful danishes, each playing a vital role in crafting that perfect balance of flavors and textures.
- 2 Frozen puff pastry sheets. The star of our show! Puff pastry is all about those glorious layers that create such an airy texture when baked. When you’re selecting your frozen puff pastry, look for high-quality brands—those will have more butter content and fewer artificial ingredients, resulting in richer flavor and better flakiness. Make sure to thaw them properly so they’re pliable enough to work with but still nice and cold; this helps maintain the layers during baking.
- 8 oz Cream cheese (room temperature). This ingredient adds that creamy richness we crave in every bite. Room temperature cream cheese is crucial here; it blends smoothly into our filling without any lumps or clumps. If possible, opt for full-fat versions as they provide that luxurious mouthfeel we desire from our danish filling.
- 1/3 cup White granulated sugar. Sugar does more than sweeten; it also contributes to the overall texture by helping to create that perfect balance within our cream cheese filling. It enhances every flavor note while providing just enough sweetness without overpowering the chocolate or cream cheese tang.
- 2 tsp Pure vanilla extract. Vanilla is like the secret handshake among flavors—it enhances everything it touches! Always choose pure vanilla extract instead of imitation; it’s worth it for both taste and quality. The warmth of vanilla melds beautifully with both chocolate and cream cheese, creating depth in our danish.
- 1 Large egg (for egg wash). This little egg acts as our golden glaze! An egg wash creates that beautiful shiny finish on our pastries that makes them so visually stunning when baked—think golden brown perfection! You can substitute with non-dairy milk if you’re looking for an alternative option.
- 1 tsp Water (for egg wash). Just a splash mixed with your egg helps thin it out so you can easily brush it onto your pastries without clumping.
- 1 cup Semi-sweet chocolate chips. These little gems bring decadence to our danishes! Semi-sweet chocolate strikes the perfect balance—not too bitter yet not overly sweet—making it ideal for drizzling over our creamy filling after baking.
- 3/4 cup Heavy cream. This liquid gold is essential for achieving silky-smooth ganache! Heavy cream has a high fat content which complements the chocolate beautifully, resulting in a luscious topping that’s rich yet balanced.
Equipment You’ll Need:
Having the right tools makes all the difference when creating something special like these Chocolate Cream Cheese Danishes! Each piece of equipment serves as an essential partner in your culinary adventure, ensuring everything comes together smoothly and deliciously.
- Pastry brush – This handy tool will be used for applying your egg wash evenly across each pastry rectangle before baking. A good-quality brush allows you to achieve even coverage without saturating the dough too much—this step is vital for getting that lovely golden color!
- Mixing bowls – A few mixing bowls in varying sizes are necessary for combining your ingredients efficiently. Using separate bowls prevents any mess-ups while preparing each component (like ganache or filling) separately—a good habit to cultivate!
- Parchment paper – Lining your baking sheets with parchment paper ensures easy release from the pan after baking while keeping cleanup breezy! It also promotes even heat distribution for perfectly browned pastries.
- Sharp knife – A sharp knife is paramount when cutting through puff pastry layers cleanly without squishing them down—this ensures they rise beautifully during baking!
Step 1: Thawing Puff Pastry Like a Pro
To kick things off, let’s start by placing those frozen puff pastry sheets on your counter for about 30 minutes to thaw gently—don’t rush this step! Thawing at room temperature allows the butter within the layers to soften slightly while maintaining its structure so we can achieve those iconic flaky layers once baked. If you’re impatient (and we all have been!), just remember: rushing can lead to dough that’s too soft or sticky later on—a scenario we definitely want to avoid!
Step 2: Creating Silky Chocolate Ganache
While we’re waiting on our pastry sheets to thaw perfectly, let’s dive into making that divine chocolate ganache! Grab some semi-sweet chocolate chips and toss them into a mixing bowl—this is where magic begins! In a saucepan over medium-low heat (we want gentle warmth here), pour in your heavy cream until steaming but not boiling; boiling would scorch the cream and ruin its luxuriousness altogether! Pour this hot liquid over your chocolate chips and let it sit undisturbed for about 1 minute and 30 seconds—a moment where patience rewards us handsomely by allowing those chips time to melt luxuriously into smooth bliss. After waiting patiently (you’ve got this!), stir gently until everything melds into one velvety mixture; if there are any stubborn chunks left behind, just pop it back into the microwave at short intervals until fully melted—a quick fix if needed!
Step 3: Crafting Your Creamy Filling
Now let’s turn our focus toward crafting that delectable cream cheese filling while we wait on our ganache to cool down beautifully! In another mixing bowl (we’re really putting those bowls to work!), beat your room-temperature cream cheese using a hand mixer at high speed for about one minute until incredibly smooth—this process helps incorporate air into the mixture which results in lightness once baked! Next comes adding in white granulated sugar—you’ll want to mix again on high until combined thoroughly because this step ensures sweetness permeates every bite evenly throughout your filling—nobody wants pockets of sugar hiding away! Finally, add two teaspoons of pure vanilla extract before giving it one last brief mix just until incorporated—it’s like giving flavor wings!
Step 4: Shaping Puff Pastry Rectangles
With both components ready at hand—the luscious ganache cooling down nicely while our smooth filling awaits its moment—we’re ready now to shape those beautiful rectangles from our thawed puff pastry sheets! Start by placing them onto a lightly floured surface; this prevents sticking while shaping them should be seamless—and no need for stress here! Use your fingers gently push seams together if they appear separated; then grab sharp knife because precision matters here folks! Cut each sheet along its seams into thirds resulting in three long rectangles per sheet (we’re aiming for six total!). From there cut each rectangle directly down its center yielding six smaller rectangles per sheet—great news since we’re aiming for twelve scrumptious danishes total!
Stay tuned—I’m excited to guide you through more steps as we assemble these beauties into flavorful masterpieces ready to impress everyone around you!
Step 5: Cutting and Shaping the Pastry with Precision
Now that your pastry has thawed, it’s time to bring it to life! Begin by placing your two sheets of frozen puff pastry on a lightly floured surface. This step is crucial as it prevents the dough from sticking and allows it to roll out easily. Using your fingers, gently press the seams of the pastry together; this is important because it ensures that the layers will hold together during baking, creating that delightful flaky texture we all adore. With a sharp knife, cut each sheet into thirds along the seams, resulting in three long rectangles per sheet. Then, for each rectangle, slice it in half to yield six smaller rectangles. The precision of these cuts is non-negotiable; they define the shape and structure of your danishes.
As you work, take a moment to appreciate how versatile and forgiving puff pastry can be. It’s like a blank canvas waiting for your creative touch! Once you’ve cut all twelve rectangles—six from each sheet—set them aside. Now, whisk together one large egg with a teaspoon of water in a small bowl until combined. This mixture will serve as an egg wash that gives our pastries that stunning golden hue in the oven. Trust me on this: brushing the edges of each rectangle with this egg wash before baking helps create a beautiful shine and enhances color, making your chocolate cream cheese danish not just tasty but visually alluring!
Step 6: Prepping Your Baking Sheets for Success
With your pastry beautifully shaped and awaiting its moment of glory, let’s talk about preparation for baking. Preheat your oven to 400°F (200°C); this high temperature is essential for achieving that divine puffiness we crave in every bite. While the oven warms up, line two cookie sheets with parchment paper. Parchment paper is your best friend here—it provides a non-stick surface that ensures easy removal of the danishes once baked while also catching any drips from our gooey filling or luscious chocolate ganache.
When you’re ready to place the pastries on the baking sheets, arrange six rectangles on each sheet, leaving enough space between them so they have room to expand and rise without crowding one another—a crowded pan leads to sad, flat pastries! It’s also worth noting that if you find yourself short on time or space, you can bake these danishes in batches; just keep one tray chilled in the fridge while you bake the other. Remember: don’t rush through this step! Giving them space allows each piece to achieve optimal fluffiness and creates those irresistible flaky layers we’re all after.
Step 7: The Art of Creating Decorative Cuts
Now comes one of my favorite parts—the decorative cutting! For each rectangle placed on your baking sheet, use a sharp knife to carefully cut another rectangle shape inside each piece of pastry, leaving about a half-inch border around the edges. Be gentle here; you want to score rather than fully cut through—this technique is critical as it creates a box effect where our delicious cream cheese filling will nestle perfectly. These cuts allow steam to escape during baking while facilitating that gorgeous rise we love so much.
As you make these cuts, don’t forget to admire how simple adjustments can lead to stunning results! This step transforms plain rectangles into charming little frames ready for their sweet fillings. Plus, when they bake up golden brown with those scores puffing up around the edge—oh my goodness! It’s utterly intoxicating and makes all your hard work worthwhile.
Step 8: Filling Your Pastries with Care
With your rectangles beautifully cut and prepped, it’s time for the fun part—adding our rich cream cheese filling! Take about one tablespoon of that velvety cream cheese mixture we whipped up earlier and spoon it into each box you’ve created on the pastries. Make sure to spread it evenly within those borders; this ensures every bite delivers an explosion of creamy goodness paired with our buttery flaky crust. Don’t worry if some filling peeks out—that’s part of its charm!
This step is absolutely paramount because it sets up the flavor profile for our chocolate cream cheese danish. The tangy sweetness from the cream cheese pairs perfectly with the decadent chocolate ganache we’re going to drizzle later—as they meld together during baking, you’ll experience flavor notes dancing across your palate like an orchestra in perfect harmony! After filling all twelve danishes, remember patience is key again: pop one tray in the freezer for about five minutes before putting them into the oven while leaving one tray in the fridge until you’re ready to bake next.
Next Major Phase – Baking Your Perfect Chocolate Cream Cheese Danish
Step 9: Baking Until Golden Perfection
At last, it’s time for these beauties to take center stage in your preheated oven! Carefully slide one tray into the oven and set a timer for 17-20 minutes—this is where magic happens! As they bake, keep an eye on them; you’re looking for that beautiful golden brown color indicating they’re perfectly cooked. The scent wafting through your kitchen will be nothing short of heavenly; I promise you will find it utterly intoxicating!
Baking time can vary slightly based on your oven’s quirks or even how thickly you’ve spread that cream cheese filling—so trust your instincts when gauging doneness. You’ll know they are ready when they’ve puffed up dramatically and are golden brown all over with no soggy spots peeking through. When they come out of the oven, resist diving right in (I know it’s hard!). Allow them to cool completely on a wire rack until they’re safe enough not only for you but also so they can fully develop their flavors.
Step 10: Drizzling Chocolate Ganache Like a Pro
Once cooled (patience pays off!), now it’s time for those final touches—the pièce de résistance—our luscious chocolate ganache! Grab that silky smooth ganache we prepared earlier and give it one final stir before spooning generous dollops onto each danish. Spread it lightly over the cream cheese filling while leaving some edges exposed; this contrast creates such an inviting presentation!
What makes these chocolate cream cheese danishes truly special is how those layers play off one another—the rich chocolate mingling effortlessly with creamy tanginess brings forth an experience that’s not just about dessert; it’s comfort food at its finest! I can’t stress enough how essential this final step is—not only does it crown our pastries with elegance but elevates them from mere treats into absolute showstoppers worthy of any gathering or quiet evening at home indulging yourself.
And there you have it—a symphony of flavors wrapped inside delicate layers begging you to take that first bite! So gather friends or keep them all for yourself—either way, savor every moment because these chocolate cream cheese danishes are more than just desserts; they’re homemade love baked into every flaky layer.
Storage and Enjoyment Tips for Your Chocolate Cream Cheese Danish
Now that your kitchen is filled with the delightful aroma of freshly baked Chocolate Cream Cheese Danish, it’s time to savor every luscious bite! But let’s talk about how to preserve these heavenly treats so you can indulge in them even after the initial excitement has faded. Understanding how to store and reheat your danishes will ensure that each piece remains a testament to your baking prowess, ready to delight your taste buds whenever the craving strikes.
Storing Leftover Chocolate Cream Cheese Danish
To keep your Chocolate Cream Cheese Danish at their best, I recommend storing them in an airtight container at room temperature. This simple step helps maintain their flaky texture and rich flavors while keeping them fresh for about 2-3 days. If you’re like me and want to extend that deliciousness, consider placing a slice of bread inside the container; it works wonders in absorbing moisture and preventing the pastries from becoming too dry. Trust me on this one; it’s a game-changer! After storage, you’ll find that the danishes still hold their charm, though nothing quite compares to pulling them straight from the oven. For those moments when you crave a warm treat, simply pop them in a preheated oven at 350°F for about 5-7 minutes. The gentle heat revives their golden crust and creamy filling, making each bite feel like a cozy hug.
Freezing Chocolate Cream Cheese Danish for Later
If you find yourself with an abundance of these decadent pastries or want to prepare ahead of time, freezing is absolutely an option you should embrace! To freeze, simply wrap each cooled danish tightly in plastic wrap or aluminum foil after they’ve cooled completely. Place them in a freezer-safe bag or container, and they’ll keep well for up to 2 months—perfect for when those chocolate cravings hit unexpectedly! When you’re ready to enjoy one (or several), just remove as many as you desire and let them thaw overnight in the fridge. For an added touch of warmth and freshness, give them a quick reheat in the oven as mentioned before. The convenience of having these little delights waiting for you is simply irresistible!
Chocolate Cream Cheese Danish

Indulge in the joy of baking with these delightful Chocolate Cream Cheese Danishes, perfect for any occasion. Each bite reveals a flaky puff pastry enveloping a rich, creamy filling enhanced by a luscious chocolate ganache. This easy-to-follow recipe transforms your kitchen into a cozy café, delivering warmth and comfort that will impress family and friends alike. Whether enjoyed as a breakfast treat or dessert, these danishes are sure to become a cherished favorite that brings smiles all around!
- Prep Time: 30 minutes
- Cook Time: 20 minutes
- Total Time: 50 minutes
- Yield: Makes approximately 12 servings 1x
- Category: Dessert
- Method: Baking
- Cuisine: American
Ingredients
- 2 frozen puff pastry sheets
- 8 oz cream cheese, room temperature
- 1/3 cup white granulated sugar
- 2 tsp pure vanilla extract
- 1 large egg (for egg wash)
- 1 cup semi-sweet chocolate chips
- 3/4 cup heavy cream
Instructions
- Thaw puff pastry sheets at room temperature for about 30 minutes.
- Preheat your oven to 400°F (200°C) and line two baking sheets with parchment paper.
- While the pastry thaws, prepare the chocolate ganache by heating the heavy cream until steaming, then pouring it over the chocolate chips. Stir until smooth.
- In a bowl, beat the cream cheese with sugar and vanilla until creamy.
- Roll out the thawed pastry into rectangles and cut each sheet into six smaller rectangles.
- Create an egg wash by whisking an egg with water; brush this mixture on the edges of each rectangle.
- Spoon cream cheese filling into the center of each rectangle and score decorative cuts around the edges.
- Place on baking sheets and bake for 17-20 minutes until golden brown.
- Drizzle cooled ganache over each danish and allow to set before serving.
Nutrition
- Serving Size: 1 danish (70g)
- Calories: 220
- Sugar: 10g
- Sodium: 140mg
- Fat: 14g
- Saturated Fat: 8g
- Unsaturated Fat: 5g
- Trans Fat: 0g
- Carbohydrates: 22g
- Fiber: 1g
- Protein: 3g
- Cholesterol: 40mg