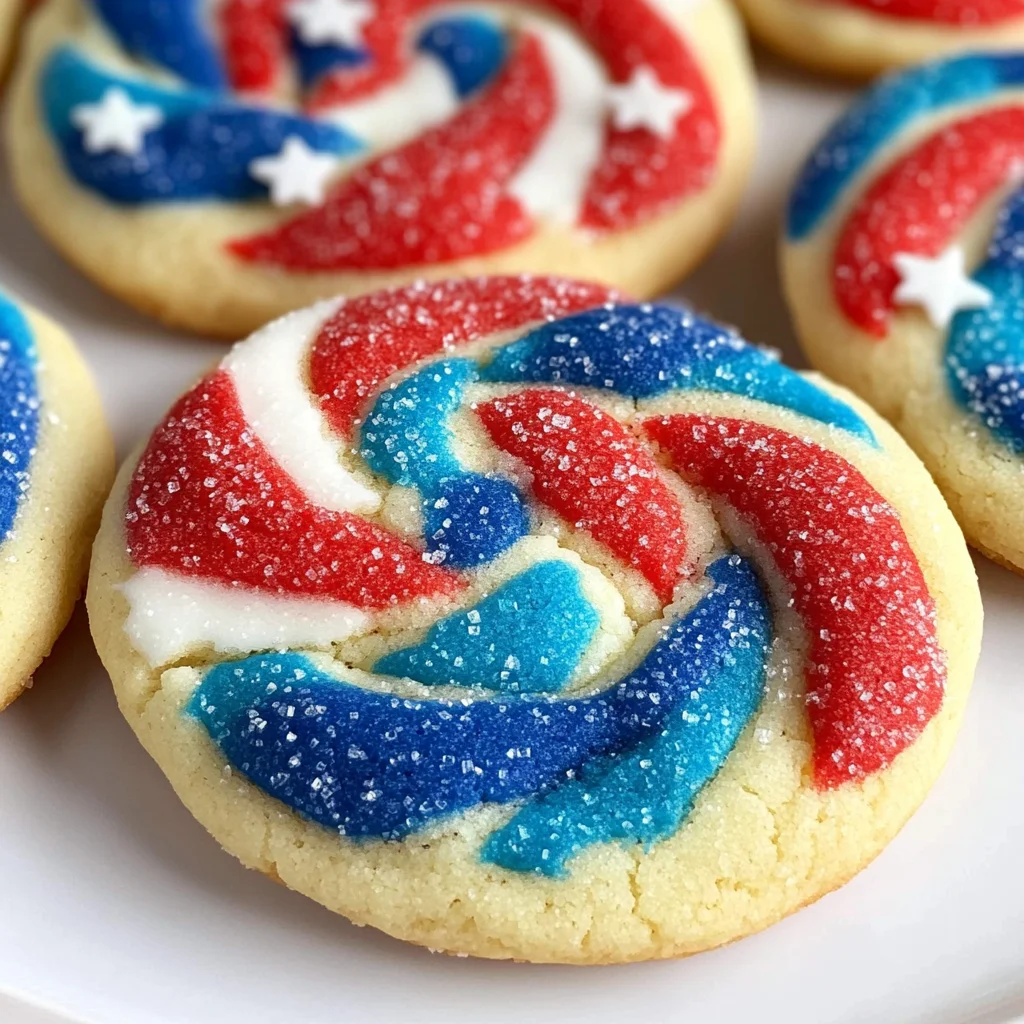
Patriotic Sugar Cookies
There’s something truly magical about baking cookies that transcends the mere act of cooking; it’s an experience that fills your kitchen with warmth, laughter, and a delightful aroma that invites everyone to gather around. These Patriotic Sugar Cookies are not just any cookies; they are a canvas of vibrant colors and soft textures that evoke feelings of joy and celebration. Imagine biting into a cookie that’s soft and chewy, with a hint of sweetness that dances on your taste buds while the sugar coating adds a wonderful crunch. Each bite is an invitation to reminisce about summer gatherings, barbecues, and fireworks lighting up the night sky. I promise you, these cookies will become a cherished tradition in your household as they bring people together in the spirit of festivity.
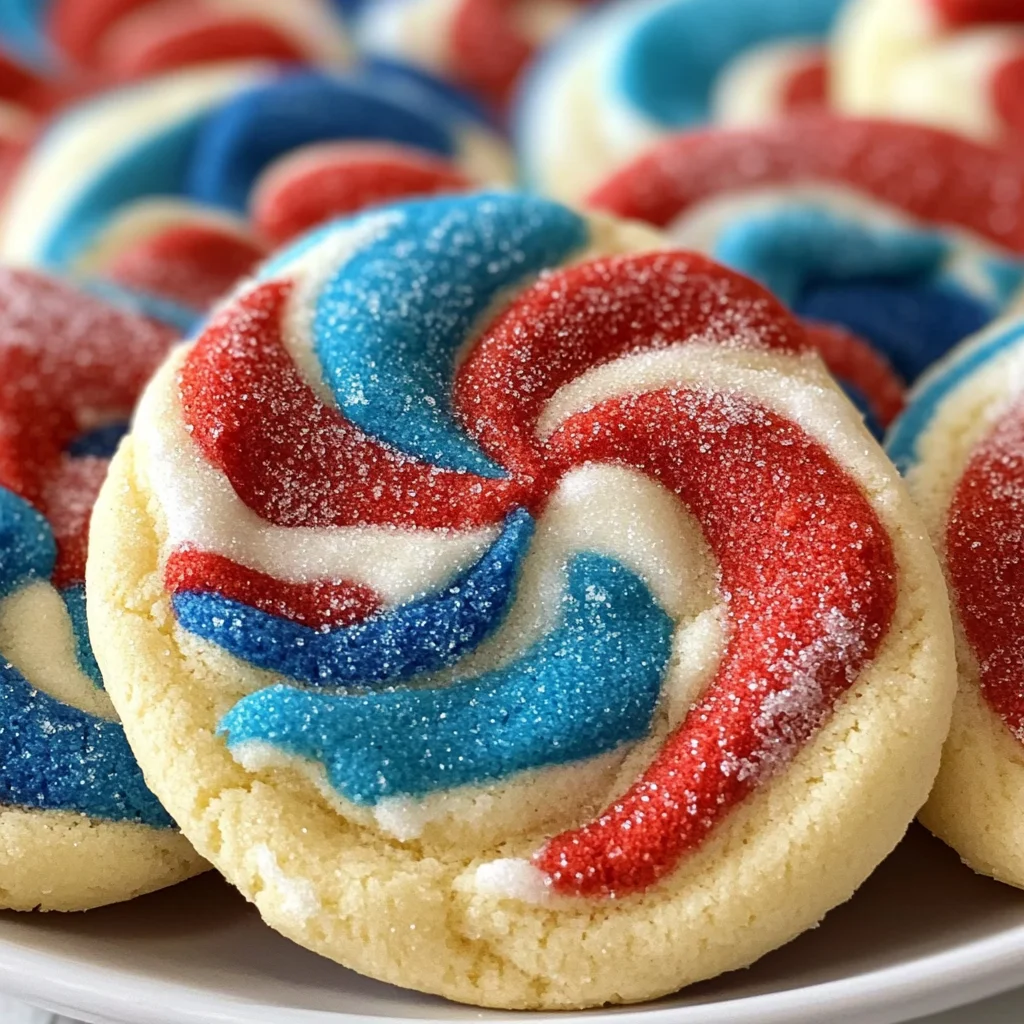
Now, let’s talk about the heart of these cookies—the dough itself is a symphony of flavors and colors. With their eye-catching red, white, and blue hues, they’re perfect for celebrating moments like Independence Day or any occasion where you want to spread a little cheer. The process of dyeing the dough makes it feel like you’re creating art as much as baking. It’s this playful element that transforms an ordinary baking session into something extraordinary. Whether you’re making them for kids or simply indulging your inner child, every step is filled with enchantment—and trust me, they taste even better than they look!
Patriotic Sugar Cookies: A Colorful Celebration in Every Bite
Let’s dive into this delightful recipe! Making these Patriotic Sugar Cookies is not only easy but also incredibly fun—especially when you see how beautifully they turn out. The combination of soft, chewy texture paired with the sugary crust makes them irresistible! So grab your apron and let’s get started on this colorful adventure.
Ingredients:
Before we embark on this delicious journey together, let’s gather our ingredients! Each component plays an essential role in bringing these cookies to life, so I’ll walk you through why each one matters.
- 1 cup (226g) unsalted butter, softened. This is crucial for creaming properly and creating that light, airy texture we’re aiming for in our Patriotic Sugar Cookies. When softened correctly—think room temperature—you’ll be able to whip it up into fluffy perfection alongside the sugar. If your butter is too cold, it won’t cream effectively; if melted, it can lead to overly flat cookies that lose their charm. Opt for high-quality butter if you can; European-style varieties with higher fat content work wonders for rich flavor.
- 2 cups (380g) granulated sugar. Ah, sugar—the magic ingredient that transforms mere dough into something truly special! Not only does it sweeten our cookies beautifully, but it also contributes to their delightful texture and color when rolled in before baking. The sugar creates those crisp edges while keeping the centers wonderfully soft and chewy. Trust me—this balance is absolutely paramount for achieving cookie perfection.
- 2 large eggs. Eggs bring moisture and richness to our cookie dough while binding all the ingredients together harmoniously. They’re also responsible for adding structure during baking without which our cookies would crumble instead of hold their delicious shape! When using eggs in baking, always bring them to room temperature first; this simple change helps them blend seamlessly into the mixture.
- 1 teaspoon (5ml) pure vanilla extract. Pure vanilla is liquid gold in baking—its aromatic essence elevates desserts from good to utterly intoxicating! This flavor works beautifully alongside the sweetness of sugar and complements all other ingredients perfectly, wrapping everything together in a warm hug of nostalgia.
- 3 ½ cups (420g) all-purpose flour. Flour acts as the backbone of our cookie dough—it provides structure without being too overpowering or heavy. When measuring flour, spoon it into your measuring cup instead of scooping directly from the bag; this prevents packing down and ensures you get just the right amount needed for light and tender cookies.
- ½ teaspoon (2g) baking soda & ½ teaspoon (2g) cream of tartar. Together these two ingredients are responsible for leavening our cookies just enough to create that lovely lift while still maintaining softness throughout each bite! Baking soda gives us that lift while cream of tartar stabilizes the egg whites when whipped—both working hand-in-hand to make our cookies light yet chewy.
- ¼ teaspoon (1.2g) salt. Don’t underestimate salt! It enhances all the other flavors in your cookies while balancing out sweetness—a non-negotiable ingredient if you want truly extraordinary results!
- Red gel color & Blue gel color: These vibrant colors are what bring life to our patriotic theme! Gel food coloring provides deep hues without altering the consistency of our dough unlike liquid dyes might do; just a few drops will suffice to create striking red and blue shades that make each cookie pop!
- Additional ½ cup granulated sugar for finishing: This final dusting adds an extra layer of sweetness along with a sparkly finish that catches the light beautifully! It’s those little details that make all the difference between good cookies and unforgettable ones.
Equipment You’ll Need:
Having the right tools makes your culinary journey smoother and more enjoyable—think of them as essential partners in creating something wonderful together! Here’s what you’ll need:
- Mixing bowls – A couple of different sizes will come in handy here; you’ll want one big bowl for combining wet ingredients and another for mixing dry ones separately before bringing everything together seamlessly.
- Electric mixer or stand mixer – While hand mixing is possible if you’re feeling adventurous (or nostalgic), I highly recommend using an electric mixer since it saves time and ensures thorough incorporation—especially important when creaming butter!
- Measuring cups & spoons – Precision is vital in baking! Using proper measuring tools ensures consistency across batches so every cookie turns out perfect each time—you don’t want surprises after all those efforts!
- Cookie scoop or tablespoon – For perfectly portioned cookies every single time! This tool helps maintain uniformity which leads not only to even baking but also visually appealing treats ready for sharing!
- Parchment paper or silicone baking mats – Both options prevent sticking while ensuring easy cleanup afterward; plus they promote even browning without burnt bottoms—a true lifesaver!
Now we’re ready to embark on this delightful adventure together where every step leads us closer toward deliciousness!
Preparing the Patriotic Sugar Cookies
Step 1: Creaming Perfection
To begin creating our beautiful Patriotic Sugar Cookies, start by softening your butter—a crucial first step! Place it in the microwave for about 10–12 seconds until it’s just pliable but not melted (we want creamy goodness here!). In a large mixing bowl, combine this softened butter with two cups of granulated sugar using either an electric mixer or stand mixer set at medium speed until well creamed together—this process known as creaming introduces air into your mixture which contributes significantly to achieving those delightfully airy textures later on! Keep mixing until it appears light yellowish pale—this usually takes around 3–5 minutes depending on equipment used.
Once creamed adequately—and trust me on this—you’ll add two large eggs along with one teaspoon of pure vanilla extract next! Mix everything thoroughly until fully incorporated—you want no sign left behind indicating anything was added after original creaming occurred—the eggs should be blended smoothly into your mixture aiding moisture levels while enhancing overall flavor profiles beautifully!
Step 2: Combining Dry Ingredients
In another bowl—a smaller one—combine three-and-a-half cups all-purpose flour along with half a teaspoon each (baking soda & cream tartar), plus finally sprinkle in that quarter teaspoon salt we mentioned earlier! Whisk lightly through these dry ingredients ensuring proper distribution before slowly adding them into wet batter mixture created earlier at low speed initially so flour doesn’t fly everywhere like confetti at New Year’s Eve celebrations!
As you incorporate these dry elements steadily over several moments rather than dumping entirely at once—allowing everything time enough (and space!) required—to blend harmoniously—it becomes apparent how quickly dough starts forming from what was initially quite runny liquid state—it transforms magically before eyes becoming thickened substance resembling cookie dough consistency idealized visions held dear by bakers around world alike!
Step 3: Adding Colorful Hues
Next comes my favorite part—the fun begins here when we divide our completed dough equally into three balls then assign colors accordingly: one red ball dyed vibrantly bright while another gets painted blue leaving third untouched representing classic white base layer within patriotic palette scheme envisioned earlier during planning stages prior entering kitchen today! Flatten each ball slightly upon surface area prepared ahead showing signs preparation having taken place leading up toward creative artistry resulting soon thereafter too…I promise you there will be smiles abound once completed creations unveiled later!
After flattening gently place several drops gel color onto center surface area within flattened circles allowing plenty opportunity work through dough easily by rolling between palms mixing thoroughly ensuring even distribution throughout entire mass achieved prior moving forward next exciting steps planned ahead incorporating these joyful hues integrated thoughtfully among others present involved project unfolding steadily now gaining momentum successfully progressing toward completion desired outcome awaited eagerly ahead…
Step 4: Scooping & Rolling Beautiful Shapes
Once colors infused cheerfully throughout respective balls begin using cookie scoop mechanism ideally suited purpose – portioning out small mounds onto parchment-lined sheets spaced apart roughly two inches apart allows ample room expand whilst baking subsequently ensuring no collisions occur during rising processes occurring within oven later stages upcoming shortly thereafter…so stick closely following directions laid forth meticulously guiding pathway toward successful endeavors fulfilled ultimately achieving goals desired collectively shared amongst participants present today working diligently alongside each other collaboratively producing something special intended primarily share moments created forever cherished fondly thereafter reminiscing fondly about times spent constructing edible masterpieces crafted lovingly hearts poured fullest intentions throughout entire journey together today…
And there we go—we’re making excellent progress toward those scrumptious cookies I know you’re excited about already—they’ll soon become favorites within families everywhere hosting joyous celebrations honoring traditions long-standing passed down generations past continuing evermore spreading happiness indulgence far beyond boundaries reached previously…stay tuned because next steps involve chilling allowing flavors deepen burgeoning admiration blossoming through patience rewarded graciously time well spent waiting patiently before diving headfirst indulgently feasting upon delectable treats loving made collectively…
Step 5: Chilling – The Secret to Perfect Cookies
Now comes one of the most important steps in our journey to create these delightful Patriotic Sugar Cookies: the chilling process. After you’ve rolled your beautifully colored dough into those enticing little balls, it’s crucial to let them chill in the refrigerator for at least one hour, but you can also go longer if your schedule allows. Why is this step non-negotiable? Well, first off, chilling the dough helps solidify the butter, which is key for maintaining that soft and chewy texture we all crave. When the butter cools down, it doesn’t spread as much during baking, ensuring we keep those lovely shapes and colors intact.
While we wait, this is a great time to catch up on life or maybe even whip up a quick batch of frosting for later (I might have a recipe for that!). As an added bonus, resting the dough gives the flour time to hydrate fully—this leads to a more tender cookie with a slightly enhanced flavor profile. Think of it as allowing the ingredients to mingle and get cozy before they hit the heat of the oven! So, tuck your dough balls into the fridge like they’re getting ready for a spa day; they’ll come out rejuvenated and ready to shine.
Step 6: Preheat & Prepare – Setting Up for Success
Once your dough has chilled and is feeling nice and firm, it’s time to prepare for baking. Preheat your oven to 350°F (175°C). This step is crucial because starting with a hot oven ensures that your cookies start baking immediately when they hit the tray. A properly preheated oven will give you that perfect lift and rise while also helping develop those beautiful edges that contrast so wonderfully with the soft centers. While you’re waiting for the oven to reach temperature—this usually takes about 10-15 minutes—you can line your baking sheets with parchment paper.
Using parchment paper not only prevents sticking but also promotes even browning. This method shields your cookies from direct contact with hot metal surfaces, which can cause them to burn on the bottom while remaining undercooked on top—definitely something we want to avoid! Once everything is prepped and your kitchen smells like heaven from all that buttery goodness permeating through the air, take a moment to enjoy this anticipation; after all, you’re just moments away from creating something utterly intoxicating!
Step 7: Baking – The Magic of Transformation
Now comes perhaps the most exciting part of our cookie-making adventure: placing those vibrant little dough balls into the oven! Arrange them about two inches apart on your prepared cookie sheets; this spacing is absolutely paramount since cookies expand as they bake. You don’t want them merging into one giant cookie masterpiece unless that’s what you’re going for (not that I would judge!). Once in the oven, set your timer for about 12-15 minutes, but don’t stray too far; watch closely during those last few minutes—this is where magic happens!
When baking these Patriotic Sugar Cookies, you’re looking for visual cues: slight golden edges while keeping a soft center is key. Pull them out when they still look just a tad underbaked—that’s what creates that delightful chewy texture we all adore! Trust me on this; erring on the side of caution will give you cookies that are both soft and deliciously satisfying rather than dry or crumbly. Let them sit on the baking sheet for several minutes after removing them from the oven; this resting period allows them to firm up just enough before being transferred to a wire rack.
Step 8: Cooling – The Patience Pays Off
After your cookies have had their initial cooling time on the baking sheet (about 5-7 minutes), it’s time to transfer them carefully onto a wire rack. This step might seem trivial, but it’s crucial in achieving optimal texture throughout each cookie. Cooling thoroughly not only prevents sogginess but also allows those flavors to deepen as they settle into their final form. I promise you; there’s something profoundly satisfying about watching those vibrant red, white, and blue treats transform into beautifully baked masterpieces right before your eyes.
As they cool on the rack—delightfully aromatic—I encourage you not to rush this final phase. Allow at least another 10-15 minutes of cooling time before diving in; I know how tempting it can be! During this period, your kitchen will continue filling with an inviting aroma that makes waiting feel like an eternity—but trust me; patience here pays off big time! Each bite will be worth every second as you savor that perfect balance of airy softness paired with just enough chewiness.
Patriotic Sugar Cookies

Get ready to celebrate with these delightful Patriotic Sugar Cookies! Bursting with vibrant red, white, and blue colors, these soft and chewy cookies make the perfect treat for any festive occasion. Their sweet flavor combined with a sugary crust creates an irresistible texture that will have everyone reaching for seconds.
- Prep Time: 20 minutes
- Cook Time: 15 minutes
- Total Time: 35 minutes
- Yield: Approximately 24 cookies 1x
- Category: Dessert
- Method: Baking
- Cuisine: American
Ingredients
- 1 cup unsalted butter, softened
- 2 cups granulated sugar
- 2 large eggs
- 1 teaspoon pure vanilla extract
- 3 ½ cups all-purpose flour
- ½ teaspoon baking soda
- ½ teaspoon cream of tartar
- ¼ teaspoon salt
- Red and blue gel food coloring
- Additional granulated sugar for finishing
Instructions
- Preheat your oven to 350°F (175°C) and line baking sheets with parchment paper.
- In a large bowl, cream together the softened butter and sugar until light and fluffy. Add eggs and vanilla extract; mix until well combined.
- In another bowl, whisk together flour, baking soda, cream of tartar, and salt. Gradually add the dry mixture to the wet ingredients until just combined.
- Divide the dough into three equal parts. Color one portion red and another blue using gel food coloring, leaving one portion plain.
- Roll dough into balls and space them two inches apart on prepared baking sheets.
- Chill in the refrigerator for at least one hour.
- Bake for 12-15 minutes or until edges are slightly golden but centers remain soft.
- Let cool on the baking sheet for a few minutes before transferring to a wire rack.
Nutrition
- Serving Size: 1 cookie (30g)
- Calories: 150
- Sugar: 10g
- Sodium: 65mg
- Fat: 6g
- Saturated Fat: 4g
- Unsaturated Fat: 2g
- Trans Fat: 0g
- Carbohydrates: 22g
- Fiber: <1g
- Protein: 1g
- Cholesterol: 20mg