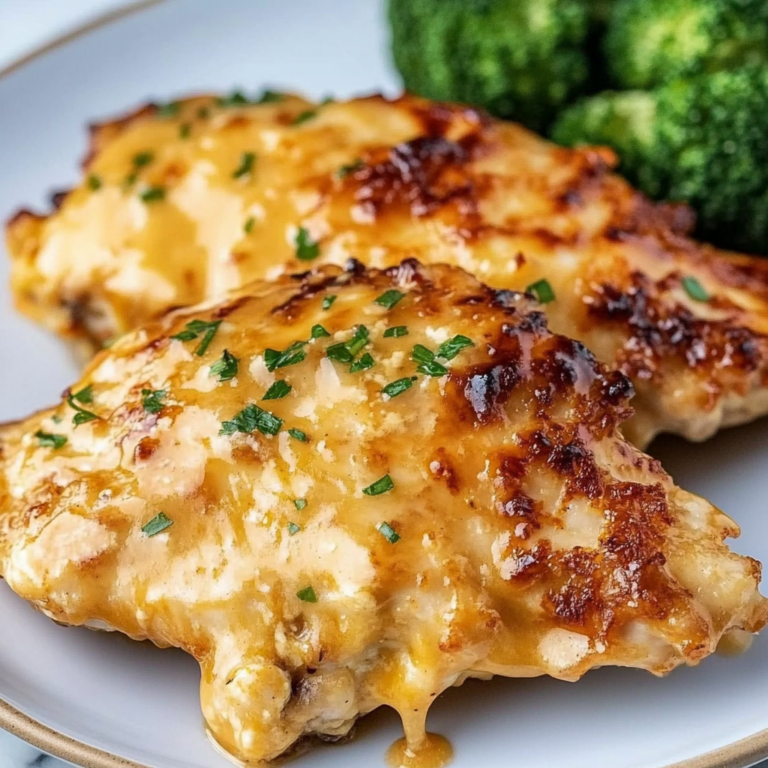
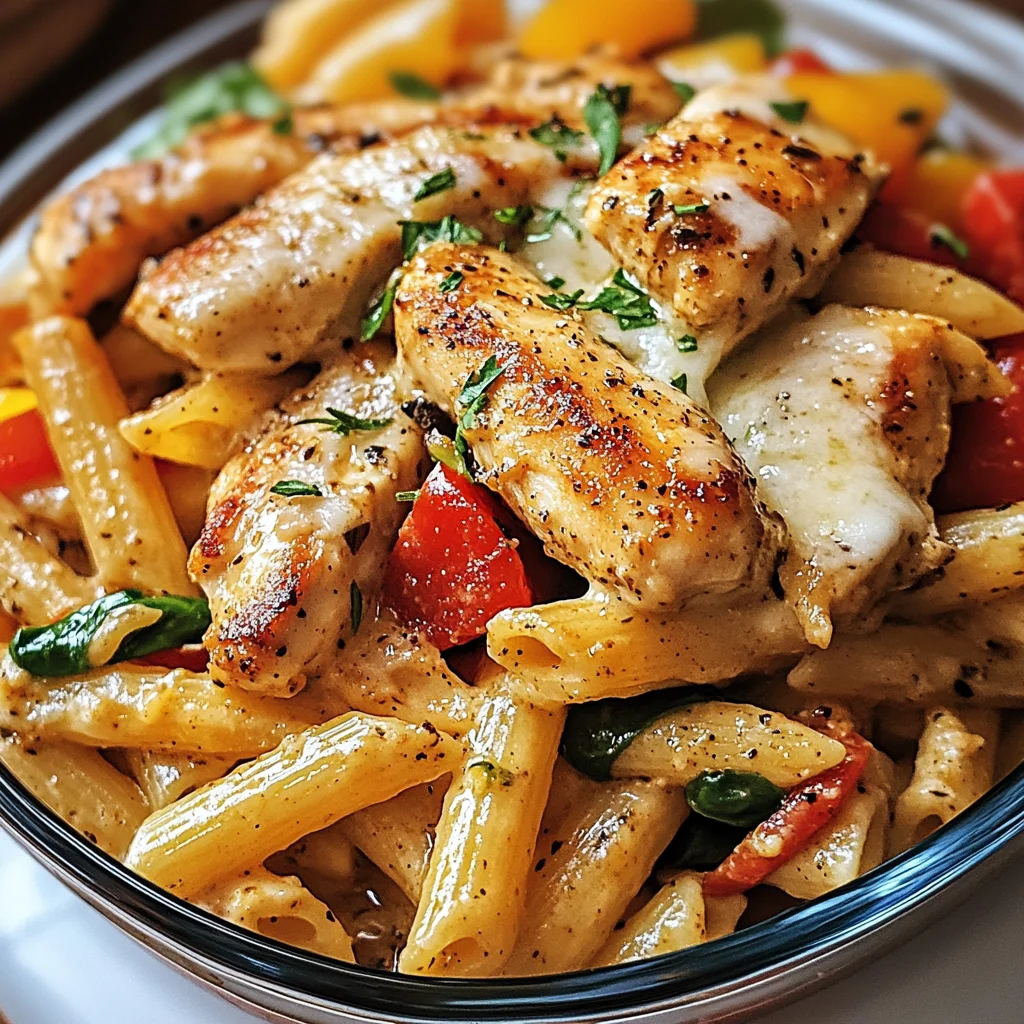
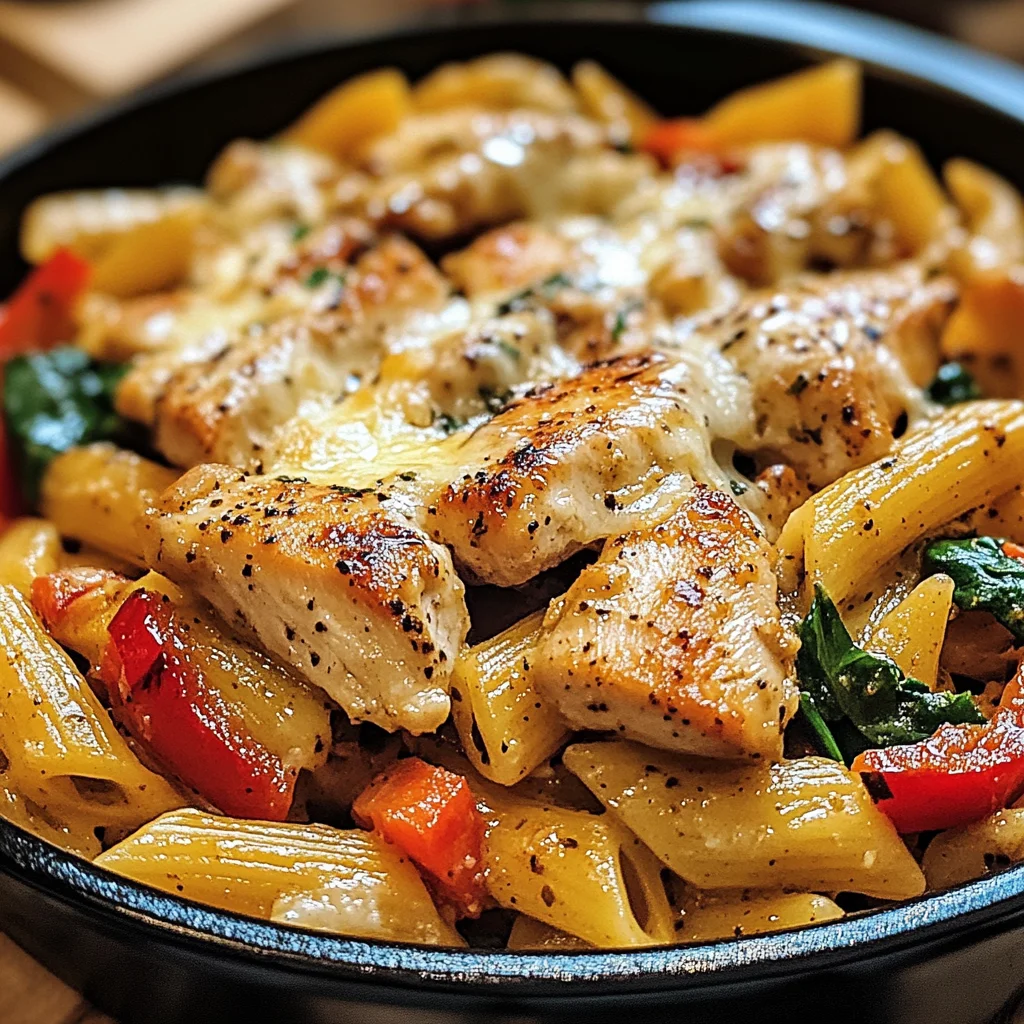
Honey Pepper Chicken Panini Pasta
There’s something profoundly satisfying about creating a dish that marries flavors in such a harmonious way, and that’s exactly what you’ll discover with this Honey Pepper Chicken Panini Pasta. Every bite is a journey through sweet and savory realms, an experience that starts with the simple yet glorious melding of honey and soy sauce, reminiscent of warm summer days spent grilling outdoors. Picture this: tender chicken, perfectly seared to golden perfection, glistening with a sticky glaze that captures the essence of your childhood barbecues. The comforting embrace of creamy pasta dances around the vibrant crunch of bell peppers and fresh spinach, making this dish not just a meal but a celebration on your plate. Trust me; it’s one of those recipes that feels like a warm hug after a long day.
This recipe isn’t just about feeding your belly; it’s about nourishing your soul with flavors that linger and memories that are made around the dinner table. The Honey Pepper Chicken Panini Pasta bridges traditional comfort food with modern twists—perfect for weeknight dinners yet impressive enough for entertaining friends or family. The combination of sweet honey and the slight kick from black pepper creates an utterly intoxicating balance that leaves everyone asking for seconds. And let’s be honest, who doesn’t love a dish where you can twirl pasta around your fork while savoring succulent pieces of chicken? This is not merely food; it’s an invitation to gather, converse, and create moments that will be cherished long after the plates have been cleared.
Honey Pepper Chicken Panini Pasta: A Symphony of Flavor in Every Bite
Welcome to the delightful world of Honey Pepper Chicken Panini Pasta! This recipe is not just another meal idea; it’s an experience to share with loved ones—a culinary adventure waiting to unfold in your kitchen. As we embark on this journey together, get ready for some serious flavor magic. With its sweet and spicy notes paired with creamy textures, this dish will surely become a beloved staple in your household. Let’s dive right into what makes this recipe so special!
Ingredients:
As we gather our ingredients, imagine how each element plays its part in creating this symphony of flavors. Each component has been carefully chosen not only for its taste but also for its ability to enhance the overall experience of the dish.
- 1/3 cup honey: This golden liquid is more than just a sweetener; it’s nature’s own nectar that brings warmth and depth to our dish. Honey adds that desirable touch of sweetness which balances beautifully with the savory elements of soy sauce and garlic. When selecting honey, opt for raw or organic varieties if possible; they often have richer flavors and more complex notes.
- 1/4 cup soy sauce (low-sodium recommended): Soy sauce brings umami to our dish—think of it as the flavor backbone holding everything together. By choosing low-sodium soy sauce, we maintain control over salt levels without sacrificing taste. This ingredient not only seasons but also helps tenderize our chicken, ensuring each bite bursts with juicy goodness.
- 1 tablespoon apple cider vinegar: A splash of apple cider vinegar brightens up our dish by adding acidity which cuts through the richness of cream later on. It provides a lovely tang that complements the sweetness of honey perfectly. If you don’t have apple cider vinegar on hand, feel free to substitute it with rice vinegar for a similar effect.
- 1 teaspoon black pepper (freshly ground for optimal flavor): Freshly ground black pepper elevates our dish from ordinary to extraordinary—it adds warmth and complexity that’s hard to replicate with pre-ground varieties. Feel free to adjust the amount based on your spice tolerance; this step is all about personal taste!
- 1/2 teaspoon red chili flakes (optional): If you crave a little kick in your pasta, these tiny flakes are here to oblige! They add both color and heat without overwhelming other flavors—just enough zing to keep things interesting.
- 1 teaspoon garlic powder: Garlic powder makes our seasoning blend aromatic without needing fresh garlic’s chopping effort! Its concentrated flavor enhances each layer while ensuring we achieve that beloved garlicky essence throughout.
- 1 pound boneless, skinless chicken breasts or thighs: I always recommend thighs if you’re looking for juicy tenderness—they hold moisture better than breasts during cooking! Whichever cut you choose, make sure they’re good quality; fresh chicken can make all the difference in achieving an extraordinary outcome.
- 1/2 cup all-purpose flour: This flour works as our coating mechanism when pan-searing chicken—it creates that lovely crust you want while locking in moisture within! For gluten-free options, consider using almond flour or cornstarch instead.
- 1/2 teaspoon paprika: Paprika adds more than just color; it introduces subtle smokiness too! It rounds out the flavor profile beautifully while also enhancing visual appeal—a vital part when serving guests!
- 1/4 teaspoon salt: Salt amplifies every flavor present in our dish—it’s essential! However, be cautious when salting since soy sauce already contains sodium; just enough will do!
- 1/4 teaspoon black pepper: Another layer! Remember—balance is key here; we want each spice note singing harmoniously rather than clashing against one another.
- 3 tablespoons olive oil or vegetable oil (for pan-searing): Oil aids in browning our chicken perfectly while providing necessary fat content. Olive oil brings its own fruity notes which can complement other ingredients beautifully!
- 12 ounces penne or rigatoni pasta: Choose any short pasta shape you adore! Rigatoni holds onto sauces wonderfully due to its ridges while penne offers delightful bites—both are fantastic choices here!
- 2 tablespoons unsalted butter: Butter adds richness beyond measure! It helps create a luscious sauce later on—don’t skip out on this crucial element!
- 3 garlic cloves, minced: Fresh garlic provides aromatic depth alongside powdered variants used earlier—it’s all about layering those flavors so they meld together seamlessly throughout cooking!
- 1/2 cup heavy cream: Heavy cream transforms our pan sauce into something dreamy and indulgent—it gives body without being overly rich if used correctly! Always look for pasture-raised options whenever possible since quality matters immensely here!
- 1/2 cup chicken broth: Broth enhances overall moisture levels during cooking while infusing extra savory notes into each bite too! Opting for low-sodium ensures we maintain control over salt levels again—a smart choice indeed!
- 1 cup freshly grated Parmesan cheese: Fresh cheese melts better than pre-grated versions—you’ll appreciate how nicely it binds everything together once added at end stage cooking process!
- Salt and pepper to taste: Adjusting seasoning towards final stages ensures balance remains intact across each component—you want diners raving about depth rather than anything bland!
- 1/2 cup chopped bell peppers (red, yellow, or green): These vibrant veggies bring color along with crunchiness—absolutely vital elements when creating visually appealing dishes worthy enough for celebrations!
- 1/2 cup fresh spinach leaves: Spinach wilts down quickly yet maintains nutritional value as well as beautiful green hues throughout presentation—don’t underestimate its power here either!
- 1/4 cup chopped parsley (for garnish): Fresh herbs always elevate dishes visually while adding brightness upon serving—garnishing is non-negotiable if aiming impressively stylish outcomes!
Equipment You’ll Need:
Having the right tools at hand can transform your cooking experience from daunting into delightful! Think of them as trusted partners guiding you through this flavorful journey toward Honey Pepper Chicken Panini Pasta perfection.
- Large pot – Essential for boiling pasta; opt for something sturdy so water won’t boil over easily while maintaining consistent temperatures throughout cooking process—this prevents mushiness later on when combined with sauces.
- Skillet or frying pan – Choose one large enough for searing multiple pieces simultaneously without overcrowding which may hinder browning efforts—we want beautiful caramelization happening here after all!
- Cutting board & knife set – Quality knives ensure precision cuts whether dicing garlic cloves finely or slicing chicken breasts into bite-sized pieces efficiently—don’t underestimate how crucial these tools become during prep stages!
- Mixing bowls – Perfect vessels allowing easy combinations between various dry ingredients before coating meats evenly throughout—you’ll thank yourself later when avoiding messy cleanup tasks otherwise incurred by improper mixing methods employed earlier down line…
With all these ingredients and equipment ready at hand let us dive into preparing this delectable Honey Pepper Chicken Panini Pasta together…
Step 1: Marinating Magic
Begin by whisking together honey, soy sauce, apple cider vinegar, garlic powder along with freshly ground black pepper (and optional red chili flakes) within mixing bowl until blended smoothly—the aroma alone should entice anyone nearby craving something delicious immediately! Pour half marinade over prepared chicken pieces ensuring even coating occurs across surfaces prior placing them inside refrigerator allowing flavors meld happily together during time spent awaiting further steps ahead… 30 minutes minimum marination time recommended here if possible because trust me—they will turn out infinitely better tasting afterwards compared skipping this important step altogether later down line…
Step 2: Coating & Cooking
Once finished marinating period elapsed remove chickens from fridge allowing come closer room temperature before proceeding next steps involving dredging them lightly through combined flour/paprika/salt mixture formed earlier—we’re aiming create crispy outer crust upon searing later through proper coating techniques employed now instead risking soggy results otherwise achieved by neglecting previous suggestions made beforehand… Heat up skillet over medium-high heat applying generous drizzle olive oil ensuring full coverage across base surface area prior adding coated pieces directly onto hot surface sizzling nicely sounds beckoning forth inviting aroma filling kitchen already enticing everyone around eagerly anticipating feast soon approaching ahead… Cook approximately 6–7 minutes per side until golden brown exterior forms developing irresistible charred bits showcasing perfect doneness achieved consistently across board without undercooking risk involved whatsoever…
Step 3: Pasta Perfection
While chicken cooks away prepare pot filled generously salted water boiling energetically meanwhile tossing penne/ridged rigatoni inside once bubbling gently begins happening—a two-step process fundamental ensuring proper al dente texture results attained whilst absorbing incredible flavors coming forth later once combined smoothly alongside creamy concoction crafted previously ahead… Allow boil away approximately 10 minutes checking periodically testing tenderness remain intact throughout motions unfolding within kitchen setting itself transforming ordinary evening into extraordinary culinary affair sure leaving lasting impressions behind everyone gathered around dining table excitedly digging deep enjoying every last mouthful savoring moments shared amongst friends/family alike—the true magic lies within shared experiences created amid laughter filled rooms echoing memories cherished forevermore…
Step 4: Creamy Sauce Creation
Once drained pasta set aside momentarily return focus back onto skillet now housing beautiful golden-brown chickens waiting patiently alongside juices released during frying action unfolding previously… Lower heat slightly then toss minced garlic cloves directly atop along stirring frequently until fragrant wafts outward enveloping entire space surrounding inviting everyone closer wanting partake deliciousness awaiting them shortly afterward following next few steps taken care meticulously ensuring nothing overlooked here either step taken leads towards magnificent culmination reached soon thereafter transforming humble ingredients incorporated earlier now blossoming vibrantly within pots/pans beckoning forth eager souls gathering hungry hearts willing indulge deeply within authenticity created amidst shared moments bonding together forevermore—all thanks little bit love sprinkled generously across everything created originally stemming back fond memories made generations past still alive today reflected upon plates served elegantly tonight amidst joyous occasions celebrated bringing families closer united fully round tables dressed brightly adorned highlighting importance connections fostered through sharing food lovingly prepared beforehand…
Step 5: Marinating the Chicken – Infusing Flavor for a Magical Experience
Now, let’s take that beautiful chicken and transform it into something truly extraordinary. Begin by placing your boneless, skinless chicken breasts or thighs into a large mixing bowl. This is where the magic happens! Pour in the honey, soy sauce, apple cider vinegar, freshly ground black pepper, red chili flakes (if you’re feeling adventurous), and garlic powder. Give it a good mix with a spatula or your hands, ensuring every piece of chicken is generously coated in this sweet and savory marinade. Trust me when I say that allowing the chicken to marinate for at least 15 minutes will yield flavors that are utterly intoxicating; it’s like giving the chicken a warm hug of flavor! If you have more time to spare, let it marinate for up to an hour or even overnight in the fridge; this is crucial as it allows those flavors to penetrate deeply into the meat, creating a profound taste experience that you’ll remember long after the meal is over. Cover your bowl with plastic wrap or transfer everything into a resealable bag and pop it into the refrigerator while you prepare the pasta.
Step 6: Cooking the Pasta – The Foundation of Your Dish
While your chicken marinates, let’s turn our attention to cooking the pasta, which is absolutely paramount to achieving that perfect Honey Pepper Chicken Panini Pasta experience. Bring a large pot of salted water to a rolling boil—this step is essential because adding salt to your boiling water enhances the pasta’s flavor from within as it cooks. Once it’s bubbling away, add your penne or rigatoni pasta. Stir occasionally and cook according to package instructions until al dente—this means it should be tender but still firm when bitten. Typically, this takes about 10-12 minutes. It’s important not to overcook; mushy pasta can ruin our dish’s texture and overall appeal! Once cooked to perfection, reserve about half a cup of that starchy cooking water (you’ll thank me later) and drain the rest in a colander. Rinse briefly under cold water if you’re not using it immediately; this helps stop the cooking process and prevents clumping.
Step 7: Searing the Chicken – Creating That Golden Crust
Now comes one of my favorite parts: searing that marinated chicken! Heat three tablespoons of olive oil (or vegetable oil if you prefer) in a large skillet over medium-high heat until shimmering—this indicates it’s ready for action! Carefully add your marinated chicken pieces to the hot skillet without crowding them too much; space is key here because we want each piece to sear beautifully rather than steam. You’ll know it’s time to flip them when they release easily from the pan and have developed an alluring golden brown crust—typically about 4-5 minutes per side does the trick for nicely sized pieces. This caramelization is what brings depth of flavor and adds complexity; don’t rush this step! Once cooked through (the internal temperature should reach 165°F), transfer your golden beauties onto a cutting board and let them rest for about five minutes before slicing them into bite-sized pieces—this resting period allows juices to redistribute throughout the meat, keeping each bite succulent and juicy.
Step 8: Bringing It All Together – The Final Symphony
With your pasta cooked perfectly al dente and your chicken gloriously seared and sliced, we’re now ready for something magical—the assembly of our Honey Pepper Chicken Panini Pasta! In that same skillet (with all those tasty brown bits left behind from cooking), add two tablespoons of unsalted butter over medium heat until melted—this adds richness that’s simply divine! Next, toss in those minced garlic cloves, stirring them around until fragrant; you’ll want about 30 seconds of sautéing here. Then pour in half a cup of heavy cream along with half a cup of chicken broth—that luscious mixture creates an enchanting sauce that coats every piece of pasta beautifully! Stir well as you bring everything to a gentle simmer; this is where you can adjust seasoning with salt and pepper according to taste. As soon as you see bubbles forming on the surface (not boiling!), add in your cooked pasta along with chopped bell peppers and fresh spinach leaves—watch how vibrant those veggies become as they gently wilt from residual heat! Finally, fold in that reserved starchy pasta water little by little until you’ve reached your desired consistency—a creamy coating that’s neither too thick nor too thin will cling lovingly to every noodle.
Final Touches – The Exquisite Finish
Step 9: Garnishing Your Plate – A Feast for All Senses
As we draw nearer to serving this masterpiece, let’s not forget about presentation—it truly elevates any dish! Take that glorious mixture off heat once all ingredients are combined beautifully and look at what you’ve created—a symphony of flavors bursting with colors right before your eyes! Before serving up generous portions onto plates or bowls, sprinkle freshly grated Parmesan cheese generously on top—this finishing touch creates an irresistible layer of creamy goodness that melds seamlessly into every bite. And for an added pop of freshness, don’t skimp on garnishing with chopped parsley—it brings vibrancy both visually and flavor-wise! You’ll want people digging in immediately because trust me; that enticing aroma wafting through your kitchen will have everyone flocking to the table as if summoned by some delicious culinary force!
I promise you, each forkful will deliver an explosion of sweet heat from honey-pepper goodness harmonizing perfectly with creamy bliss—a comfort food experience like no other! So gather around together with loved ones, share stories as laughter fills the air while enjoying this delightful Honey Pepper Chicken Panini Pasta—you’ve created not just dinner but memories that will linger long after plates are cleared away!
Storage and Enjoyment Tips for Your Honey Pepper Chicken Panini Pasta
Now that you’ve created this exquisite dish of Honey Pepper Chicken Panini Pasta, it’s time to bask in the glory of your culinary triumph! The aroma wafting through your kitchen is an invitation to gather around the table and share this delightful meal with family and friends. But what happens when you find yourself with leftovers? Don’t worry! This dish not only stands out when freshly made, but it also has some excellent storage possibilities that will keep the flavors singing long after dinner.
Storing Leftover Honey Pepper Chicken Panini Pasta
When it comes to storing your leftover Honey Pepper Chicken Panini Pasta, I recommend using an airtight container—this is absolutely paramount for maintaining that delicious harmony of flavors. Place the pasta in the refrigerator, where it can happily reside for up to three days. If you want to go the extra mile in preserving its quality, consider placing a slice of bread inside the container; this little trick helps absorb excess moisture and keeps your pasta from becoming mushy. As for taste, rest assured that this pasta will still be profoundly satisfying after a day or two in the fridge; those honey and pepper flavors will continue to meld beautifully, creating an even deeper symphony of flavors. When you’re ready to dive back in, simply reheat it gently on the stovetop with a splash of chicken broth or cream to restore its creamy goodness.
Freezing for Later
If you’re thinking about making this delightful dish ahead of time or saving some for future cravings, freezing is a fantastic option! To freeze your Honey Pepper Chicken Panini Pasta properly, allow it to cool completely before transferring it into freezer-safe containers or bags. This way, you’ll prevent any ice crystals from forming that could compromise texture and flavor. It can stay frozen for up to three months—talk about convenience! When you’re ready to indulge again, simply thaw overnight in the refrigerator and reheat on low heat on the stove with a bit more cream or broth until warmed through. This preparation ensures that when you do unearth this gem from your freezer, it will taste just as fresh as when you first made it. Isn’t knowing there’s a delicious homemade meal waiting for you just the best feeling?