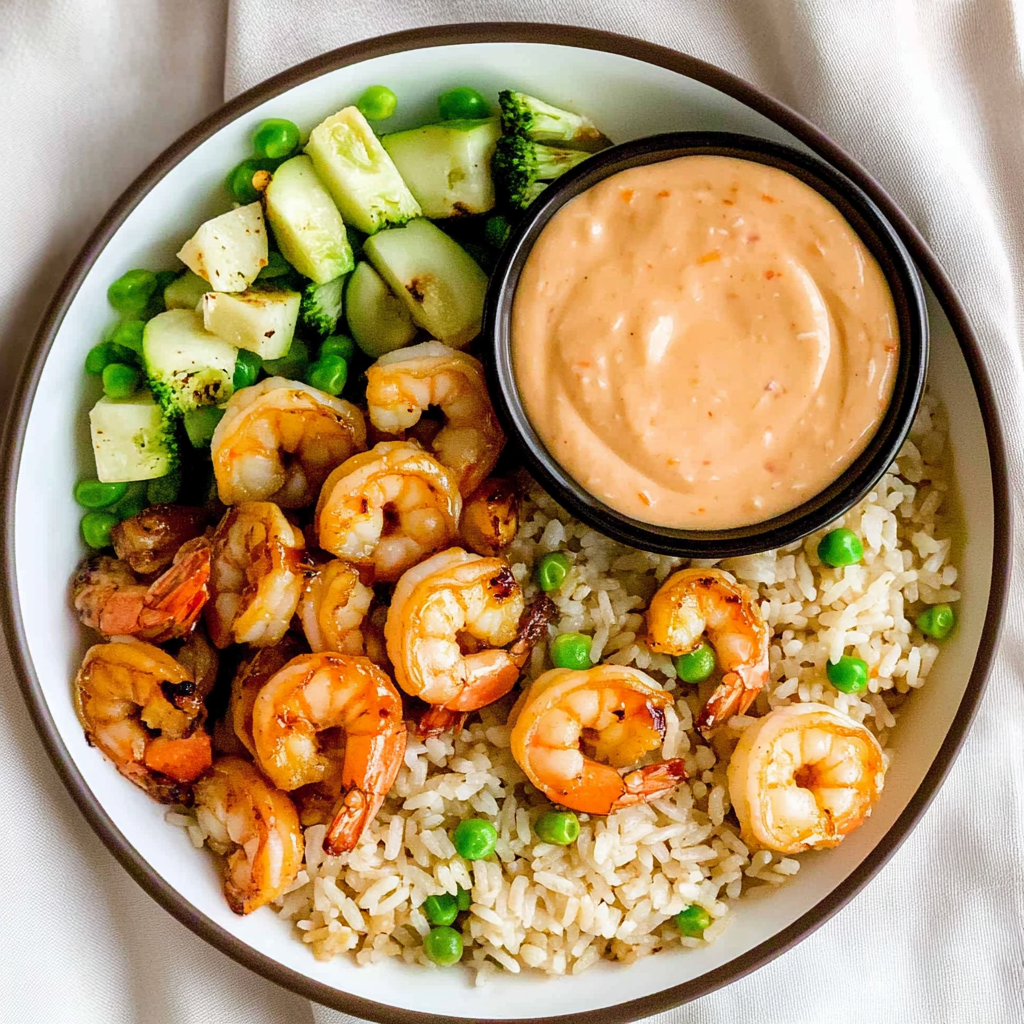
Savory Hibachi Shrimp Rice Bowls in Just 30 Minutes!
There’s something incredibly comforting about a bowl of Hibachi Shrimp Rice Bowls, isn’t there? This delightful dish brings together the savory flavors of tender shrimp, vibrant vegetables, and fluffy rice, all drizzled with a creamy yum yum sauce that takes it to the next level. Whether you’re looking for an easy weeknight dinner or a way to impress guests at your next gathering, this recipe is sure to be a hit. Plus, the best part? You can whip it up in just 30 minutes!
These Hibachi Shrimp Rice Bowls are not only delicious but also versatile. They can easily fit into meal prep plans or serve as a crowd-pleaser at family gatherings. Trust me; once you try this recipe, it will quickly become one of your favorites!
Why You’ll Love This Recipe
– Quick and Easy: Ready in just 30 minutes, making it perfect for busy weeknights.
– Flavorful and Fun: Each bite is filled with delicious flavors that everyone will love.
– Customizable: You can easily adapt the ingredients to suit your taste preferences.
– Perfect for Meal Prep: Prepare several servings in advance for quick lunches or dinners.
– Family-Friendly: A great way to get everyone involved in cooking and enjoying a wholesome meal together.
Ingredients You’ll Need
Gathering fresh ingredients is part of the fun! Here’s what you’ll need to create these mouthwatering Hibachi Shrimp Rice Bowls.
For the Yum Yum Sauce
– ½ cup mayo
– 2 tbsp. ketchup
– ½ tsp. garlic powder
– ½ tsp. paprika
– Few dashes of hot sauce or to taste (optional)
For the Bowl
– 3 tbsp. unsalted butter (divided)
– 1 lb. raw shrimp (peeled, deveined, and patted dry)
– 4 tbsp. soy sauce (divided)
– 1 medium zucchini (sliced)
– 1 small-medium onion (chopped)
– 1 egg
– 2 cups frozen peas and carrots (unthawed)
– 4 cups cooked rice (cooled)
Variations
The beauty of Hibachi Shrimp Rice Bowls lies in their flexibility! You can mix things up based on what you have on hand or your dietary preferences.
– Swap the protein: Try chicken, tofu, or even scallops for a different take on this dish.
– Add more veggies: Bell peppers, broccoli, or snap peas would add color and crunch.
– Change up the sauce: Experiment with teriyaki sauce or sriracha for an added kick.
– Make it vegetarian: Omit the shrimp and increase the amount of vegetables for a hearty vegetarian option.
How to Make Hibachi Shrimp Rice Bowls
Step 1: Prepare the Sauce
Start by making your yum yum sauce! In a bowl, mix together mayo, ketchup, garlic powder, paprika, and hot sauce if you’re feeling adventurous. This creamy condiment adds an irresistible flavor that perfectly complements the shrimp and rice. Once mixed, pop it in the fridge until you’re ready to serve.
Step 2: Cook the Shrimp
Heat a large skillet over medium-high heat and melt 1 tablespoon of butter in it. Add your shrimp to the pan and cook them for about one minute on each side until they turn pink and opaque. Pour in 2 tablespoons of soy sauce during cooking; this will enhance their flavor as they caramelize slightly in the pan. Once done, remove them from the skillet and set aside.
Step 3: Sauté Vegetables
If needed, wipe down your skillet with a paper towel before adding another tablespoon of butter. Toss in chopped onion and sliced zucchini into the pan; sauté these for about 4–5 minutes until they’re tender and fragrant. Add another 2 tablespoons of soy sauce while cooking so that everything gets coated nicely before removing them from the skillet.
Step 4: Cook Egg and Rice
In your now-empty skillet, melt one last tablespoon of butter over medium heat. Crack an egg into the pan and scramble it until fully cooked through. Next, add in your cooled rice along with those unthawed frozen peas and carrots; stir everything together well! After about 2–3 minutes of sautéing, drizzle in another 2 tablespoons of soy sauce to give it that classic hibachi flavor. Stir-fry everything for an additional few minutes until heated through.
Step 5: Assemble Your Bowls
Now comes the fun part! Layer your fried rice mixture into bowls followed by sautéed vegetables on top and finally finish off with succulent shrimp. Drizzle generously with your homemade yum yum sauce for that extra touch of deliciousness!
Enjoy every bite of these amazing Hibachi Shrimp Rice Bowls as they bring joy not just to your palate but also to your dining experience!
Pro Tips for Making Hibachi Shrimp Rice Bowls
Creating the perfect Hibachi Shrimp Rice Bowls is all about attention to detail and a little bit of practice. Here are some tips to help you elevate your dish:
– Use fresh shrimp: Fresh or high-quality frozen shrimp will give your dish the best flavor and texture. Always opt for shrimp that is peeled and deveined for convenience.
– Don’t overcrowd the pan: When cooking the shrimp or vegetables, make sure not to overcrowd the skillet. This ensures even cooking and allows everything to achieve that delicious sear.
– Prep ingredients ahead of time: Having everything prepped before you start cooking will make the process smoother and quicker, allowing you to enjoy your meal without stress.
– Adjust soy sauce to taste: Soy sauce can vary in saltiness. Start with less and add more as needed, especially if you’re watching your sodium intake.
– Experiment with veggies: Feel free to swap out or add different vegetables like bell peppers, mushrooms, or broccoli to customize your rice bowls according to your preferences.
How to Serve Hibachi Shrimp Rice Bowls
Serving up your Hibachi Shrimp Rice Bowls can be just as fun as making them! Consider these ideas for a vibrant presentation that will impress your family or friends.
Garnishes
– Chopped green onions: Sprinkle some fresh green onions on top for a pop of color and a mild onion flavor.
– Sesame seeds: Toasted sesame seeds add a nice crunch and nutty flavor that complements the dish beautifully.
Side Dishes
– Miso soup: A warm bowl of miso soup is a classic Japanese side that pairs perfectly with your rice bowls.
– Edamame: Steamed edamame sprinkled with sea salt makes for a healthy and protein-rich addition.
– Seaweed salad: A light seaweed salad adds freshness and texture, enhancing the overall meal experience.
– Pickled ginger: Serve pickled ginger on the side for a tangy contrast that brightens up every bite.

Make Ahead and Storage
Meal prepping can save you time during busy weeks while still allowing you to enjoy delicious homemade meals. Here’s how to store your Hibachi Shrimp Rice Bowls effectively.
Storing Leftovers
– Cool completely before storing in an airtight container in the fridge. They can last up to 3 days.
– Keep the yum yum sauce separate until ready to serve again, ensuring it stays fresh.
Freezing
– Allow your rice bowls to cool fully before transferring them into freezer-safe containers.
– They should be consumed within 2 months for optimal taste; label containers with dates for reference.
Reheating
– For best results, reheat in a skillet over medium heat until warmed through, adding a splash of water if necessary.
– Alternatively, microwave in short intervals (1 minute at a time), stirring occasionally until heated evenly.
FAQs
If you’re curious about any aspect of making Hibachi Shrimp Rice Bowls, here are some common questions that might help clear things up!
Can I use other types of seafood?
Yes! Feel free to substitute shrimp with other seafood options like scallops or even chicken if desired. Just adjust cooking times accordingly.
Is there a vegetarian version of this recipe?
Absolutely! You can replace shrimp with tofu or additional vegetables, using vegetable broth instead of soy sauce for added flavor without meat.
How can I make it spicier?
To increase the heat level, consider adding more hot sauce during preparation or sprinkling some red pepper flakes on top just before serving.
Can I use brown rice instead of white rice?
Yes! Brown rice works wonderfully in this recipe. Just be sure it’s cooked beforehand since it takes longer to prepare than white rice.
Final Thoughts
I hope you feel inspired to try these delightful Hibachi Shrimp Rice Bowls! They’re not only quick to whip up but also bursting with flavors that everyone will love. Enjoy this culinary journey right from your kitchen—happy cooking!
Hibachi Shrimp Rice Bowls
Ingredients
Method
- Start by making your yum yum sauce! In a bowl, mix together mayo, ketchup, garlic powder, paprika, and hot sauce if you're feeling adventurous. Once mixed, pop it in the fridge until you’re ready to serve.
- Heat a large skillet over medium-high heat and melt 1 tablespoon of butter. Add your shrimp to the pan and cook them for about one minute on each side until they turn pink and opaque. Pour in 2 tablespoons of soy sauce during cooking; remove them from the skillet and set aside.
- Wipe down your skillet with a paper towel before adding another tablespoon of butter. Toss in chopped onion and sliced zucchini; sauté for about 4–5 minutes until tender. Add another 2 tablespoons of soy sauce while cooking.
- In the now-empty skillet, melt one last tablespoon of butter over medium heat. Crack an egg into the pan and scramble until fully cooked. Add in your cooled rice along with the unthawed frozen peas and carrots; stir well! Drizzle in another 2 tablespoons of soy sauce and stir-fry until heated through.
- Layer your fried rice mixture into bowls, followed by sautéed vegetables on top, and finish with shrimp. Drizzle generously with your homemade yum yum sauce.