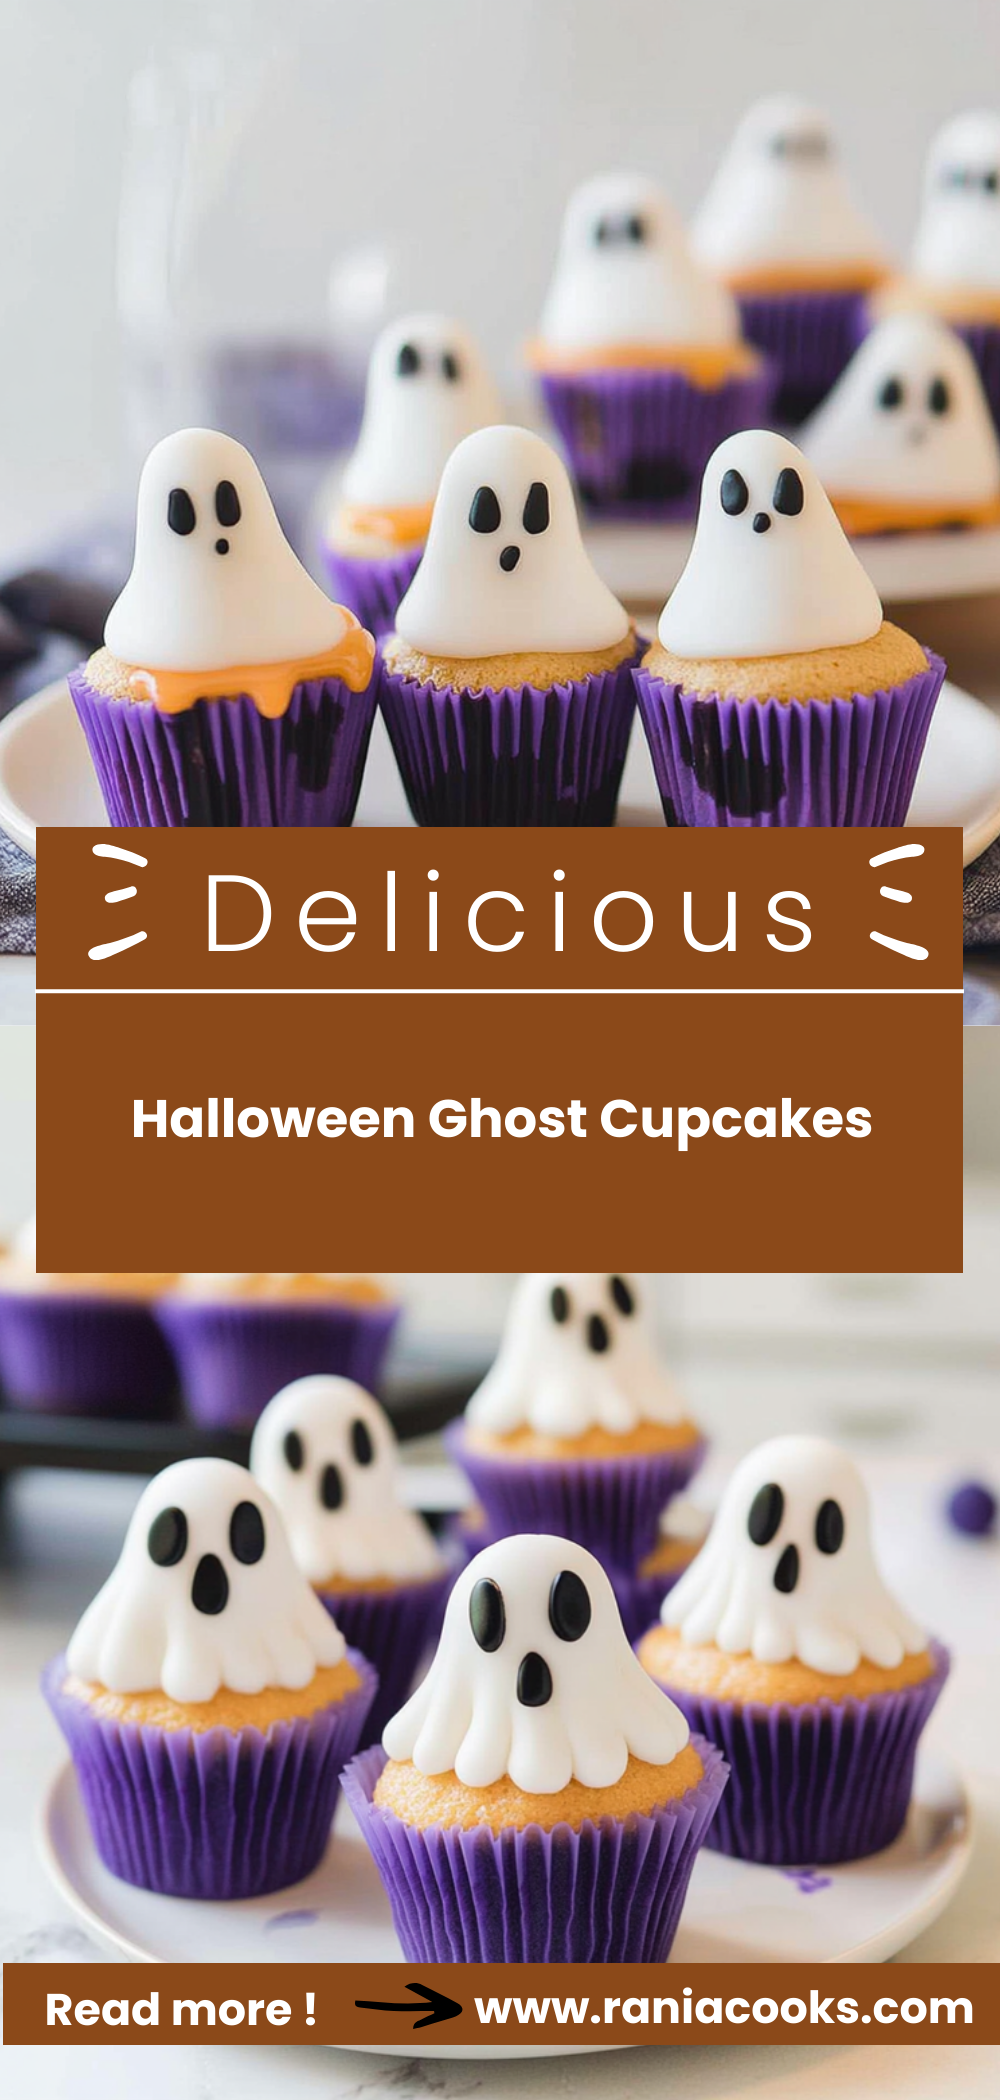
Spooktacular Halloween Ghost Cupcakes Recipe You’ll Love
There’s something truly magical about Halloween, isn’t there? The crisp air, the vibrant colors of fall, and of course, all the delicious treats! One of my absolute favorite recipes for this spooky season is Halloween Ghost Cupcakes. These delightful purple cupcakes topped with fluffy white meringue ghosts are not only adorable but also incredibly fun to make. They’re perfect for Halloween parties, school events, or even just a cozy night in with family.
What I love most about these cupcakes is how they combine an elegant appearance with a playful spirit. The fluffy meringue ghosts bring a whimsical touch that will impress both kids and adults alike! Plus, they’re easy to customize, making them suitable for various occasions beyond Halloween—think birthday parties or any celebration where you want to add a little fun.
Why You’ll Love This Recipe
– Easy to make: The step-by-step instructions make it simple for bakers of any skill level to create these charming treats.
– Fun for everyone: Kids will love helping out in the kitchen, especially when it comes time to decorate those ghostly meringues!
– Stunning presentation: The contrast of the purple buttercream and white meringue makes these cupcakes a showstopper at any gathering.
– Perfectly sweet: The combination of light meringue and rich buttercream offers a delightful balance that’s sure to satisfy any sweet tooth.
– Versatile treat: While they’re perfect for Halloween, these cupcakes can be adapted for other celebrations throughout the year!
Ingredients You’ll Need
Before we dive into the fun part—making our Halloween Ghost Cupcakes—let’s gather our ingredients! You’ll find everything you need for both the fluffy meringue ghosts and the delicious buttercream frosting right here.
For the Meringue Ghosts
– 2 large Egg Whites (Room Temperature)
– 1/4 tsp Cream of Tartar
– 1/2 cup White Sugar
For the Buttercream Frosting
– 1 stick Unsalted Butter (softened)
– 2 cups Confectioner’s Sugar
– 2 tbsp Milk
– Purple Gel Food Coloring
For Decoration
– Black Decorating Frosting
Variations
Flexibility is key when it comes to baking! While these Halloween Ghost Cupcakes are delightful as is, here are some fun variations you might consider:
– Swap the color: Use different gel food coloring to create ghosts in pink or green for other occasions!
– Add sprinkles: Before adding your meringue ghost on top, sprinkle some edible decorations over the buttercream for extra flair.
– Make mini versions: Use a mini cupcake pan to create bite-sized treats that are perfect for parties or snack time.
– Experiment with flavors: Try adding a hint of vanilla or almond extract to your buttercream for an extra layer of flavor.
How to Make Halloween Ghost Cupcakes
Step 1: Preheat Your Oven and Prepare Baking Sheet
Preheat your oven to 200 degrees F and line a baking sheet with parchment paper. This preparation ensures that your meringues have a clean surface to bake on while also preventing sticking.
Step 2: Beat Egg Whites
Pour egg whites into a large bowl and begin beating them on low speed with an electric mixer. This initial slow mixing helps incorporate air gently without splattering.
Step 3: Add Cream of Tartar
Once you see some bubbles forming in your egg whites, add the cream of tartar. This ingredient stabilizes the egg whites and helps achieve those beautiful peaks we’re aiming for.
Step 4: Gradually Add Sugar
Slowly sprinkle in the sugar while gradually increasing your mixer speed to its highest setting. Adding sugar gradually allows it to dissolve properly, resulting in a smooth meringue mixture.
Step 5: Whip Until Stiff Peaks Form
Continue mixing until your mixture turns bright white and forms semi-stiff peaks. This step is crucial because it determines how well your ghosts will hold their shape during baking.
Step 6: Prepare Piping Bag
Scoop the meringue mixture into a piping bag fitted with Wilton tip #12. This will allow you to pipe out those cute ghost shapes easily!
Step 7: Pipe Meringue Mounds
On your lined baking sheet, pipe out mounds of meringue—start by creating a base about 1 inch in diameter and continue piping upwards until it’s about 2 inches high. Pull away quickly at the end to form that ghostly peak!
Step 8: Bake Meringues
Bake in your preheated oven for 2 hours. After baking time is complete, turn off the heat but leave them inside for an additional 30 minutes. This process helps them dry out completely without browning.
Step 9: Make Buttercream Frosting
While your meringues cool down, prepare your buttercream frosting by combining softened butter, confectioners’ sugar, and milk in a large bowl.
Step 10: Mix Until Smooth
Using an electric mixer, beat together all ingredients until well incorporated and smooth. This creates the perfect texture for spreading on our cupcakes.
Step 11: Tint Your Buttercream
Add one small drop of violet gel food coloring and mix until you achieve a lovely purple hue that’s ready to spread on our cupcakes!
Step 12: Frost Each Cupcake
Transfer the purple buttercream into another piping bag fitted with Wilton tip #12 and frost each cupcake generously.
Step 13: Cool Meringues
Once baked meringues have cooled slightly (but not completely), gently remove them from the baking sheet.
Step 14: Decorate Meringues
Attach Wilton tip #3 onto your black decorating frosting tube and pipe eyes and mouths onto each meringue cookie; this adds personality to our spooky treats!
Step 15: Assemble Your Cupcakes
Place one cute meringue ghost atop each frosted cupcake. If you have extra ghosts leftover (lucky you!), serve them alongside as an extra treat!
And there you have it—the delightful journey of creating Halloween Ghost Cupcakes! Enjoy every bite of this festive treat that’s bound to bring smiles all around!
Pro Tips for Making Halloween Ghost Cupcakes
Making Halloween Ghost Cupcakes can be a delightful experience, especially when you follow a few simple tips to ensure they turn out perfectly. Here are some actionable pointers to help you create the spookiest treats for your Halloween festivities!
– Use room temperature egg whites: This helps achieve greater volume and stability when whipping the meringue, resulting in lighter and fluffier ghosts.
– Gradually add sugar: Incorporating the sugar slowly while beating the egg whites allows for better dissolution, leading to a smoother meringue texture.
– Pipe quickly and confidently: When forming the ghost shapes, it’s important to work efficiently. Pipe the base and build up without hesitation to maintain the shape and avoid deflation.
– Keep meringues stored properly: After cooling, store any leftover meringues in an airtight container at room temperature to keep them crisp and delicious.
– Experiment with colors: Don’t hesitate to play around with different shades of purple or even add edible glitter for a festive touch!
How to Serve Halloween Ghost Cupcakes
Presenting your Halloween Ghost Cupcakes can be as fun as making them! Here are some creative ideas to make your spooky treats shine at your next gathering.
Fun Displays
– Arrange cupcakes on a spooky-themed cake stand or platter for an eye-catching display.
– Use decorative parchment paper or Halloween-themed cupcake liners to elevate their appearance.
Garnishes
– Sprinkles: Add colorful Halloween-themed sprinkles on top of the buttercream for extra flair.
– Edible glitter: A sprinkle of edible glitter can give your cupcakes a magical touch that kids will love.
Side Dishes
– Fresh fruit salad: Pair these sweet treats with a refreshing fruit salad for a balanced dessert table.
– Pumpkin spice cookies: Serve alongside pumpkin-flavored goodies for an autumn delight.
– Hot chocolate or apple cider: Warm beverages complement the sweetness of the cupcakes beautifully.
Make Ahead and Storage
Preparing ahead can save you time and stress, especially during busy holiday seasons. Here’s how you can manage storage effectively:
Storing Leftovers
– Keep any leftover cupcakes in an airtight container at room temperature for up to 2 days. This keeps the buttercream soft and delicious while maintaining the integrity of your ghosts.
Freezing
– If you want to prepare in advance, freeze un-frosted cupcakes. Wrap each cupcake tightly in plastic wrap, then place them in an airtight container. They can be frozen for up to 3 months.
Reheating
– If you’ve frozen cupcakes, allow them to thaw overnight in the refrigerator before bringing them back to room temperature. Frost them fresh before serving for best results.
FAQs
If you have questions about making these adorable ghostly delights, you’re not alone! Here are some frequently asked questions that might help clear things up.
Can I make these cupcakes gluten-free?
Yes! You can easily substitute all-purpose flour with a gluten-free baking blend in this recipe while keeping all other ingredients unchanged.
Can I use store-bought frosting instead of homemade?
Absolutely! If you’re short on time, using store-bought frosting is perfectly fine. However, homemade buttercream tends to have a fresher taste that pairs wonderfully with these cupcakes.
What if I don’t have cream of tartar?
If you don’t have cream of tartar on hand, lemon juice or white vinegar can be used as substitutes in equal amounts. They help stabilize the egg whites similarly.
Final Thoughts
I hope you feel inspired and excited to whip up these Halloween Ghost Cupcakes! They’re not only delicious but also bring a fun, festive vibe to any gathering. Don’t hesitate to get creative with decorations and flavors—your guests will love them! Happy baking!

Halloween Ghost Cupcakes
Ingredients
Method
- Preheat your oven to 200 degrees F and line a baking sheet with parchment paper.
- Pour egg whites into a large bowl and begin beating them on low speed with an electric mixer.
- Once you see some bubbles forming in your egg whites, add the cream of tartar.
- Slowly sprinkle in the sugar while gradually increasing your mixer speed to its highest setting.
- Continue mixing until your mixture turns bright white and forms semi-stiff peaks.
- Scoop the meringue mixture into a piping bag fitted with Wilton tip #12.
- On your lined baking sheet, pipe out mounds of meringue.
- Bake in your preheated oven for 2 hours. After baking time is complete, turn off the heat but leave them inside for an additional 30 minutes.
- While your meringues cool down, prepare your buttercream frosting by combining softened butter, confectioners’ sugar, and milk in a large bowl.
- Using an electric mixer, beat together all ingredients until well incorporated and smooth.
- Add one small drop of violet gel food coloring and mix until you achieve a lovely purple hue.
- Transfer the purple buttercream into another piping bag fitted with Wilton tip #12 and frost each cupcake generously.
- Once baked meringues have cooled slightly, gently remove them from the baking sheet.
- Attach Wilton tip #3 onto your black decorating frosting tube and pipe eyes and mouths onto each meringue cookie.
- Place one cute meringue ghost atop each frosted cupcake.