Gordon Ramsay Pickled Onions: Quick Crunchy Flavor Boost
The Heartfelt Art of Pickling: A Journey Through Flavor
Oh, my dear friend, let me take you on a journey that will transform the way you think about a humble ingredient—onions! When I first stumbled upon Gordon Ramsay’s Quick Pickled Onions recipe, it was as if a light bulb went off in my kitchen. You see, pickled onions are not just a condiment; they are a vibrant symphony of flavors that dance across your palate. They bring an unmistakable crunch and a tangy brightness that can elevate any dish from mundane to extraordinary. Imagine slicing through those glossy jars, releasing the intoxicating aroma of vinegar mingling with garlic and peppercorns, and feeling that rush of anticipation for the burst of flavor that’s about to follow. This is more than just food; it’s an experience steeped in tradition yet bursting with contemporary flair.
These quick pickles are perfect not only for topping tacos or sandwiches but also as a stunning centerpiece at gatherings. They’re that secret ingredient you never knew you needed! Whether you have them on your dinner plate, tucked within your favorite salads, or served alongside grilled veggies, their presence transforms each bite into something profoundly satisfying. And let’s not forget the ease of preparation—within 45 minutes, you’ll have three beautiful jars filled with this liquid gold that not only taste heavenly but also look like a work of art on your table. So grab your apron and let’s dive into this delightful culinary adventure together!
Equipment You’ll Need:
Before we dive into making our Gordon Ramsay Pickled Onions: Quick Crunchy Flavor Boost, let’s gather our trusty companions—the kitchen tools essential for success in this flavorful endeavor! Having the right equipment makes everything smoother and more enjoyable; it’s like having good friends by your side during this culinary adventure.
- Sharp Knife – A good quality sharp knife is essential for achieving those exquisite thin slices without crushing or bruising your red onions—this is absolutely vital since we want them delicate yet crunchy in texture.
- Cutting Board – Your cutting board serves as your workspace; ensure it’s sturdy enough to withstand some slicing action without slipping around under pressure.
- Mixing Bowl – We’ll need a mixing bowl large enough to combine our brine ingredients seamlessly before pouring them over those gorgeous onion slices.
- Jars with Lids – Ideally glass jars with tight-fitting lids are best for storing our pickles long-term—this keeps everything fresh while showcasing their beautiful colors!
- Measuring Cups & Spoons – Precision matters in cooking; measuring cups and spoons will ensure we hit just the right balance between sweet and tangy!
With everything ready at hand, let’s roll up our sleeves and make something truly magical!
Stay tuned as we continue exploring more steps together toward crafting these delectable Gordon Ramsay Pickled Onions—a true treasure worth savoring every moment spent preparing them alongside loved ones around dinner tables everywhere!
Step 5: Infuse the Brine with Flavor
Now that you have your beautiful, thinly sliced red onions waiting patiently, it’s time to turn our attention to crafting the brine. This step is where the magic begins! In a medium-sized saucepan, combine the 2 cups of white vinegar and 2 cups of water. The vinegar’s sharp tang is absolutely crucial here; it’s what will not only pickle your onions but also penetrate them deeply, transforming their flavor profile from raw and pungent to something utterly intoxicating and balanced. Trust me on this—this mixture needs to boil gently for a moment. Bring it to a simmer over medium heat, stirring occasionally until it’s evenly mixed.
Once you see those little bubbles forming and the liquid starts dancing in the pot, add in your ⅓ cup of cane sugar and 2 tablespoons of sea salt. The sugar will beautifully offset the acidity of the vinegar, while the salt works its way into every crevice of those onions. You want to dissolve these ingredients completely; this is not just about taste but also about texture. A well-dissolved brine ensures that each onion slice gets an equal opportunity to soak in all that flavor! After a few minutes—around 4-5 should do—you’ll notice that the brine has taken on a lovely sheen as it thickens slightly. This glossy finish is a hint at how flavorful it will become once it’s cooled down and settles around those vibrant onion slices. Don’t rush this step; let everything meld together harmoniously!
Step 6: Add Aromatics for Depth
With your brine bubbling away, it’s time to introduce some depth into this symphony of flavors! Crush 1-2 cloves of garlic, releasing their aromatic essence into your cooking space—the smell will be simply heavenly! You can use the flat side of a chef’s knife or even a mortar and pestle if you want to get fancy. Adding garlic at this stage allows its earthy notes to infuse into the brine as it simmers, creating layers of flavor that would otherwise be absent. Once you’ve added the garlic, toss in a sprinkle of mixed peppercorns—these tiny orbs are like little flavor bombs just waiting to burst open.
The beauty of using peppercorns is that they lend subtle spiciness without overwhelming your pickles. As they simmer alongside the garlic and brine concoction, they release their essential oils, which mingle beautifully with the vinegar’s acidity and sweetness from sugar. Allow this mixture to simmer for another 3-5 minutes while keeping an eye on its vivid color changes—from bright white to an alluring golden hue as all those flavors marry beautifully. It’s during these moments when patience pays off; allowing these ingredients time together results in an utterly extraordinary brine that elevates your pickled onions from simple condiments to something truly remarkable.
Step 7: Combine Onions and Brine
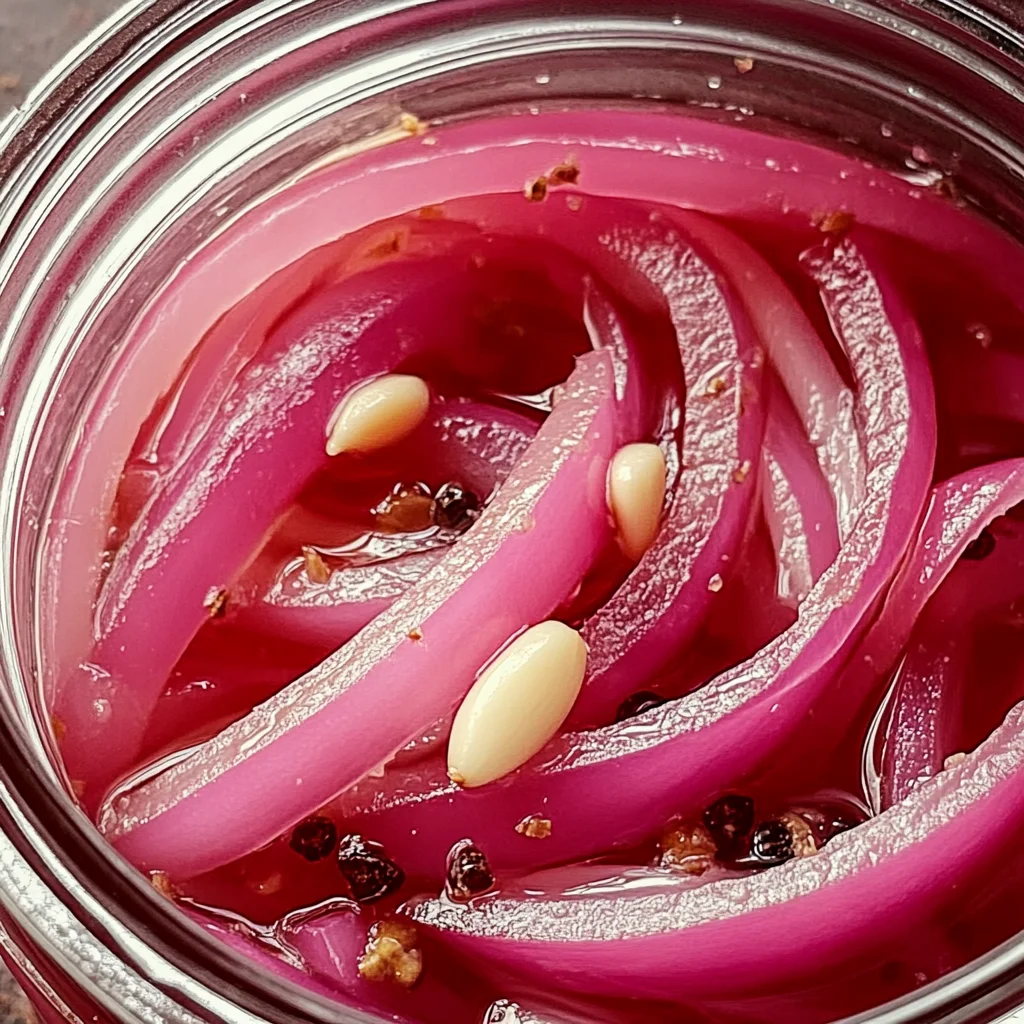
Now comes one of my favorite parts—combining those gorgeous onions with your freshly crafted brine! Carefully remove your saucepan from the heat once you’ve achieved a delightful simmering harmony between all those ingredients leading us towards pickled perfection. Grab a large glass jar or container (or three small jars if you’re feeling generous) and pack in those lovely red onion slices tightly. As you layer them in, don’t hesitate to admire their jewel-like hues; it’s like you’re creating your own edible art!
Once your jars are filled with onions—a sight so vibrant it might make you smile—you’ll want to pour that steaming hot brine directly over them until they’re completely submerged. It’s absolutely paramount that every piece is covered by this magical liquid gold because exposure to air can lead to uneven pickling or spoilage. If there isn’t enough brine left after filling up your jars, don’t fret! Just mix equal parts vinegar and water in another small bowl and add it until everything is submerged nicely.
Step 8: Chill Out and Let It Rest
Ahh…here comes my favorite part where patience truly becomes your best friend! Now it’s time for our pickled onions to relax in their cozy environment for at least 30 minutes, but I highly encourage letting them chill out longer if you can—upwards of two hours or even overnight! Why chill? Because resting allows all those incredible flavors we coaxed out through simmering—the sweet vinegary goodness mingling with earthy garlic and spicy pepper—to fully permeate every inch of those beautiful onion slices.
During this resting period, you’ll find that the colors deepen as they absorb all those delightful essences surrounding them. The onions will transform from their raw state into something tender yet crunchy—a textural contrast that adds such excitement when layered onto sandwiches or served alongside grilled veggies and meats (or even enjoyed straight from the jar!). So please resist any temptation to dive in too soon; trust me when I say that waiting will lead you toward something profoundly satisfying.
Conclusion:
As we wrap up this flavorful journey through making Gordon Ramsay Pickled Onions: Quick Crunchy Flavor Boost, I can’t help but feel excited about what you’ve just created! This recipe is not just about quick pickles; it’s about infusing life into every meal with these brilliant bursts of flavor and crunch. The balance between sweet and tangy is absolutely paramount, creating a taste that dances on your palate. You’ve taken simple ingredients and turned them into something profoundly satisfying—a true testament to how kitchen magic happens when love and creativity collide.
This recipe is a must-try for so many reasons beyond just taste. It’s easy enough for weeknight dinners yet impressive enough for entertaining friends at gatherings or family barbecues. Picture yourself pulling open that jar on a summer afternoon—your guests’ eyes lighting up as they catch a whiff of those aromatic delights wafting through the air! Each bite sings with joy and brings an unexpected twist to sandwiches or salads alike; it transforms ordinary dishes into extraordinary experiences. I promise you; making these quick pickled onions is as enjoyable as eating them!
When it comes to serving suggestions, allow your imagination to run wild! Imagine savoring one alongside tacos bursting with flavor or piled high on grilled veggies during a summer cookout. For an afternoon pick-me-up, toss some onto a fresh salad where their bright acidity cuts through creamy dressings beautifully. And if you’re feeling indulgent? Layer them onto charcuterie boards filled with artisanal cheeses and crusty breads—the perfect companion for wine lovers too! The possibilities are endless!
Feeling adventurous? This recipe is wonderfully adaptable! Try experimenting with different types of vinegar like apple cider or rice vinegar for subtle new flavors—each variation brings its unique charm while complementing various dishes beautifully. You could even toss in spices like cumin or coriander seeds during the pickling process for an exciting twist that infuses each onion slice with warmth and depth. I invite you to make this recipe personal—share it with family and friends who will cherish it as much as you do! Try it out today, dive into this culinary adventure together, and don’t forget—I’d love to hear about your experiences!
Gordon Ramsay Pickled Onions: Quick Crunchy Flavor Boost
Discover the transformative power of pickling with Gordon Ramsay’s Quick Pickled Onions! This easy and vibrant recipe takes humble red onions and elevates them into a tangy, crunchy condiment that enhances any dish. Perfect for topping tacos, salads, or even enjoyed straight from the jar, these quick pickles are a delightful burst of flavor that will leave your taste buds dancing. With just a handful of ingredients and minimal preparation time, you can create a gourmet-style topping at home that adds sophistication to everyday meals.
- Prep Time: 15 minutes
- Cook Time: 15 minutes
- Total Time: 30 minutes
- Yield: About 3 servings (3 jars) 1x
- Category: Condiment
- Method: Pickling
- Cuisine: American
Ingredients
- 2 small Red Onions (thinly sliced)
- 2 cups White Vinegar
- 2 cups Water
- ⅓ cup Cane Sugar
- 2 tablespoons Sea Salt
- 1–2 cloves Garlic (crushed)
- Mixed Peppercorns (to taste)
Instructions
- Thinly slice the red onions and place them in a mixing bowl.
- In a saucepan, combine white vinegar, water, cane sugar, and sea salt. Heat until warm and dissolved.
- Stir in crushed garlic and mixed peppercorns; simmer gently for 5 minutes.
- Pour the warm brine over the sliced onions in jars until fully submerged.
- Seal tightly and let them cool at room temperature or refrigerate for at least 30 minutes before enjoying.
Nutrition
- Serving Size: 1/4 cup (60g)
- Calories: 50
- Sugar: 12g
- Sodium: 500mg
- Fat: 0g
- Saturated Fat: 0g
- Unsaturated Fat: 0g
- Trans Fat: 0g
- Carbohydrates: 12g
- Fiber: 1g
- Protein: 0g
- Cholesterol: 0mg