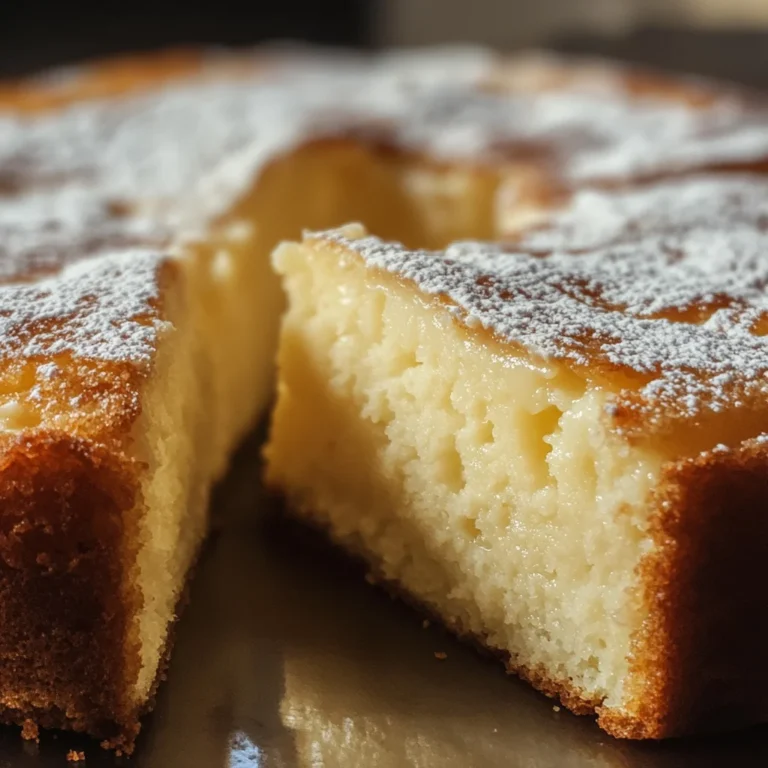
Key Lime Cake
When I think about my favorite desserts, one recipe that always comes to mind is this luscious Key Lime Cake. It’s more than just a cake; it’s a celebration of bright, zesty flavors that dance on your taste buds and invoke the carefree spirit of sunny days by the beach. There’s something utterly enchanting about the way the tartness of fresh lime zest intermingles with the sweetness of the sugar, creating a symphony of flavors that feels both refreshing and indulgent. This cake is so moist and fluffy, it almost feels like a hug in dessert form. Every bite takes you on a journey, reminding you of those cherished moments spent with loved ones, sharing stories and laughter over slices of this delightful treat.
Now, if you’ve never had the pleasure of trying Key Lime Cake before, you’re in for an absolute delight! Imagine cutting into a soft, airy cake that has been lovingly infused with tangy lime juice and zest—it’s like biting into a slice of sunshine. And let’s not forget about the cream cheese frosting; it’s sweet yet tangy, creating an exquisite balance that perfectly complements the cake underneath. This recipe isn’t just about satisfying your sweet tooth; it’s about creating memories around the table. Whether it’s a birthday celebration, a summer picnic, or simply because you deserve something special today, this Key Lime Cake will surely steal the show.
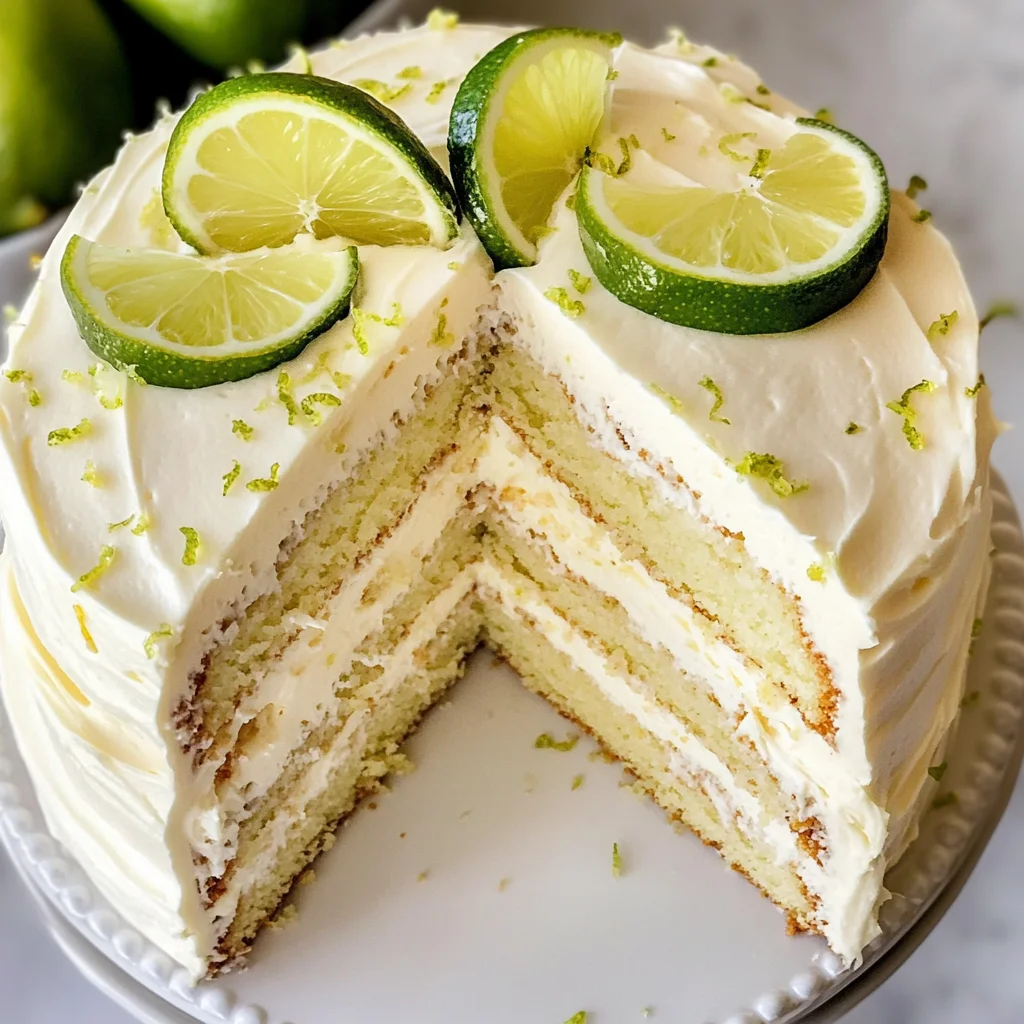
Key Lime Cake: A Slice of Sunshine
Let’s embark on this culinary adventure together! Making this Key Lime Cake is not just about following steps; it’s about experiencing joy in every moment. The beauty of this recipe is its simplicity coupled with the vibrant flavors that come alive as you mix each ingredient. With just a handful of simple ingredients, we are going to create something truly extraordinary that will leave everyone asking for seconds.
Ingredients:
Before we dive into baking, let’s get acquainted with our star players in this delicious Key Lime Cake.
- 1 cup Canola or Olive Oil. Using oil instead of butter in this cake keeps it moist and tender while allowing those zesty lime flavors to shine through beautifully. Canola oil is neutral in flavor but feel free to use olive oil for a slight fruity finish—just make sure it’s light olive oil to avoid overwhelming the cake’s delicate taste. The moisture from the oil also helps maintain that delightful texture for days after baking.
- 3 large Eggs. Eggs are essential here; they provide structure and stability while also adding richness to our batter. They help bind everything together and contribute to that lovely rise we’re aiming for as they create steam during baking. Make sure your eggs are at room temperature; this allows them to emulsify better with other wet ingredients, leading to an airy batter.
- 1 1/3 cup Whole Milk. Whole milk enriches our cake and provides moisture—this is crucial for achieving that tender crumb we all crave in a cake. The fat in whole milk helps carry flavor as well; thus ensuring each bite is decadently delicious. If you need a dairy-free alternative, coconut milk works wonderfully too!
- 2 Tablespoons Fresh Lime Zest. Ahh, lime zest! This ingredient is where much of our key lime flavor comes from—it’s like capturing the essence of summer in each little piece! Zest contains aromatic oils from the skin which elevate our cake’s flavor profile significantly. When selecting limes for zesting, look for firm limes that yield slightly when pressed; they’ll be juicier too!
- 1 Tablespoon Fresh Lime Juice. Freshly squeezed lime juice not only adds tanginess but also contributes acidity which balances out sweetness beautifully. It acts as a flavor enhancer throughout our cake and frosting, making every forkful even more refreshing! Always opt for fresh rather than bottled lime juice if possible—the difference is astonishing!
- 2 cups Sugar. Sugar does more than sweeten; it also contributes to our cake’s texture by helping create that fluffy crumb we all love! It caramelizes slightly during baking, giving us gorgeous golden edges while adding depth to the overall flavor profile.
- 2 cups Flour. All-purpose flour serves as our foundation here—the backbone if you will—providing structure and body to our cake without being overly dense or heavy. If you’re looking for gluten-free options, consider using almond flour or a good-quality gluten-free blend (though you’ll want to adjust certain measurements).
- 1 teaspoon Baking Powder & 1/2 teaspoon Baking Soda. These leavening agents are non-negotiables! They work together to give our cake its rise and fluffy texture by creating bubbles during baking—think little pockets of air that make every bite light as air!
- 1 teaspoon Salt. A pinch of salt enhances all flavors present in our cake while balancing out sweetness beautifully—it really makes those citrus notes pop! Don’t skip this step; it may seem small but it’s absolutely paramount to achieving depth in flavor.
- 1/2 cup Butter (softened). Butter adds richness and flavor complexity—not only does it create tenderness but also adds slight nuttiness due to its fat content which complements those bright lime notes perfectly! Make sure your butter is softened at room temperature so it can cream beautifully with sugar later on.
- 8 ounce Cream Cheese (softened). Cream cheese is what gives our frosting its unique tangy kick while remaining creamy and spreadable—it’s simply heavenly! Like butter, ensure your cream cheese reaches room temperature before incorporating so you can achieve that smooth consistency without lumps.
- 4 – 4 1/2 cups Powdered Sugar. This will help us achieve the right sweetness level while providing structure to our frosting without making it overly dense or sugary tasting—trust me on this one! Start with less sugar and gradually add until you reach your desired level of sweetness.
- 1 Tablespoon Fresh Lime Juice & 1/2 teaspoon Fresh Lime Zest (for frosting). Just like in our cake batter, these two elements will brighten up our cream cheese frosting wonderfully—bringing everything full circle back to those zesty key limes we love!
- Fresh Limes (sliced for garnish): Finally, no Key Lime Cake would be complete without beautiful lime garnishes! They add visual appeal alongside extra freshness when served—plus they look stunning atop your masterpiece!

Equipment You’ll Need:
Before we dive into mixing up some magic in the kitchen, let’s gather our trusty tools! Having the right equipment makes all the difference—it ensures everything runs smoothly while allowing us to focus on crafting something delicious out of love rather than stress.
- Mixing Bowls: You’ll need several mixing bowls—one large bowl for combining wet ingredients and another for dry ingredients (plus possibly smaller ones if you’re feeling fancy!). Choose glass or stainless steel bowls as they help retain temperature better while mixing compared to plastic.
- Electric Mixer or Whisk: An electric mixer makes creaming together butter/sugar an absolute breeze but don’t worry if you don’t have one—a good old-fashioned whisk works wonders too! Just remember: arm workout included!
- Measuring Cups & Spoons: Precision matters when baking—you want accurate measurements so every element comes together harmoniously resulting in perfect textures/tastes every time!
- Spatula: A silicone spatula smoothly folds ingredients without deflating any incorporated air bubbles which helps maintain fluffiness throughout both batter/frosting preparations!
- Cake Pans (9-inch or 8-inch): Choose either two 9-inch round pans or three 8-inch round pans depending upon how tall you’d like your final product—that decision lies solely within your preference!
Now that we’ve got everything set up let’s get ready to create something absolutely extraordinary—a Key Lime Cake bursting with sunshine vibes ready for sharing amongst friends/family alike!
Preparing the Key Lime Cake / Making the Batter
Step 1: Preheat Your Oven
First things first—we’re going to preheat our oven to 325 degrees Fahrenheit (163 degrees Celsius). Why? Preheating ensures consistent heat throughout baking time so nothing gets left behind undercooked or overdone later on down line! Trust me when I say don’t rush this step because starting off correctly lays down foundation needed for success here!
Step 2: Mix Wet Ingredients
In a large mixing bowl—grab your trusty electric mixer if available—we’re going combine canola oil (or olive oil), eggs (make sure they’re at room temperature), whole milk along with freshly zested limes plus their juice! Beat these elements together at medium speed until well combined—about two minutes should do it nicely—but watch closely as textures start blending into one another resembling liquid gold blissfully swirling around inside bowl… oh my goodness already smells divine doesn’t?!
Step 3: Combine Dry Ingredients
In another large bowl whisk together granulated sugar alongside flour mixture comprising baking powder/baking soda/salt until evenly incorporated throughout mixture before adding into egg/oil combo gently folding everything until no dry patches remain visible anymore—it should be thick yet slightly pourable consistency resembling pancake batter perhaps? Don’t overmix though—as tempting as it may seem… treat this creation delicately instead allowing air pockets remain intact which lead fluffy results post-bake!
Step 4: Bake Your Cakes
Once you’ve finished preparing batter it’s time pour evenly into prepared pans (spray them lightly beforehand so cakes release easily after cooling) then place directly onto middle rack inside preheated oven letting them bake undisturbed until toothpick inserted comes out clean indicating doneness—approximately twenty-six minutes if using three eight-inch pans versus thirty-six minutes if opting larger nine-inch sizes respectively… patience pays off here trust me when I say nothing beats watching those beauties rise beautifully through oven door from afar whilst aromas waft around kitchen enveloping everything within warm embrace reminding us why we embarked upon this journey today…
Stay tuned as we continue crafting both frosting that’ll crown these layers above alongside getting ready serve pieces adorned garnished fresh lime slices bringing whole experience full circle delightfully inviting everyone indulge their senses amidst slice sunshine goodness awaiting next hour ahead filled laughter joy shared amongst loved ones gathered around table devouring delectable treats created together ultimately bonding hearts forevermore through food made with love…
Step 5: Pouring the Batter with Love and Care
Now that you’ve lovingly combined your ingredients, it’s time to pour the batter into your prepared cake pans. This step is more than just pouring; it’s about creating layers of flavor and texture that will sing when baked. With a spatula in hand, gently scoop the luscious batter from your mixing bowl, allowing it to cascade into each pan like a glorious river of lime-infused sweetness. If you’re using three 8-inch pans, divide the batter evenly among them, but if you’re going with two 9-inch pans, don’t worry; they’ll be just as magnificent.
As you pour, take a moment to appreciate that vibrant green hue from the lime zest—a beautiful testament to the bright flavors within. It’s crucial to spread the batter evenly across the bottoms of the pans, as this ensures uniform baking. An uneven layer can lead to one side rising higher than the other, which could affect not only the presentation but also the texture of each slice. Trust me on this; a balanced cake is a happy cake! Give each pan a gentle tap on your countertop—this will release any trapped air bubbles and help achieve that delightfully tender crumb we all crave.
Step 6: Baking Your Key Lime Cake to Perfection
Preheat your oven to 325 degrees Fahrenheit (that’s about 160 degrees Celsius for my metric friends), and slide those beautiful pans into the oven with care. The magic of baking begins now! You’ll want to set your timer—if you’re using three 8-inch pans, aim for about 20-26 minutes. If you opted for two 9-inch pans, keep an eye on them for about 30-36 minutes. But remember, every oven behaves differently!
As they bake, you’ll start to notice that intoxicating aroma wafting through your kitchen—a sweet and tangy scent that’s nothing short of enchanting. This aroma signals that the chemical reactions are happening inside those pans—the sugar caramelizing while the eggs and fat work together to create structure. To check for doneness without cutting into your masterpiece prematurely, use a toothpick inserted in the center: it should come out clean or with just a few moist crumbs clinging to it. This step is crucial because overbaking can lead to dryness—utterly non-negotiable in our quest for moistness!
Step 7: Cooling Down – The Sweet Wait
Once your cakes are fully baked and have reached that glorious golden-brown hue, it’s essential to let them cool properly before frosting. Carefully remove them from the oven (don’t forget those oven mitts!), and allow them to rest in their pans for about 10-15 minutes. This period is vital as it gives the cakes time to firm up slightly while still warm; if you try moving them too soon, they may crumble or break apart—definitely not what we want!
After their brief rest, gently run a knife around the edges of each cake and invert them onto wire racks lined with parchment paper or cooling pads. Letting them cool completely at room temperature will ensure they retain their lovely moisture and texture without becoming dense or gummy. Be patient here—don’t rush this step! It can be tempting to frost while still warm due to excitement (trust me, I’ve been there!), but waiting guarantees a beautifully smooth frosting application later on.
Step 8: Crafting Your Cream Cheese Frosting
While those delightful cakes are cooling down completely, let’s turn our attention to crafting that utterly intoxicating cream cheese frosting. In a large mixing bowl, combine softened butter and cream cheese using an electric mixer until they become light and fluffy—about 2-3 minutes on medium speed should do the trick! This technique is known as creaming; it incorporates air into your mixture and sets up an airy base for your frosting.
Now comes my favorite part: gradually adding powdered sugar! Start by adding just two cups at first; mix on low speed until combined before increasing back up to medium speed—this will save you from a sugary explosion all over your kitchen counter! After incorporating those two cups smoothly, add another cup at a time until you reach that perfect sweet-to-tangy balance—usually between four and four-and-a-half cups total works wonders based on personal preference.
Next up is adding in one tablespoon of fresh lime juice along with half a teaspoon of fresh lime zest. These additions are absolutely paramount—they elevate your frosting from merely sweet to an enticing citrus symphony that complements our key lime cake perfectly! Mix everything together until it’s smooth and spreadable but resist the urge to overmix; we want creamy perfection without losing its lightness.
Next Major Phase – Assembling Your Key Lime Cake
With our cakes cooled down beautifully and our luscious cream cheese frosting prepared like a work of art, we’re finally ready for assembly! It’s time to bring together these elements into something truly extraordinary.
Step 9: Layering with Love
Begin by placing one layer of cake onto a serving platter or cake stand (a little tip: if you’re feeling extra fancy, use parchment paper underneath so you can easily remove any mess after frosting). Now comes an exciting moment: spreading a generous layer of cream cheese frosting over this first layer! Use an offset spatula for even application—it’s perfect for creating smooth edges and romantic swirls atop your cake.
Don’t skimp on this step; this frosting is what makes each bite profoundly satisfying! Once you’ve got a delightful coating covering every inch of that first layer, gently place your second layer on top (if using three layers, repeat this process!). Continue layering until all cakes are lovingly stacked high—and don’t fret if some frosting spills out between layers; it adds character!
Finally, apply a thin crumb coat—a light layer of frosting all around—to seal in any crumbs before finishing off with another hefty dollop of frosting on top! Smooth out those edges and create peaks or swirls if you’d like—it’s all about personal flair here! For an extra touch of zestiness, sprinkle some additional lime zest atop your frosted creation or adorn it with fresh lime slices—how gorgeous will that look?
Embrace every moment throughout this process because layering is where magic happens; it’s not just about assembling but creating something breathtakingly beautiful that tastes as good as it looks. And trust me when I say—it will be worth every ounce of effort when you slice into this masterpiece later!
Get ready because soon you’ll be presenting this show-stopping Key Lime Cake at your next gathering or simply savoring each delightful slice yourself—you deserve it!
Storage and Enjoyment Tips for Your Key Lime Cake
Now that your Key Lime Cake is baked to perfection and cooled, it’s time to revel in the joy of sharing this delightful treat with friends and family, or maybe just savoring it all by yourself! The vibrant citrus aroma wafting through your kitchen is only a prelude to the deliciousness that awaits. But before you dive in, let’s talk about how to ensure your cake stays fresh and scrumptious for as long as possible. After all, who wouldn’t want a slice of this moist, zesty loveliness at their fingertips whenever the craving strikes?
Storing Leftover Key Lime Cake
To keep your leftover Key Lime Cake in its prime, store it in an airtight container at room temperature if you plan on enjoying it within a few days. If you’re thinking longer-term storage, popping it into the refrigerator will extend its life by a week or so. I recommend wrapping the cake tightly with plastic wrap before placing it in the container to lock in moisture—this is absolutely paramount for maintaining that delightful texture we’ve worked so hard to achieve. If you happen to have a slice or two left over from a gathering (and trust me, that’s a rarity!), you can use the classic trick of placing a slice of bread in the container with the cake; this helps keep everything wonderfully moist. When you take a bite after a day or two, you’ll find that the flavors meld beautifully, creating an even more profound taste experience than when it was freshly baked. Should you prefer to enjoy it warm again, simply pop a slice in the microwave for about 10-15 seconds—just enough to take the chill off without losing that lovely fluffiness.
Freezing Key Lime Cake for Later
If you want to prepare ahead or simply save some cake for those days when you need an extra pick-me-up, freezing is an excellent option! To freeze your Key Lime Cake properly, allow it to cool completely before wrapping individual slices or whole layers tightly in plastic wrap followed by aluminum foil—this double-layer protection is crucial for preventing freezer burn. It will keep well for up to three months without losing any of its vibrant flavor or texture. When you’re ready to indulge again, let it thaw overnight in the fridge or at room temperature for a few hours. This method not only provides convenience but also means you have this incredible dessert on hand for spontaneous get-togethers or surprise visitors. There’s something so satisfying about knowing that a slice of this heavenly cake awaits—just waiting for those perfect moments where sweetness is needed most.
Key Lime Cake

Indulge in a slice of sunshine with this delightful Key Lime Cake, a perfect fusion of zesty lime flavors and creamy sweetness. This moist cake captures the essence of summer, bringing joy to any occasion, whether it’s a birthday celebration or a simple afternoon treat. The cake is airy and fluffy, complemented by a luscious cream cheese frosting that balances tanginess and sweetness beautifully. With easy-to-follow steps and simple ingredients, you can create this refreshing dessert that will not only please your palate but also evoke cherished memories shared at the table.
- Prep Time: 20 minutes
- Cook Time: 30 minutes
- Total Time: 50 minutes
- Yield: Serves approximately 12 slices 1x
- Category: Dessert
- Method: Baking
- Cuisine: American
Ingredients
- 1 cup canola or light olive oil
- 3 large eggs
- 1 1/3 cups whole milk (or coconut milk for dairy-free)
- 2 tablespoons fresh lime zest
- 1 tablespoon fresh lime juice
- 2 cups sugar
- 2 cups all-purpose flour (or gluten-free blend)
- 1 teaspoon baking powder
- 1/2 teaspoon baking soda
- 1 teaspoon salt
- 1/2 cup softened butter
- 8 ounces softened cream cheese
- 4 to 4 1/2 cups powdered sugar for frosting
- Fresh limes for garnish
Instructions
- Preheat your oven to 325°F (163°C).
- In a large bowl, mix oil, eggs, milk, lime zest, and juice until well combined.
- In another bowl, whisk together sugar, flour, baking powder, baking soda, and salt.
- Gradually fold dry ingredients into the wet mixture until just combined; don’t overmix.
- Pour the batter evenly into prepared cake pans and bake for about 26 minutes (for three 8-inch pans) or about 36 minutes (for two 9-inch pans), until a toothpick comes out clean.
- Let cakes cool in pans for 10-15 minutes before transferring to wire racks to cool completely.
- For frosting: Beat softened butter and cream cheese together until fluffy. Gradually add powdered sugar and mix until smooth; then incorporate lime juice and zest.
- Assemble the cake by layering with frosting between each layer and on top; garnish with fresh lime slices.
Nutrition
- Serving Size: 1 serving
- Calories: 320
- Sugar: 28g
- Sodium: 200mg
- Fat: 16g
- Saturated Fat: 6g
- Unsaturated Fat: 10g
- Trans Fat: 0g
- Carbohydrates: 42g
- Fiber: <1g
- Protein: 3g
- Cholesterol: 55mg