Veggie Wrap with Hummus
Ah, the Veggie Wrap with Hummus! This isn’t just a recipe to me; it’s a vibrant celebration of flavors and textures that has the power to brighten even the dullest of days. When I take my first bite, it feels like I’m diving into a garden bursting with life — crisp, fresh vegetables nestled in a warm tortilla, all held together by the creamy embrace of hummus. Each ingredient contributes its own unique character, creating a symphony of flavors that dances on my palate. Whether you’re looking to whip up a quick lunch or impress guests at your next gathering, this wrap is your ticket to culinary delight. I promise you, once you try this Veggie Wrap with Hummus, it will become an indispensable part of your cooking repertoire.
Now, let’s talk about why this delightful wrap is more than just food. It’s an experience that beautifully merges tradition and modernity. With its roots in Mediterranean cuisine and an array of colorful veggies that scream freshness, this dish represents a commitment to health without sacrificing flavor or satisfaction. It’s perfect for any occasion — picnics in the park, school lunches for the kids (they’ll love it!), or as a light dinner after a long day. Imagine savoring each bite while basking in the gentle warmth of the sun on your face or sharing laughs around the table with loved ones. The Veggie Wrap with Hummus transcends mere nourishment; it embodies care, joy, and connection.
Veggie Wrap with Hummus: A Colorful Culinary Adventure
Let’s embark on this exciting culinary journey together! The beauty of these wraps lies not only in their vibrant appearance but also in their simplicity and versatility. You can customize them based on what you have on hand or what your taste buds crave — feel free to swap out veggies or add some protein if you desire! Let’s dive into what makes this Veggie Wrap with Hummus so extraordinary.
Ingredients:
As we prepare our delicious Veggie Wraps with Hummus, let’s take a moment to appreciate each ingredient and how it contributes to the overall experience. Each component plays a vital role in not just flavor but also nutrition and texture.
- 4 tortilla shells (burrito-sized, any variety): The foundation of our wraps! Tortillas are fantastic because they offer flexibility and hold everything together without falling apart. Whether you choose whole-wheat for extra fiber or corn tortillas for a gluten-free option, ensure they are fresh and pliable; otherwise, they might crack when rolling. You could even try flavored varieties like spinach or sun-dried tomato for an added twist!
- 1/2 cup hummus: Ahh, hummus — that luscious spread made from blended chickpeas that’s utterly intoxicating! It’s creamy yet light and acts as both glue and flavor enhancer in our wraps. I always recommend using homemade hummus if possible; it’s surprisingly easy to make and allows you to control the seasoning to suit your taste perfectly. However, store-bought options can do just fine too—just check for brands that use simple ingredients without preservatives.
- 1 cup spinach: Bright green baby spinach leaves are not only visually appealing but packed with nutrients like iron and vitamins A and C. They provide a nice crunch while also contributing to that beautiful vibrant color palette in our wrap. Make sure you rinse them well before use; fresh spinach should be crisp with no wilting!
- 1 yellow bell pepper (cut into strips): Sweet yellow bell peppers add a pop of color along with their delightful crunch and natural sweetness. They’re rich in antioxidants too! When choosing bell peppers, look for ones that are firm and shiny; avoid any bruises or soft spots as these can indicate overripeness.
- 1/2 cucumber (cut into matchsticks): Crisp cucumbers lend refreshing coolness to our veggie wrap while also providing hydration due to their high water content. The crunch they provide is absolutely paramount for texture contrast! Opt for organic cucumbers if possible; they’ll taste better and often have fewer pesticides.
- 1/2 cup carrots (grated): Carrots bring both sweetness and vibrant color! Grating them helps them blend seamlessly into our wrap while ensuring every bite has their delightful flavor. Look for firm carrots without any cracks; they should be bright orange as dull-colored ones may lack sweetness.
- 1/2 cup beets (grated): Earthy beets introduce an entirely different flavor profile while also adding stunning visual appeal with their deep red hue! Their natural sweetness complements other ingredients beautifully. If using pre-cooked beets from the store, ensure they aren’t marinated or pickled unless you’re feeling adventurous!
- 1/4 cup red onion (cut into strips): Red onions offer a sharp bite that balances out the sweetness from other ingredients brilliantly. They add depth of flavor but can be strong—so if you’re sensitive to raw onion’s bite, consider soaking them in cold water for about ten minutes before using!
- 1/2 lemon (cut into wedges): Fresh lemon juice brightens everything up! Just a squeeze over those veggies elevates their flavors exponentially by adding acidity—a crucial element in cooking that enhances overall taste.
- 4 teaspoons extra-virgin olive oil: This liquid gold not only adds richness but also helps meld all those vibrant flavors together into something truly extraordinary! Extra virgin olive oil is best here thanks to its robust flavor profile—look for cold-pressed options stored away from light for maximum quality.
- 4 teaspoons everything bagel seasoning: This magical blend brings additional layers of flavor without overwhelming anything else—think sesame seeds mingling harmoniously with garlic and onion flakes. It adds that final touch that makes these wraps irresistible!

Equipment You’ll Need:
Having the right tools makes all the difference when cooking — think of them as your trusty sidekicks on this culinary adventure! While they may not be ingredients themselves, each piece serves an essential role in bringing your Veggie Wraps with Hummus to life.
- Cutting board: A good cutting board provides stability while slicing through those colorful veggies effortlessly—opt for one made from bamboo or plastic since they’re easy on knives!
- Sharp knife: A sharp knife ensures clean cuts which are crucial when preparing vegetables; no one wants mushy pieces ruining their wrap experience!
- Grater: For those carrots and beets? A box grater allows you to finely shred them quickly—this step promotes even distribution throughout your wrap so every bite is balanced.
- Mixing bowl: Use this handy vessel when prepping your fillings; it keeps everything organized as you layer each ingredient before assembling your wraps.
With all these tools at hand—and perhaps some music playing softly in the background—you’re ready to dive into making these incredible Veggie Wraps with Hummus!
Preparing the Veggie Wrap with Hummus
Step 1: Setting Up Your Tortillas
Lay all tortillas out on a clean surface — perhaps your kitchen counter or a large cutting board will work best here as it gives ample space for assembly. Spread about 2 tablespoons of hummus onto each tortilla shell evenly across its surface; this luscious layer acts as both glue and flavor enhancer throughout our wrap journey! Ensure there’s some border left around edges so we can easily roll later—this small detail makes all the difference when wrapping tightly later on!
Step 2: Layering It Up
Now comes one of my favorite parts — layering those beautiful vegetables! Start by placing approximately 1/4 cup baby spinach leaves flat against the hummus-coated tortilla because trust me—it creates such an inviting base full of nutrition right off the bat! Next comes every other colorful ingredient we’ve prepared earlier—bell pepper strips followed by matchstick cucumbers then grated carrots topped off finally by earthy beet shavings atop everything else after tossing those red onion strips over last minute before squeezing fresh lemon juice generously across all layers followed by drizzling extra virgin olive oil lightly above them too along sprinkling everything bagel seasoning generously over top because let me tell you…this combination elevates each bite significantly!
Step 3: Wrapping It All Together
To roll these beauties up tightly without losing any precious filling inside requires some technique! Start at one edge where you’ve layered veggies first then carefully lift empty border over towards those magnificent fillings pressing gently downwards until snugly bundled close together before tucking edge underneath itself securing tight closure so nothing spills out during transport later—I assure you taking time here results worth effort put forth now!
Step 4: Chill Out!
Once wrapped securely within waxed paper or parchment (to keep things neat), place each finished veggie wrap inside refrigerator until ready-to-eat moment arrives—it’ll allow flavors mingle beautifully enhancing overall enjoyment experience ahead plus helps firm up structure making handling easier later too during munching time ahead!! These wraps can typically stay fresh stored correctly lasting anywhere between four–five days max which means meal prep just got super convenient folks!!
I hope you’re feeling excited about making these delicious Veggie Wraps with Hummus! Stay tuned as we continue through this recipe adventure together where you’ll learn more tips along way ensuring every aspect executed flawlessly resulting glorious creation waiting patiently rewardingly devoured soon afterward!!
Step 5: Rolling Up the Flavor
Now, it’s time for one of the most satisfying parts of this process: rolling up your delightful veggie wraps! You’ll want to start with the side that has all those vibrant veggies layered exquisitely. As you pull the empty edge over the colorful mound, it’s crucial to keep everything tucked in nice and tight — think of it as giving your veggies a warm hug! This technique not only ensures that each bite is filled to the brim with fresh flavors but also prevents any sneaky ingredients from spilling out. Trust me on this; a well-rolled wrap is non-negotiable when it comes to creating a portable meal that looks as beautiful as it tastes.
As you roll, take care to gently pull back on the filling; this helps maintain tension and keeps everything snugly wrapped up. Once you’ve brought the edge over, tuck it underneath itself, forming a secure little pocket of goodness. If you’ve done this correctly, you’ll see the edges of your tortilla encase the filling without any gaps — perfection! If you’re finding that your tortillas are cracking or splitting, don’t fret! A quick fix is to warm them slightly in a dry skillet for about 10-15 seconds on each side before assembling; this makes them more pliable and ready to embrace those delicious fillings.
Step 6: Wrapping It Up
After your wraps are rolled, it’s time for an extra bit of love — wrapping them tightly in waxed paper or parchment paper. This step may seem trivial at first glance, but let me assure you that it plays a vital role in keeping your veggie wraps fresh and intact until you’re ready to devour them. By wrapping them snugly, you’re creating a protective barrier that maintains moisture while preventing any rogue ingredients from escaping. Plus, there’s something so satisfying about unwrapping these little gifts when lunchtime rolls around!
Once they’re all wrapped up, give them a gentle squeeze to ensure they hold their shape. Now comes the part where patience pays off: refrigerate these bundles of joy until you’re ready to eat. I recommend letting them chill for at least 30 minutes if you can muster the willpower — trust me on this one! The flavors have a magical way of mingling together during this resting period, making every bite even more tantalizing than before. If you can wait longer—up to 4-5 days—these veggie wraps become even more convenient for packed lunches or quick snacks!
Step 7: The Art of Presentation
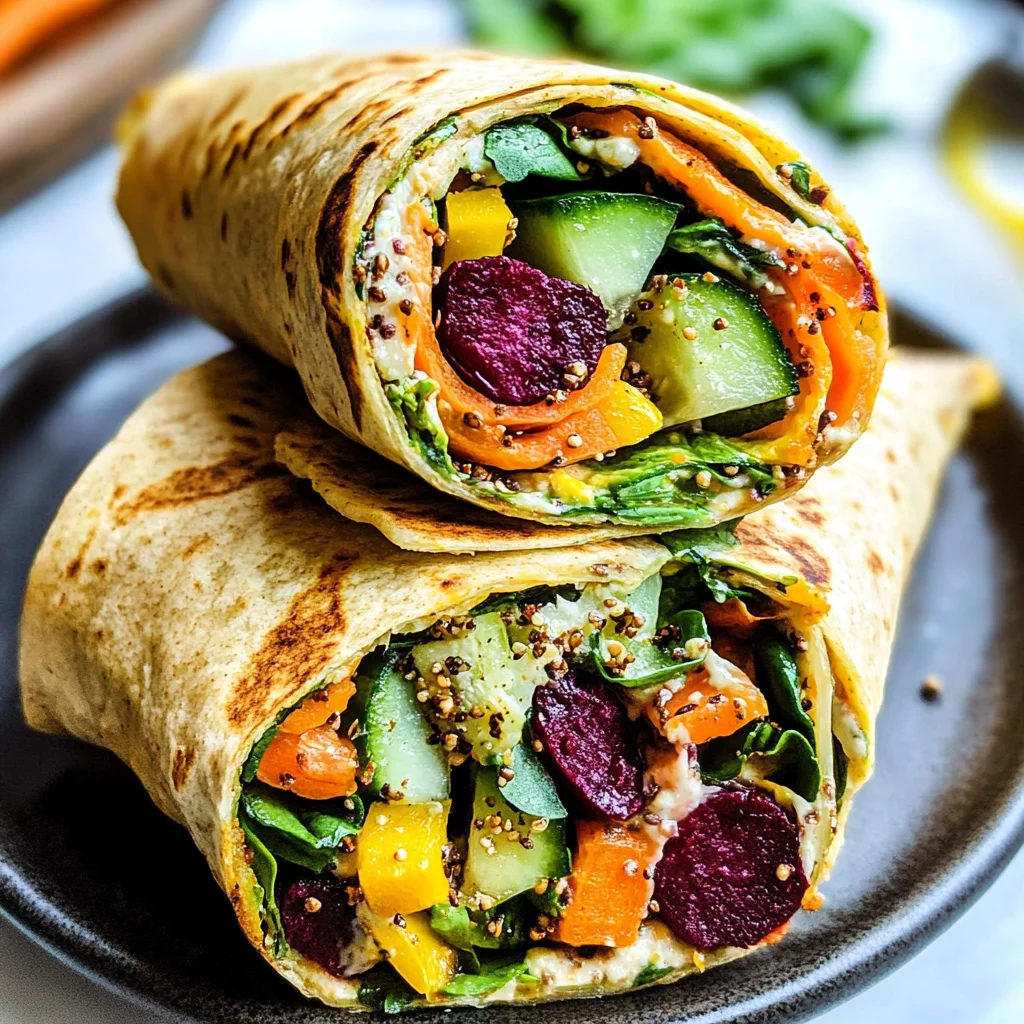
When it’s finally time to serve your veggie wraps, presentation is key! After all, we eat with our eyes first, don’t we? I love removing the wraps from their cozy paper homes and slicing them diagonally in half; this not only makes for an inviting display but also reveals those gorgeous layers inside. You’ll see vibrant greens peeking out alongside pops of yellow and orange from the bell peppers and carrots—each slice is like an edible rainbow!
You might want to serve these gorgeous wraps with extra hummus on the side for dipping or drizzled over the top for an added touch of creaminess. It’s absolutely paramount to consider garnishing your plate with a few lemon wedges too; a squeeze right before biting into those fresh layers adds an invigorating brightness that elevates every flavor note even further. Your guests (or yourself!) will be utterly captivated by how beautiful and appetizing these wraps look—perfect for brunch gatherings or just a cozy night in.
Step 8: Enjoying Every Bite
Finally—the moment we’ve all been waiting for—digging into your perfectly crafted veggie wrap with hummus! As you take that first bite, allow yourself to truly savor the experience; feel how crisp and refreshing each ingredient is against the creamy backdrop of hummus. The sweet crunch from the bell pepper dances harmoniously with earthy beets and tender carrots while cool cucumber provides that refreshing crunch we all crave. I promise you; each mouthful delivers a symphony of flavors that will make your tastebuds sing!
As you relish every bite, remember that food is more than just sustenance; it’s an experience meant to be shared and enjoyed. Consider sharing these wraps with friends or family members while discussing what variations they might try next! Perhaps adding some roasted red peppers or swapping out veggies based on what’s in season could ignite even more culinary inspiration within your kitchen adventures. Above all else, enjoy this journey into vibrant flavors because cooking should always be filled with joy!
Conclusion:
As we reach the end of our culinary journey through this Veggie Wrap with Hummus recipe, I hope you feel as excited as I do about creating this vibrant dish. It’s not just about layering ingredients; it’s about embracing those beautiful textures and colors that evoke joy and satisfaction with every bite. The creamy hummus acts as a luscious canvas upon which the bright sweetness of bell peppers and crispness of cucumbers come alive—it’s truly extraordinary! I promise you, once you experience this symphony of flavors wrapped in soft tortillas, you’ll find yourself reaching for this recipe time and time again.
This recipe is an absolute must-try—not only because it tastes incredible but also due to its versatility and ease of preparation. Picture yourself serving these wraps at a casual gathering or packing them in lunchboxes; they are perfect for any occasion! The process is so simple; you’ll find joy in creating something so colorful and nourishing without spending hours in the kitchen. Imagine unwrapping one after a long day—the anticipation builds as you uncover that perfect blend of crunchy veggies and creamy hummus just waiting to be devoured!
When it comes to enjoying these veggie wraps, think beyond just eating them alone; they’re fantastic companions to various dishes! Imagine savoring one alongside a refreshing quinoa salad drizzled with lemon vinaigrette or pairing it with homemade sweet potato fries for that lovely contrast between warm and cold textures. For an afternoon pick-me-up or light dinner, serve them along with a side of roasted chickpeas tossed in spices—what could be better? Perhaps enjoy one while sipping on iced herbal tea during warm days; it’s pure bliss!
Feeling adventurous? This recipe is wonderfully adaptable—you could easily swap out any vegetables based on what’s in season or what you have on hand. For instance, try adding sliced radishes for an extra crunch or using spicy arugula instead of spinach if you’re craving something bolder! You might even consider spreading some pesto instead of hummus if you’re looking for an Italian twist; honestly, the possibilities are endless! So grab this delicious recipe today, experiment with your variations, share your experiences with friends and family—and let’s create some unforgettable memories together around good food!
Veggie Wrap with Hummus

Enjoy this vibrant Veggie Wrap with Hummus bursting with freshness! Perfect for meal prep—try it today!
- Prep Time: 15 minutes
- Cook Time: 0 minutes
- Total Time: 15 minutes
- Yield: Serves 4
- Category: Lunch
- Method: No-cook
- Cuisine: Mediterranean
Ingredients
- 4 tortilla shells (burrito-sized)
- 1/2 cup hummus
- 1 cup baby spinach
- 1 yellow bell pepper (sliced)
- 1/2 cucumber (cut into matchsticks)
- 1/2 cup grated carrots
- 1/2 cup grated beets
- 1/4 cup red onion (sliced)
- Juice of 1/2 lemon
- 4 teaspoons extra-virgin olive oil
- 4 teaspoons everything bagel seasoning
Instructions
- Lay out the tortillas on a clean surface and spread about 2 tablespoons of hummus on each.
- Layer the spinach, yellow bell pepper, cucumber, carrots, beets, and red onion on top of the hummus.
- Squeeze fresh lemon juice over the layered veggies and drizzle with olive oil. Sprinkle everything bagel seasoning on top.
- Roll the wrap tightly from one edge to seal in all the fillings. Tuck the ends as you roll to prevent any spillage.
- Wrap each completed veggie wrap in waxed paper or parchment and refrigerate until ready to serve.
Nutrition
- Serving Size: 1 wrap (approximately 200g)
- Calories: 310
- Sugar: 5g
- Sodium: 400mg
- Fat: 16g
- Saturated Fat: 2g
- Unsaturated Fat: 12g
- Trans Fat: 0g
- Carbohydrates: 36g
- Fiber: 8g
- Protein: 8g
- Cholesterol: 0mg