High Protein, No Sugar Monkey Bread – A Real Dream
There’s something profoundly magical that happens when the scent of freshly baked goods fills your kitchen. It’s an invitation to gather, share stories, and create memories—all wrapped up in the warm embrace of comfort food. Today, I’m thrilled to share with you my beloved recipe for High Protein, No Sugar Monkey Bread – A Real Dream. This delightful treat is not just a sweet indulgence; it’s an experience filled with nostalgia and a vision of healthier living. Imagine pulling apart those soft, fluffy morsels that are just bursting with flavor, all while knowing they’re packed with protein and devoid of processed sugars. Yes, you heard that right! This is a guilt-free pleasure that you can enjoy at breakfast or as a snack throughout the day.
As I reminisce about my childhood adventures in the kitchen, I can’t help but smile at the memories of monkey bread shared among friends and family. Each pull apart reveals layers of sweetness and warmth that beckon everyone to join in on the fun. But this recipe takes it one step further by elevating traditional monkey bread into something truly extraordinary—transforming it into a high-protein powerhouse without sacrificing the joy and comfort it brings. Trust me when I say this is going to be your new go-to when you want something special without reaching for those refined sugars or heavy fats.
High Protein, No Sugar Monkey Bread – A Real Dream: A Healthier Twist on a Classic Favorite
Are you ready to embark on this culinary adventure? This recipe will guide you through creating a mouthwatering monkey bread that not only satisfies your sweet tooth but also fuels your body with nourishing ingredients. With no yeast required, we’ll achieve all that delicious fluffiness using simple pantry staples combined with the magic of Greek yogurt and protein powder. Let’s dive into this journey together!
Ingredients:
Before we begin crafting our delightful monkey bread, let’s take a moment to appreciate each ingredient and its role in making this dish so special.
- 1½ cup (180g) Flour: The foundation of any good bake! In our High Protein, No Sugar Monkey Bread – A Real Dream, flour gives structure while allowing us to achieve that classic fluffy texture we love. You can choose from various types like whole wheat or almond flour for added nutrition or gluten-free options if needed; just remember to adjust liquid slightly if substituting!
- ½ cup (45g) Vanilla Protein Powder: This ingredient adds both flavor and an incredible protein boost! Look for quality options that blend well without leaving a chalky taste—whey-casein blends work beautifully here. Not only does it enhance the taste profile with its subtle sweetness, but it also contributes to keeping our monkey bread satisfying and filling.
- ½ cup (45g) Unflavored Protein Powder: Complementing the vanilla protein powder perfectly, the unflavored variety serves as a blank canvas for our monkey bread. It provides additional protein without altering the taste too much—essential for achieving our health goals while still indulging in something sweet.
- 2 tsp Baking Powder: This leavening agent is absolutely paramount for giving our dough that lovely rise as it bakes. It creates those fluffy layers we associate with traditional monkey bread! Ensure your baking powder is fresh; otherwise, it may not perform as expected during baking.
- ¼ tsp Baking Soda: Combining baking soda with baking powder adds an extra lift and creates a wonderfully tender crumb in our final product. Don’t skip this step; it’s crucial for achieving the perfect texture!
- 2 cups (450g) Non-fat Greek Yogurt: Ahh, Greek yogurt—the creamy hero of our recipe! It acts as both moisture and richness while keeping fat content low. Plus, its tangy flavor balances out sweetness beautifully and provides essential probiotics for gut health.
- 2 Tbsp Almond Milk (30ml): A dash of almond milk adds just enough moisture to bind everything together while keeping things light. Feel free to substitute with oat milk or any plant-based alternative you prefer; they all contribute wonderfully!
- 3 Tbsp Zero Calorie 1:1 Sugar Replacement (18g): In lieu of traditional sugar, this zero-calorie sweetener keeps our monkey bread guilt-free while still delivering sweetness where it counts! Just be sure to choose one that measures like sugar for consistency.
- 1½ tsp Cinnamon: The warm embrace of cinnamon adds depth and an intoxicating aroma to our monkey bread—it’s what makes every pull apart feel like home! Choose fresh ground cinnamon for maximum flavor impact; trust me, it’s worth it!
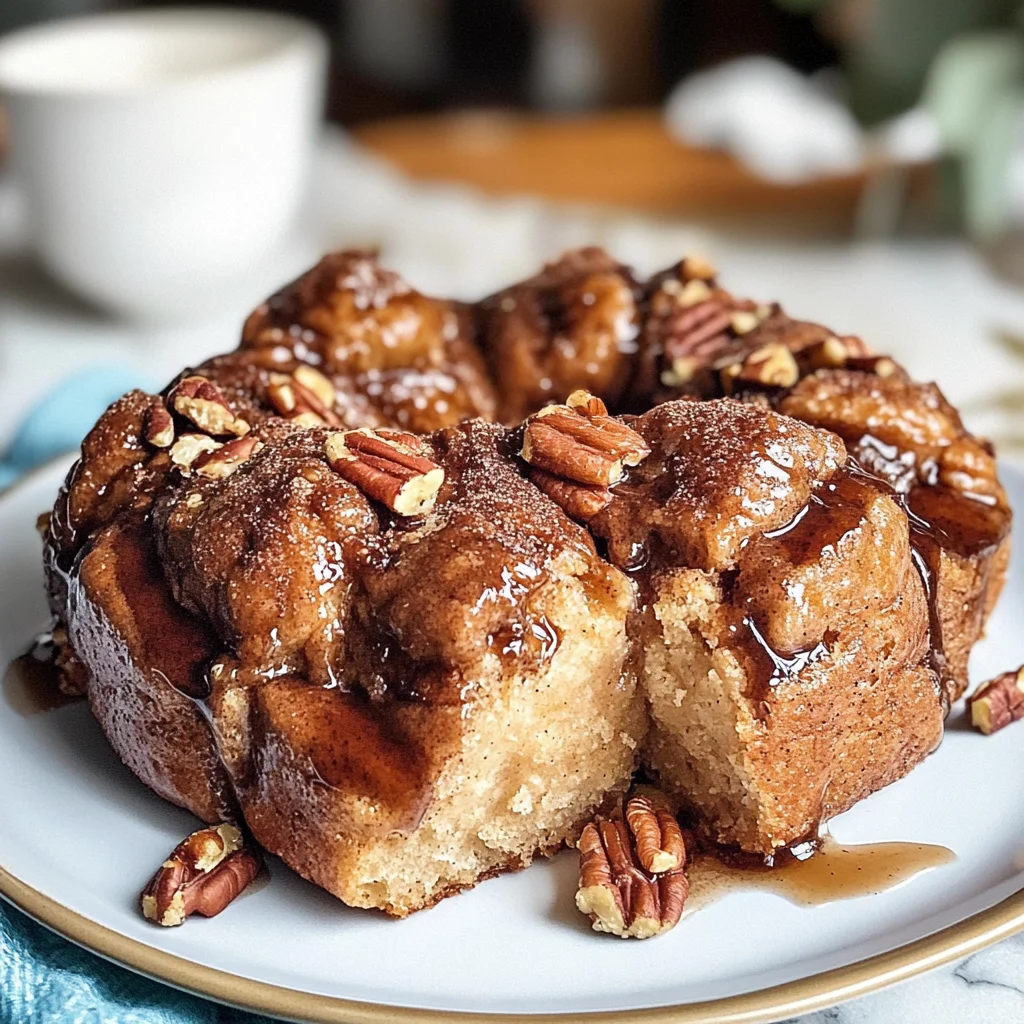
- Optional: 2 Tbsp Chopped Pecans (28g): If you’re feeling a bit adventurous—or simply love nuts—adding chopped pecans will introduce delightful crunchiness and nutty richness to each bite. They’re entirely optional but highly recommended for those who enjoy texture contrast!
Equipment You’ll Need:
Before we start whipping up this deliciousness in the kitchen, let’s make sure we have all the right tools at hand. Having solid equipment can make all the difference in ensuring everything goes smoothly while preparing your High Protein, No Sugar Monkey Bread – A Real Dream.
- Loaf Pan: An essential item for shaping your monkey bread! A standard 9×5 inch loaf pan works best here—it creates that lovely shape where each piece stays together yet pulls apart easily once baked.
- Mixing Bowls: You’ll need two mixing bowls—one large enough to accommodate all your dry ingredients plus yogurt later on and another smaller one if you’d like separate bowls when preparing toppings or extras like nuts or cinnamon sugar mixtures.
- Wooden Spoon or Silicone Spatula: These tools are perfect for gently combining ingredients without overmixing—which is crucial since overmixing can lead to tough dough balls! Opt for sturdy materials that won’t scratch your bowls.
- Measuring Cups & Spoons: Accurate measurements are key in baking; they ensure consistency across batches! Invest in good-quality measuring cups (both dry and liquid) along with measuring spoons for precise amounts every time.
With these essentials ready to go, we’re one step closer to creating something remarkable together!
Preparing the High Protein, No Sugar Monkey Bread – A Real Dream
Step 1: Preheat Your Oven & Prepare Your Pan
First things first—let’s get that oven preheated to 350°F (175°C)! Preheating ensures even cooking throughout baking time which is critical when crafting anything fluffy like our High Protein, No Sugar Monkey Bread – A Real Dream. While that’s warming up beautifully in anticipation of deliciousness, lightly butter your loaf pan so nothing gets stuck later on—this step will allow easy release once baked!
Step 2: Add Crunchy Love
If you’re opting for pecans (and why wouldn’t you?), now’s the time to sprinkle them neatly over the bottom of your prepared loaf pan before adding any dough mixture on top. This little detail adds such delightful flavor as they toast during baking—a crunchy surprise waiting at the bottom once flipped out onto a serving plate!
Step 3: Combine Dry Ingredients
In a large mixing bowl—a vessel where magic happens—combine your flour along with both protein powders (vanilla & unflavored), baking powder alongside baking soda until uniformly mixed together. This process ensures even distribution across all parts of your dough later on; don’t rush this step because proper blending leads us towards achieving optimal lightness within our monkey bread!
Step 4: Introduce Creamy Goodness
Now comes my favorite part—adding Greek yogurt into our dry mix! Gently stir everything together until large shaggy lumps form; we’re looking for sticky dough clumps rather than smooth batter here so avoid overmixing at all costs! Overmixing activates gluten too much which could yield tough bites instead of tender ones we desire from each pull-apart piece later on down the line.
And there you have it—a gorgeous beginning toward crafting an unforgettable treat that’s sure not only nourish but delight everyone lucky enough to indulge! Stay tuned as we continue exploring how simple steps lead us closer toward enjoying these delectable bites filled with warmth & love straight from my kitchen into yours…
Step 5: Forming the Dough Balls with Love
Now that you’ve created your shaggy dough, it’s time to transform it into little bites of joy—your monkey bread balls! To do this, you’ll want to slightly wet your palms; this prevents the dough from sticking to your hands and helps you roll it effortlessly. I find that a bit of moisture adds an almost mystical quality to the process, allowing the dough to come together beautifully. Next, divide your sticky dough into about 25 pieces, roughly 2 tablespoons each. This portioning is essential because it ensures that each piece bakes evenly and gives you those delightful pull-apart bites we all adore. As you roll each piece into a ball, think about how they’ll come together in the pan to create a sensational experience for you and anyone lucky enough to share this treat with you.
What’s crucial here is not to over-mix or over-handle the dough—trust me on this! If you knead too much, those protein-rich ingredients will lead to tougher bread balls instead of the tender, fluffy texture we’re aiming for. You want just enough handling for them to hold their shape without losing that pillowy softness. As you work through this step, take a moment to enjoy the aroma wafting up; it’s a tantalizing hint of what’s to come! And don’t worry if they aren’t perfect spheres—each one will have its unique character once they puff up in the oven.
Step 6: Layering for Maximum Flavor
With your dough balls ready, it’s time to prepare the loaf pan for baking—a vital step that will enhance every bite of your High Protein, No Sugar Monkey Bread. Start by lightly buttering your loaf pan; this creates a non-stick surface that is absolutely paramount for allowing your monkey bread to release easily after baking. If you’re feeling adventurous or simply want extra crunch and depth of flavor, sprinkle chopped pecans across the bottom of the pan before adding your dough balls. This isn’t just an optional step—it’s a game-changer! As they bake, those nuts will toast and infuse their rich nuttiness into the bread while providing a delightful texture contrast.
After you’ve spread the pecans (if using), layer those rolled dough balls in the pan with care. This part feels like an art project as you nestle them close together but without overcrowding; they need room to rise and expand into that glorious loaf shape we crave. The way they come together creates a visual masterpiece that will surely impress anyone who lays eyes on it! I like to arrange them in a circular pattern where each ball touches its neighbor—this helps them bake uniformly and creates those irresistible pull-apart sections we all love at brunch gatherings or family breakfasts.
Step 7: Baking Your Dream Creation
Now comes one of my favorite parts—the moment when anticipation meets delicious reality! Preheat your oven to 350°F (175°C) if you haven’t already done so; this is crucial because starting with a hot oven ensures even baking throughout. Once preheated, carefully place your assembled monkey bread in the center rack and let it bake for about 40 minutes. As it bakes, keep an eye on how beautifully golden brown it becomes—a visual cue that signifies it’s nearing perfection!
The aroma wafting through your kitchen will be utterly intoxicating; it’s like being wrapped in a warm hug from all those lovely spices mingling together. You might notice some bubbling around the edges—that’s completely normal! It means those flavors are marrying perfectly inside as they transform into something special. A gentle tap on top near the end of baking should yield a light sound—a sign that it’s time for testing doneness. Insert a toothpick into the center; if it comes out clean or with just a few moist crumbs clinging to it (but no raw batter), then congratulations! Your High Protein, No Sugar Monkey Bread is ready!
Step 8: Cooling and Unveiling Your Masterpiece
Patience can be tough when there’s warm monkey bread waiting, but trust me—allowing it to cool slightly before turning it out is non-negotiable for achieving optimal results! Once removed from the oven, let your masterpiece rest in its pan for about 10-15 minutes. During this time, not only does it finish cooking internally, but cooling also helps maintain structural integrity when flipping it out—no one wants their beautiful creation crumbling apart at first sight!
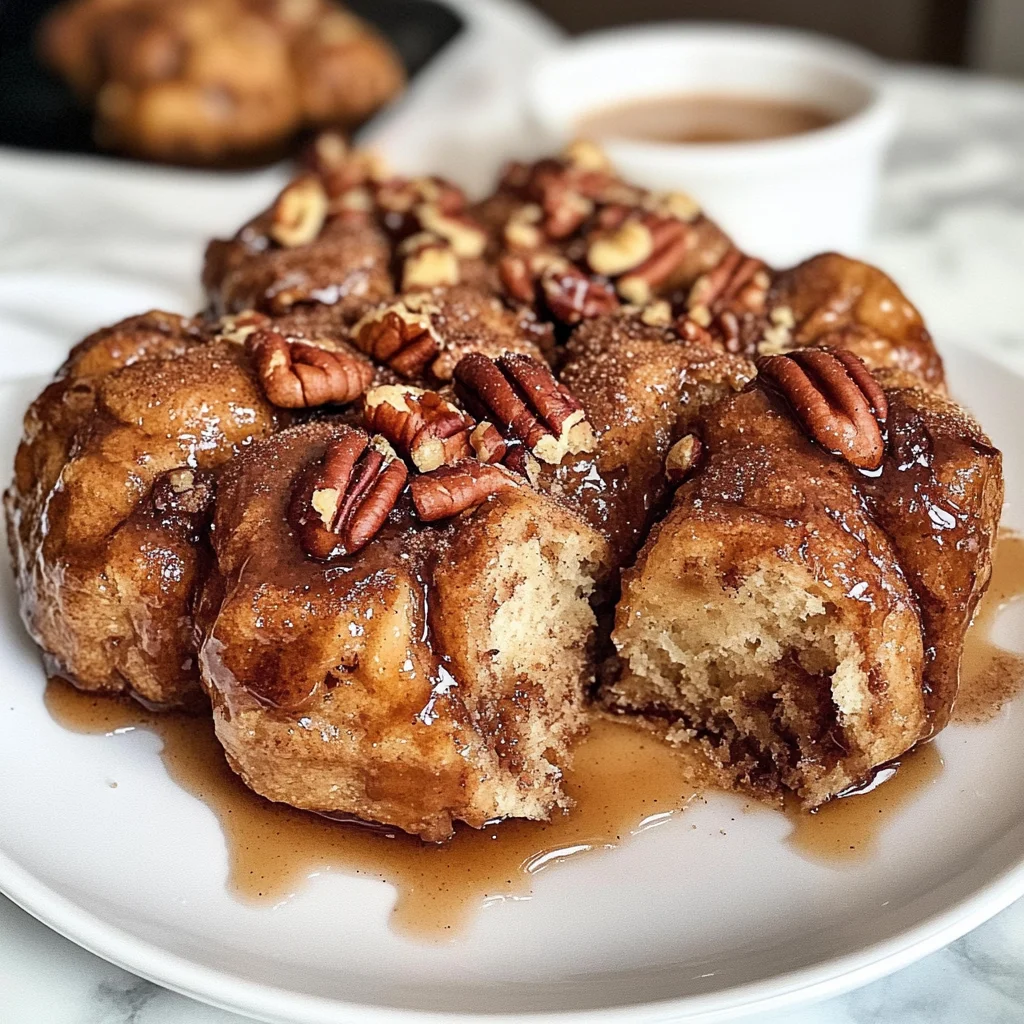
After its brief rest period, grab a plate larger than your loaf pan and place it on top before flipping everything upside down with confidence. Gently give it a little shake if necessary—this encourages any stubborn bits to release—but don’t be afraid! When you finally lift off that loaf pan, prepare yourself for pure bliss as you unveil an extraordinary sight: golden-brown balls glistening like jewels atop each other! The moment is truly unforgettable as everyone gathers around—your heart swells knowing you’ve crafted something both healthy and indulgent all at once.
Final Touches: Enjoying Your High Protein, No Sugar Monkey Bread – A Real Dream
Now that you’ve successfully baked and unveiled your High Protein, No Sugar Monkey Bread—a true dream come true—it’s time for the best part: enjoying every irresistible bite! I encourage you to serve this delightful treat warm; there’s something profoundly satisfying about pulling apart those fluffy morsels straight from the oven as they steam gently beneath your fingers. You can savor them plain or perhaps drizzle over some melted dark chocolate or nut butter if you’re feeling extra decadent without compromising on health!
As you share this special creation with friends or family—or maybe indulge solo—you’ll find yourself marveling at how such simple ingredients have transformed into something so utterly extraordinary. Each mouthful bursts with flavor while offering nourishing protein goodness without any added sugar—a real win-win situation in my book! Whether enjoyed as breakfast or dessert after dinner, remember this recipe is not just food; it’s woven with memories and love waiting to be made anew every single time.
So go ahead and dive into making this High Protein, No Sugar Monkey Bread—I promise you won’t regret adding this gem into your recipe rotation!
Storage and Enjoyment Tips for Your High Protein, No Sugar Monkey Bread – A Real Dream
Now that your kitchen is filled with the warm, intoxicating aroma of freshly baked High Protein, No Sugar Monkey Bread, it’s time to relish every bite! But wait—before we dive in, let’s chat about how to store this delightful treat. After all, I promise you’ll want to savor every morsel of this wonderfully fluffy and satisfying bread long after it’s out of the oven. Imagine waking up the next morning to a slice of this deliciousness, gently warmed and ready to brighten your day.
Storing Leftover High Protein, No Sugar Monkey Bread – A Real Dream
To keep your monkey bread fresh and utterly delightful, I recommend storing it in an airtight container or wrapping it snugly in plastic wrap. Find a cool spot on your countertop or in the pantry where it can breathe without drying out. When stored properly, your monkey bread should stay delicious for about 3-4 days. If you want to maintain that moist texture (which is absolutely paramount), consider placing a slice of bread inside the container; it works wonders at keeping everything soft and inviting! Each day that passes only adds to its charm as flavors meld beautifully together. If you’re looking to enjoy it warm again, simply pop a piece in the microwave for 15-20 seconds—trust me, you’ll feel like you’re indulging in a fresh-out-of-the-oven experience all over again!
Freezing for Later
If you’re planning ahead or just want to stash some away for those busy days when dessert calls but time doesn’t allow for baking, freezing your High Protein, No Sugar Monkey Bread is a fantastic option! Simply wrap individual pieces tightly in plastic wrap and then place them into a freezer-safe bag or container—this protects against freezer burn while ensuring they retain their wonderful flavor. They can be frozen for up to three months without losing their delightful essence! When you’re ready to enjoy them, just take out what you need and let them thaw at room temperature for about 30 minutes or pop them directly into the microwave from frozen for a quick reheat. The convenience of having these little bites of joy on hand is simply extraordinary!
High Protein, No Sugar Monkey Bread – A Real Dream

Discover how easy it is to make High Protein, No Sugar Monkey Bread – A Real Dream that’s healthy and delicious. Try this delightful recipe today!
- Prep Time: 15 minutes
- Cook Time: 40 minutes
- Total Time: 55 minutes
- Yield: Approximately 25 servings 1x
- Category: Dessert
- Method: Baking
- Cuisine: American
Ingredients
- 1½ cups flour (whole wheat or almond flour recommended)
- ½ cup vanilla protein powder
- ½ cup unflavored protein powder
- 2 tsp baking powder
- ¼ tsp baking soda
- 2 cups non-fat Greek yogurt
- 2 Tbsp almond milk (or plant-based alternative)
- 3 Tbsp zero-calorie sugar replacement
- 1½ tsp cinnamon
- Optional: 2 Tbsp chopped pecans
Instructions
- Preheat your oven to 350°F (175°C) and lightly grease a 9×5 inch loaf pan.
- In a large mixing bowl, combine flour, both protein powders, baking powder, and baking soda.
- Mix in Greek yogurt and almond milk until a shaggy dough forms—avoid overmixing.
- If using pecans, sprinkle them at the bottom of the prepared loaf pan.
- Divide dough into about 25 pieces and roll each into a ball before placing them in the pan.
- Bake for about 40 minutes until golden brown; test doneness with a toothpick.
- Allow to cool for 10-15 minutes in the pan before flipping onto a plate.
Nutrition
- Serving Size: 1 piece (25g)
- Calories: 70
- Sugar: 1g
- Sodium: 85mg
- Fat: 1g
- Saturated Fat: 0g
- Unsaturated Fat: <0.5g
- Trans Fat: 0g
- Carbohydrates: 10g
- Fiber: 1g
- Protein: 6g
- Cholesterol: 0mg