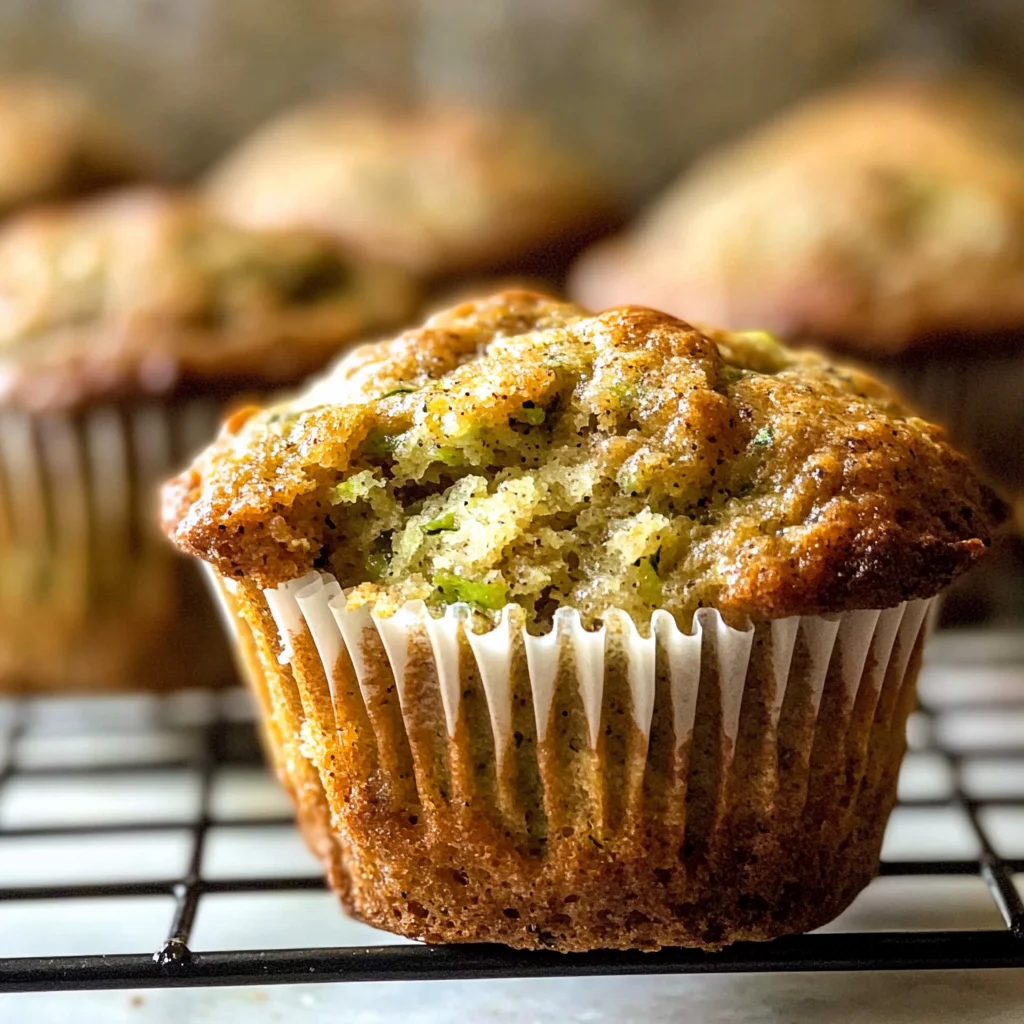
Healthy Banana Zucchini Muffins
The aroma of freshly baked muffins wafting through the kitchen is one of life’s simplest yet most profound joys. It’s an experience that transcends mere food; it’s a bridge connecting cherished memories, warmth, and comfort. Today, I want to share with you one of my absolute favorites: Healthy Banana Zucchini Muffins. These delightful treats are not just about satisfying your sweet tooth—they embody the love and care that goes into every homemade bite. Imagine biting into a tender muffin that’s perfectly moist, bursting with flavors, and laced with the sweetness of ripe bananas and subtle hints of cinnamon. Trust me when I say, they are a revelation, a beautiful blend of tradition and innovation that will have you coming back for seconds.
Now, let’s talk about what makes these Healthy Banana Zucchini Muffins so special. First off, they’re incredibly versatile—perfect for breakfast on the go or as an afternoon snack paired with your favorite cup of tea. The addition of zucchini not only adds moisture but also sneaks in extra nutrients without compromising taste; it’s a clever way to incorporate veggies into your diet without even realizing it. Each bite is a symphony of flavors that’s profoundly satisfying yet guilt-free. Gather your ingredients and let’s embark on this culinary adventure together—it’s going to be delicious!
Healthy Banana Zucchini Muffins: A Deliciously Nutritious Treat
These Healthy Banana Zucchini Muffins are not just good for you; they’re utterly delightful! With their tender crumb and naturally sweet flavor profile, these muffins will surprise your taste buds while nourishing your body. Whether you’re an experienced baker or just starting out in the kitchen, I assure you that this recipe is approachable and rewarding.
Ingredients:
As we embark on this baking journey together, let’s take a moment to appreciate each ingredient we’ll be using. Each one plays a vital role in creating our scrumptious muffins.
- 2 very ripe bananas, mashed: The star of our show! Ripe bananas bring an intense natural sweetness that enhances the flavor profile of the muffins while providing necessary moisture. When selecting bananas, look for those that have reached that lovely speckled stage—those brown spots indicate peak ripeness and maximum flavor. If you find yourself with some overripe bananas languishing on the counter, this is your perfect opportunity to put them to good use!
- ¼ cup butter, melted: Melting the butter before incorporating it into our batter helps create a wonderfully rich texture that elevates our muffins from good to extraordinary! Butter carries flavor like no other fat can; it adds depth and richness while ensuring a tender crumb in our muffins. Be sure not to let it cool too much after melting—warm butter blends beautifully with other wet ingredients.
- ½ cup Greek yogurt: This ingredient serves dual purposes—it adds creaminess while also introducing protein into our muffins! Greek yogurt helps keep them moist and fluffy without adding excess fat. For those looking for alternatives, unsweetened applesauce can work as a substitute while still retaining moisture.
- ¼ cup maple syrup: Nature’s liquid gold! Maple syrup not only sweetens our muffins but also contributes unique flavor notes that pair beautifully with banana and cinnamon. When purchasing maple syrup, opt for pure maple syrup rather than imitation syrups for the best flavor experience.
- ½ cup milk: Milk helps bind all the ingredients together while adding moisture to our batter. You can use any variety you prefer—dairy or plant-based! Almond milk or oat milk both work wonderfully here if you’re looking for non-dairy options.
- 1 cup grated zucchini (about one medium zucchini): Grating zucchini may seem like an extra step, but trust me—it’s worth it! Not only does it add moisture without overpowering flavor, but it’s also a fantastic way to sneak in some vegetables! Remember to squeeze out excess moisture using a kitchen towel before adding it to the batter; this ensures we don’t end up with overly wet muffins.
- 2 eggs: Eggs are essential for structure in baking; they act as binders and help create that beautiful rise we want in our muffins. For those who follow an egg-free diet, flaxseed meal mixed with water is an excellent substitute—mix 1 tablespoon of flaxseed meal with 2.5 tablespoons of water to replace one egg.
- 1 teaspoon vanilla extract: This magical ingredient enhances all other flavors in our muffins and adds a fragrant aroma as they bake—what’s not to love? Always choose pure vanilla extract over imitation for the best flavor payoff.
- 1¾ cups white whole wheat flour: Using white whole wheat flour gives us all the nutritional benefits of whole grains without sacrificing texture or taste! It’s lighter than traditional whole wheat flour but still packed with fiber. If you don’t have white whole wheat flour on hand, feel free to substitute all-purpose flour—but I promise you’ll miss out on some added nutrients!
- 2 teaspoons cinnamon: Cinnamon adds warmth and depth—a cozy touch that makes these muffins feel like home! Its aromatic qualities perfectly complement the sweetness of bananas and enhance every bite.
- 1 teaspoon baking soda & 1 teaspoon baking powder: Both leavening agents are essential here; baking soda provides lift by reacting with acidic components (like yogurt), while baking powder ensures that initial rise during baking at high temperatures creates those lovely rounded tops we adore!
- ½ teaspoon salt: A touch of salt enhances all flavors at play in our banana zucchini muffins—it’s absolutely paramount for balance!
Now that we’ve gathered all these wonderful ingredients together, I can already feel the excitement bubbling up inside me as we prepare to make some magic happen!
Equipment You’ll Need:
Having the right tools at your disposal makes all the difference when whipping up these Healthy Banana Zucchini Muffins. While they may not be ingredients, these essential partners ensure everything runs smoothly from start to finish.
- Muffin tin: This trusty tool is what transforms our batter into delightful individual treats! A standard muffin tin typically holds 12 muffins; ensure yours is in good shape—non-stick pans make removal easier.
- Muffin liners or cooking spray: Either option will prevent sticking; muffin liners add an adorable touch too! If you’re using cooking spray instead, be generous—you want those gorgeous muffins popping out effortlessly!
- Box grater: A simple yet invaluable tool for grating zucchini efficiently! It allows us to achieve that fine consistency needed without turning it into mush (which can happen if you’re not careful).
- Mixing bowls (large): You’ll need at least two large mixing bowls—one for wet ingredients and another for dry—to keep things organized while blending flavors seamlessly together!
- Whisk: An essential tool for combining dry ingredients evenly and incorporating air into wet mixtures which leads us towards fluffy perfection!
Now that we have everything set up nicely let’s dive right into preparing those delectable Healthy Banana Zucchini Muffins!
Step 1: Preheat Your Oven & Prepare Your Muffin Tin
Before anything else, let’s get our oven preheating at 425°F (220°C). This higher initial temperature is key because it helps create those lovely domed tops we’re aiming for in our muffins—the golden rule when baking! As soon as you’ve set your oven temperature, grab your muffin tin and line it using muffin liners or spray it generously with cooking spray; trust me when I say there’s nothing worse than sticking muffins ruining what could otherwise be perfect treats.
Step 2: Grate Your Zucchini
Next up is grating our zucchini—a task that’s easier than it sounds! Simply cut off both ends of your medium-sized zucchini before grating it against a box grater until you reach about one cup’s worth (around 8 ounces). Once grated, gather this green magic into a clean kitchen towel or cheesecloth—and here comes my favorite part—squeeze out any excess moisture gently before setting aside. Why do we do this? Well, removing excess liquid ensures our batter isn’t too runny which might lead us down soggy muffin road—a road none of us want to travel!
Step 3: Combine Wet Ingredients
In one large mixing bowl (the bigger the better!), mash those very ripe bananas until smooth—they should look almost creamy by now! Then mix in melted butter along with Greek yogurt followed by maple syrup which brings sweetness along with its unique flavor profile—so inviting already! Next pour in milk followed by cracking two eggs directly into this beautiful mixture along with vanilla extract giving everything just enough time to blend beautifully together before introducing those grated zucchinis later—you’ll want them well incorporated throughout every muffin!
Step 4: Whisk Together Dry Ingredients
In another bowl (yes—we’re multitasking!), whisk together white whole wheat flour alongside cinnamon which smells divine as it mingles around freshly grated zucchini! Add both baking soda AND powder here too since they’ll activate once mixed into wet ingredients shortly thereafter—and don’t forget salt either as its presence enhances all other flavors present within these delightful muffins during baking process ahead!
I can’t wait for you to see how these come together next… so let’s keep going strong until completion!
Step 5: The Perfect Balance – Mixing Dry and Wet Ingredients
Now that we have our wet ingredients lovingly mixed and the dry ingredients whisked together, it’s time to unite these two mixtures into a harmony of flavors that will make your kitchen smell utterly intoxicating. Gently add the dry ingredients into the bowl with the wet mixture. This is a crucial moment, so I encourage you to take your time! Using a spatula or wooden spoon, fold the dry mix into the wet mix just until combined. The goal here is to create a batter that’s beautifully lumpy rather than perfectly smooth. Trust me on this one—overmixing can lead to tough muffins, which is something we absolutely want to avoid.
Why is this step so important? The gluten in the flour begins to develop when it’s mixed with liquid, and if you mix too vigorously or for too long, you’ll activate too much gluten, resulting in muffins that lack that light and airy quality we all adore. As you fold, you’ll notice how the batter comes together, transforming from distinct components into a cohesive mixture that feels almost alive with possibility. So resist the urge to keep stirring; let those lumps be! They are a sign of character in your muffins, promising pockets of moisture and flavor throughout each bite.
Step 6: Filling Those Muffin Cups – A Labor of Love
With your batter ready and waiting like a treasure just begging to be discovered, it’s time to fill those muffin cups. Using either an ice cream scoop or a measuring cup, divide the batter evenly among the 12 prepared muffin cups. You want to fill each cup about three-quarters full; this allows enough room for them to rise without overflowing during baking. Just imagine those lovely domes forming as they bake—it’s truly a sight that warms my heart!
As you ladle in the batter, take a moment to appreciate its texture—a thick yet pourable consistency that promises moistness and flavor in every muffin. If you notice any stray zucchini bits sticking out more than others, give them a gentle nudge back into the batter; we want even distribution for consistent baking. This step is non-negotiable because uneven filling can lead to some muffins being undercooked while others become overdone. Once filled, give each muffin cup a gentle tap on the counter; this helps release any air bubbles trapped within and ensures they bake evenly.
Step 7: The Magic of Temperature – Baking at Two Temps
Now comes one of my favorite parts—the baking! Preheat your oven to 425°F (220°C) and once it reaches this glorious temperature, slide those muffin trays in like you’re sending off little boats on an adventure! Bake them at this higher temperature for just 5 minutes without opening that oven door—this initial blast of heat is absolutely paramount for creating muffins with beautiful dome tops. It encourages rapid rising; think of it as giving your muffins their first burst of energy!
After those first five minutes are up—imagine how tantalizing your kitchen must smell by now—it’s time for an important shift: without opening the oven door (yes, resist the temptation!), reduce the heat down to 350°F (175°C). This lower temperature allows your muffins to bake through evenly without burning on top while still maintaining that delightful rise from earlier. Bake them at this temperature for an additional 20-22 minutes until they’re golden brown and beautiful. To check for doneness, insert a toothpick into the center of one muffin; if it comes out clean or with just a few moist crumbs clinging to it, congratulations—you’ve nailed it!
Step 8: Cooling Down – Patience is Key
As you pull your golden treasures from the oven, allow yourself a moment of pure joy—breathe in deeply; those aromas are nothing short of heavenly! However, before diving right in (which I know can be tempting), it’s essential to let these beauties cool slightly in their tin for about 5 minutes. This resting period allows them to firm up just enough so they won’t fall apart when you try to remove them.
Once they’ve cooled sufficiently but are still warm to touch—think comforting but not scalding hot—it’s time for another critical step: transferring them onto a wire rack. This allows air circulation all around each muffin so they won’t become soggy on the bottom as they cool completely. Gently run a butter knife around each muffin’s edge if needed before carefully lifting them out of their cozy homes in the tin. Arrange them on the wire rack with space between each one; trust me when I say this will make all the difference in achieving that perfect texture.
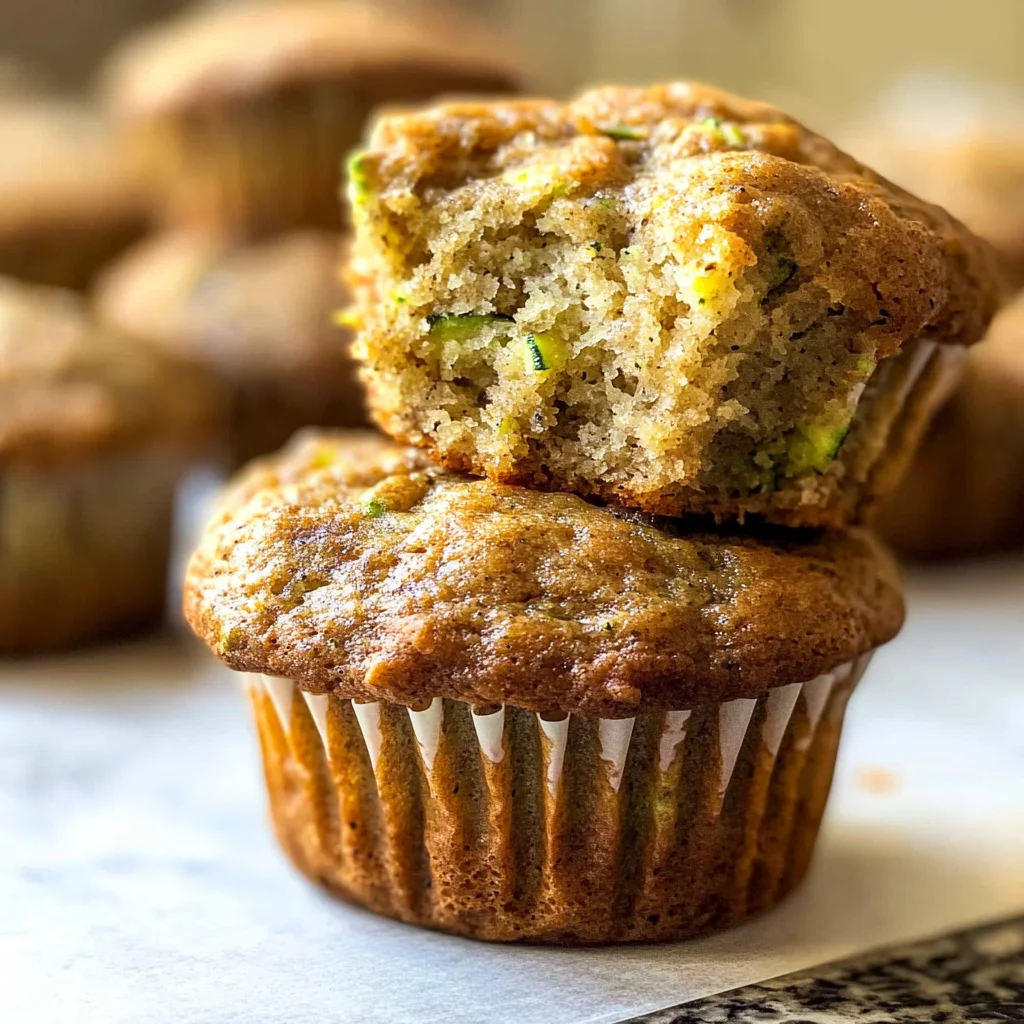
Next Major Phase – Enjoying Your Healthy Banana Zucchini Muffins
Step 9: The Grand Finale – Storing Your Muffins Right
Now that your kitchen is filled with warmth and laughter from baking these delightful Healthy Banana Zucchini Muffins, let’s talk about storage because no one wants these scrumptious treats to go stale! Once they’ve fully cooled on that wire rack—give them another ten minutes or so—store your muffins in an airtight container at room temperature if you’re planning on enjoying them within three days. There’s something profoundly satisfying about reaching for one at breakfast or as an afternoon snack!
But what if you want these treasures around longer? Individually wrap each cooled muffin tightly in plastic wrap or foil and pop them into a freezer-safe bag or container before placing them in your freezer where they’ll stay fresh for up to one month. When you’re ready for another taste sensation from these delights, simply remove as many as you need (trust me—you’ll probably want more than one!) and either let them thaw naturally or warm them up gently in a microwave for about 15-20 seconds until they’re just warmed through.
And there you have it—your journey creating these Healthy Banana Zucchini Muffins has come full circle! Each bite promises not only nourishment but also joy—a wonderful treat crafted with love and care that’s bound to become a staple in your home too! Enjoy every moment—and share generously with friends; after all, good food tastes even better when shared!
Storage and Enjoyment Tips for Your Healthy Banana Zucchini Muffins
Now that your kitchen smells heavenly and those delightful Healthy Banana Zucchini Muffins have emerged from the oven, it’s time to think about how to savor every last crumb of this deliciousness! Picture yourself indulging in these scrumptious treats, perhaps with a warm cup of tea or coffee, feeling the soft, moist texture melt in your mouth. But what if you have leftovers? Don’t worry; I’ve got your back on how to store these muffins so you can enjoy them days later without losing any of that wonderful flavor!
Storing Leftover Healthy Banana Zucchini Muffins
When it comes to keeping your muffins fresh and tasty, the right container can make all the difference. I recommend using an airtight container to store your Healthy Banana Zucchini Muffins; this will help lock in moisture and keep them soft. You can place a piece of parchment paper or a slice of bread inside the container—a little trick that works wonders! This simple addition draws excess moisture away from the muffins while keeping them perfectly tender. Stored this way at room temperature, your muffins will stay delicious for up to three days. But trust me when I say they won’t last that long! If you happen to have any left after that (which is rare), you can still enjoy them by warming them up slightly in the microwave or toaster oven for an even more inviting experience.
Freezing Healthy Banana Zucchini Muffins for Later
If you want to extend the joy of these muffins beyond a few days, freezing them is an excellent option! To freeze, simply wrap each muffin individually in plastic wrap or foil, then place them in a freezer-safe bag or container. This way, they’re protected from freezer burn while preserving their delightful flavors. You can keep your muffins frozen for up to one month—perfect for those moments when you need a quick snack or breakfast on the go! When you’re ready to indulge again, just pop one out and let it thaw at room temperature or heat it directly from frozen in the microwave for about 30 seconds. The convenience factor here is absolutely fantastic; imagine having a healthy treat at your fingertips whenever you crave something special!
With these storage tips, you’ll ensure that your Healthy Banana Zucchini Muffins remain as delightful as they were fresh out of the oven!
Healthy Banana Zucchini Muffins

Indulge in the delightful experience of baking Healthy Banana Zucchini Muffins—an easy and nutritious treat perfect for breakfast or a snack. These muffins combine the natural sweetness of ripe bananas with the subtle earthiness of zucchini, resulting in a moist and flavorful bite that everyone will love. Packed with wholesome ingredients like whole wheat flour and Greek yogurt, these muffins provide essential nutrients without sacrificing taste.
- Prep Time: 15 minutes
- Cook Time: 25 minutes
- Total Time: 40 minutes
- Yield: Approximately 12 servings 1x
- Category: Breakfast
- Method: Baking
- Cuisine: American
Ingredients
- 2 very ripe bananas, mashed
- ¼ cup melted butter
- ½ cup Greek yogurt
- ¼ cup maple syrup
- ½ cup milk (dairy or plant-based)
- 1 cup grated zucchini
- 2 eggs (or flaxseed substitute)
- 1¾ cups white whole wheat flour
- 2 teaspoons cinnamon
- 1 teaspoon baking soda
- 1 teaspoon baking powder
- ½ teaspoon salt
Instructions
- Preheat your oven to 425°F (220°C) and prepare a muffin tin with liners or cooking spray.
- In a large bowl, mash the ripe bananas and mix in melted butter, Greek yogurt, maple syrup, milk, eggs, and vanilla extract until well combined.
- In another bowl, whisk together white whole wheat flour, cinnamon, baking soda, baking powder, and salt.
- Gently fold the dry ingredients into the wet mixture until just combined; be careful not to overmix.
- Fill each muffin cup three-quarters full with the batter and tap the tin on the counter to remove air bubbles.
- Bake at 425°F for 5 minutes then reduce the temperature to 350°F (175°C) and bake for an additional 20-22 minutes until golden brown.
- Allow muffins to cool in the tin for 5 minutes before transferring to a wire rack.
Nutrition
- Serving Size: 1 muffin (60g)
- Calories: 150
- Sugar: 8g
- Sodium: 180mg
- Fat: 5g
- Saturated Fat: 3g
- Unsaturated Fat: 2g
- Trans Fat: 0g
- Carbohydrates: 24g
- Fiber: 2g
- Protein: 3g
- Cholesterol: 30mg