Apple Cider Braised beef Shoulder
There’s something utterly magical about the transition from summer to fall, isn’t there? As the leaves turn brilliant shades of orange and gold, our kitchens become havens of warmth and comfort, inviting friends and family to gather around the table. One of my favorite ways to embrace this season is by making Apple Cider Braised Beef Shoulder. This dish isn’t just about nourishing your body; it’s about creating an experience that wraps you in a comforting embrace, like your favorite quilt on a chilly evening. The tender beef shoulder, bathed slowly in fresh apple cider, mingles with aromatic herbs and sweet apples, creating a symphony of flavors that is profoundly satisfying. It’s the essence of autumn captured in one glorious pot, where each bite tells a story of love, tradition, and the beauty of home-cooked meals.
As I prepare this dish in my kitchen, I’m often reminded of family gatherings where the air was filled with laughter and the tantalizing scents of savory braises wafting through the house. This Apple Cider Braised Beef Shoulder has become a staple at those gatherings—a true crowd-pleaser that brings everyone together. What makes it so special? Perhaps it’s the juxtaposition of succulent beef and the bright sweetness of apples, which harmonize beautifully with the earthy flavors of rosemary and thyme. Whether it’s a cozy dinner for two or a festive feast for six or eight, this recipe never fails to warm hearts and bellies alike. Trust me when I say that once you serve this dish, it will demand a place in your regular rotation—it’s just that good!

Apple Cider Braised Beef Shoulder: A Cozy Fall Delight
Now that we’re all feeling warm and fuzzy inside, let’s dive into making this delightful dish! The combination of fresh apple cider and tender beef shoulder creates a meal that feels like an embrace on a plate. Each ingredient plays a vital role in crafting those layers of flavor that will have everyone asking for seconds. Get ready to embark on a culinary adventure!
Ingredients:
Every great recipe begins with quality ingredients—the real stars of our show! As we gather these components for our Apple Cider Braised Beef Shoulder, think about how each element contributes to the overall taste and texture. Here’s what you’ll need:
- 4-5 lb beef shoulder roast or Boston butt roast. Choosing the right cut is absolutely paramount here; look for well-marbled beef shoulder as it ensures tenderness when cooked low and slow. The marbling melts into the meat during braising, infusing every bite with rich flavor. If you prefer Boston butt—often used for pulled pork—you’ll find it equally delightful when braised without any pork-related ingredients.
- 2 tablespoons neutral oil. For searing our beef, neutral oil serves as an excellent choice because it can withstand high heat without imparting its flavor onto the meat. Oils like canola or grapeseed are fantastic options here; they help develop that beautiful crust on the beef which is crucial for building flavor.
- 2 cups fresh apple cider (not apple cider vinegar). This liquid gold is what makes our dish shine! Fresh apple cider adds sweetness and acidity—balancing out the richness of the beef beautifully. When shopping for cider, opt for unfiltered varieties if possible; they tend to have more complex flavors thanks to their natural sediment.
- 2 cups chicken stock or broth. Opting for homemade stock elevates your dish significantly as it provides depth without overpowering other flavors. If you’re short on time or don’t have homemade stock handy, choose low-sodium store-bought varieties to maintain control over salt levels.
- 2 tablespoons Dijon mustard. This tangy condiment does wonders by enhancing the overall flavor profile! It acts as an emulsifier in our braising liquid while also adding subtle depth through its sharp yet mellow taste—don’t skip this step!
- 1 tablespoon dehydrated minced onion. Though fresh onions are lovely, dehydrated minced onion offers concentrated flavor without added moisture—perfect for our braise! It dissolves nicely into our cooking liquid while still providing those sweet onion notes we crave.
- 1 head of garlic, top sliced off opposite of the root end. Garlic is non-negotiable here; roasting it alongside our beef allows its pungent aroma to mellow into something sweet and buttery after hours in the oven—a transformation you won’t want to miss!
- 3 rosemary sprigs. Fresh herbs are essential; rosemary lends its woodsy aroma which complements both our beef and apples exquisitely. Tying these sprigs together with kitchen twine makes them easy to remove later on without leaving bits behind in your finished dish.
- 4 thyme sprigs. Similar to rosemary but with its own unique fragrance, thyme adds another layer of aromatic complexity that marries beautifully with both savory and sweet elements present in this recipe.
- 1 red onion, cut into thick slices. The natural sweetness found in red onions caramelizes wonderfully during roasting—bringing both color and flavor contrast against our hearty meat!
- 2 firm and slightly tart apples, peeled and cut into wedges. Apples provide not only sweetness but also essential acidity which helps balance out every bite—and let’s be honest—their tender texture after braising gives us pure joy!
- Kosher salt & freshly cracked black pepper—these two simple ingredients enhance all others! Season generously throughout each step; remember that seasoning builds layers upon layers so don’t hold back!
Now that we’ve gathered everything needed for this cozy dish let’s move forward into preparing them!
Equipment You’ll Need:
Before we jump into the cooking process itself, let’s take a moment to ensure we have all necessary tools at hand—it truly makes things smoother! Having reliable equipment allows you to focus solely on crafting something wonderful without unnecessary stress.
- Large Dutch oven – A heavy-duty Dutch oven is key here; its thick walls retain heat exceptionally well while allowing even cooking throughout long braising sessions—this means perfectly tender results every time! If you don’t have one yet, consider investing as they’re versatile pieces you’ll use again and again.
- Sharp chef’s knife – A good chef’s knife will make prep work much easier—trust me on this! With clean cuts through both meat and vegetables alike, you’ll find yourself navigating tasks smoothly rather than wrestling stubborn ingredients.
- Cutting board – Choose a sturdy cutting board (wooden or plastic) large enough to handle all your chopping needs comfortably—it protects your countertops while providing ample workspace too!
With all these tools ready to go alongside our incredible ingredients list—we’re officially set up for success in creating an unforgettable meal together!
Preparing the Apple Cider Braised Beef Shoulder
Step 1: Preheat Your Canvas
Let’s begin by setting ourselves up right! Preheat your oven to 325°F (163°C)—this temperature will create an ideal environment for slow-cooking magic later on when we add everything together seamlessly! As you do this initial step—take a moment to breathe deeply—inhaling those fall-inspired scents lingering around… feel free already envisioning how delicious everything will soon become!
Step 2: Trim & Season
Next up is prepping our star player—the beef shoulder roast! If there are large fat caps present (and they often are), trim them away carefully using your sharp knife; removing excess fat helps prevent greasiness while still leaving enough marbling intact for optimal tenderness during cooking time later down line—this process truly matters! After trimming comes seasoning—pat those pieces dry using paper towels first before liberally sprinkling kosher salt followed by freshly cracked black pepper over every side like confetti at a celebration! This seasoning enhances natural flavors beautifully while ensuring moisture retention throughout cooking as well.
Step 3: Sear Those Beauties
Heat neutral oil within your Dutch oven over medium-high heat until shimmering gently but not smoking—that’s when you know it’s primed for action! Once hot enough (about 3 minutes), arrange seasoned beef pieces within single layer allowing ample space between them—if they’re crowded too closely together they won’t brown properly resulting instead only steaming rather than getting golden crusts we desire so desperately…so keep spacing in mind here please! Sear each side for about 4–5 minutes until richly browned before flipping using tongs—they should develop deep caramelization which translates directly into flavor bliss down road!
Step 4: Whisk Together Liquid Gold
While your beef sears away creating beautiful aromas throughout kitchen (I promise you’ll want this smell bottled!), grab another bowl where we’ll whisk together apple cider along with chicken stock/broth followed by Dijon mustard plus dehydrated minced onion too—it should form luscious braising liquid filled with enticing scents reminiscent autumn harvests blooming everywhere around us right now… Use kitchen twine tie rosemary sprigs alongside thyme stems forming small bundles before setting aside ready join forces later within pot full potential goodness awaiting us ahead!
As we move forward from here into combining these elements beautifully within one pot setting ourselves up perfectly for successful outcomes ahead—I cannot wait share more steps guiding through rest journey towards ultimate comfort food satisfaction arriving shortly thereafter… stay tuned friends—magic awaits us around next corner!
Apple Cider Braised Beef Shoulder: A Cozy, Heartwarming Dish
Step 5: Whisking Up the Flavorful Elixir
Now that your beef is beautifully seared and exuding a rich, mouthwatering aroma, it’s time to create the magic elixir that will transform this dish into something truly extraordinary. In a medium bowl, take those two cups of fresh apple cider—this isn’t just any cider, but the kind that fills your home with an intoxicating scent reminiscent of crisp autumn days. To this luscious liquid gold, add two cups of chicken stock or broth; I prefer using a low-sodium version to control the saltiness. Then, whisk in two tablespoons of Dijon mustard and one tablespoon of dehydrated minced onion. This mixture will serve as both a braising liquid and a flavor base that seeps deep into the meat.
Why do we whisk these ingredients together? Well, when you combine them before adding to the pot, it ensures an even distribution of flavors throughout the beef. Trust me on this—no one wants clumps of mustard here and there! Once you have your potion ready, set it aside for a moment while you prepare your herb bundle. Take three sprigs of rosemary and four sprigs of thyme, gathering them together like old friends. Using kitchen twine, tie them up neatly—this bouquet garni will infuse its aromatic goodness into the meat without leaving bits floating in your finished dish.
Step 6: The Art of Braising
With your seared beef resting comfortably in its pot and the fragrant concoction waiting patiently by your side, it’s time to combine all these elements into a harmonious symphony! Pour the prepared braising liquid over the beef, ensuring every piece is submerged in this flavorful bath. Place that head of garlic—sliced across its top—to join the party along with your herb bundle nestled alongside it. Cover the Dutch oven tightly; this is crucial because creating a sealed environment allows steam to build up inside, effectively steaming and tenderizing the beef.
Now comes one of my favorite parts—the oven! Preheat it to 325°F (that cozy warmth can already be felt!). Carefully slide your Dutch oven into this warm haven and let it work its magic for about three hours. This low-and-slow technique is non-negotiable; it’s what breaks down those tough muscle fibers in the beef shoulder, allowing them to transform into fork-tender morsels that practically melt in your mouth. You’ll want to check at around two and a half hours if you’re using boneless cuts since they might cook just a tad quicker than their bone-in counterparts.
Step 7: Dressing Up for Final Cook Time
As those aromas swirl through your kitchen like an enchanting spell, don’t forget about flipping your beef halfway through braising! This step is paramount; turning the meat ensures that each side gets equally immersed in all those flavors from the braising liquid and herbs. When you remove it from the oven for that halfway check-in—be careful, it’s hot!—you should notice a delightful transformation; the edges will be darkened and caramelized while juices bubble enticingly around it.
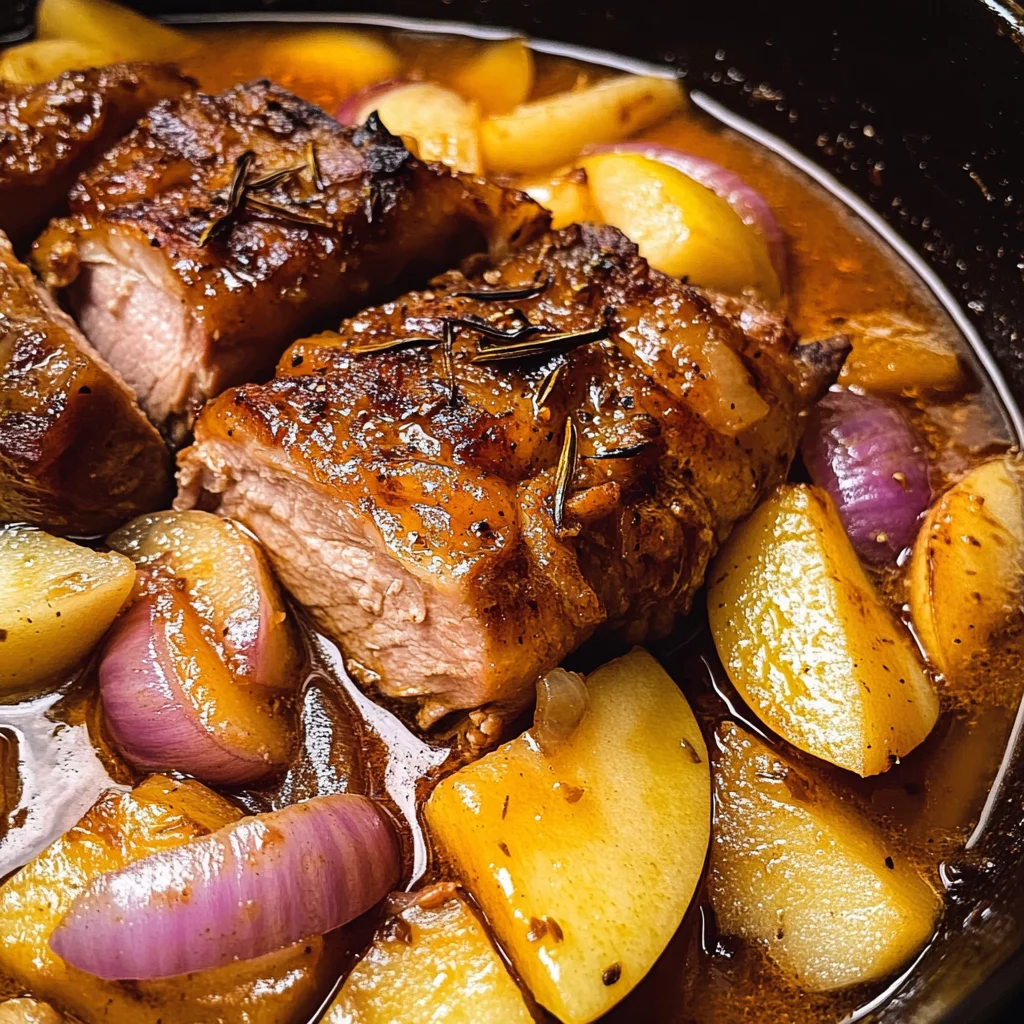
Once you’ve flipped everything over like a professional chef (don’t worry if it feels intimidating; you’re doing wonderfully!), it’s time to introduce some new friends to our delicious gathering—the onions and apples! Arrange thick slices of red onion and wedges from those firm yet slightly tart apples around the beef in the pot. Their sweetness will balance beautifully with the savory notes already developing in your dish. Cover again and return everything back to that warm embrace for another 30-45 minutes until those apples are tender but not mushy; you want them to hold their shape while still providing bursts of sweetness.
Step 8: The Sweetest Resting Period
The moment you’ve been waiting for has finally arrived—your Apple Cider Braised Beef Shoulder is now almost ready for its grand reveal! Once you’ve reached that heavenly point where you’ve checked for doneness (the meat should be incredibly tender but not falling apart), carefully remove it from the oven. But wait! Before diving in with forks at hand, allow this succulent roast to rest in its aromatic bath for at least 30 minutes.
Resting is crucial because during this time, juices within the meat redistribute themselves evenly rather than spilling out onto your cutting board when sliced—it’s like letting all those delightful flavors settle down after a vigorous dance party! As you let it relax in that warm broth filled with garlic cloves softening like pillows waiting for someone special, take a moment to savor what you’ve accomplished so far—the anticipation makes every bite worth it.
When you’re ready to serve, gently squeeze those roasted garlic cloves out of their husk directly onto both beef and broth—it adds an utterly intoxicating depth that’s simply unparalleled! Finally, taste your braising liquid; season it with salt and pepper as needed—it should sing with flavor! Serve generous spoonfuls over each slice of beef alongside tender apples and onions. This dish isn’t just about feeding hunger; it’s about creating warmth within everyone who shares in this meal together.
Final Touches: The Heartfelt Conclusion
As you gaze upon your masterpiece—a hearty Apple Cider Braised Beef Shoulder—you’ll feel an overwhelming sense of accomplishment mixed with warmth from memories shared around tables filled with love. Each bite you’ll take will transport you back to cozy fall evenings surrounded by laughter and stories shared among friends or family.
Remember, cooking doesn’t just satisfy hunger; it’s an expression of love and creativity. So gather around with your loved ones as you relish every last bit of this comforting dish together—you’ve earned it! Enjoy every slice as they soak up all those incredible flavors created by your hands—and trust me when I say they’ll be begging for seconds!
Happy cooking! 🍏🥩
Storage and Enjoyment Tips for Your Apple Cider Braised beef Shoulder
Oh, what a delight it is to know that your kitchen is filled with the comforting aroma of Apple Cider Braised Beef Shoulder! Once you’ve savored every last bite of this cozy dish, you might find yourself with some delightful leftovers to cherish. Trust me, these remnants are just as enticing as the first serving. Properly storing your braised beef shoulder ensures that you can revisit its deeply satisfying flavors for days to come, which is truly a gift worth embracing.
Storing Leftover Apple Cider Braised beef Shoulder
When it comes to preserving those lovely leftovers, choosing the right containers is key. I recommend using airtight glass or plastic containers; they keep the moisture locked in and help prevent any unwanted odors from mingling in your fridge. If you’re in a particularly creative mood, consider layering the beef with some fresh herbs or even a slice of bread on top—this clever trick keeps the meat juicy while absorbing any excess moisture. Generally, your delicious creation will last about three to four days in the refrigerator, and I promise you that the flavors only deepen as they mingle together over time. For reheating, gently warm it on the stovetop or in the oven at a low temperature to maintain that tender texture. Just imagine taking a forkful of this rich, apple-infused goodness again—it’s like wrapping yourself in a cozy blanket!
Freezing Apple Cider Braised beef Shoulder for Later
If you want to extend your enjoyment even further, freezing is an absolutely wonderful option! To do this properly, let your braised beef cool completely before transferring it into freezer-safe containers or heavy-duty freezer bags; make sure to remove as much air as possible to prevent freezer burn—nobody wants that! This hearty meal can be frozen for up to three months without losing its flavor, which is simply fantastic when you’re craving something delicious but don’t have time to cook. When you’re ready to enjoy a taste of fall again, simply thaw it overnight in the refrigerator and reheat slowly until piping hot. It’s like having a little piece of autumn waiting for you whenever you desire!
Incorporating these storage tips will ensure that your Apple Cider Braised Beef Shoulder continues to bring joy long after it’s first served.
Apple Cider Braised Beef Shoulder

Apple Cider Braised Beef Shoulder is the ultimate cozy dish that captures the essence of fall. As the leaves change and the air turns crisp, this one-pot meal becomes a staple for gatherings and intimate dinners alike. Tender beef shoulder is slow-cooked in fresh apple cider, chicken stock, and aromatic herbs, resulting in a symphony of flavors that embrace your taste buds like a warm hug. Each bite is infused with sweet apples and savory onions, making it a comforting centerpiece for any table. Perfectly paired with creamy mashed potatoes or crusty bread, this dish invites family and friends to linger longer over delicious conversations and hearty laughter.
- Prep Time: 20 minutes
- Cook Time: 3 hours
- Total Time: 3 hours 20 minutes
- Yield: Serves approximately 6–8 people 1x
- Category: Main
- Method: Braising
- Cuisine: American
Ingredients
- 4–5 lb beef shoulder roast
- 2 tablespoons neutral oil (canola or grapeseed)
- 2 cups fresh apple cider
- 2 cups chicken stock
- 2 tablespoons Dijon mustard
- 1 tablespoon dehydrated minced onion
- 1 head garlic, top sliced off
- 3 rosemary sprigs
- 4 thyme sprigs
- 1 red onion, cut into thick slices
- 2 firm apples, peeled and cut into wedges
- Kosher salt and freshly cracked black pepper
Instructions
- Preheat your oven to 325°F (163°C).
- Trim excess fat from the beef shoulder and season generously with salt and pepper.
- Heat oil in a large Dutch oven over medium-high heat. Sear the beef on all sides until browned (about 4–5 minutes each side). Remove from pot.
- In a bowl, whisk together apple cider, chicken stock, Dijon mustard, and dehydrated minced onion.
- Place the seared beef back into the pot and pour the apple cider mixture over it. Add garlic and herb bundles.
- Cover tightly and braise in the oven for about three hours, flipping halfway through.
- During the last hour, add red onion slices and apple wedges around the beef.
- After cooking, let rest for at least 30 minutes before serving.
Nutrition
- Serving Size: Approximately 1 cup (240g)
- Calories: 450
- Sugar: 12g
- Sodium: 410mg
- Fat: 23g
- Saturated Fat: 9g
- Unsaturated Fat: 14g
- Trans Fat: 0g
- Carbohydrates: 20g
- Fiber: 3g
- Protein: 42g
- Cholesterol: 115mg