Air Fryer Honey Butter Garlic Chicken Tenders Recipe
There’s something truly magical about the scent of chicken tenders sizzling away in the kitchen, a delightful blend of savory and sweet that fills the air with anticipation. When I think of comfort food, these Air Fryer Honey Butter Garlic Chicken Tenders come to mind, embodying everything that’s heartwarming about home-cooked meals. As you sink your teeth into the crispy golden crust and experience the explosion of flavors from the honey butter garlic glaze, you’ll understand why this recipe is more than just food—it’s an experience, a celebration of simple pleasures that brings us together. This dish marries tradition with innovation, offering a guilt-free indulgence that can be enjoyed any day of the week.
Every time I prepare these tenders, I’m reminded of how cooking is not just about following a recipe but embracing a moment—a chance to connect with loved ones over something delicious. The beauty of using an air fryer means you can achieve that perfect crunch without the heaviness of deep frying, allowing for an utterly intoxicating balance between crispy and tender. This recipe is not only quick and easy; it also satisfies those cravings for something sweet yet savory. So gather your ingredients, roll up your sleeves, and let’s dive into this delightful culinary journey together!
Air Fryer Honey Butter Garlic Chicken Tenders Recipe: A Sweet Symphony of Flavors
Welcome to a world where crispy meets sweet! These Air Fryer Honey Butter Garlic Chicken Tenders are sure to become a cherished favorite in your home. Perfect for busy weeknights or entertaining friends, they embody everything great about comfort food with a modern twist. Trust me when I say that once you take your first bite, you’ll be hooked on this symphony of flavors!
Ingredients:
As we embark on this culinary adventure together, let’s take a moment to appreciate each ingredient’s role in crafting these delectable chicken tenders. Each element contributes its unique character to create an unforgettable dish.
- 1 lb chicken tenders. The star ingredient of our dish! Chicken tenders are naturally tender and juicy, making them ideal for quick cooking. Look for fresh cuts at your local market; they should appear moist and slightly shiny without any discoloration. If you can’t find tenders, chicken breasts cut into strips work beautifully as well. The benefit of using chicken tenderloins lies in their ability to cook evenly and quickly—ensuring every bite remains succulent while achieving that coveted crispiness.
- ¼ cup honey. This liquid gold is what adds depth and sweetness to our glaze, balancing out the savory notes beautifully. Opt for raw or local honey if possible; its flavor profile can vary from floral to earthy depending on its source. Honey not only enhances taste but also helps create a caramelized exterior during cooking thanks to its natural sugars—it’s absolutely paramount for achieving that beautiful golden color we all crave.
- 2 tbsp unsalted butter, melted. Butter introduces richness and moisture to our glaze while helping it adhere beautifully to our chicken. Unsalted butter is essential here as it allows us to control the saltiness of our dish better; we want all those lovely flavors to shine rather than be overwhelmed by saltiness! When melting the butter, keep an eye on it; we just want it liquefied—not browned—as burnt butter can introduce bitter notes.
- 3 cloves garlic, minced. Ahh, garlic—the aromatic superstar! Freshly minced garlic adds an incredible depth of flavor that permeates each tender morsel with its fragrant essence. Be sure to use fresh cloves rather than pre-minced varieties for maximum flavor impact—there’s simply no comparison! The heat from our air fryer will mellow the harshness while accentuating its natural sweetness.
- 1 tsp paprika. This spice adds warmth and a hint of smokiness to our tenders without overpowering them—a touch that elevates the entire dish! You can choose between sweet or smoked paprika based on your preference; both will lend their unique charm but remember: quality matters here! A good-quality paprika will provide vibrant color and robust flavor.
- 1 tsp salt. Salt is crucial in cooking—it enhances flavors and balances sweetness perfectly in this recipe. Don’t shy away from seasoning generously; it’s essential for bringing out all those lovely notes from our other ingredients! Opt for kosher or sea salt as they provide better control over seasoning compared to table salt.
- ½ tsp black pepper. This humble spice brings warmth and complexity without demanding attention—a perfect complement to our honey butter garlic mixture! Freshly cracked black pepper is always best; it delivers more aromatic oils than pre-ground versions so don’t skip this step!
- 1 cup breadcrumbs (panko or regular). Breadcrumbs are what give us that irresistible crunch we’re after! Panko breadcrumbs are lighter and crispier compared to regular breadcrumbs—they’ll elevate your tenders’ texture substantially! If you choose regular breadcrumbs instead, know they’ll still work but expect a different crunch level.
- Cooking spray. While not technically an ingredient in terms of flavor, cooking spray ensures our chicken doesn’t stick during air frying while contributing minimal calories compared to traditional oil methods—this small step leads us closer toward achieving perfection!
Equipment You’ll Need:
Before we get started on making these delightful chicken tenders, let’s gather some essential tools that will make our cooking experience smoother and more enjoyable—trust me when I say having the right equipment is half the battle won!
- Air fryer – Your new best friend in the kitchen! An air fryer circulates hot air around food producing crispy exteriors while sealing moisture inside—perfect for our chicken tenders! If you don’t have one yet, consider investing; they’re versatile machines capable of whipping up anything from veggies to desserts with ease!
- Mixing bowls – You’ll need at least two bowls here: one for whisking together our honey garlic mixture and another for rolling (or coating) our chicken tenders in breadcrumbs effortlessly! Opting for glass or stainless steel makes cleanup easier since they’re both durable options.
- Whisk – To ensure even mixing when combining honey, butter, garlic, spices—you want everything blended harmoniously without any clumps hanging around!
- Tongs – These handy tools are perfect for flipping your chicken halfway through cooking without fussing too much or getting burned—it’s all about keeping things easygoing while ensuring success!
With everything prepared at hand let’s dive into making these tantalizing Air Fryer Honey Butter Garlic Chicken Tenders!
Preparing the Air Fryer Honey Butter Garlic Chicken Tenders Recipe
Step 1: Whisk Together Your Honey Garlic Mixture
In a small bowl—a space where magic begins—whisk together your honey, melted butter, minced garlic cloves along with paprika, salt & pepper until thoroughly combined into what I like to call ‘heavenly nectar.’ This process not only melds all flavors beautifully but also creates a luscious glaze that will elevate those tenders beyond mere ordinary fare! It’s important not just because you want everything mixed well but because each ingredient plays off one another: honey brings sweetness while garlic adds depth—together they create layers within each bite.
Step 2: Reserve Some Liquid Gold
Here comes my favorite part: setting aside half of this glorious mixture before coating those chicken beauties! It may seem like an extra step—but trust me—it’s crucial because this reserved portion serves as an indulgent drizzle atop finished tenders adding another dimension altogether upon serving time! Plus who doesn’t love drizzling extra sauce on their meal? Just imagine how utterly intoxicating it’ll be when everyone takes their first bites…
Step 3: Coat Each Tender Generously
Now onto coating—we’re talking full immersion here folks! Dip each chicken tender into that luscious honey garlic mixture ensuring an even covering before rolling them lovingly through breadcrumbs until they’re sufficiently coated—this step guarantees crispy perfection awaits once cooked so don’t rush through it! Take pride in this task; envision how delightful these morsels will transform post-cooking as they turn golden brown magically—that crunch alone makes all efforts worthwhile!
Step 4: Preheat Your Air Fryer
While you’re busy coating away let’s preheat our trusty air fryer at 400°F (200°C)—this high temperature creates magic by forming crisp exteriors while locking tenderness inside—achieving textural harmony unlike anything else out there! Please never skip preheating; it’s non-negotiable if you want those lovely crunchy results waiting patiently at dinner table later on—not only does it help retain juices but gives optimal results every single time too!
Stay tuned as we continue exploring how easy it is creating these delightful bites worthy enough sharing amongst friends—and trust me—you’ll want second helpings after tasting them firsthand…
Step 5: Preheat Your Air Fryer to Perfection
Now, let’s talk about the importance of preheating your air fryer—this is crucial for achieving that delightful crispiness everyone craves in chicken tenders! Set your air fryer to 400°F (200°C) and let it heat up for about 5 minutes. You might wonder, why do we need to preheat? Well, just like an oven, preheating ensures that your chicken tenders start cooking immediately when they hit the hot basket. This quick sear at a high temperature locks in moisture and creates that beautiful golden-brown crust that we all adore. It’s also essential for ensuring even cooking throughout; no one wants a tender that’s perfectly golden on the outside but undercooked inside! So, resist the urge to skip this step; trust me, you’ll be thanking yourself later when you take that first bite.
While your air fryer warms up, take a moment to prepare your workspace. Gather all your ingredients together and maybe even put on some of your favorite music—cooking should feel joyful! The anticipation builds as you know you’re just moments away from creating something utterly intoxicating. Make sure your chicken tenders are patted dry with paper towels; this helps the honey garlic mixture adhere better and ensures that every bite is bursting with flavor.
Step 6: Arrange and Cook Like a Pro
Once your air fryer is preheated and ready to go, it’s time to arrange those beautifully coated chicken tenders in the basket. Lightly spray the air fryer basket with cooking spray—this non-stick touch is absolutely paramount for preventing any sticking and will allow your tenders to slide right out once they’re done cooking. As you place each tender in the basket, make sure they’re arranged in a single layer without overlapping; crowding them can lead to uneven cooking and that dreaded sogginess. Remember, we want every piece to bask in that hot air circulation!
Cook your chicken tenders for 10–12 minutes, flipping them halfway through this process. This flipping isn’t just a suggestion; it’s an essential technique to ensure both sides get equally crispy. When flipping, use tongs—this not only protects your fingers from potential splatter but gives you a good grip on those delicious morsels! Keep an eye on them as they cook; they should transform into a stunning golden brown color with an aroma that will have everyone flocking to the kitchen like bees to honey. If you find they aren’t browning as quickly as expected after about 8 minutes, don’t hesitate to increase the time by a minute or two but keep checking!
Step 7: The Magic of Timing
As your chicken tenders approach the end of their cooking time, let’s talk about doneness—this is where experience meets intuition! You want to check not only for color but also temperature. The internal temperature of chicken should reach 165°F (75°C) for safe consumption. Use a meat thermometer if you have one handy; it takes away any guesswork and ensures you’re serving perfectly cooked tenders every time. And trust me on this: there’s nothing worse than biting into what looks like perfect chicken only to find it undercooked!
The sound of sizzling chicken combined with that tantalizing garlic aroma wafting through your kitchen will make it hard to resist peeking inside too often! If you’re feeling adventurous, consider adding some veggies alongside the tenders during the last few minutes of cooking—a handful of bell peppers or broccoli can easily cook alongside and soak up some of those delightful flavors without much extra effort on your part. Just remember not to overcrowd—let those tenders shine!
Step 8: Finish Strong with Flavors That Shine
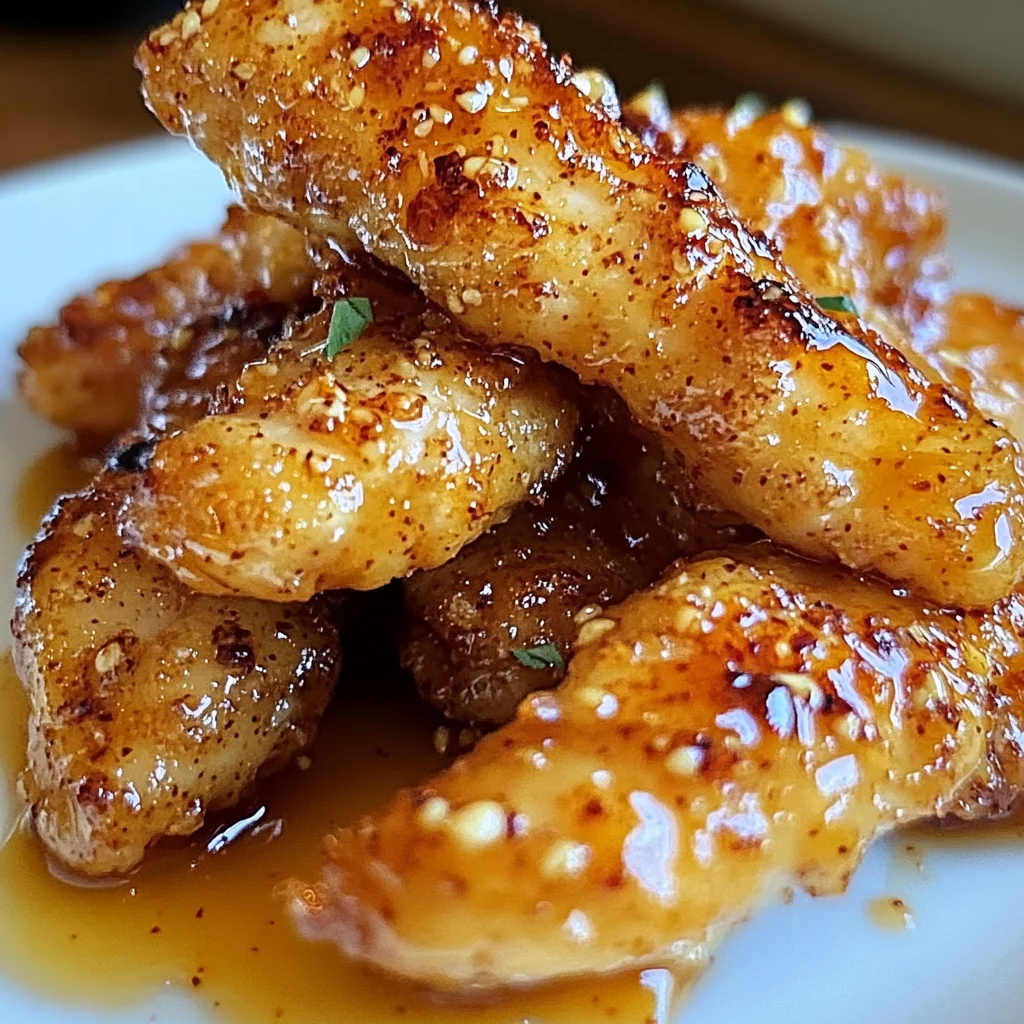
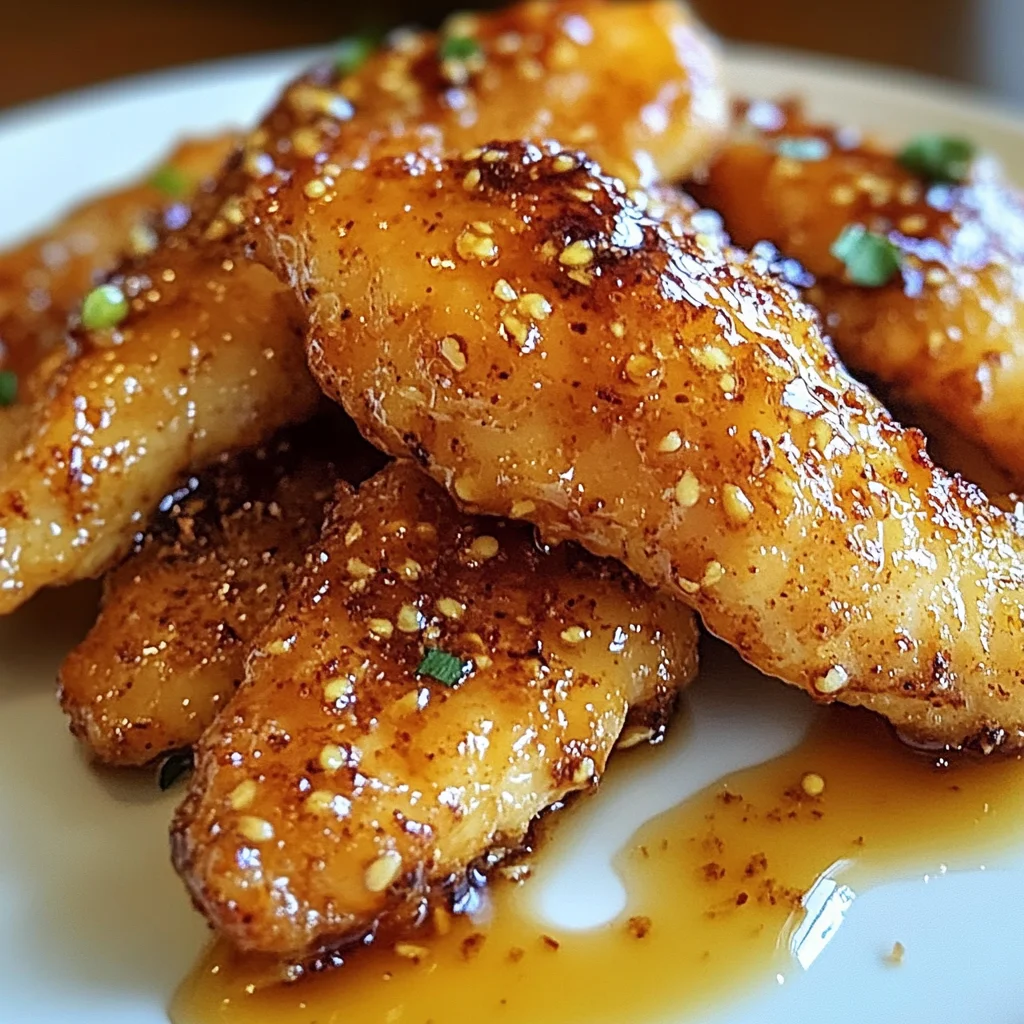
Once those glorious air-fried honey butter garlic chicken tenders are cooked through and golden brown, it’s time for the pièce de résistance—the finishing drizzle! This step brings everything full circle by adding an extra layer of flavor and ensuring no drop of that luscious sauce goes uneaten. Retrieve the reserved honey garlic sauce from earlier; its sweet-salty aroma has been building anticipation while our chicken cooked away!
Drizzle this magical elixir over each tender right after they come out of the air fryer while they’re still warm—it’s almost like giving them a warm hug! Watch how it melts slightly into every crevice, creating an utterly intoxicating glaze that glistens invitingly against those crispy edges. This finishing touch is non-negotiable because it elevates the dish from merely delicious to truly extraordinary! Serve these beauties immediately while they’re hot—you want everyone at the table experiencing them fresh out of their golden nest.
Conclusion:
As we wrap up this culinary journey through my beloved Air Fryer Honey Butter Garlic Chicken Tenders Recipe, I hope you’re feeling as inspired as I am! There’s something profoundly satisfying about balancing sweet honey with savory garlic and buttery goodness that elevates these tender morsels beyond ordinary chicken dishes. The crispy coating gives way to juicy meat within, creating a symphony of flavors that dance on your palate. It’s not just food; it’s an experience that brings joy and warmth into your home.
This recipe is an absolute must-try not only for its irresistible taste but also for the sheer joy of preparing it! From family dinners to game day snacks or even a cozy night in with friends, these chicken tenders shine in any setting. Just imagine pulling them from the air fryer—golden brown and glistening from their honey butter glaze—your loved ones gathering around in anticipation as the enticing aroma wafts through the air. The sheer delight on their faces will be worth every moment spent in the kitchen!
For serving suggestions, picture dipping one of these glorious tenders into a cool ranch dressing or perhaps even a spicy aioli for that extra kick. They pair beautifully with fresh salads or roasted vegetables—imagine savoring one with a side of buttery corn on the cob during summer barbeques or nestled between fluffy sliders at your next gathering. For an afternoon pick-me-up, serve them alongside sweet potato fries—what could be better than that?
Feeling adventurous? This recipe is wonderfully adaptable! You could swap out honey for maple syrup for a completely different flavor profile or introduce some heat by adding chili flakes to the garlic mixture. Want something zesty? A splash of lemon juice would brighten everything beautifully! The possibilities are endless, so don’t hesitate to experiment and make this dish uniquely yours. I invite you to try it out soon; share your experience with me—I’d love nothing more than to hear how these tender delights brought happiness into your kitchen!
Air Fryer Honey Butter Garlic Chicken Tenders
Experience the delightful crunch and sweet-savory explosion of flavors with our Air Fryer Honey Butter Garlic Chicken Tenders. Perfect for busy weeknights or gatherings, these tender bites are a modern twist on comfort food that everyone will love. Coated in a luscious honey garlic glaze and air-fried to golden perfection, they deliver all the satisfaction of traditional fried chicken without the guilt. With simple ingredients and easy preparation, you’ll have an irresistible dish ready in no time. Get ready to savor a meal that brings joy and warmth to your table!
- Prep Time: 15 minutes
- Cook Time: 12 minutes
- Total Time: 27 minutes
- Yield: Serves 4
- Category: Dinner
- Method: Air Frying
- Cuisine: American
Ingredients
- 1 lb chicken tenders
- ¼ cup honey
- 2 tbsp unsalted butter, melted
- 3 cloves garlic, minced
- 1 tsp paprika
- 1 tsp salt
- ½ tsp black pepper
- 1 cup breadcrumbs (panko or regular)
- Cooking spray
Instructions
- In a small bowl, whisk together honey, melted butter, minced garlic, paprika, salt, and black pepper until combined.
- Reserve half of the sauce for drizzling later.
- Dip each chicken tender into the remaining honey garlic mixture and coat in breadcrumbs.
- Preheat your air fryer to 400°F (200°C) for about 5 minutes.
- Lightly spray the air fryer basket with cooking spray, then arrange the chicken tenders in a single layer.
- Cook for 10–12 minutes, flipping halfway through, until golden brown and cooked through (internal temperature should reach 165°F).
- Drizzle reserved sauce over hot chicken tenders before serving.
Nutrition
- Serving Size: 2 tenders (150g)
- Calories: 320
- Sugar: 9g
- Sodium: 780mg
- Fat: 11g
- Saturated Fat: 4g
- Unsaturated Fat: 7g
- Trans Fat: 0g
- Carbohydrates: 34g
- Fiber: 1g
- Protein: 22g
- Cholesterol: 70mg