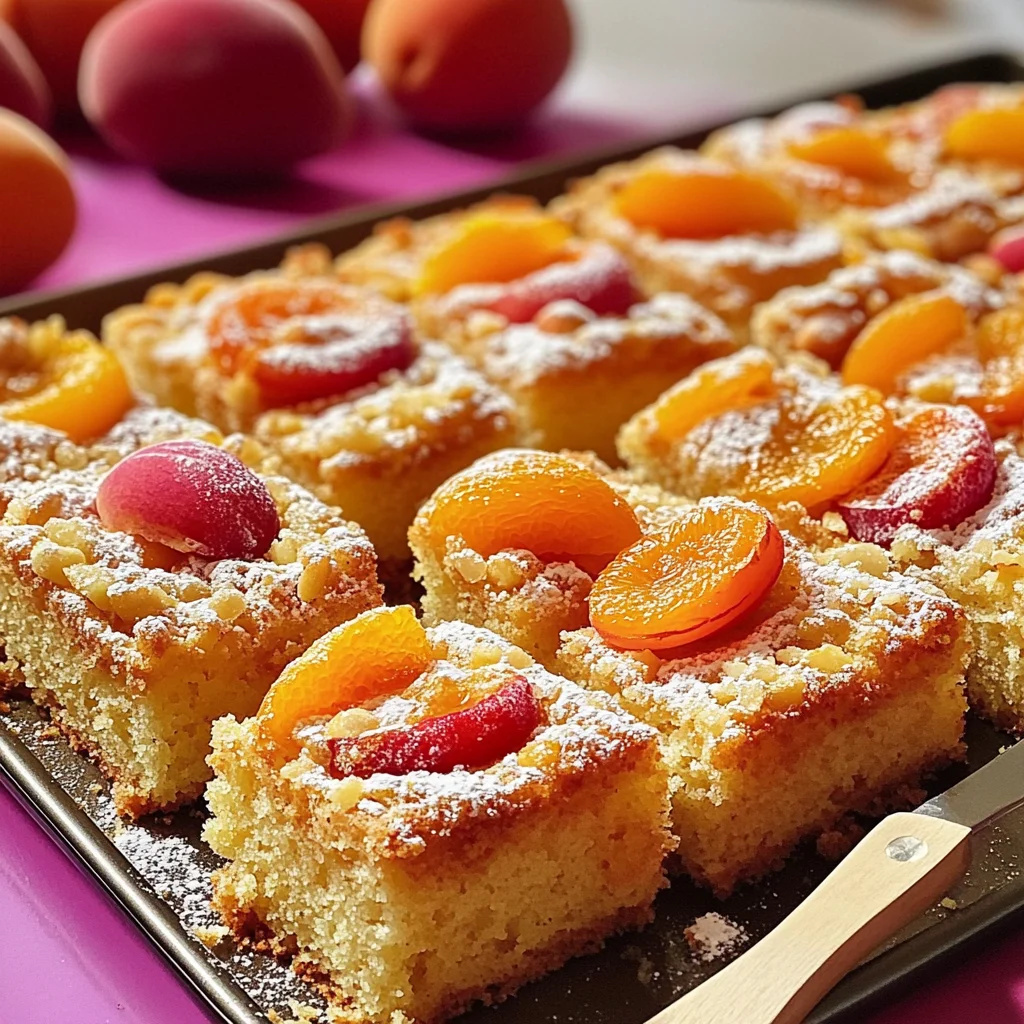
Apricot and almond traybake
There’s something utterly enchanting about the act of baking, don’t you think? The way a simple collection of ingredients can transform into something truly magical is a sensation that warms my heart. This Apricot and almond traybake is not just a recipe; it’s a celebration of summer’s bounty, a joyful embrace of bright apricots nestled atop a light, fluffy sponge. Picture this: the sweet aroma wafting through your kitchen, the golden edges crisping just right, and when you finally take that first bite—oh my goodness! It’s like a symphony of flavors dancing on your taste buds, where each mouthful sings with the essence of sun-kissed fruit and the nutty richness of almonds. Trust me when I say that this dessert is more than just food; it’s an experience crafted with love.
This delightful traybake captures the essence of home—inviting friends over for an afternoon tea, or enjoying a quiet moment with your favorite book in hand. As you slice into this cake, revealing its tender crumb and vibrant fruit, you’ll find that each piece carries not just flavor but warmth and memories waiting to be made. Not to mention how easy it is to whip up! With just a few simple steps and ingredients you likely have on hand, this Apricot and almond traybake will become a staple in your baking repertoire. So let’s roll up our sleeves and dive into this delicious journey together!
Apricot and Almond Traybake: A Sweet Slice of Summer
Ah, let me share with you one of my all-time favorite recipes—this Apricot and almond traybake. It’s the kind of dessert that feels both comforting and refreshing at the same time. The sweet apricots meld beautifully with the rich almond flavor, creating an utterly intoxicating experience that I promise will have everyone reaching for seconds. Whether you’re looking for an everyday treat or something special for gatherings, this traybake is perfect for any occasion.
Ingredients:
As we embark on this delightful culinary journey together, let’s take a moment to appreciate each ingredient we’ll be using. Each one plays a vital role in creating that moist, flavorful cake we’re aiming for.
- 220 g butter: Butter serves as the backbone of our cake’s texture and flavor. When softened to room temperature, it becomes easier to cream with sugar, allowing air to incorporate into the mixture—this is crucial for achieving that lightness we desire in our Apricot and almond traybake. If possible, opt for high-quality butter; European-style varieties often have higher fat content, which translates to richer flavor.
- 220 g caster sugar (superfine sugar): Caster sugar dissolves quickly into mixtures compared to granulated sugar. This rapid dissolution helps create an even sweetness throughout the batter while contributing to that lovely golden crust we’ll see after baking. If you can’t find caster sugar at your local store, you can easily make your own by pulsing granulated sugar in a food processor until fine but not powdery.
- 4 medium eggs: Eggs are essential here—not only do they provide moisture and richness to our sponge cake, but they also act as binding agents which help maintain structure while adding protein. When using eggs in baking, it’s best if they are at room temperature as they blend more easily into the batter.
- 50 g ground almonds: Ground almonds add a wonderful nuttiness and depth to our cake that perfectly complements the apricots’ sweetness. They also contribute moisture thanks to their natural oils while enhancing the overall texture. If you’re feeling adventurous or want an extra crunch factor, consider substituting half with chopped almonds instead!
- 170 g self-raising flour: This flour is pre-mixed with baking powder which gives our cake its lift without requiring additional leavening agents. It’s important to sift this flour before use; doing so ensures there are no lumps and aerates it slightly which promotes an even rise during baking.
- 1 tsp baking powder: A little insurance policy here! Adding extra baking powder alongside self-raising flour guarantees our cake will rise beautifully without being too dense. Be cautious not to add too much—more isn’t always better when it comes to leavening agents!
- 1 tsp vanilla extract: This liquid gold adds depth and warmth to baked goods; its aromatic nature elevates every flavor within our traybake. Always opt for pure vanilla extract over imitation if possible—it makes such a difference!
- 8 apricots (halved): Fresh apricots bring brightness both visually and flavor-wise—they’re juicy little gems that burst with flavor as they bake down into sweet lusciousness atop our sponge cake layer. When selecting apricots at the market, look for ones that are slightly soft but not mushy; they should have vibrant color indicating ripeness.
- Caster sugar (to sprinkle over the fruit): A touch more sugar sprinkled on top before baking enhances caramelization while balancing out any tartness from our beautiful apricots.
- Icing sugar (to serve): Just a dusting of icing sugar before serving adds an elegant touch that makes everything feel special! Not only does it look appealing but also provides just another hint of sweetness when enjoyed alongside your warm slice.
Equipment You’ll Need:
Now let’s talk about tools! Having the right equipment makes all the difference in ensuring success in your kitchen adventures—and believe me when I say these tools will become your trusted companions as we create something wonderful together!
- Mixing bowl: A sturdy mixing bowl is essential for combining all those glorious ingredients smoothly without making too much mess! Opt for glass or stainless steel for their durability and ease of cleaning.
- Electric mixer or whisk: While an electric mixer speeds up creaming butter and sugar wonderfully (and saves your arm from tiring!), if you prefer working by hand or don’t have one available—a good ol’ whisk will do just fine! Just be ready for some workout action!
- Spatula: A rubber spatula will help fold ingredients gently without deflating all that lovely air you’ve worked hard to incorporate into your batter—it’s non-negotiable!
- Baking dish: For this recipe specifically, I recommend using a stoneware dish as it distributes heat evenly throughout cooking; however, any oven-proof dish will work well enough! Just ensure it’s prepared properly by greasing before pouring in your batter.
- Oven thermometer: Oven temperatures can sometimes be deceiving—having an oven thermometer helps ensure you’re truly baking at 180℃ / 350℉ allowing consistent results every time!
Now that we’ve gathered our ingredients and tools together like old friends reuniting after years apart let’s move forward into preparing this scrumptious Apricot and almond traybake!
Step 1: Creaming Together – The Foundation of Fluffiness
The first step in crafting our delightful traybake involves creaming together butter and caster sugar until fluffy—a process known as “creaming.” Begin by placing your softened butter into your mixing bowl along with caster sugar—you’ll want those two beautiful ingredients to come together harmoniously here! Use either your electric mixer on medium speed or whisk vigorously by hand until pale yellow hues emerge along with noticeable volume increase—this typically takes about 3–5 minutes depending on method used.
Why do we spend time on this step? Well, creaming incorporates air into the fat which contributes significantly towards achieving lift—resulting ultimately in airy cakes rather than dense bricks! It’s absolutely paramount not rush through here; take pleasure in watching how those two transform from solid mass into fluffy clouds filled with potential!
Step 2: Adding Eggs – Binding Our Mixture
Next comes adding eggs one at a time; trust me—the individual addition allows each egg’s rich proteins emulsify gradually throughout batter resulting smoother consistency overall! After cracking open each egg directly above bowl (to avoid any shell surprises), mix thoroughly after every addition until fully combined—that glossy sheen indicates you’re on track!
This gradual incorporation enriches taste too—not only does egg add moisture but provides critical structure thanks protein content which supports final product integrity during baking so don’t skip out on giving them their moment either!
Step 3: Folding In Dry Ingredients
After successfully adding eggs comes folding dry ingredients including self-raising flour along with ground almonds plus baking powder AND vanilla extract mixed gently until JUST combined—it’s essential at this stage not overmix because doing so risks developing gluten leading toward tougher texture instead desired softness we crave from sponge cakes!
Use gentle motions making sure all elements integrate smoothly yet leaving behind pockets gluten-free goodness perfect awaiting those luscious apricots atop later…oh my goodness I can already imagine how heavenly smells filling kitchen soon enough!
Step 4: Preparing For Baking Bliss
With batter ready now let’s prepare dish itself! Lightly spray inside stoneware dish using cooking spray ensuring even coverage prevents sticking once baked perfection arrives later down road…while smoothening out surface with spatula creates inviting canvas awaiting placement seasonal treasures—those halved apricots deserve their special moment too after all!
So there you have it—the initial steps toward creating this stunning Apricot and almond traybake are laid out beautifully before us like pieces coming together in grand puzzle masterpiece waiting reveal itself soon enough! Continue following along as we’ll delve deeper into arranging fruits gracefully atop batter plus final touches leading toward glorious bake time ahead…stay tuned dear friend because magic awaits us next!
Step 5: The Art of Pouring and Smoothing the Batter
Now that you’ve lovingly prepared your cake batter, it’s time to pour it into your dish, and this step is where your creation begins to take shape! Start by choosing a stoneware dish if you have one—its ability to retain heat will work wonders for your traybake. If you don’t have stoneware, a glass or metal baking dish will suffice; just make sure to grease it generously with some Lurpak cooking spray. This preparation is absolutely paramount because a well-greased pan will allow your cake to release effortlessly once it’s baked, ensuring that every crumb is intact and ready for enjoyment!
Carefully pour the batter into the center of the prepared dish. As you do this, use a spatula to gently coax the mixture outwards towards the edges, smoothing it down into an even layer. You want this batter to spread evenly because an uneven distribution can lead to uneven baking—nobody wants a lopsided cake! Take a moment here to appreciate the texture and color of your batter; it should be thick yet pourable, with a velvety sheen that promises deliciousness ahead. Trust me on this: the more attention you give at this stage, the better your final product will be.
Step 6: A Fruitful Arrangement
Now comes one of my favorite parts—arranging those luscious apricots! Your fruit isn’t just any topping; they are going to infuse your traybake with their sweet juices as they bake, creating pockets of delight throughout the sponge. Halve each apricot carefully, making sure they’re ripe but still firm enough to hold their shape during baking. What makes these apricots so special? When they’re pressed into the batter with their cut sides facing up and down in an alternating pattern, they not only look stunning but also caramelize beautifully in the oven.
As you press them gently into the batter, think about how each bite will reveal that perfect balance of soft fruit and fluffy sponge. The pressing technique is essential here because it allows those apricots to nestle right into the cake while still being exposed enough for their natural sugars to caramelize as they bake. As a final touch before we send this beauty off to bake, sprinkle a light dusting of caster sugar over the top of your arranged apricots. This added sweetness will enhance their flavor even further as they become golden and tender in the oven, transforming them into little gems of sweetness amidst your traybake.
Step 7: Baking to Perfection
With everything prepped and ready, it’s time for this masterpiece to go into a preheated oven set at 180℃ (350℉). Place your dish on the middle rack—this position ensures even heat circulation around all sides of your traybake, promoting uniform baking that’s crucial for achieving that golden-brown finish we all dream about. As you close the oven door, take a moment to relish in that warm anticipation; soon your kitchen will be filled with scents so intoxicating that you’ll find yourself counting down each minute until it’s done.
The key here is patience; I promise you it’s worth every second! Bake for about 35-40 minutes but keep an eye on those last few minutes! Every oven behaves differently due to variations in size and heat distribution. You’re looking for a golden-brown color across the surface and a firm center when gently pressed with a finger. To test for doneness, insert a skewer or toothpick into the center—if it comes out clean or with just a few crumbs sticking to it (not wet batter!), then you’re good to go! But if it seems sticky or raw, give it an extra few minutes—don’t rush this step; trust me on this one!
Step 8: Cooling Down Before Serving
Once you’ve removed your beautiful Apricot and almond traybake from the oven, resist the temptation to dive right in! Allowing your cake to cool in its dish is an often-overlooked step but one that’s truly transformative. By letting it rest for about 10-15 minutes in its own warmth, you’re allowing the structure of the cake to firm up slightly—a non-negotiable aspect if you want clean slices when serving.
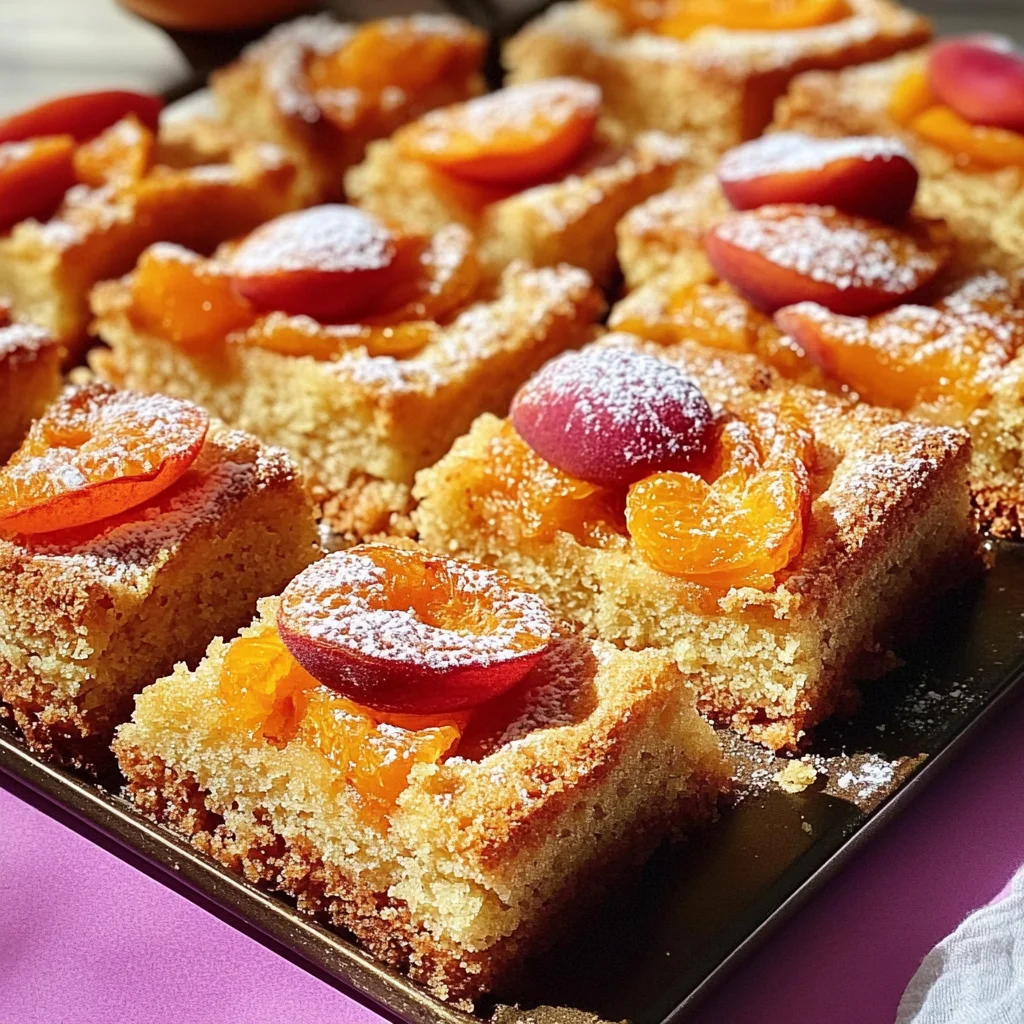
During this cooling period, take note of how those apricots continue doing their magic; they’ll release some juices that mingle beautifully with the sponge beneath them as everything settles together. Once cooled slightly but still warm (you want them just barely warm), dust generously with icing sugar using a fine sieve—it adds such elegance and sweetness without overwhelming what you’ve already created. When you’re ready to serve, slice it into squares—it doesn’t have to be perfect; remember that rustic charm is part of its allure! Each square should display those gorgeous apricot halves peeking through like little treasures waiting to be discovered.
Final Touches: Serve and Delight!
Ahh! The moment we’ve been waiting for has finally arrived—you’re now ready to enjoy your Apricot and almond traybake! Whether served at afternoon tea or as a delightful dessert after dinner, I promise you that each bite will evoke feelings of warmth and happiness reminiscent of summer days spent outdoors. The combination of moist sponge soaked in fruity goodness paired with delicate almond notes creates an utterly extraordinary experience.
Serve these squares slightly warm or at room temperature—both are divine—and watch as everyone savors every single bite while reminiscing about summers past. Don’t forget—the joy doesn’t stop at eating; sharing these treats brings people together in such profound ways! So gather your friends or family around, cut generous portions (after all, there’s plenty!), and celebrate not only what you’ve created but also those connections made over food—a truly beautiful story unfolding one slice at a time!
So there you have it—the complete guide on how to create my beloved Apricot and almond traybake from start to finish! I hope you find joy in making this recipe as much as I do! Happy baking!
Storage and Enjoyment Tips for Your Apricot and almond traybake
Ah, the moment has finally arrived! Your Apricot and almond traybake is out of the oven, the aroma wafting through your kitchen, beckoning you to indulge in its deliciousness. The golden brown sponge, studded with juicy apricots, is just waiting to be enjoyed. But before you dive in, let’s talk about how to preserve this delightful treat so you can savor it for days to come.
Storing Leftover Apricot and almond traybake
To keep your Apricot and almond traybake fresh and utterly irresistible, I recommend using an airtight container. This will not only prevent it from drying out but also keep those lovely flavors intact. Ideally, store it at room temperature if you plan to enjoy it within a couple of days. However, if you find yourself with leftovers beyond that (which is rare because it’s so delicious), pop it in the fridge where it can last for about a week. A little tip from my kitchen: placing a slice of bread in the container can help maintain moisture and softness—trust me on this one! After a day or two, the flavors meld beautifully; the sweetness of the apricots becomes even more pronounced while the sponge remains delightfully moist. When you’re ready to serve, simply warm up a piece in the microwave for about 10 seconds to revive that fresh-baked goodness!
Freezing Apricot and almond traybake for Later
If you want to extend the joy of your baking adventure even further, freezing is an excellent option! To freeze your traybake perfectly, allow it to cool completely before slicing into squares. Then wrap each piece individually in plastic wrap and place them in a sturdy freezer bag or airtight container. I promise you; this method keeps them tasting just as scrumptious as when they first came out of the oven! You can store them for up to three months in the freezer without compromising their flavor or texture. When you’re ready for a sweet treat, simply thaw at room temperature or pop them straight into a preheated oven for a quick reheat—imagine pulling out that warm dessert on a cozy evening! The convenience of having such an easy-to-make dessert on hand is absolutely delightful.
Apricot and Almond Traybake

Indulge in the vibrant flavors of summer with this delightful Apricot and Almond Traybake. Perfectly moist and fluffy, this easy-to-make dessert features juicy apricots nestled atop a rich almond sponge cake. Whether you’re hosting an afternoon tea or enjoying a quiet moment with a favorite book, each slice offers a symphony of sweetness that will transport you to sun-soaked days. With simple ingredients and straightforward steps, baking this treat is as joyful as sharing it with friends and family. Prepare to be enchanted by the aroma wafting through your kitchen as this beautiful traybake bakes to golden perfection!
- Prep Time: 15 minutes
- Cook Time: 40 minutes
- Total Time: 55 minutes
- Yield: Approximately 12 servings 1x
- Category: Dessert
- Method: Baking
- Cuisine: British
Ingredients
- 220 g butter
- 220 g caster sugar
- 4 medium eggs
- 50 g ground almonds
- 170 g self-raising flour
- 1 tsp baking powder
- 1 tsp vanilla extract
- 8 halved apricots
- Caster sugar (for sprinkling)
- Icing sugar (for serving)
Instructions
- Preheat the oven to 180℃ (350℉) and grease your baking dish.
- In a mixing bowl, cream together softened butter and caster sugar until pale and fluffy.
- Gradually add eggs, mixing well after each addition.
- Fold in ground almonds, self-raising flour, baking powder, and vanilla extract until just combined.
- Pour the batter into the prepared dish, smoothing it into an even layer.
- Press halved apricots cut-side up into the batter and sprinkle with caster sugar.
- Bake for 35–40 minutes or until golden brown and a skewer comes out clean.
- Allow to cool slightly before dusting with icing sugar and slicing.
Nutrition
- Serving Size: 1 slice (80g)
- Calories: 290
- Sugar: 24g
- Sodium: 110mg
- Fat: 16g
- Saturated Fat: 10g
- Unsaturated Fat: 5g
- Trans Fat: 0g
- Carbohydrates: 31g
- Fiber: 1g
- Protein: 4g
- Cholesterol: 74mg