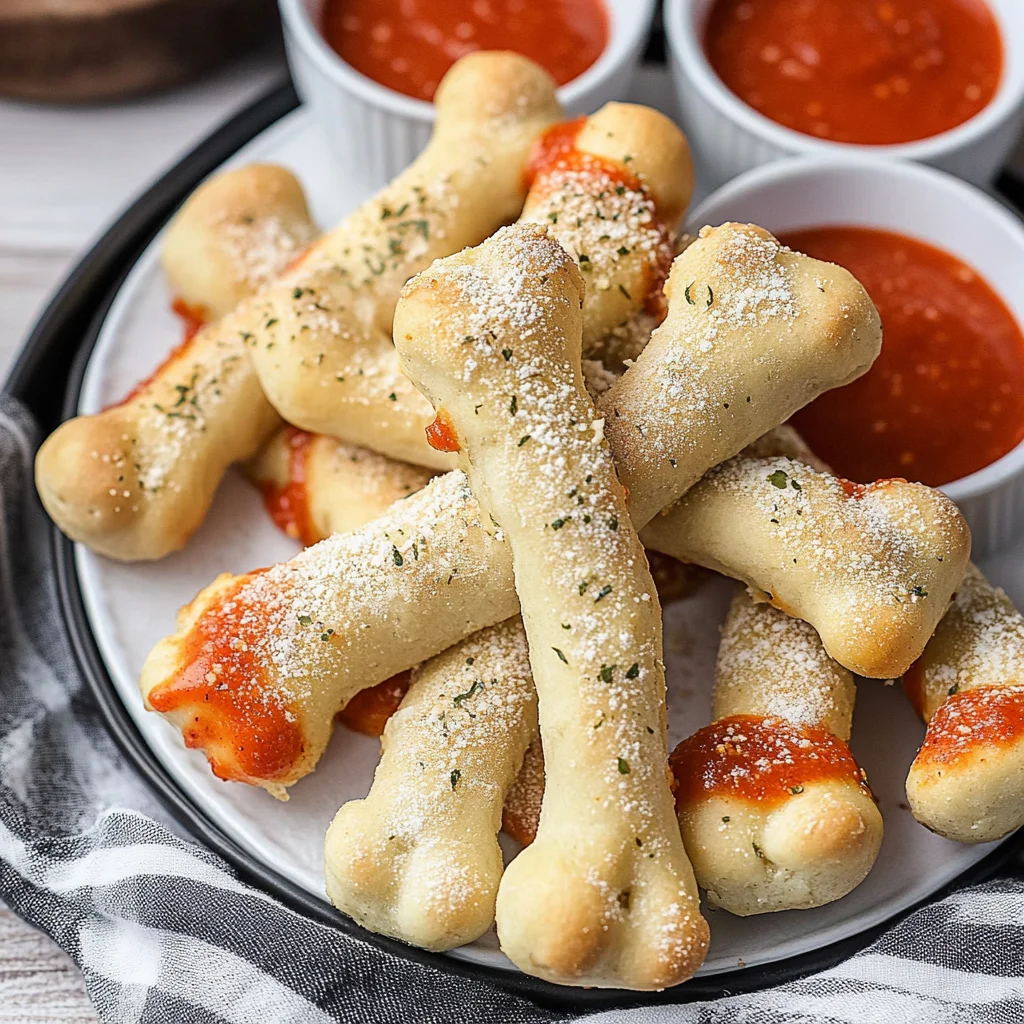
Breadstick Bones Recipe: Spooky and Savory Fun Snacks
These breadstick bones are not just fun to look at; they’re a deliciously crispy, savory, and playful snack that will have your taste buds dancing with joy! I created this Breadstick Bones Recipe for those busy weeknights when I wanted something both entertaining and protein-packed for my family. With about 150 calories each, these spooky delights are loaded with the goodness of whole grains and just enough cheese to keep everyone satisfied. They’re perfect for Halloween parties or anytime you want to add a bit of whimsy to your meal prep.
I still remember the first time I made these eerie treats—Halloween night last year. My kids were buzzing with excitement, decked out in their costumes while I pulled the tray out of the oven. As soon as they caught sight of the breadsticks shaped like bones, my youngest squealed, “Can we eat them now?!” The twist in this recipe is using whole wheat flour, which not only adds a nutty flavor but also boosts the protein content compared to regular breadsticks. Watching my teenagers come back for seconds was the highlight of my evening; their delighted faces told me I’d hit a home run with this one!
Ingredients for the Breadstick Bones Recipe
Each ingredient in this dish plays an essential role in flavor and texture. Here’s what you’ll need:
- 1 cup warm water (about 110°F): Activates the yeast for a perfect rise.
- 2 teaspoons sugar: Fuels the yeast to help the dough rise beautifully.
- 2 teaspoons active dry yeast: Responsible for creating that delightful airy texture.
- 2 cups all-purpose flour (plus extra for dusting): Provides structure and chewiness to the breadsticks.
- 1 teaspoon salt: Enhances the overall flavor of the dough.
- 2 tablespoons olive oil: Adds moisture and richness to the breadsticks.
- 1 tablespoon garlic powder: Infuses each bite with aromatic garlic flavor.
- 1 tablespoon parmesan cheese (grated): Contributes a savory, cheesy note to the toppings.
- 1 teaspoon Italian seasoning: Brings a medley of herbs for added depth of flavor.
Step-by-Step Instructions
I recommend starting by combining the warm water, sugar, and yeast first, as it allows the yeast to activate while you prepare the other ingredients.
Step 1: In a mixing bowl, combine 1 cup of warm water (about 110°F), 2 teaspoons of sugar, and 2 teaspoons of active dry yeast. Let this mixture sit for about 5 minutes until it becomes frothy on top; this indicates that your yeast is alive and ready to work its magic. The warmth of the water is essential for activating the yeast, so be sure it’s not too hot or cold.
Step 2: Once your yeast mixture is frothy, add in 2 cups of all-purpose flour, 1 teaspoon of salt, and 2 tablespoons of olive oil. Mix everything together until a dough begins to form. I usually find it helpful to use a wooden spoon or my hands at this stage to ensure all ingredients are well incorporated. You want a cohesive dough that pulls away from the sides of the bowl.
Step 3: Transfer the dough onto a floured surface and knead it for about 5 minutes until it’s smooth and elastic. This step is crucial as it develops gluten in the dough, giving your breadsticks that perfect chewy texture. If you find the dough too sticky, don’t hesitate to sprinkle a little more flour while kneading.
Step 4: Place your kneaded dough in a greased bowl, covering it with a cloth. Let it rise in a warm place for about 1 hour or until it has doubled in size. This rest period is when the magic happens! A tip here is to find a cozy spot like an unheated oven or near a warm stove—just make sure it’s not too hot!
Step 5: Preheat your oven to 375°F (190°C) and line a baking sheet with parchment paper. It’s important to have everything prepared before shaping your bones since you’ll want them to go straight into the oven once they’re formed.
Step 6: After an hour, punch down the risen dough gently to release any air bubbles. Divide it into 8 equal pieces; using a kitchen scale can ensure uniformity if you want them all to bake evenly.
Step 7: Roll each piece into a long, thin shape resembling a bone, approximately 6 inches long. I like to taper the ends slightly for that authentic bone look! Make sure not to roll them too thick as they need space to expand while baking.
Step 8: Place each shaped bone on your lined baking sheet with about an inch apart between them; this ensures they won’t stick together while baking.
Step 9: Now it’s time for flavor! Sprinkle garlic powder (1 tablespoon), grated parmesan cheese (1 tablespoon), and Italian seasoning (1 teaspoon) over each bone-shaped breadstick. Feel free to adjust these amounts based on your taste—everyone loves extra garlic!
Step 10: Bake in the preheated oven for about 12-15 minutes or until they’re golden brown. Keep an eye on them during the last few minutes; you want that delightful golden color without burning!
Step 11: Once baked, remove them from the oven and let cool slightly before serving. These breadstick bones are best enjoyed warm, so don’t wait too long before diving in!
What to Serve with Breadstick Bones Recipe
This dish is already incredibly filling and balanced, but these sides add extra variety and nutrition to round out your meal perfectly.
Garlic Parmesan Roasted Broccoli: Tossed in olive oil, garlic, and a sprinkle of parmesan, this roasted broccoli provides a delightful crunch that contrasts beautifully with the soft texture of the breadstick bones. The garlic complements the flavors of the breadsticks, while the broccoli offers a boost of vitamins C and K—perfect for keeping our immune systems strong during the chilly fall season. My kids love it, especially when I let them help sprinkle on the cheese before roasting!
Creamy Avocado Dip: This smooth dip made from ripe avocados, lime juice, and a pinch of salt is not only delicious but also packed with healthy fats that keep you feeling satisfied. The creaminess adds a nice contrast to the baked breadsticks, while echoing their Italian seasoning with a hint of citrus. With about 3 grams of protein per serving, it’s a simple yet nutritious way to enhance your snack time or party platter. I often whip this up for family movie nights; it’s always a hit!
Italian Quinoa Salad: A vibrant mix of quinoa, cherry tomatoes, cucumbers, and fresh herbs tossed in a light vinaigrette makes for an excellent side that mirrors the Italian seasonings in the breadstick bones. The fluffy quinoa provides additional protein (around 8 grams per cup) and fiber that helps keep everyone full longer. I love preparing this salad in advance; it keeps well in the fridge and is great for packing into lunches throughout the week!
Roasted Sweet Potato Wedges: These wedges are tossed with olive oil, sea salt, and a sprinkle of paprika before being roasted until crisp. Their natural sweetness pairs wonderfully with the savory garlic flavors of the breadsticks while providing complex carbohydrates for sustained energy. Each serving offers about 4 grams of fiber along with essential vitamins A and C—perfect for growing kids who need those nutrients! I often make these as part of our weekly meal prep so we have quick sides ready to go.
Storage & Serving Tips

To store your spooky Breadstick Bones, allow them to cool completely before placing them in an airtight container. They will stay fresh in the fridge for up to 3 days. If you want to keep the toppings extra flavorful, store the garlic powder and Italian seasoning together in a small container, and keep the grated parmesan cheese in a separate container to maintain its texture. The breadstick dough components can be stored separately as well; however, it’s best to consume them soon after baking for optimal freshness.
When reheating, preheat your oven to 350°F and bake the breadsticks for about 5-7 minutes until they’re warmed through and regain some crispness. Avoid microwaving them, as this will make the breadsticks soft and chewy rather than pleasantly crispy. If you decide to reheat the toppings like parmesan or garlic, sprinkle them on just before baking for a fresher taste instead of reheating them separately.
Pro tip: To batch cook these Breadstick Bones for meal prep, consider doubling the recipe on a Sunday and portioning them into individual containers for easy grab-and-go snacks throughout the week. Family members can self-assemble their own fun plates by pairing these bone-shaped breadsticks with various dips or sauces. For added variety, swap out traditional toppings with spices like smoked paprika or nutritional yeast for different flavors, and you could also mix in seeds or herbs directly into the dough for an extra twist. Remember to store any cheese separately to keep it fresh, adding it right before serving!
Conclusion
This Breadstick Bones Recipe has become one of those recipes I make at least twice a month because it’s not only playful and fun but also delivers 150 calories per serving without compromising on flavor. The secret lies in the use of warm water to activate the yeast perfectly, resulting in breadsticks that are delightfully fluffy and ideal for any Halloween gathering. Give this one a try this week. I promise it’ll become a regular rotation meal in your house too.
Breadstick Bones Recipe
Ingredients
Method
- In a mixing bowl, combine warm water, sugar, and yeast. Let it sit for 5 minutes until frothy.
- Add flour, salt, and olive oil to the yeast mixture. Mix until a dough forms.
- Knead the dough on a floured surface for about 5 minutes until smooth.
- Place the dough in a greased bowl, cover with a cloth, and let it rise in a warm place for 1 hour or until doubled in size.
- Preheat the oven to 375°F (190°C). Line a baking sheet with parchment paper.
- Punch down the risen dough and divide it into 8 equal pieces.
- Roll each piece into a long, thin shape resembling a bone, about 6 inches long.
- Place the shaped bones on the prepared baking sheet.
- Sprinkle garlic powder, parmesan cheese, and Italian seasoning over the shaped bones.
- Bake in the preheated oven for 12-15 minutes or until golden brown.
- Remove from the oven and let cool slightly before serving.