Firecracker Cupcakes
The scent of freshly baked goods wafting through the air, the vibrant colors of red, white, and blue tantalizing your eyes, and the joyous laughter of friends and family all come together to create a sense of celebration that is simply unmatched. These Firecracker Cupcakes are more than just a dessert; they are an embodiment of summer festivities, a delicious way to bring people together during the Fourth of July. As I stand in my kitchen, meticulously whipping up these delightful treats, I can’t help but feel that each swirl of batter is infused with memories of fireworks lighting up the sky and sparklers dancing in little hands. The excitement builds as you think about serving these cupcakes at your next gathering—trust me, they’re bound to be the star of the show!
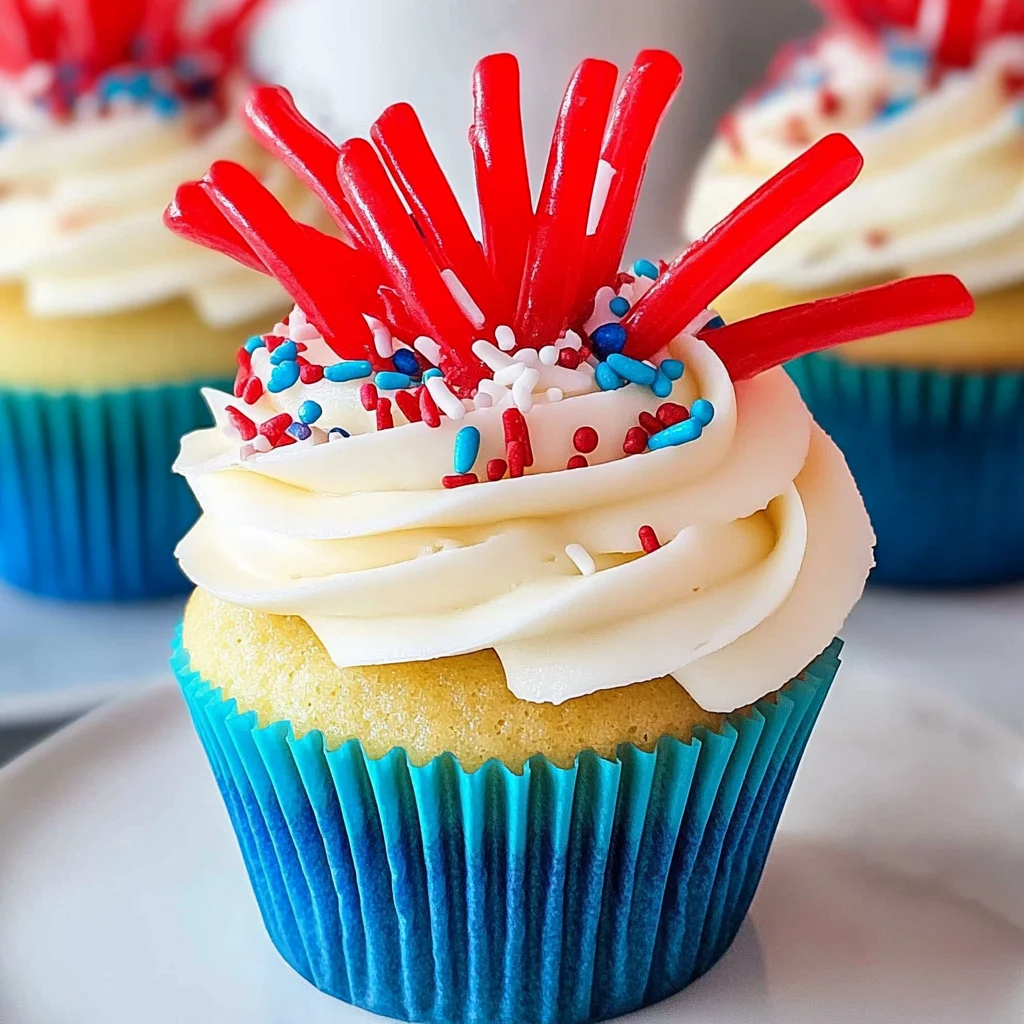
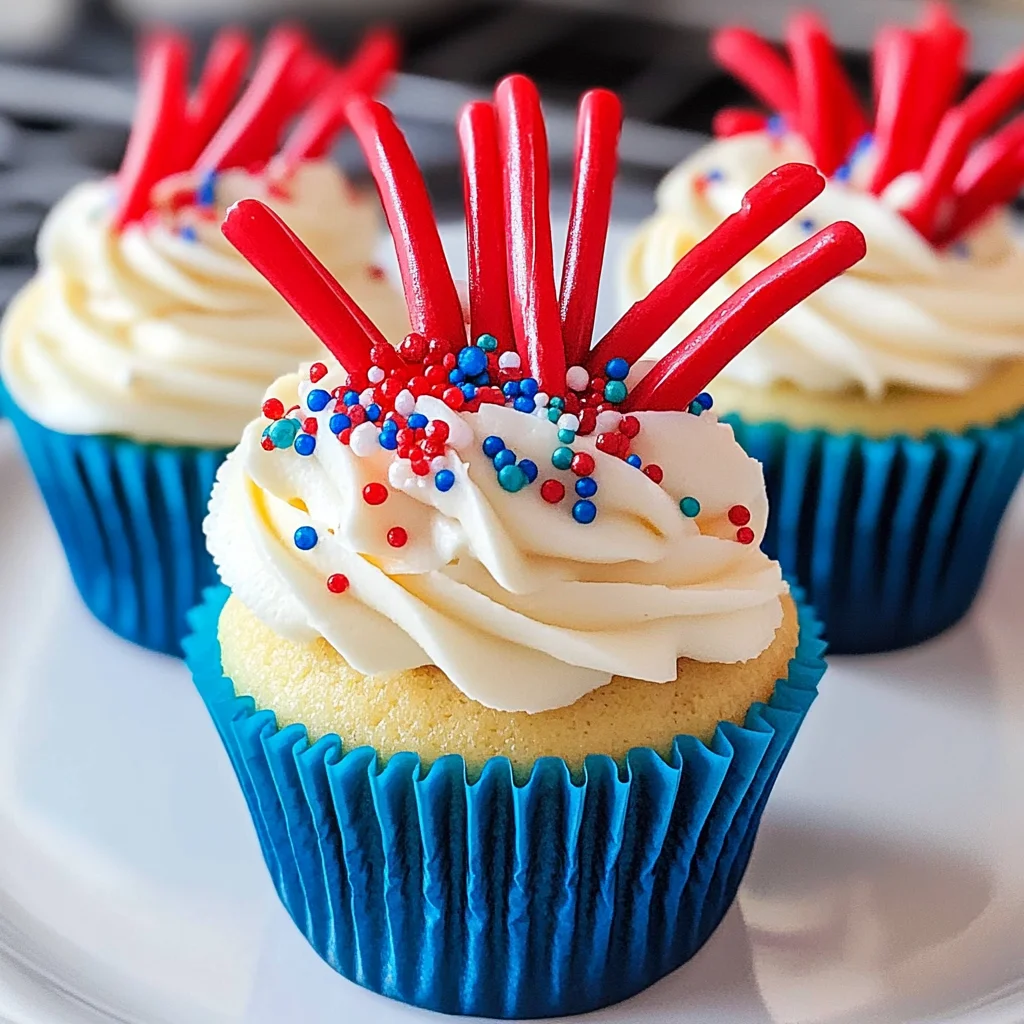
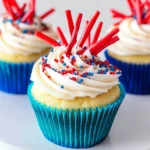
What truly makes these cupcakes exceptional is their playful spirit. With alternating layers of vibrant red, blue, and soft white cake, every bite is like a mini celebration bursting with flavor. You’ll find that the rich white chocolate frosting brings an indulgent creaminess that perfectly complements the lightness of the cake. And let’s not forget about those charming decorations! From patriotic sprinkles to whimsical licorice firecrackers, it’s hard not to smile when you see these beauties on your dessert table. So roll up your sleeves and get ready for a fun-filled baking adventure that will leave your guests raving about your culinary skills!
Firecracker Cupcakes: A Sweet Celebration in Every Bite
These Firecracker Cupcakes are perfect for any summer celebration, especially as we gather to honor our nation’s independence. They are easy to make yet deliver a stunning visual impact that will impress everyone at your party. Plus, who doesn’t love a festive dessert? Let’s dive into this colorful world where cake mix meets creativity, and every bite feels like a holiday.
Ingredients:
As we embark on this colorful culinary journey together, let’s take a moment to appreciate each ingredient that contributes to our Firecracker Cupcakes. Each one not only plays a role but also adds its unique character to this celebratory treat.
-
1 box white cake mix (+ ingredients listed on box). This serves as our foundation—quick and easy! The beauty of starting with a cake mix is that it simplifies preparation while still allowing for creativity. When choosing your cake mix, opt for a reputable brand for consistent results; you’ll want one that guarantees moistness and tenderness without artificial flavors.
-
Blue gel food coloring. This isn’t just any food coloring; it’s what transforms our cupcakes into vibrant stars! Gel food coloring is much more concentrated than liquid versions, allowing you to achieve those deep hues without altering the batter’s consistency. A little goes a long way! Always remember that you can add more if needed but starting small helps keep control over the color intensity.
-
Red gel food coloring. Just like its blue counterpart, red gel food coloring helps us achieve those stunning patriotic stripes in our cupcakes! It’s essential for creating that eye-catching visual appeal while ensuring every bite has flavor in addition to color—because who doesn’t want their dessert to be both beautiful and delicious?
-
1 cup white chocolate chips. Melted down, these chips add an indulgent creaminess to our frosting that’s utterly intoxicating! Look for high-quality brands with real cocoa butter rather than fillers; they melt beautifully and provide an extraordinary flavor profile that pairs excellently with our vanilla cake base.
-
1 cup salted butter (2 sticks), softened. Butter is crucial for creating a rich texture in both our cupcake batter and frosting—it lends moisture while adding depth of flavor. Make sure it’s softened so it can blend seamlessly with other ingredients; cold butter won’t incorporate correctly and could lead to lumpy frosting or dense cupcakes.
-
4-5 cups powdered sugar. This sweetener forms the backbone of our frosting; it provides sweetness while helping achieve that fluffy texture we crave! Using sifted powdered sugar prevents clumps from forming when mixing—a small but vital step for achieving smooth results.
-
5-7 tbsp heavy cream. Heavy cream adds richness and helps us reach that perfect pipeable consistency for our frosting! Start with less; you can always add more until you find just the right texture—one that’s light enough to hold its shape but creamy enough to give each cupcake an elegant finish.
-
1 tbsp lemon juice (about half a lemon). This little splash brings brightness to our frosting while balancing out all that sweetness! It’s surprising how such a small amount can elevate flavors so significantly—trust me on this one; it’s absolutely non-negotiable!
-
6 pcs Red pull-and-peel licorice. These whimsical candies are just what we need for decoration—they mimic firecrackers perfectly! Not only do they add fun flair to our cupcakes visually but also offer a chewy contrast against the soft cake.
-
Patriotic sprinkles. Sprinkles bring joy and celebration into any dessert setting! Choose ones with vibrant colors—red, white, and blue—to top off your cupcakes right before serving; they’ll sparkle like fireworks atop your delicious creations!
Equipment You’ll Need:
Having the right tools in your kitchen makes all the difference between baking being a chore or an enjoyable experience filled with joy and laughter. While they may not be ingredients themselves, each piece of equipment acts as an essential partner in creating something wonderful.
-
Cupcake pan – A sturdy cupcake pan allows you to bake evenly shaped cakes that rise perfectly every time. If you’re making these Firecracker Cupcakes for an event like Independence Day or any gathering with loved ones, investing in quality pans will ensure uniform baking results—no one wants lopsided cupcakes!
-
Piping bags & tips (like Wilton 1M) – These tools are crucial for achieving beautiful frosting swirls on top of your cupcakes! Piping bags allow you more control over application compared to spreading with knives or spatulas—and trust me when I say there’s something deeply satisfying about piping fluffy frosting onto baked goods!
-
Mixer (stand or hand) – A mixer will become your best friend during this process! Whether you opt for a stand mixer or handheld version doesn’t matter too much; just ensure whichever you choose has enough power behind it because beating butter until creamy requires some muscle power.
-
Toothpick – This little tool becomes essential as we swirl together different colored batters before baking them into gorgeous cupcakes! Having one nearby also allows you to check if they’re done by inserting it into a cupcake—the toothpick should come out clean when ready.
With everything set up properly—the ingredients prepped and equipment gathered—we’re ready to create some unforgettable Firecracker Cupcakes together!
Preparing the Firecracker Cupcakes
Step 1: Preheating Your Oven & Preparing Your Pan
First things first—let’s get things heated up! Preheat your oven to 350°F (175°C). The reason why preheating matters so much is pretty straightforward: it ensures your cupcakes bake evenly from start to finish instead of sitting around waiting while temperatures fluctuate inside the oven—that would lead them potentially sinking or becoming dense instead of light as air! Once you’ve got the oven humming away nicely, grab your cupcake pan and line it with festive cupcake liners—a fun touch if you’re using ones decorated in stars or stripes—to add even more cheerfulness before we dive into making batter!
Step 2: Mixing Your Cake Batter
Now comes one of my favorite parts: preparing the cake mix according to package instructions as directed on its box label! Follow along carefully here since this step lays down all those foundational flavors—the chemical reactions happening inside help create airy pockets within each cupcake once baked—so don’t rush this step at all… take time mixing until everything looks uniform throughout without lumps remaining visible anywhere within mix itself before moving forward toward portioning into three separate bowls where we’ll introduce color magic shortly after!
Step 3: Dividing & Coloring Your Batter
Once you’ve got everything mixed nicely together within that bowl full o’ batter goodness—you’ll want pour equal amounts into three separate bowls now using measuring cups if necessary (I promise no one’s keeping score here!) In one bowl add blue gel food coloring until desired shade achieved—while another gets dressed up bright red—the last bowl remains untouched without any added hues yet simply representing traditional white cake base beneath all those layers awaiting transformation ahead later down road ahead… Trust me when I say there’s nothing quite like watching those colors blend beautifully together right before eyes—it sparks pure joy knowing something magical awaits just around corner after finishing steps ahead!
Step 4: Layering Those Colors
Now it’s time for some artistic flair! Pour alternating spoonfuls from each colored bowl directly into prepared cupcake liners—aiming carefully so each layer remains distinctively visible upon completion while filling approximately three-fourths full (too much might cause overflow which leads messy oven situation we’d rather avoid!). Once filled appropriately across cups use toothpick gently swirl lightly through mixtures creating abstract patterns—this process known as marbling adds visual interest making everyone excitedly curious about what awaits inside when biting down later too!
Baking these splendid creations not only fills kitchens pleasantly aromatic scents wafting freely but also brings smiles upon faces gathered around tables waiting eagerly until cooled completely before indulging themselves thereafter… So stay tuned because we’re nearly there folks—it’ll all be worth effort put forth once fully frosted topped off prettily adorned delicate sprinkles celebrating freedom shining bright alongside colorful licorice firecrackers adorning them beautifully too!
Firecracker Cupcakes: A Celebration of Color and Flavor
I can already feel the excitement building for those warm summer days, the sun shining brightly as we gather with friends and family to celebrate. And what better way to bring a little extra joy to your Fourth of July festivities than with these delightful Firecracker Cupcakes? These cupcakes are not just a dessert; they’re a canvas for creativity, filled with vibrant colors and flavors that reflect the spirit of the holiday. Trust me when I say, once you take that first bite, you’ll be transported to a world of sweet nostalgia, fireworks crackling in the distance, laughter ringing in the air, and memories made over shared desserts. Let’s dive into these next steps together!
Step 5: Swirling Colors for a Stunning Effect
Now that your batter is beautifully colored, it’s time to create that eye-catching swirl effect! This step is absolutely paramount because it allows each cupcake to showcase its own unique design while ensuring every bite is as visually stunning as it is delicious. Using a toothpick, gently swirl through the cake batter in each cupcake liner. Don’t worry about being too perfect here; a light touch is all you need. What you’re aiming for is just enough movement to blend the colors slightly without completely mixing them together. This creates those dreamy marbled effects that will dazzle everyone at your celebration.
As you swirl, watch how the colors dance together—the white against the bold red and blue will create an utterly intoxicating visual. Be careful not to overdo it; too much swirling could lead to muddy colors instead of those beautiful distinct layers. It’s important to maintain that separation so each layer shines through when baked! Remember, this step is all about bringing artistic flair into your baking—so let your creativity flow!
Step 6: Baking Your Colorful Creations
Once you’ve swirled those colors into your cupcake liners like an artist painting their masterpiece, it’s time to pop them into the oven! Preheat your oven to 350°F—a temperature that’s just right for achieving moist but perfectly cooked cupcakes. The key here is patience; I know it’s tempting to open that oven door early out of curiosity (believe me, I’ve been there!), but keeping the door closed until at least 18 minutes ensures consistent heat distribution.
Bake them for 18-21 minutes or until you can insert a toothpick and it comes out clean—this is the best test for doneness! Keep an eye on those lovely little cakes during their baking journey; they will rise beautifully, filling your kitchen with an enticing aroma that sings of sweet vanilla and buttery goodness. You’ll know they’re ready when they spring back lightly when touched and have formed a golden top. Remember, every oven behaves differently! If yours tends to run hot or cold, adjust accordingly—you want perfection in every bite.
Step 7: Melting White Chocolate Magic
While those gorgeous cupcakes are baking away, let’s turn our attention to something truly magical—melted white chocolate! This creamy delight is going to be the hero of our frosting and add a richness that complements our colorful cupcakes beautifully. Start by placing one cup of white chocolate chips in a microwavable bowl; then microwave them in short bursts of about 15 seconds each time. Stir gently between intervals; this step prevents overheating and ensures smooth melting.
What makes this technique so important? Well, melted chocolate creates an exquisite texture in your frosting—it becomes luscious and silky smooth rather than grainy or clumpy if overheated. Once melted and smooth without any lumps, allow it to cool down before adding it into your frosting mixture later on. Patience is key here—if you rush this step by proceeding while it’s still warm, you’ll end up with melted butter instead of fluffy frosting! So give it some time; trust me when I say it’s worth the wait!
Step 8: Crafting Your Creamy Frosting
With the sweet aroma of freshly baked cupcakes wafting through your kitchen and that velvety white chocolate ready for action, let’s whip up some frosting that will leave everyone begging for more! In a mixing bowl (a stand mixer works wonders here), beat one cup of salted butter until creamy—this should take about two minutes at medium speed. The butter should become light in color and smooth like liquid gold—a sign you’re on the right track!
Next comes the powdered sugar—gradually add four to five cups while continuing to mix on low speed at first (to avoid a sugary cloud!). You want everything blended evenly before turning up the speed. After incorporating all that sweetness, add in five to seven tablespoons of heavy cream along with one tablespoon of fresh lemon juice—this delightful addition serves two purposes: it cuts through some sweetness while adding a refreshing brightness that balances everything out perfectly.
Keep mixing until everything combines beautifully! The goal here is lightness; so once you’ve achieved a thick consistency suitable for piping (think whipped cream but denser), add in your cooled melted white chocolate from earlier. Mix again until fully integrated—this gives our frosting its signature richness! Afterward, crank up that mixer speed high for about five whole minutes—it might seem long but trust me on this one—it transforms your frosting from good to absolutely extraordinary by making it light and fluffy!
Conclusion:
As we wrap up this delightful journey through making Firecracker Cupcakes, I hope you’re feeling just as excited as I am! These spirited little cakes embody everything that makes summertime celebrations so special—they’re bursting with color and flavor while being incredibly easy to whip up. It’s not just about the visual appeal; it’s about that scrumptious combination of fluffy cake layers and creamy frosting that truly elevates each bite. The tangy hint from the lemon juice mingles perfectly with the sweet white chocolate frosting, creating an utterly intoxicating experience that will leave everyone begging for more.
You absolutely must try this recipe not only because it delivers on taste but also because it’s such a joy to make! Imagine gathering your loved ones around, decorating these cupcakes together—it becomes more than just baking; it’s creating memories filled with laughter and love. These cupcakes shine at any occasion—be it backyard barbecues or Fourth of July picnics—the moment you pull them from the oven is like unveiling hidden treasures. The sweet aroma wafting through your kitchen will draw everyone in like bees to honey!
As far as serving suggestions go, picture savoring one of these delectable cupcakes with a refreshing glass of lemonade on a sunny afternoon. Or perhaps pairing it with a scoop of vanilla ice cream for an extra indulgent dessert experience—I promise you won’t regret it! For those cozy evenings, why not enjoy one alongside a warm cup of chamomile tea? There’s something magical about how the flavors dance together.
Feeling adventurous? This recipe is wonderfully adaptable—I can almost see your creative mind racing! You could swap out the white chocolate chips for dark chocolate or even add zesty orange zest into your frosting for an extra kick. How about experimenting with different colors for various holidays? The possibilities are endless! So go ahead—try this recipe out for yourself, share your own twists on it with family and friends, and embrace the joy that comes from baking together. Can’t wait to hear how your Firecracker Cupcakes turn out!
Firecracker Cupcakes
Celebrate summer with vibrant Firecracker Cupcakes! Easy to make and delightful to eat—perfect for any festive gathering. Try them today!
- Prep Time: 30 minutes
- Cook Time: 20 minutes
- Total Time: 50 minutes
- Yield: Approximately 24 cupcakes 1x
- Category: Dessert
- Method: Baking
- Cuisine: American
Ingredients
- 1 box white cake mix
- Blue gel food coloring
- Red gel food coloring
- 1 cup white chocolate chips
- 1 cup salted butter (softened)
- 4–5 cups powdered sugar
- 5–7 tbsp heavy cream
- 1 tbsp lemon juice
- Red pull-and-peel licorice (for decoration)
- Patriotic sprinkles (for decoration)
Instructions
- Preheat the oven to 350°F (175°C). Line a cupcake pan with festive liners.
- Prepare the cake mix according to package instructions. Divide the batter into three bowls: one for each color (red, blue, and white).
- Add blue gel food coloring to one bowl and red gel food coloring to another, mixing until desired colors are achieved.
- Pour alternating spoonfuls of each colored batter into the cupcake liners, filling them about three-fourths full. Use a toothpick to swirl colors gently for a marbled effect.
- Bake for 18-21 minutes or until a toothpick inserted in the center comes out clean. Allow cupcakes to cool completely.
- For frosting, melt white chocolate chips in the microwave until smooth. In a mixing bowl, cream softened butter before gradually adding powdered sugar and mixing in heavy cream and lemon juice.
- Add melted white chocolate once cooled and beat until fluffy.
- Frost cooled cupcakes and decorate with patriotic sprinkles and pieces of red pull-and-peel licorice.
Nutrition
- Serving Size: 1 cupcake (70g)
- Calories: 290
- Sugar: 30g
- Sodium: 180mg
- Fat: 15g
- Saturated Fat: 9g
- Unsaturated Fat: 5g
- Trans Fat: 0g
- Carbohydrates: 37g
- Fiber: 0g
- Protein: 2g
- Cholesterol: 40mg