Indulge in 7 Delightful Banana Pudding Brownies Today!
There’s something profoundly comforting about the act of baking, don’t you think? It’s like a warm embrace on a chilly day, a sweet escape that transcends the ordinary. When I think about the magic of food, it often revolves around moments shared with loved ones—those cherished memories infused with laughter, stories, and the tantalizing aromas wafting through the air. Today, I invite you to indulge in a delightful creation that perfectly embodies this spirit: banana pudding brownies! You’re not just making a dessert; you’re crafting an experience that bridges tradition and innovation, where rich chocolatey goodness meets the creamy allure of banana pudding. Trust me when I say that these brownies are more than just a treat; they’re little bites of joy that bring people together and create smiles.
As we embark on this culinary journey together, imagine the aroma of melting butter mingling with the sweetness of sugar and vanilla—it’s downright intoxicating! The moment you take that first bite, you’ll be greeted by a symphony of flavors—a fudgy brownie base topped with velvety banana pudding and fresh banana slices. Each layer plays its part beautifully, creating an utterly satisfying blend that’s sure to become a staple in your dessert repertoire. So roll up your sleeves, gather your ingredients, and let’s dive into creating these heavenly banana pudding brownies together!
Indulge in 7 Delightful Banana Pudding Brownies Today!: A Sweet Symphony of Flavors
With every bite of these banana pudding brownies, you’ll find yourself enveloped in the warmth of nostalgia while experiencing something wonderfully new. This recipe is not merely about combining ingredients; it’s about creating a memory—one that brings together the rich essence of chocolate with the creamy comfort of banana pudding. Whether you’re celebrating a special occasion or simply looking to brighten an ordinary day, these brownies are perfect for sharing (or keeping all to yourself!). Let’s get started on this delightful adventure!
Ingredients:
Oh boy! Here we go with the ingredients—the very heart and soul of our banana pudding brownies. Each component plays a pivotal role in achieving that perfect balance of textures and flavors.
- 1 cup (2 sticks or 226g) unsalted butter, softened to room temperature. This is crucial for creaming properly and creating that light, airy texture we’re aiming for in our indulgent banana pudding brownies today! If your butter is too cold, it won’t cream effectively; if it’s melted, your brownies will spread too much in the pan. Opt for high-quality butter—European-style butter with higher fat content can elevate your brownies to new heights!
- 2 cups granulated sugar. Sugar isn’t just about sweetness; it’s also about texture! In our brownie batter, sugar helps create that delightful chewy consistency while balancing out the richness from the cocoa powder. When selecting sugar, look for finely granulated options as they dissolve better during mixing.
- 4 large eggs. Eggs are our binding agents—think of them as tiny miracle workers holding everything together while adding moisture and richness to each bite. Room temperature eggs will incorporate more easily into your mixture compared to cold ones straight from the fridge.
- 2 teaspoons vanilla extract. Ahh, vanilla—the liquid gold of baking! This extract enhances all other flavors present in our brownies without overwhelming them. It adds warmth and depth that’s absolutely paramount to achieving balance in desserts.
- 1 cup all-purpose flour. Flour provides structure to our brownies without making them too cakey; we want fudgy perfection here! When measuring flour, fluff it up first before spooning it into your measuring cup for accuracy—it prevents overpacking which can lead to dense results.
- 1 cup cocoa powder. Cocoa powder is where we get that chocolatey richness! Unsweetened cocoa is what you’ll want here because it allows us to control sweetness while packing intense flavor into our brownie base. Look for high-quality brands for maximum taste impact.
- 1/2 teaspoon baking powder. While we want our brownies dense and fudgy rather than fluffy like cake, a pinch of baking powder still helps give them lift without compromising their chewy texture—this delicate balance is essential for success!
- 1/2 teaspoon salt. Salt isn’t just there to season; it amplifies all those sweet flavors while cutting through any overwhelming richness from the butter or chocolate—it’s non-negotiable!
- 1 cup banana pudding mix. This is where things get fun! The pudding mix adds both flavor and creaminess atop our brownie base—transforming them into something uniquely delicious! Ensure it’s instant mix as we need it to set quickly.
- 2 cups milk. Milk hydrates our pudding mix perfectly and ensures we achieve that lush consistency we crave! Whole milk yields richer results but feel free to use any plant-based alternative if preferred—you’ll still enjoy fantastic outcomes.
- 1 cup whipped cream. Lightly folding whipped cream into our pudding gives us an airy texture—it creates clouds of lusciousness atop those fudgy brownies! If you’re short on time or ingredients, store-bought can work just fine too!
- 1 banana, sliced. Fresh bananas add natural sweetness as well as beautiful color—we eat with our eyes first after all! Choose ripe bananas for optimal flavor but avoid overly mushy ones since they’ll be layered directly atop our dessert.
Now that we’ve gathered all these wonderful ingredients together let’s move forward into what tools you’ll need before diving headfirst into creating magic!
Equipment You’ll Need:
Before we begin baking these delightful treats, having the right tools at hand makes this entire process smoother and so much more enjoyable! Think of these instruments as essential partners in your culinary journey toward crafting something truly special.
- Mixing bowls (at least two). A good set of mixing bowls is key—they allow you to easily separate wet ingredients from dry ones without any mess or fuss. Opt for glass or stainless steel materials which help maintain temperature while mixing.
- Whisk or electric mixer: The choice between whisking by hand or using an electric mixer depends on personal preference; however I highly recommend using an electric mixer if you’re looking for ease during creaming butter and sugar together—it saves time while ensuring thorough incorporation!
- Rubber spatula: A flexible rubber spatula will become your best friend here; it’s perfect for scraping down sides of bowls ensuring nothing goes unnoticed when combining mixtures—it also gently folds whipped cream into puddings without deflating them!
- Baking pan (9×13-inch). A standard rectangular baking pan works wonders for this recipe—you want one made from heavy-duty material which conducts heat evenly so edges cook perfectly alongside softer centers.
- Parchment paper (optional). While greasing your pan works fine too—the parchment paper provides easy removal post-baking while keeping those edges beautifully intact!
With all these wonderful tools at your disposal now let’s roll up those sleeves even further—we’re ready to begin preparing these indulgent banana pudding brownies today!
Step 1: Preheat Your Oven & Prepare Your Pan
The journey truly begins here: preheating your oven isn’t just routine—it sets off chemical reactions within those buttery delights waiting patiently inside! Preheat your oven to 350°F (175°C) so it’s nice and hot when you’re ready to slide those brownies in—a critical step because an adequately heated oven ensures even baking throughout without any soggy middles or burnt edges later on down the line! While waiting patiently for this momentous occasion (and maybe snacking on some chocolate), take a moment to prepare your baking pan by greasing it lightly or lining it with parchment paper which acts as insurance against sticky mishaps later—trust me on this one!
Step 2: Cream Butter & Sugar Together
Now comes one of my favorite parts—the creaming process! In a large mixing bowl (or using an electric mixer), combine your softened butter with granulated sugar until light and fluffy—a process known as “creaming.” This step might seem simple yet it’s absolutely paramount because incorporating air into this mixture creates lift within baked goods resulting in tender textures instead of dense bricks akin cement blocks—you wouldn’t want that now would you? As you whip away diligently perhaps envision soft clouds forming right before your eyes; aim for about 3 minutes until everything looks pale yellow—not only does this provide structure but also builds flavor through caramelization when baked!
Step 3: Add Eggs & Vanilla Extract
Next up are our lovely eggs along with that dreamy vanilla extract—a match made in heaven if ever there was one! Crack each egg into a separate bowl beforehand (just in case anything suspicious lurks within), then slowly introduce them one by one into your creamed mixture whilst continuing to beat until fully incorporated after each addition—it guarantees proper blending avoiding potential curdling issues later down line since cold ingredients react poorly together sometimes leading disappointment instead deliciousness! And don’t forget about adding two teaspoons worth fragrant vanilla extract at this stage either—its aromatic notes weave seamlessly through every bite elevating flavors beyond measure—it truly makes all difference!
Step 4: Combine Dry Ingredients Separately
While waiting patiently during previous steps consider taking advantage by whisking together flour mixture—in another bowl combine all-purpose flour along side cocoa powder along salt & baking powder until evenly blended (this ensures no rogue clumps sneak their way back into batter)—this practice promotes uniformity plus ensures leaveners activate effectively once they hit wet components later helping achieve desired height during baking phase overall maintaining integrity throughout final product itself too—a vital consideration indeed my friend!
Now you’re officially equipped with both knowledge—and spirit—to continue onto creating those indulgent masterpieces ahead—I promise they’ll be worth every moment spent crafting side-by-side together throughout magical process unfolding ahead next!!
Step 5: Whisking in the Dry Ingredients – The Heart of the Brownie Base
Now that you have your wet ingredients beautifully combined, it’s time to introduce the dry ingredients into this luscious mixture. Grab a separate bowl and whisk together your all-purpose flour, cocoa powder, baking powder, and salt. This step is crucial because it ensures that every ingredient is evenly distributed, preventing any clumps from forming in your brownies. The cocoa powder needs to be well incorporated to provide that rich, chocolatey flavor we’re all craving. I can almost smell the aroma of chocolate wafting through my kitchen as I write this!
Once you’ve whisked those dry ingredients together until they create a fine, even mix, gradually add them to your wet ingredients. Trust me on this: adding them incrementally allows for better incorporation and prevents any lumps from ruining the silky texture of your brownie batter. Use a spatula or wooden spoon to gently fold the dry ingredients into the wet mix. Avoid over-mixing; you want just enough blending so that everything comes together in a smooth batter without losing that light and airy feel. As you stir, revel in how the colors deepen and transform into a decadent chocolate hue—this is where magic happens!
Step 6: Pouring the Brownie Batter – The Anticipation Builds
With your brownie batter now perfectly mixed and oozing with chocolaty goodness, it’s time to pour it into your greased baking pan. This step might seem simple, but it’s where we start creating layers of delightful flavor and texture. Pour the batter directly into the center of your prepared pan, then use a spatula to gently spread it out towards the edges. You want an even layer here because this ensures uniform baking; if one part is thicker than another, you may end up with uneven cooking—nobody wants undercooked brownies!
Once you’ve spread it evenly across the pan, take a moment to admire its glossy finish before sliding it into your preheated oven. Bake these beauties at 350°F (175°C) for about 25-30 minutes. Now here’s where patience pays off—don’t rush this step! You’ll know they’re ready when a toothpick inserted in the center comes out with just a few moist crumbs clinging to it—not gooey batter! That slight underbake is absolutely paramount as it ensures that dreamy fudgy texture we love in brownies rather than dry cake-like squares.
Step 7: Cooling Your Brownies – The Crucial Waiting Game
Once those brownies have baked to perfection, remove them from the oven and allow them to cool in their pan for about 15-20 minutes before transferring them onto a wire rack. This cooling phase is essential because while they’re warm, they continue to set up slightly more as they cool down. If you were to cut into them right away, you might find they fall apart instead of holding their shape—a situation we definitely want to avoid! As they cool on the rack, their edges will firm up while maintaining that gloriously gooey center.
Don’t be tempted to skip this cooling period; I promise you it’s worth every minute spent waiting! While you’re allowing them to cool, take this time for reflection or perhaps prepare yourself for what’s coming next—the banana pudding layer! The contrast between warm brownies and cold pudding will create an utterly intoxicating experience for anyone lucky enough to indulge in these treats.
Step 8: Preparing the Banana Pudding – A Creamy Dream Awaits
As your brownies are cooling beautifully, let’s dive into preparing that creamy banana pudding layer—it’s what truly sets these banana pudding brownies apart! In a medium-sized bowl, whisk together one cup of banana pudding mix with two cups of milk until it thickens up nicely—this usually takes just a couple of minutes. What makes this step so special is not just its flavor but also its texture; we’re aiming for something luxuriously creamy that complements our dense brownie base perfectly.
After achieving that delightful thick consistency (think velvety liquid gold), set aside about half of this banana pudding mixture because we’ll need it later for topping. Now comes arguably my favorite part: gently folding in one cup of whipped cream into the remaining pudding mixture until it’s light and fluffy. This step transforms our already delicious pudding into something truly extraordinary—it adds airiness and elevates the entire dessert experience! Gently combine using a spatula; remember—patience here yields texture! Folding maintains that lightness while ensuring every bite remains cloudlike and indulgent.
Next Major Phase: Layering Your Indulge in 7 Delightful Banana Pudding Brownies Today!
Step 9: Spreading That Decadent Pudding – Uniting Flavors
Now comes the moment we’ve been eagerly waiting for: spreading that luxurious banana pudding over our cooled brownies! Using an offset spatula or simply a large spoon, dollop generous amounts of that heavenly whipped banana pudding onto your brownie base. Start from the center and work your way outwards so you end up with an even layer covering every corner—this is where those flavors truly unite.
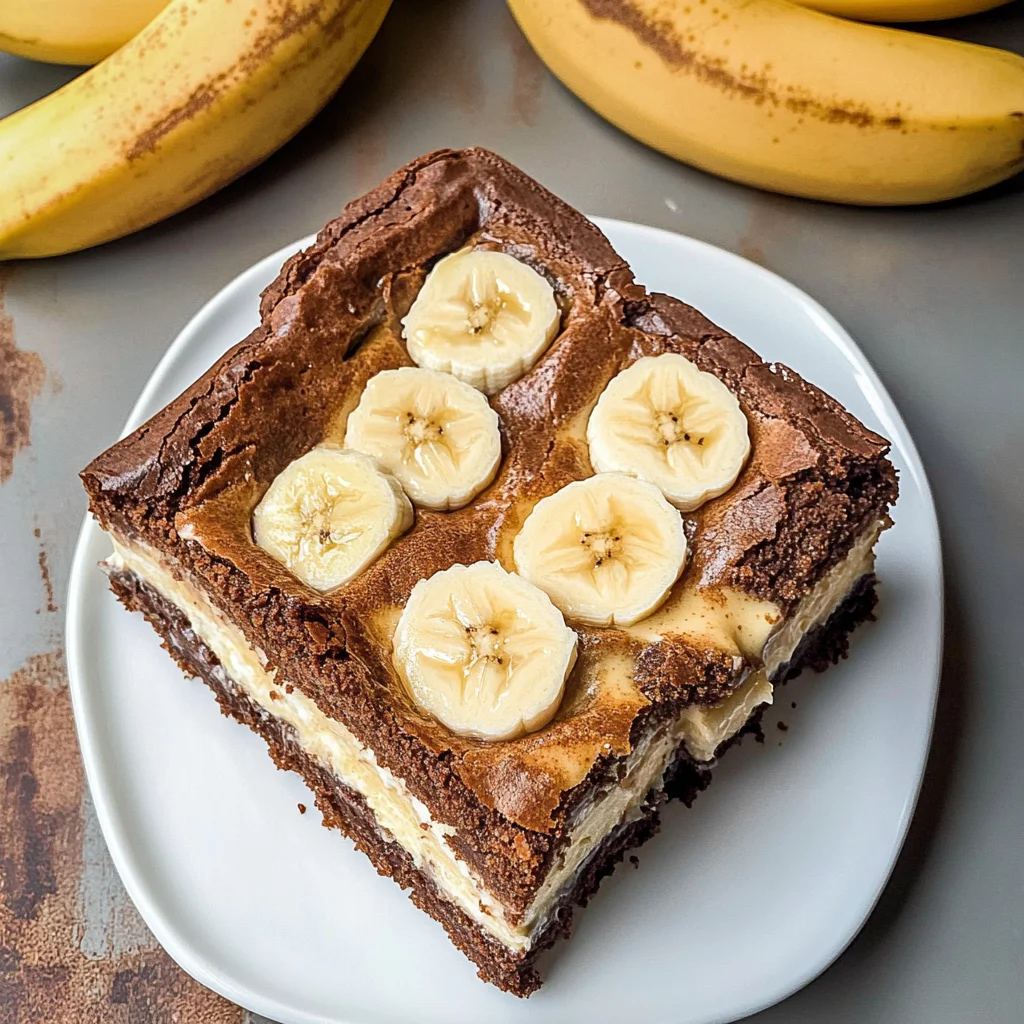
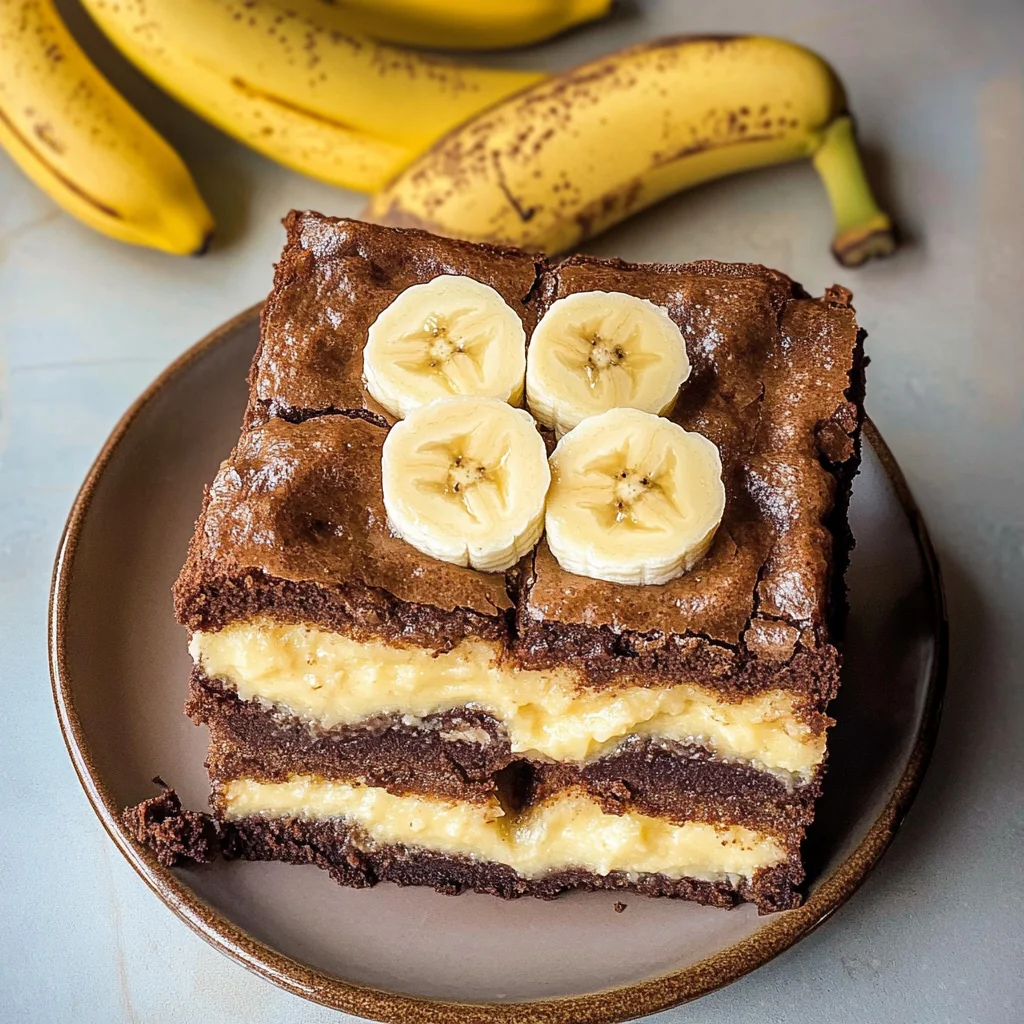
As you spread it out smoothly across the surface of those fudgy brownies beneath, take a moment to appreciate how each spoonful glides effortlessly over them like soft clouds meeting solid ground—a beautiful union indeed! Once you’ve achieved an even layer (don’t skimp here; make sure each bite has enough pudding!), top with slices from one ripe banana carefully arranged on top—this not only looks stunning but adds an extra burst of fresh flavor as well.
Step 10: Chilling – The Transformational Moment
Finally, once you’ve adorned those glorious creations with banana slices, it’s time for yet another waiting game—you’ll want to chill these beauties in the refrigerator for at least one hour before serving them up! Why chill? Well, this step allows all those flavors to meld together beautifully while also setting up our pudding layer so it holds its shape when cut into squares later on. The transformation during chilling is profound; flavors deepen and harmonize as they mingle together like old friends at a reunion!
So resist any urge to dive right in; trust me when I say that waiting only enhances their overall experience—it builds anticipation and allows everyone around you (including yourself!) to savor every second leading up to tasting these incredible desserts. After an hour has passed, slice yourself a piece (or two) and prepare for an explosion of deliciousness unlike anything else!
Indulge in 7 Delightful Banana Pudding Brownies Today—you deserve it!
Storage and Enjoyment Tips for Your Indulge in 7 Delightful Banana Pudding Brownies Today!
Now that you’ve crafted these delightful banana pudding brownies, I can hardly contain my excitement for you to dig in! Picture the scene: a warm kitchen filled with the intoxicating scent of chocolate and ripe bananas, your loved ones gathered around, each eager to taste this sweet creation. But what happens if you have a few leftovers? Fear not! With a bit of care, you can savor these brownies even days later, and trust me, they’ll be just as delicious.
Storing Leftover Indulge in 7 Delightful Banana Pudding Brownies Today!
To keep your banana pudding brownies fresh and utterly scrumptious, transfer them into an airtight container—this is absolutely paramount for preserving their soft texture. You can store them in the refrigerator for up to five days without losing any of that wonderful flavor. If you want to maintain their mouthwatering qualities even longer, consider placing a slice of bread in the container; it works wonders at keeping moisture levels just right! After a few days, the brownies will still taste divine, melding flavors beautifully as they chill together. When you’re ready to enjoy them again, simply take them out and let them come to room temperature; this will revive their delightful fudginess. Trust me on this—you won’t want to miss out on that rich taste!
Freezing Banana Pudding Brownies for Later
If you’re looking to save some for a special occasion or just want to prepare ahead (because let’s be honest, who doesn’t love a good head start?), freezing these banana pudding brownies is an excellent option! They freeze beautifully when wrapped tightly in plastic wrap or stored in a freezer-safe container. You can keep them frozen for up to three months—so convenient! When you’re ready to indulge again, simply remove them from the freezer and let them thaw overnight in the fridge or at room temperature for an hour or so. This makes it incredibly easy to always have something sweet on hand for unexpected visitors or those late-night cravings when only chocolate will do. The joy of having these treats available at your fingertips is simply irresistible!
Indulge in 7 Delightful Banana Pudding Brownies Today!
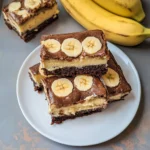
Indulge in a delightful treat with our Banana Pudding Brownies! This recipe combines the rich, fudgy goodness of chocolate brownies with the creamy allure of banana pudding, creating an unforgettable dessert experience. Each bite offers a perfect harmony of flavors and textures, making them ideal for any occasion—whether it’s a casual family gathering or a festive celebration. With layers of chocolatey brownie and luscious banana pudding topped with fresh banana slices, these brownies are sure to impress everyone. Plus, they’re easy to make and even easier to enjoy!
- Prep Time: 20 minutes
- Cook Time: 30 minutes
- Total Time: 50 minutes
- Yield: Approximately 16 servings 1x
- Category: Dessert
- Method: Baking
- Cuisine: American
Ingredients
- 1 cup unsalted butter
- 2 cups granulated sugar
- 4 large eggs
- 2 teaspoons vanilla extract
- 1 cup all-purpose flour
- 1 cup cocoa powder
- ½ teaspoon baking powder
- ½ teaspoon salt
- 1 cup banana pudding mix
- 2 cups milk
- 1 cup whipped cream
- 1 ripe banana, sliced
Instructions
- Preheat your oven to 350°F (175°C) and prepare a 9×13-inch baking pan by greasing it or lining it with parchment paper.
- In a large mixing bowl, cream the softened butter and granulated sugar until light and fluffy.
- Add the eggs one at a time, followed by the vanilla extract, mixing until well combined.
- In another bowl, whisk together flour, cocoa powder, baking powder, and salt.
- Gradually add the dry ingredients to the wet mixture until combined but don’t overmix.
- Pour the batter into the prepared pan and spread evenly; bake for 25-30 minutes or until a toothpick comes out with moist crumbs.
- While cooling, whisk together banana pudding mix and milk until thickened; fold in whipped cream gently.
- Spread pudding over cooled brownies and top with banana slices; chill for at least an hour before serving.
Nutrition
- Serving Size: 1 brownie (70g)
- Calories: 290
- Sugar: 24g
- Sodium: 150mg
- Fat: 14g
- Saturated Fat: 8g
- Unsaturated Fat: 6g
- Trans Fat: 0g
- Carbohydrates: 38g
- Fiber: 2g
- Protein: 3g
- Cholesterol: 45mg