Moist Pistachio Pudding Bread – A Sweet Simple Delight
There’s something truly magical about the way certain recipes can transport us to moments in time, evoking memories that are as sweet as the treat itself. The Moist Pistachio Pudding Bread – A Sweet Simple Delight is one such recipe. With every bite, you’re enveloped in a soft, tender crumb that sings of nostalgia and whimsy, enticing you to savor not just the flavors but the experience of baking it too. Imagine walking into a warm kitchen filled with the nutty aroma of toasted pistachios mingling with the rich scent of butter and sugar; it’s like an embrace from a loved one. This bread isn’t just food; it’s a celebration of life’s simple pleasures, making it perfect for breakfast, an afternoon snack, or even dessert. I promise you, once you make this delightful creation, it will become a cherished staple in your kitchen.
As we embark on this culinary adventure together, let me share a little secret: what makes this recipe truly special is its versatility and ease. The harmonious blend of pistachio pudding mix and chopped nuts creates an utterly intoxicating flavor profile that feels indulgent yet approachable. Whether you’re looking to impress guests at a brunch gathering or simply yearning for a comforting treat during your quiet moments at home, this bread fits the bill perfectly. It brings people together, sparking conversations and smiles with each slice, whether enjoyed plain or dressed up with icing. Trust me on this—once you experience the moistness and flavor explosion packed into each slice, you’ll be hooked!
Moist Pistachio Pudding Bread – A Sweet Simple Delight: A Dreamy Treat Awaits
Now that we’ve set the stage for our delightful baking escapade, let’s dive into creating our Moist Pistachio Pudding Bread! This recipe is not only incredibly easy but also yields a treat that feels sumptuous enough for any occasion. The beauty of this dish lies in its simplicity—every ingredient plays a vital role in crafting that perfect loaf that many will rave about.
Ingredients:
As we prepare to gather our ingredients, think of this as assembling the team players in our culinary masterpiece. Each item contributes uniquely to the overall symphony of flavors we’re about to create. Let’s break down what you’ll need:
- 2 cups All-Purpose Flour: This ingredient is non-negotiable when it comes to providing structure to our bread. All-purpose flour has just the right balance of protein content which helps develop gluten—a crucial element for achieving that lovely texture we crave. When selecting your flour, aim for unbleached varieties if possible; they tend to yield better results because they haven’t been treated with chemical agents that can affect taste and texture.
- 3 large Eggs: Room temperature eggs are essential here because they incorporate more easily into batters than cold eggs straight from the fridge. They add moisture, richness, and act as a binding agent while also helping with leavening during baking. If you’re wondering why this matters—well, eggs contribute to lifting the bread while keeping it tender and moist.
- 1 cup Unsalted Butter: I adore using unsalted butter in my baking because it allows me to control the salt levels precisely—this is crucial for achieving balanced flavors! You can melt it for easier mixing if you prefer; melted butter blends beautifully with sugars to create an irresistible base of flavor.
- 1 teaspoon Salt: Salt might seem insignificant in sweets but trust me—it enhances flavors! Whether using kosher or table salt doesn’t matter too much here; just remember that salt can intensify sweetness and round out all those beautiful flavors.
- 1 tablespoon Baking Powder: Freshness is key here! Always check your baking powder’s expiration date before use; stale leavening agents won’t provide the lift we want in our bread. This little powerhouse ensures our loaf rises beautifully without becoming dense.
- 1 cup White Sugar: While white sugar gives us sweetness and moisture retention in our bread, swapping it with brown sugar can add depth due to its molasses content—an option worth considering if you’re looking for something richer!
- 1 cup 2% Milk: Milk adds moisture and contributes to tenderness in our bread; however, feel free to substitute with any dairy-free alternative like almond or oat milk if preferred! Just keep an eye on consistency as some alternatives may vary.
- 1 box Jell-O Pistachio Pudding Mix: This magical ingredient provides both flavor and moisture without needing additional steps like making pudding from scratch! Instant or sugar-free versions work wonderfully here.
- 1/2 cup Chopped Pistachios: Not only do these nuts contribute delightful texture and nutty flavor throughout each slice, but they also serve beautifully as a garnish if you’re feeling fancy!
- 1 cup Icing Sugar: For those who want to dress their bread up a notch! This sweet glaze adds another layer of indulgence without overpowering the natural pistachio flavor already present.
- As needed 2% Milk (for Icing): Adjusting milk content helps achieve your desired icing consistency—whether you prefer a thicker glaze or something more drizzled-like!
Equipment You’ll Need:
Now that we have everything ready to go, let’s talk about tools—because having the right equipment makes all the difference when you’re creating something wonderful! Think of these tools not merely as items but rather as essential partners in our baking journey:
- Mixing Bowls: A good set of mixing bowls is indispensable! Choose various sizes so you can mix wet ingredients separately before combining them with dry ones—a crucial step for ensuring an even batter.
- Measuring Cups & Spoons: Precision is paramount in baking! Invest in quality measuring cups and spoons so every scoop contributes accurately towards your final product.
- Electric Mixer: While you could mix by hand (and sometimes I do!), using an electric mixer saves time and effort while achieving proper creaming—a process essential for incorporating air into your batter.
- Rubber Spatula: This versatile tool will help scrape down sides of bowls efficiently as well as fold delicate mixtures gently when needed.
- Loaf Pan (9×5 inch): Opting for a high-quality metal loaf pan ensures even cooking throughout; dark-coated pans may yield slightly different results due to heat conductivity compared against glass ones!
With all these components gathered together harmoniously—the stage is set for us to create something truly extraordinary!
Preparing the Moist Pistachio Pudding Bread – A Sweet Simple Delight
Step 1: Melting Butter & Creaming
Let’s start by melting our unsalted butter either on low heat over stove or microwave until it’s just melted—not bubbling away! Afterwards, allow it cool slightly before adding sugar—this process known as creaming helps incorporate air into mixture which leads us towards achieving that light-and-fluffy texture we long for in baked goods. Once cooled enough (but still liquid gold), combine melted butter with white sugar using your electric mixer at medium speed until creamy—this should take around 2 minutes! Keep an eye out here; you want everything well-combined but don’t over beat—the goal is smoothness rather than volume at this stage!
Step 2: Adding Eggs & Vanilla
Once you’ve achieved that lovely creamy mixture from step one, it’s time for our eggs! Crack them directly into bowl ensuring no yolks break prematurely (we want every drop!). Let them join their buttery partner before turning mixer back on low speed until incorporated thoroughly—a minute should suffice here—but remember don’t rush this step—it’s crucial for building structure within final loaf!
Step 3: Incorporating Dry Ingredients
Now comes my favorite part where we bring everything together! In another bowl whisk together all-purpose flour along with baking powder and salt until evenly mixed—a solid foundation ensures balanced rising during bake time ahead! Gradually introduce dry mixture into wet slowly allowing mixer work through batch before adding remaining portions—it’ll look slightly lumpy initially but hang tight because we’re getting closer by folding remaining elements later on!
Step 4: Mixing In Milk & Pudding Mix
After ensuring all dry ingredients are combined smoothly—let’s pour milk right over batter followed closely behind by pistachio pudding mix stirring gently until fully integrated—it’ll thicken up quickly transforming liquid blend into rich velvety dreamscape almost instantly giving life back again through added moisture from milk combined thoughtfully within batter yielding delicious results ahead where lusciousness awaits after oven embrace soon enough!
Continue with excitement as we delve deeper into further steps…
Step 5: Mixing the Wet Ingredients – Creating a Flavorful Base
Now that we’ve got our dry ingredients ready to go, it’s time to dive into mixing our wet ingredients, which is where the magic truly begins. In a large mixing bowl, start by combining your room temperature eggs and the unsalted butter. If you haven’t melted the butter yet, now’s the perfect chance to do so; just make sure it’s not too hot when you add it to avoid scrambling the eggs! Whisk these together until they are light and fluffy—this step is crucial because incorporating air creates a delightful texture in your bread. You want to whisk vigorously for about 2-3 minutes until the mixture becomes pale and creamy; this is what gives your Moist Pistachio Pudding Bread that wonderfully soft crumb.
Next, gradually add in your white sugar, continuing to whisk everything together until it’s well combined. The sugar not only sweetens the batter but also contributes to that beautiful golden color when baked. As you mix, take a moment to enjoy the intoxicating aroma of sweet butter merging with eggs—trust me, it’s like a warm hug in your kitchen! Then pour in your milk while whisking gently; this will help create a smooth batter without any lumps. At this point, I encourage you to take a deep breath and embrace the lovely scent wafting from your mixing bowl—this is just the beginning of an extraordinary journey toward baking perfection!
Step 6: Incorporating the Pudding Mix – Adding Depth of Flavor
Now comes one of my favorite parts: adding the star ingredient, our Jell-O Pistachio Pudding Mix! This mix is more than just flavor; it’s like liquid gold that transforms an ordinary loaf into something truly special. Gently sprinkle the pudding mix into your wet ingredients while stirring with a spatula or wooden spoon. You’ll notice how quickly it dissolves and melds with that creamy mixture, creating a luscious base that’s going to give our bread its distinct pistachio flavor and moistness. Make sure there are no clumps left behind because those pesky little bits could turn into an unpleasant surprise later on.
Once everything is thoroughly mixed, allow yourself a moment to appreciate how vibrant and inviting this batter looks. It should be thick yet pourable—a beautiful green hue reminiscent of a springtime garden. This step matters immensely because not only does the pudding mix enhance flavor but also adds moisture that keeps our bread tender long after it cools down. Now, don’t rush this part! Letting those flavors meld for about 5 minutes can make all the difference in achieving that deeply satisfying taste we’re aiming for.
Step 7: Combining Dry Ingredients – Building Structure
It’s time to bring everything together! Carefully add your flour mixture into the wet ingredients in batches. I recommend doing this in three increments: first half of your flour mixture, then mix until just combined before adding in another quarter, and finally pour in the last bit. This gentle folding technique ensures that you don’t overmix—overmixing can lead to tough bread due to gluten development, which we absolutely want to avoid here! Use a spatula or wooden spoon and fold gently until you see no more streaks of flour; we’re looking for a batter that’s just combined with some small lumps still visible.
As you combine everything, watch for its transformation—the batter should be thick yet oozy at this point, almost like cake batter but denser. This density is paramount because it means we’re creating enough structure for our Moist Pistachio Pudding Bread without losing its signature softness. And oh! Don’t forget about those chopped pistachios! Gently fold them into the batter during this step; they’ll add delightful little bursts of nutty flavor and texture throughout each slice. The smell will be utterly intoxicating as those nuts mingle with sweet pistachio goodness!
Step 8: Pouring & Preparing – Ready for Baking Bliss
With everything beautifully combined, let’s prepare for baking! Preheat your oven to 350°F (175°C) if you haven’t done so already—it’s essential that our bread has an adequately heated environment when it goes in so that it rises perfectly without collapsing later on. While waiting for your oven to reach temperature, grab an appropriate-sized loaf pan—usually around 9×5 inches works wonders—and grease it generously with butter or non-stick spray if you’re avoiding dairy altogether. Line it with parchment paper if you want an easy release; trust me on this one—it makes life so much easier when you’re ready to slice into that gorgeous loaf later!
Once greased up and ready, pour your luscious batter into the prepared loaf pan and spread it evenly using a spatula or spoon. At this stage, take a moment to marvel at how rich and inviting that green-hued batter looks—it’s like nature’s own masterpiece waiting patiently for its moment in the spotlight! Gently tap the pan on the counter once or twice; this helps eliminate air bubbles trapped within—which could disrupt our glorious rise during baking—and ensures even cooking throughout. Now it’s time for our creation to find its place in that preheated oven for about 50 minutes.
Next Major Phase – Baking Your Perfect Moist Pistachio Pudding Bread – A Sweet Simple Delight
Step 9: Baking Perfection – The Art of Timing
As your Moist Pistachio Pudding Bread bakes away in its warm cocoon of heat, prepare yourself for one of life’s little joys—the irresistible aroma filling your kitchen! Around the 40-minute mark, start checking on your loaf’s progress by inserting a toothpick into its center; if it comes out clean or with just a few crumbs attached (not wet batter!), it’s time to pull it out! But remember—don’t rush this crucial final step; even if it’s taking slightly longer than anticipated (and sometimes ovens can be finicky), patience is key here.
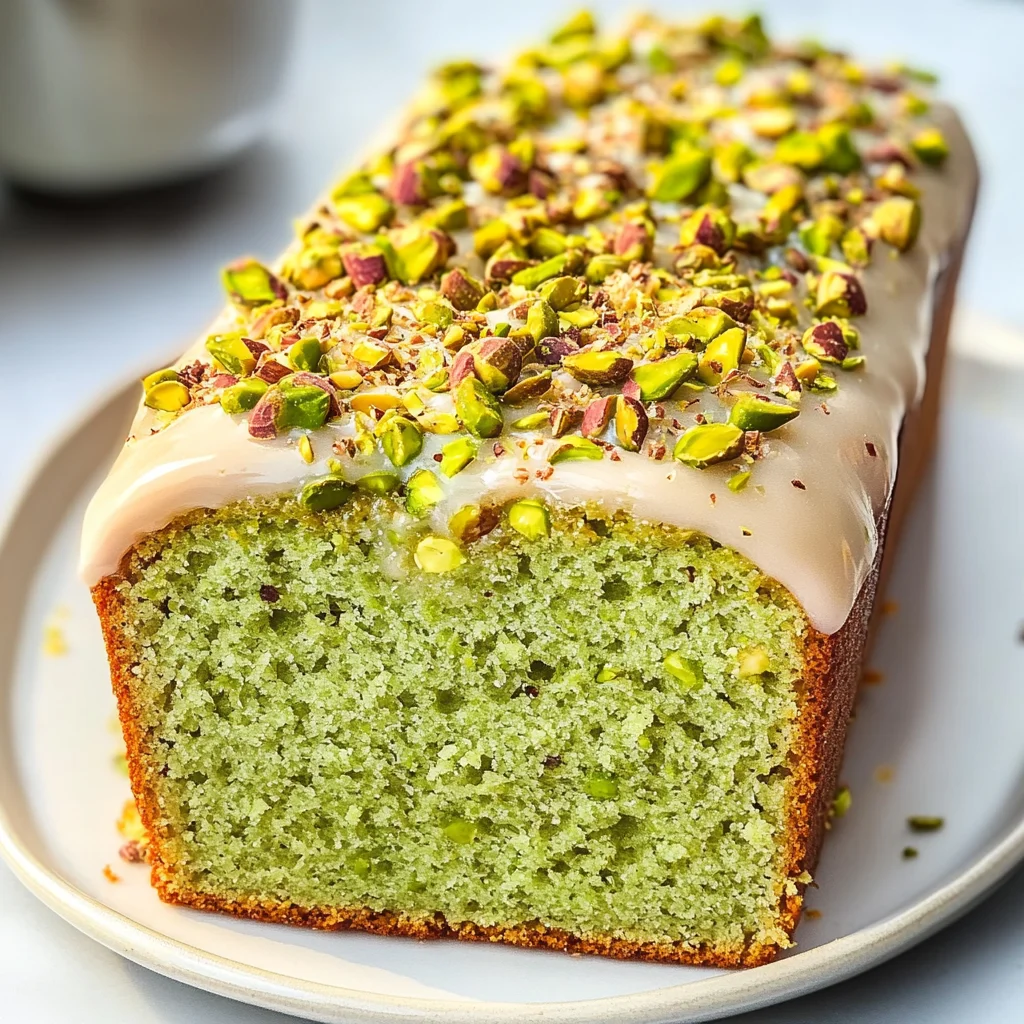
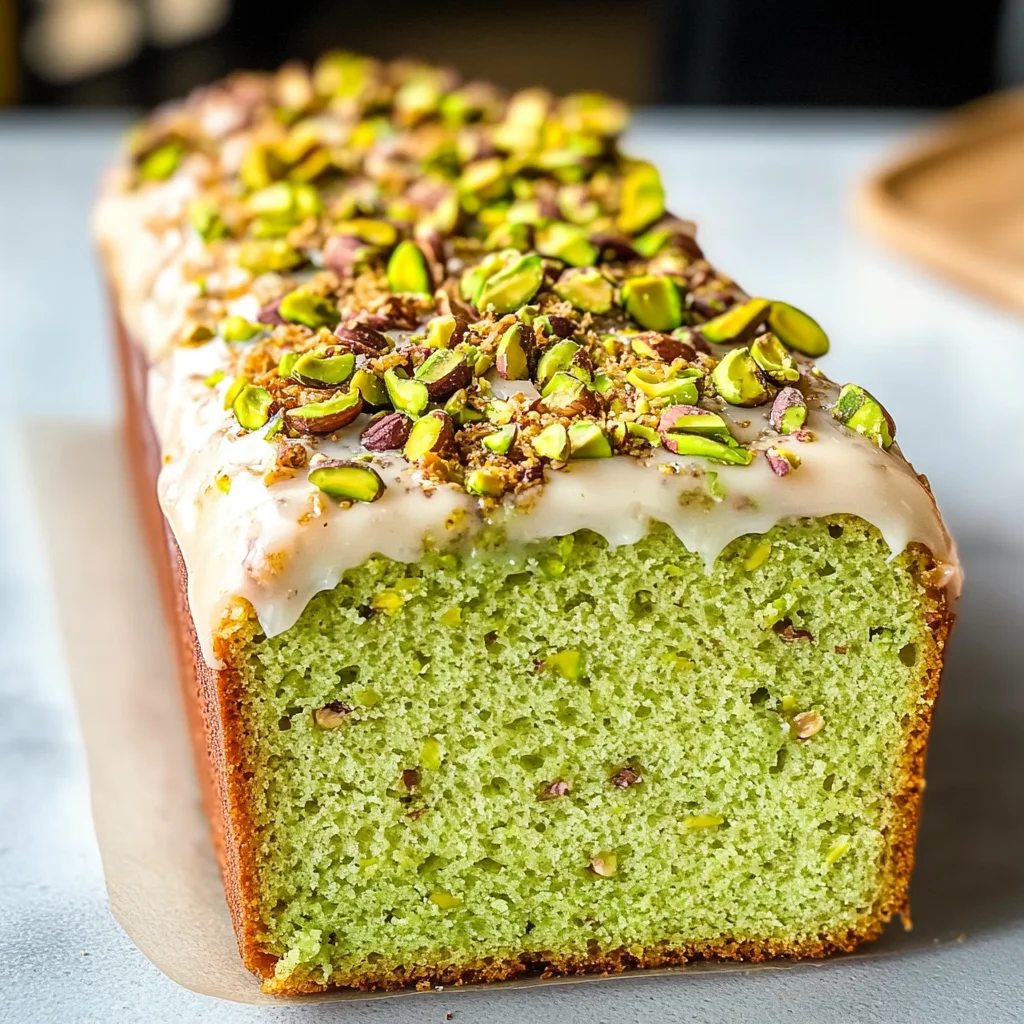
The visual cues are essential too: look for a golden-brown crust forming on top along with slight cracks—that beautiful rustic charm we adore so much! Once you’ve confirmed doneness through our trusty toothpick test, carefully remove your bread from the oven using oven mitts (safety first!). Allow it to cool in its pan for about 10-15 minutes before transferring onto a wire rack—a vital resting period where flavors continue mingling and developing further depth.
Step 10: Glazing & Serving – The Final Touches
Once cooled (but still warm!), let’s talk about finishing touches because every great creation deserves them! In a small bowl, combine icing sugar with enough milk until you achieve that perfect drizzling consistency—think pancake syrup but slightly thicker. When drizzled over slices of bread later on, it’ll create an enchanting glaze that’ll not only enhance presentation but also amplify sweetness beautifully against those nutty flavors we love so much.
Don’t forget those additional chopped pistachios reserved earlier; sprinkle them generously over each slice once glazed—they’ll add delightful crunchiness while looking stunningly vibrant atop that soft green background. And voila! You’ve turned simple ingredients into something profoundly satisfying—a true showstopper worthy of any gathering or quiet afternoon indulgence at home.
Serving Suggestions – Enjoy Every Bite
Slice up pieces as generous or delicate as you like—each bite will reveal moist goodness wrapped around crunchy pistachios that’ll have everyone coming back for more! Pair these slices with fresh fruit or perhaps even alongside tea or coffee; I promise you’ll be met with smiles all around as everyone savors each mouthful filled with heartwarming flavors. So there you have it—the journey towards creating Moist Pistachio Pudding Bread—a sweet simple delight that’s bound to hold cherished spots at breakfast tables and snack times alike! Enjoy every moment spent baking and sharing this beloved treat—you deserve it!
Storage and Enjoyment Tips for Your Moist Pistachio Pudding Bread – A Sweet Simple Delight
Now that your kitchen is filled with the intoxicating aroma of freshly baked Moist Pistachio Pudding Bread, it’s time to think about how to savor every last crumb! I can just imagine you slicing into that soft, green-hued loaf, the delicate pistachio scent wafting through the air. But what happens if you have leftovers? Fear not, my friend! This delightful treat is not only a joy to eat warm from the oven but also surprisingly easy to store and enjoy later on.
Storing Leftover Moist Pistachio Pudding Bread – A Sweet Simple Delight
To keep your Moist Pistachio Pudding Bread in its prime, I recommend using an airtight container. This is crucial for maintaining that luscious moisture we’ve worked so hard to achieve. You can keep it at room temperature for about three days—though trust me, it may not last that long if you have friends or family around! For longer storage, pop it in the refrigerator where it can stay fresh for up to a week. One little pro tip: if you slice your bread before storing it, place a piece of parchment paper between each slice to help retain its delightful freshness. When you take a bite after storage, you’ll find that the flavors deepen beautifully; it’s like magic happening in your kitchen! If you want to enjoy it warm again, simply reheat individual slices in the microwave for about 10-15 seconds or toast them lightly for that fresh-out-of-the-oven experience.
Freezing for Later
If you’re looking ahead and know you won’t finish your delicious bread within a week, consider freezing some for later enjoyment! To freeze properly, wrap your cooled Moist Pistachio Pudding Bread tightly in plastic wrap, then place it inside a freezer-safe bag or container. This double layer ensures that no pesky freezer burn sneaks in and ruins your masterpiece! It will keep frozen for up to three months—yes, three whole months of pantry bliss waiting for you! When you’re ready to indulge again, simply take out a slice and let it thaw at room temperature or warm it directly from frozen in the microwave. How convenient is that? The ability to have this delightful treat on hand whenever cravings strike is just one more reason why this recipe is such a treasure!
Moist Pistachio Pudding Bread – A Sweet Simple Delight

Indulge in the delightful experience of baking with our Moist Pistachio Pudding Bread – A Sweet Simple Delight. This easy-to-make recipe combines the rich, nutty flavor of pistachios with a tender crumb, creating a treat that’s as comforting as it is delicious. Perfect for breakfast, an afternoon snack, or dessert, this bread brings warmth and joy to your kitchen. The unique addition of pistachio pudding mix ensures each slice is moist and flavorful, captivating the hearts of everyone who tries it. With just a few simple ingredients and straightforward steps, you’ll craft a loaf that not only tastes divine but also fills your home with an inviting aroma. Get ready to enjoy this beautiful bread that’s sure to become a favorite!
- Prep Time: 15 minutes
- Cook Time: 50 minutes
- Total Time: 1 hour 5 minutes
- Yield: Serves approximately 12 slices 1x
- Category: Dessert
- Method: Baking
- Cuisine: American
Ingredients
- 2 cups All-Purpose Flour
- 3 large Eggs
- 1 cup Unsalted Butter
- 1 teaspoon Salt
- 1 tablespoon Baking Powder
- 1 cup White Sugar
- 1 cup 2% Milk (or dairy-free alternative)
- 1 box Jell-O Pistachio Pudding Mix
- 1/2 cup Chopped Pistachios
- 1 cup Icing Sugar (for optional glaze)
Instructions
- Preheat oven to 350°F (175°C). Grease a 9×5 inch loaf pan.
- Melt butter and let it cool slightly. In a bowl, combine melted butter and sugar until creamy.
- Add eggs one at a time, mixing well after each addition.
- In another bowl, whisk together flour, baking powder, and salt; gradually add to the wet mixture.
- Pour in milk and pistachio pudding mix; stir until combined.
- Fold in chopped pistachios gently.
- Pour batter into prepared loaf pan and smooth the top.
- Bake for about 50 minutes or until a toothpick inserted comes out clean.
- Cool in the pan for 10 minutes before transferring to a wire rack.
Nutrition
- Serving Size: 1 serving
- Calories: 230
- Sugar: 15g
- Sodium: 150mg
- Fat: 10g
- Saturated Fat: 6g
- Unsaturated Fat: 4g
- Trans Fat: 0g
- Carbohydrates: 31g
- Fiber: 0g
- Protein: 4g
- Cholesterol: 80mg