10 Minute Smashed Chickpea Salad Sandwich
There’s something beautifully transformative about a simple recipe that can elevate a mundane day into a moment of joy, don’t you think? The 10 Minute Smashed Chickpea Salad Sandwich is not just a quick meal; it’s a delightful embrace of flavors and textures, bringing together creamy chickpeas, zesty dill pickles, and the crunch of fresh veggies. Imagine the first bite—a perfect harmony where tanginess dances with heartiness, and every mouthful feels like a warm hug from an old friend. This dish invites you to sit down, slow down, and savor each moment, making it so much more than just food on a plate. It’s about creating memories, sharing stories over lunch breaks, or enjoying a quiet moment alone with your thoughts. I promise you, once you experience this sandwich, it will become a cherished staple in your kitchen.
The beauty of this recipe lies in its versatility and accessibility. It speaks to the heart of home cooking—a bridge between tradition and innovation. As we explore this dish together, think about how you can customize it! Perhaps you’ll add some avocado for creaminess or toss in some chopped bell peppers for an extra crunch. Each ingredient plays its part in this symphony of flavors and textures. And let’s be honest—who doesn’t love a meal that can be thrown together in just ten minutes? Whether you’re packing it for lunch or serving it as a light dinner alongside a vibrant salad, this Smashed Chickpea Salad Sandwich is sure to impress. So roll up your sleeves—let’s embark on this culinary adventure!
10 Minute Smashed Chickpea Salad Sandwich: A Quick Delight That Packs a Punch
This recipe is one that will surely win your heart and your stomach! With just ten minutes of prep time, you’ll have a hearty sandwich filled with vibrant flavors that are perfect for any occasion—be it lunch at work or a cozy dinner at home. The combination of chickpeas and zesty ingredients creates an utterly intoxicating mix that I know you’ll fall in love with.
Ingredients:
As we begin our culinary journey together for the 10 Minute Smashed Chickpea Salad Sandwich, let’s take a moment to appreciate the ingredients we’ll be using. Each brings something special to the table—literally!
- 1 (425g) Can Chickpeas: Ah, the humble chickpea! These little legumes are not only incredibly nutritious but also serve as the star of our show today. They are rich in protein and fiber, making them both hearty and satisfying. When choosing canned chickpeas, opt for organic brands when possible; they often have better flavor and texture. Rinse them well before using to remove excess sodium and any tinny taste from the canning process. Trust me on this—the fresher they taste, the better your salad will be!
- 1/4 C + 1 Tbs (55g) Dill Pickles (finely chopped): Dill pickles add that delightful tanginess that truly elevates this salad sandwich from basic to extraordinary! Their crunch contrasts beautifully with the creaminess of the chickpeas while imparting a refreshing zing that cuts through richness perfectly. If you’re not keen on dill pickles, feel free to substitute with sweet pickles or even relish for an entirely different flavor profile!
- 1/4 C (35g) Purple Onion (finely chopped): Purple onions bring not only flavor but also stunning color to our sandwich! Their mild sweetness complements the savory elements beautifully without overpowering them. When chopping onions, go for small pieces; this ensures they distribute evenly throughout our mixture without dominating each bite.
- 2 Tbs (30g) Just Mayo or Vegenaise: This creamy element is what ties everything together—making our salad luscious without any animal products involved! Just Mayo or Vegenaise provides that familiar mayonnaise texture while being completely plant-based. If you’re feeling adventurous or simply want to use what you have on hand, regular mayonnaise works too; however, I encourage exploring vegan options for their lighter feel.
- 2 1/2 tsp Stone Ground Mustard: This ingredient adds depth and complexity with its tangy bite! Stone ground mustard has those charming little mustard seeds visible—it’s like adding texture directly into your mixture along with flavor. If you find yourself out of stone ground mustard one day—you could easily substitute Dijon mustard; just keep an eye on how tangy it makes your salad.
- 1 1/2 tsp Apple Cider Vinegar (or pickle juice): The acidity here is absolutely paramount—it brightens up all other flavors and balances everything out wonderfully! Apple cider vinegar has subtle fruity notes that pair beautifully with our other ingredients; however, if you’re craving something more zesty from those pickles you’ve used earlier—pickle juice works splendidly as well!
- 1/4 + 1/8 tsp Fine Sea Salt: Salt may seem simple but don’t underestimate its power! It enhances flavors dramatically throughout our dish—bringing out sweetness from veggies while taming bitterness within ingredients like onion. Always taste as you go; adjusting salt levels based on personal preference is key here!
- 2 tsp Fresh Dill (fresh-chopped): Fresh herbs like dill add such vibrancy to this sandwich! Its delicate anise-like flavor complements our pickles perfectly while giving that extra freshness we crave in every bite. If fresh isn’t available—you could always use dried dill; just remember to use less since dried herbs tend to be more concentrated.
- 1/8 tsp Ground Turmeric (optional for color): Why turmeric? Well beyond its health benefits lies its stunning golden hue—it makes everything look more appetizing! Use sparingly if you wish—the goal here isn’t overwhelming spice but rather enhancing visual appeal if desired.
- 8-10 grinds of fresh Black Pepper: Black pepper adds warmth without heat—a gentle nudge toward complexity in flavor profiles throughout our dish! Freshly ground peppercorns release aromatic oils which really uplift every bite; if possible—always choose whole peppercorns over pre-ground varieties whenever feasible.
- Multigrain Bread or Optional Gluten Free Bread: Choosing bread can define your sandwich’s character entirely! Multigrain bread offers nuttiness alongside wholesome textures while gluten-free alternatives ensure everyone at your table can enjoy this meal without reservation.
- Sprouts: They pack such nutritional punch while providing delightful crunch—we’re talking about vibrant life added right into our meal! They also visually enhance presentation which is always nice when serving guests—or yourself!
- Kale: This leafy green adds robustness plus essential vitamins/minerals too—not only does kale boast impressive health benefits but also adds beautiful layers between slices creating mouthfeel variety within each bite!
- Shredded Carrots: Sweetness from carrots brightens everything up while contributing additional crunch factor too—it’s amazing how simple additions like these transform texture completely!
- Lettuce: Crisp lettuce leaves do wonders by providing refreshing crunch amidst creaminess found inside sandwiches—they also play role in keeping everything contained nicely without spilling out everywhere!
- Tomatoes: Last but certainly not least—tomatoes introduce juiciness while balancing flavors beautifully allowing each ingredient shine through distinctly amongst others present here today—they’re absolutely necessary companions for successful structural integrity overall!
Equipment You’ll Need:
Before we dive into making this incredible sandwich together, let’s talk about some essential tools that will make our journey smoother and more enjoyable. Having the right equipment allows us to focus solely on crafting something wonderful instead of worrying about logistics.
- Potato Masher – This tool is key for achieving that perfect rough mash we’re aiming for with chickpeas! A potato masher allows us full control over texture—we want some chunks left intact while breaking down others into creamy goodness—it makes all difference when biting into our finished product.
- Cutting Board – An absolute must-have partner during prep work! A sturdy cutting board provides safety plus stability as we chop & dice veggies ensuring clean even cuts every time—we want uniform pieces so they cook evenly when needed later down line!
- Sharp Knife – Investing in quality knives pays off tremendously throughout cooking endeavors—they ensure precision cuts go smoothly without unnecessary effort expended which means quicker results overall allowing us enjoy delicious meals faster than ever before!
With these tools ready at hand let’s gather ourselves mentally before diving deep into preparation steps ahead—this journey promises delightful rewards waiting patiently just around corner!
Preparing the 10 Minute Smashed Chickpea Salad Sandwich
Step 1: Rough Mashing the Chickpeas
Start by opening up your can of chickpeas—make sure to drain them well before rinsing under cold water until clean—that step alone helps eliminate excess sodium along with any metallic aftertaste lingering around from packaging process itself! Using your trusty potato masher now gives us opportunity create desired consistency within chickpeas—the aim here isn’t total mushiness but rather creating balance between smashed bits combined alongside whole ones still intact which provide lovely bites throughout sandwiches later on… Don’t rush this step because proper mashing leads way towards achieving satisfying mouthfeel overall once assembled later down road so take your time enjoying rhythmic motion required until mixture looks like beautiful blend ready welcoming additional flavors soon coming alongside rest ingredients joining party shortly thereafter!
Step 2: Mixing In Flavors
Once chickpeas achieve their perfect rough mash status now comes most exciting part—adding those finely chopped dill pickles along purple onions directly into bowl containing them already awaiting next steps eagerly while also including generous dollop Just Mayo/Vegenese followed by stone ground mustard drizzled atop surface waiting patiently amongst friends nearby… Finally pour apple cider vinegar over entire concoction sprinkling salt along seasoning blend too ensuring everything melds harmoniously together whilst stirring gently incorporating all components thoroughly allowing flavorful explosion emerge forth creating something truly extraordinary right before eyes…
Step 3: Seasoning Adjustments
Now comes crucial moment where tasting occurs—it’s essential check seasoning levels adjust according preferences prior final assembly takes place ensuring nothing feels lacking once sandwiched between chosen breads later… Remember there’s beauty found within simplicity especially when it comes spices/herbs used here so feel free experiment adjusting amounts according individual likes/dislikes until desired balance achieved whether opting extra dash salt sprinkle freshly cracked black pepper atop mixture next time around perhaps even another spoonful mayo added if feeling bold enough venture outside comfort zone wanting richer profile altogether…
Step 4: Storing Your Creation
If by chance leftovers remain after assembling sandwiches don’t fret as they’ll keep well stored within covered container fridge lasting up two days maximum maintaining freshness throughout duration allowing repeated enjoyment later week without hassle preparing anew each instance enjoy again knowing nourishment awaits whenever hunger strikes unexpectedly…
I can’t wait for you all try out my beloved version Smashed Chickpea Salad Sandwiches yourselves bringing joy into lives through delicious bites shared among family friends alike letting hearts full happiness knowing nourishing choices made daily matter deeply all times essentially feeding souls along way enriching life experiences every single day ahead!
Step 5: Rough-Mash Those Chickpeas to Perfection
Now we’re diving into the heart of the magic—the chickpeas! Using a potato masher, gently rough-mash the chickpeas in a medium-sized mixing bowl. The goal here is to create a delightful mixture where you can still see whole chickpeas peeking through, adding a lovely texture to your salad sandwich. Aim for a mix that is both creamy and chunky; this combination is what gives our 10 Minute Smashed Chickpea Salad Sandwich that irresistible bite. Trust me on this: the contrasting textures make each mouthful exciting and satisfying, as the chickpeas release their nutty flavor while still maintaining that hearty integrity.
As you mash, take a moment to appreciate the aromas wafting from the bowl. Chickpeas have this wonderful ability to absorb flavors, and with every press of your masher, they become even more inviting. You might notice some chickpea skin floating around—don’t worry about those! They add fiber and character to your dish. Remember, don’t rush this step; it’s absolutely paramount for achieving that perfect balance between creaminess and chunky goodness. Once you’ve got your desired texture, it’s time to add in our vibrant supporting cast of ingredients.
Step 6: Mixing It All Together
With our chickpeas beautifully mashed, it’s time for the fun part—mixing in all those fabulous ingredients! Add in your finely chopped dill pickles, purple onion, Just Mayo (or Vegenaise), stone ground mustard, apple cider vinegar (or pickle juice), fine sea salt, fresh dill, optional ground turmeric for that pop of color, and freshly cracked black pepper. As you mix these together with a sturdy spatula or a fork, watch how the colors meld into an inviting mixture that practically sings with flavor! Each addition plays a crucial role; the dill pickles bring tanginess that cuts through the creaminess of the mayo while the mustard adds depth and warmth.
Be sure to taste your mixture at this point—this is where you’ll want to adjust any seasonings to suit your palate. Don’t shy away from adding a little more salt or maybe an extra dollop of mayo if you prefer it creamier! This step is not just about combining ingredients but also about creating harmony among flavors; think of it as composing a symphony where each ingredient has its own voice but together creates something extraordinary. Also, mixing thoroughly ensures every bite of your sandwich will be bursting with flavor!
Step 7: Chill Out!
Ahh, now comes one of my favorite parts—the chilling phase! While you could dive right into making your sandwiches at this point (and I wouldn’t blame you!), allowing your smashed chickpea salad to chill in the refrigerator for about 30 minutes makes all the difference. Why chill? Well, during this resting period, all those vibrant flavors mingle and deepen even further—think of it as letting them get acquainted before they make their big debut on your bread!
This step is crucial because it transforms what is already delicious into something profoundly satisfying. The cold temperature also enhances the refreshing quality of your salad when served on warm days or alongside crisp veggies. If you’re short on time and can’t chill for long, I promise you it’ll still be tasty right away; however, if you can wait just a little bit longer, you’ll be rewarded with an even richer flavor profile when everything has had time to come together beautifully.
Step 8: Assemble Your Perfect Sandwich
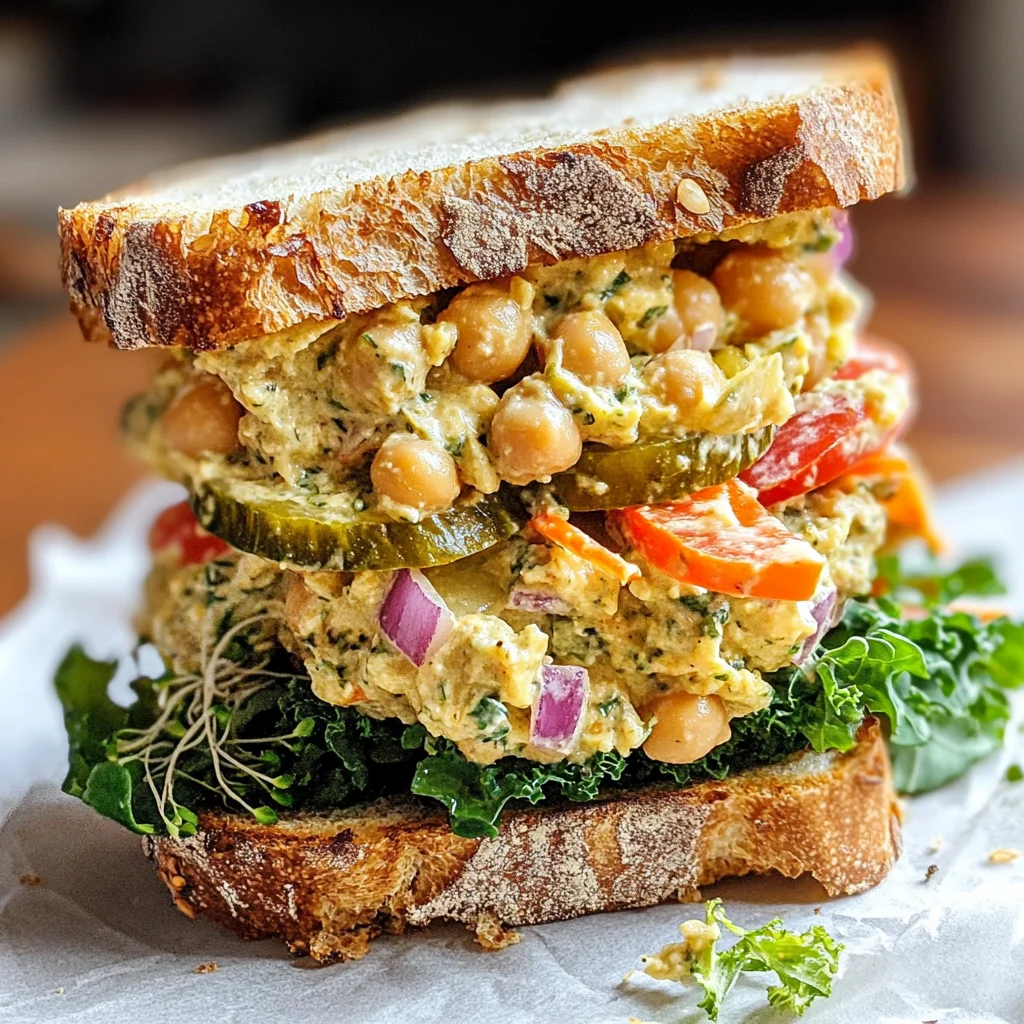
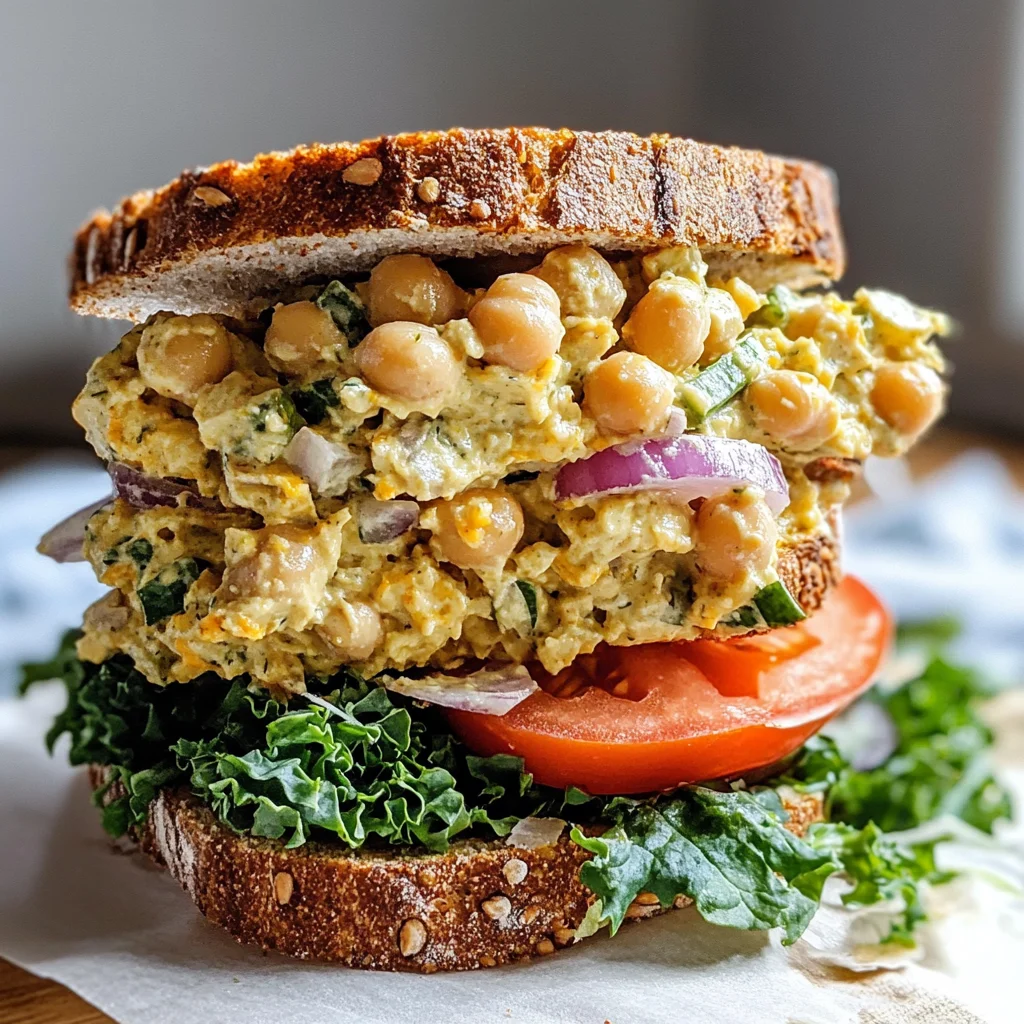
Once you’ve allowed those flavors to mingle and develop during chilling, it’s time for the pièce de résistance—assembling your 10 Minute Smashed Chickpea Salad Sandwich! Start by selecting your favorite multigrain bread or gluten-free alternative if needed; both options provide great texture and nutrition but choose what speaks most to you! Lay out two slices on a clean cutting board and pile high with that luscious chickpea mixture we crafted earlier.
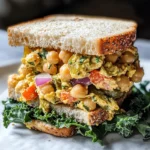
Now comes the fun part—load up on toppings! Consider adding fresh sprouts for a satisfying crunch that contrasts beautifully with our creamy salad. A handful of kale provides not only nutritional benefits but also adds a vibrant green color that makes this sandwich truly pop on your plate. Don’t forget shredded carrots for sweetness and lettuce for crunch; sliced tomatoes can contribute a juicy freshness that rounds out every bite so perfectly. When you’ve built up your stack just right—it should feel like a small tower of delight—place another slice of bread on top gently yet confidently.
Final Touches: Enjoy Every Bite!
Now that you’ve assembled your masterpiece, it’s time to enjoy every single bite! Whether you’re having this sandwich for lunch or dinner—or perhaps as an afternoon snack—I promise you there’s something extraordinarily comforting about biting into layers filled with such wholesome goodness. Take a moment before devouring to admire how beautiful it looks; I always find food tastes better when we appreciate its aesthetic appeal first!
Slice it down the middle if you’d like—a diagonal cut reveals all those colorful layers hidden inside—and serve alongside any extra veggies or chips for added crunch. What makes these sandwiches so special is not just their incredible flavor but also how easily they come together without compromising on taste or nutrition—it’s like having a delicious secret weapon in your culinary arsenal! So gather around with friends or family and share this delightful creation; I can’t wait for you all to experience its charm firsthand.
By embracing this process from start to finish—and taking pride in each ingredient—you’re not just making lunch; you’re crafting an experience filled with love and care that everyone will appreciate. Enjoy every bite of your 10 Minute Smashed Chickpea Salad Sandwich—you deserve it!
Storage and Enjoyment Tips for Your 10 Minute Smashed Chickpea Salad Sandwich
Now that you’ve crafted this delightful 10 Minute Smashed Chickpea Salad Sandwich, it’s time to revel in the joy of eating it! Each bite is a revelation—tangy, creamy, and utterly satisfying. But what if you find yourself with some leftovers? No worries at all! This salad is just as wonderful the next day, making it perfect for meal prep or a quick lunch option. So let’s talk about how to keep this beauty fresh while you savor every last morsel.
Storing Leftover 10 Minute Smashed Chickpea Salad Sandwich
To keep your delicious creation at its prime, store the leftover 10 Minute Smashed Chickpea Salad in an airtight container in the refrigerator. A glass container works wonders here; it seals tightly and keeps those flavors locked in. You can enjoy your chickpea salad for up to two days—trust me, it’s so good that it rarely lasts that long in my house! If you’re planning on having it as a sandwich later, consider keeping the salad separate from the bread until you’re ready to serve. This simple trick prevents the bread from getting soggy and ensures every bite remains crisp and delightful. The flavors meld beautifully after a day in the fridge, giving you an even more profound taste experience that’s both refreshing and comforting at once. When you’re ready to dig in again, just scoop out a generous portion, layer it on your favorite bread with fresh greens, and enjoy!
Freezing Your 10 Minute Smashed Chickpea Salad for Later
If you want to take your meal prep game up a notch, freezing your chickpea salad is another fantastic option! Simply place your salad in a freezer-safe container or a resealable freezer bag, ensuring you remove as much air as possible before sealing. This way, your flavors stay vibrant and intact! It can be frozen for up to three months without losing its delightful charm. When you’re ready to use it, simply transfer it from the freezer to the fridge overnight to thaw—this method allows for a gentle defrosting that preserves texture and flavor beautifully. What makes this such an appealing option is not only the convenience but also the knowledge that you have a quick meal waiting for you on those busy days when cooking feels like an overwhelming task. Imagine pulling out a container full of bright flavors from your freezer; it’s like unwrapping little gifts of culinary delight!
10 Minute Smashed Chickpea Salad Sandwich
Experience a burst of flavors and textures with our 10 Minute Smashed Chickpea Salad Sandwich, a quick and nutritious option that brings joy to any meal. This delightful sandwich features creamy chickpeas mashed to perfection, combined with zesty dill pickles, crunchy fresh veggies, and a hint of mustard for an invigorating kick. Perfect for lunch breaks or a light dinner, this recipe is versatile enough to customize—add avocado, bell peppers, or your favorite greens for extra flair. With minimal preparation time, you can enjoy a satisfying meal that not only nourishes the body but also warms the heart. Make this sandwich your new go-to for quick meals that impress!
- Prep Time: 10 minutes
- Cook Time: None
- Total Time: 0 hours
- Yield: Serves 2 sandwiches 1x
- Category: Sandwich
- Method: No-cook
- Cuisine: American
Ingredients
- 1 (425g) can chickpeas
- 1/4 cup + 1 tbsp dill pickles (finely chopped)
- 1/4 cup purple onion (finely chopped)
- 2 tbsp Just Mayo or Vegenaise
- 2 1/2 tsp stone ground mustard
- 1 1/2 tsp apple cider vinegar
- Salt and black pepper to taste
- Fresh dill (for garnish)
- Multigrain or gluten-free bread
- Optional toppings: sprouts, kale, shredded carrots, lettuce, tomatoes
Instructions
- Drain and rinse the chickpeas under cold water. Using a potato masher, roughly mash them in a mixing bowl until creamy yet chunky.
- Add the dill pickles, purple onion, Just Mayo (or Vegenaise), stone ground mustard, apple cider vinegar, salt, and black pepper. Mix well until combined.
- Taste and adjust seasoning if needed.
- Chill the mixture in the refrigerator for about 30 minutes to enhance flavors.
- Assemble your sandwich by spreading the chickpea salad on slices of multigrain bread and adding optional toppings as desired.
Nutrition
- Serving Size: 1 serving
- Calories: 350
- Sugar: 3g
- Sodium: 650mg
- Fat: 12g
- Saturated Fat: 1g
- Unsaturated Fat: 9g
- Trans Fat: 0g
- Carbohydrates: 45g
- Fiber: 12g
- Protein: 15g
- Cholesterol: 0mg