Strawberry Earthquake Cake
There’s something so profoundly satisfying about baking, isn’t there? The way the kitchen fills with warmth and the sweet smell of sugar and fruit dances in the air is nothing short of magical. It’s almost like a hug from within, wrapping you in comfort and nostalgia. This Strawberry Earthquake Cake is not just another dessert; it’s an experience that brings together the best of summer’s bounty with a touch of indulgence. Imagine biting into a slice where moist strawberry cake meets the rich creaminess of cream cheese, punctuated by bursts of fresh strawberries and the delightful crunch of coconut. Each bite is a symphony of flavors that sings to your soul, making it perfect for sharing with loved ones or savoring during a quiet moment at home.
I remember the first time I made this cake; it was on a sun-drenched afternoon while my kids were playing outside, their laughter blending with the gentle rustle of leaves in our garden. The recipe whispered promises of sweetness and joy, and as I mixed the ingredients together, I felt an overwhelming sense of connection to all those moments spent in the kitchen with family, creating memories over delicious food. This Strawberry Earthquake Cake has become a staple in our household, a cherished recipe that bridges tradition with innovation—proof that sometimes, taking a classic and giving it a little twist can lead to truly extraordinary results.
Strawberry Earthquake Cake: A Sweet Slice of Summer Delight
This Strawberry Earthquake Cake is sure to become your new favorite dessert! With its vibrant pink hue and decadent cream cheese swirl, it’s not just visually stunning but also packed with flavor and texture. It’s the kind of cake that brings smiles to faces and sparks joy at every gathering. So let’s embark on this delightful culinary journey together!
Ingredients:
As we gather our ingredients for this luscious Strawberry Earthquake Cake, it’s essential to embrace each component’s unique role in creating something truly special. You’ll find that each ingredient contributes its magic to this beautiful creation.
-
1 box strawberry cake mix. This is where our cake gets its vibrant color and luscious flavor! The strawberry cake mix serves as an excellent base for our dessert, giving it that unmistakable fruity essence without any extra work on your part. When choosing a mix, look for one that’s made with real fruit or natural flavors if possible; trust me, it makes all the difference in taste!
-
Ingredients listed on the box (eggs, oil, water). These are crucial players in bringing our cake to life! Eggs provide structure and moisture; they’re responsible for binding everything together while also adding richness to our cake. Oil keeps things moist and tender—a key factor here since we want every bite to melt in your mouth. And don’t forget water—it helps activate the dry ingredients!
-
1½ cups fresh or frozen strawberries (chopped). Fresh strawberries bring an irresistible juiciness that elevates this cake beyond ordinary desserts; they create pockets of flavor throughout each slice. If you’re using frozen berries, make sure to thaw them first and drain any excess liquid—this will help maintain the right texture in your cake.
-
1 cup white chocolate chips or chunks. Oh my goodness—the addition of white chocolate is like pouring liquid gold into our batter! It adds creamy sweetness and balances out the tartness from fresh strawberries beautifully. When selecting white chocolate, choose high-quality chips or bars with cocoa butter as one of their first ingredients—that ensures a smoother melt and richer flavor.
-
1 cup sweetened shredded coconut. Coconut introduces a delightful chewiness while providing an exotic twist that complements our strawberries perfectly! It adds texture as well as subtle sweetness; be sure to use sweetened coconut here since we want those flavors to shine through amidst all the other gorgeous elements.
-
½ cup chopped pecans or walnuts (optional). These nuts add both crunch and depth! If you love that nutty flavor and texture contrast, go ahead—don’t be shy! Just make sure to toast them lightly before adding them into the batter; this step enhances their flavor profile significantly.
-
8 oz cream cheese (softened). This is what elevates our cake from good to downright sensational! Cream cheese provides that luxurious richness we crave in desserts—a creamy swirl through each slice makes it utterly intoxicating! Ensure it’s softened before usage so you can beat it easily into submission later on.
-
½ cup unsalted butter (softened). Butter brings unparalleled flavor along with tenderness when creamed properly with sugar—this step is absolutely paramount for achieving lightness in our final product. Make sure it’s at room temperature for optimal results; cold butter won’t give us that dreamy consistency!
-
2½ cups powdered sugar. Sweetness comes from powdered sugar, which dissolves beautifully into our cream cheese mixture creating a smooth frosting-like swirl throughout the cake layers—not only does it taste fantastic but looks beautiful too!
-
1 teaspoon vanilla extract. Vanilla is like magic dust—it enhances all other flavors present without overpowering them! A splash goes a long way towards rounding out sweetness while adding warmth; always use pure vanilla extract whenever possible for sublime results.
Equipment You’ll Need:
Having the right tools at your fingertips makes all the difference when you’re creating something as delightful as this Strawberry Earthquake Cake! While these may not be ingredients, they are essential partners in cooking up magic.
-
9×13-inch baking pan – This size is ideal because it allows for even baking without overcrowding; we want every inch of our batter cooked perfectly through! A non-stick pan is preferred here; if you don’t have one on hand, simply grease well before pouring in your batter.
-
Mixing bowls (various sizes) – You’ll need these for mixing everything from your batter base to your rich cream cheese filling—it keeps things organized while ensuring every ingredient gets incorporated smoothly without spilling over!
-
Electric mixer (handheld or stand) – A must-have when mixing together butter into sugar until creamy—this process known as creaming incorporates air into your mixture resulting in fluffiness later on once baked!
-
Rubber spatula – Perfect for folding ingredients gently together without deflating any precious air pockets we’ve created during mixing processes! Plus, they’re great at scraping down bowl sides ensuring no bits are left behind.
-
Measuring cups & spoons – Accurate measurements are crucial—trust me when I say eyeballing isn’t going to cut it here if you want consistency across batches!
Preparing this scrumptious Strawberry Earthquake Cake starts off by preheating your oven…
Step 1: Preheat Your Oven & Prep Your Pan
Preheating your oven might seem mundane but trust me—it sets the stage for perfect baking conditions later on! Set your oven temperature to 350°F (175°C) so that by the time you’ve mixed everything together, it’ll be ready for action right away! While waiting patiently during those few minutes feels tedious—and let’s face it—we all want instant gratification—it’s crucial for achieving even cooking throughout every layer within our cake! As soon as you’ve prepped everything else (which won’t take long), grease up that trusty 9×13-inch baking pan liberally so nothing sticks once baked—no one likes leaving parts behind after such hard work!
Step 2: Mix Up Your Batter Base
Now let’s dive into getting that luscious batter ready! Start by following package instructions carefully when preparing your strawberry cake mix because getting ratios right ensures consistent rise while maintaining moisture levels throughout each bite later on—they’re designed specifically tailored towards success after all! Once done mixing per instructions provided alongside eggs/oil/water combo mentioned earlier—gently fold in those lovely chopped strawberries along with white chocolate chips/coconut/nuts if desired using gentle motions here—this keeps air pockets intact ensuring softness remains intact during bake time rather than being dense afterwards.
Step 3: Layer In Half The Batter
With everything combined beautifully now—it’s time we start layering things up beautifully inside prepared pan itself! Pour half of newly minted batter directly into greased pan—it should spread easily across bottom evenly without much fuss required—don’t worry about perfection though because swirling technique awaits us shortly after next steps unfold!
Step 4: Create That Creamy Swirl
In another bowl while waiting patiently—you’ll want focus solely upon combining softened cream cheese alongside softened butter until smooth creamy consistency forms—this process known as creaming introduces air which helps keep texture light whilst enhancing overall flavor depth along way too—all win situations here folks… Once mixed thoroughly—you can then introduce powdered sugar along vanilla extract stirring gently until fully incorporated yielding thick frosting-like mixture perfect enough drop spoonfuls across initial layer previously poured above! Don’t rush this step either—we want ample distribution across entire surface area available…
And there you have it—a beautiful beginning unfolding towards perfection awaits just around corner! Stay tuned as we continue crafting each detail leading towards ultimate indulgence ahead…
Step 5: Creamy Bliss – Preparing the Cream Cheese Swirl
Now, let’s create that luscious cream cheese swirl that is the heart and soul of our Strawberry Earthquake Cake. Begin by taking 8 oz of softened cream cheese—this is crucial because softening allows for a smooth and creamy texture that blends beautifully with the butter. In a mixing bowl, combine the cream cheese with ½ cup of unsalted butter, also softened to room temperature. I can’t emphasize enough how important it is to give your ingredients time to warm up; this step ensures they meld together seamlessly without lumps. Using an electric mixer, beat these two together until you achieve a velvety consistency that sings with promise.
Next, gradually add 2½ cups of powdered sugar into the mix—this is where the magic happens! The sugar not only sweetens but also transforms your mixture into a silky-smooth delight. Mix in 1 teaspoon of vanilla extract; the aromatic essence will elevate your cake to a whole new level, making every bite not just a taste but an experience. Trust me; this step is non-negotiable! You want to mix until everything is well combined and creamy, which should take about 2 minutes. The result should be a rich, thick cream cheese mixture that you’ll be spooning over your cake batter with joy. Just imagine that perfect blend of tangy creaminess contrasting against the sweet strawberry base—it’s utterly intoxicating!
Step 6: Layering the Love
With our batter and cream cheese mixture ready, it’s time to start layering everything in our prepared pan. Carefully pour half of the strawberry cake batter into your greased 9×13-inch baking pan, spreading it evenly across the bottom. This initial layer acts as a sturdy foundation for all those delightful flavors we’re about to introduce. As you pour, take a moment to admire the vibrant pink hue of the batter; it’s like sunshine captured in cake form!
Now comes one of my favorite parts: dropping spoonfuls of that heavenly cream cheese mixture over the strawberry batter. Use a large spoon or spatula to dollop generous amounts across the surface—don’t worry about making it perfect! The beauty here lies in its rustic charm. When you swirl it later, those drops will create beautiful ribbons throughout your cake. I can hear some of you asking why we don’t just mix it all together now—well, this method allows for pockets of creamy goodness in each bite while maintaining distinct layers of flavor. So go ahead and embrace those imperfections; they’re part of what makes this cake so special!
Step 7: Swirling Symphony
Once you’ve artfully placed dollops of cream cheese mixture over half of your batter, it’s time for one last pour! Gently pour the remaining strawberry cake batter over everything, covering those lovely dollops below. Now comes yet another key step: using a knife or skewer to gently swirl through the layers. This technique isn’t just decorative; it creates an absolute symphony of flavors in every slice.
As you swirl, be gentle; you’re aiming for delightful marbling rather than complete incorporation. Picture this: every slice revealing luscious swirls of pink mingling with creamy white—a true work of art! It’s essential to watch how deep you go with your swirling; too much mixing could disrupt those beautiful layers we’ve created and lead to an uneven texture when baked. Just a few gentle figure-eight movements are usually enough to create stunning patterns without losing structure.
Step 8: Baking Your Perfect Strawberry Earthquake Cake
Now that we’ve layered and swirled, it’s time for our creation to make its grand entrance into the oven! Preheat your oven to 350°F (175°C), ensuring it’s fully heated before placing your cake inside—this guarantees even baking throughout. Bake for about 40-45 minutes; however, keep an eye on those last few minutes because ovens can vary quite a bit! You’ll know your cake is ready when it’s risen beautifully and springs back lightly when touched—just like my grandma used to say: If it feels firm but springy under your fingers, it’s done!
Another way to check for doneness is by inserting a toothpick or knife into the center; if it comes out clean or with just a few moist crumbs clinging onto it (not wet batter!), then congratulations—you’ve nailed this step! Don’t rush this moment either; patience truly pays off as those heavenly aromas fill your kitchen, transforming it into a cozy haven that beckons everyone around.
Final Touches – Cooling and Serving Your Masterpiece
Step 9: The Cooling Ritual
Once you’ve pulled your Strawberry Earthquake Cake from the oven—and believe me, you’ll want to savor every second as you let it cool—allow it to sit in the pan on a wire rack for at least an hour before slicing into it. Yes, I know it’s tempting to dive right in (everyone will be eyeing that glorious creation!), but trust me on this: letting it cool completely allows flavors to deepen and meld together beautifully. If you slice too soon, you risk losing some moisture and creating uneven pieces.
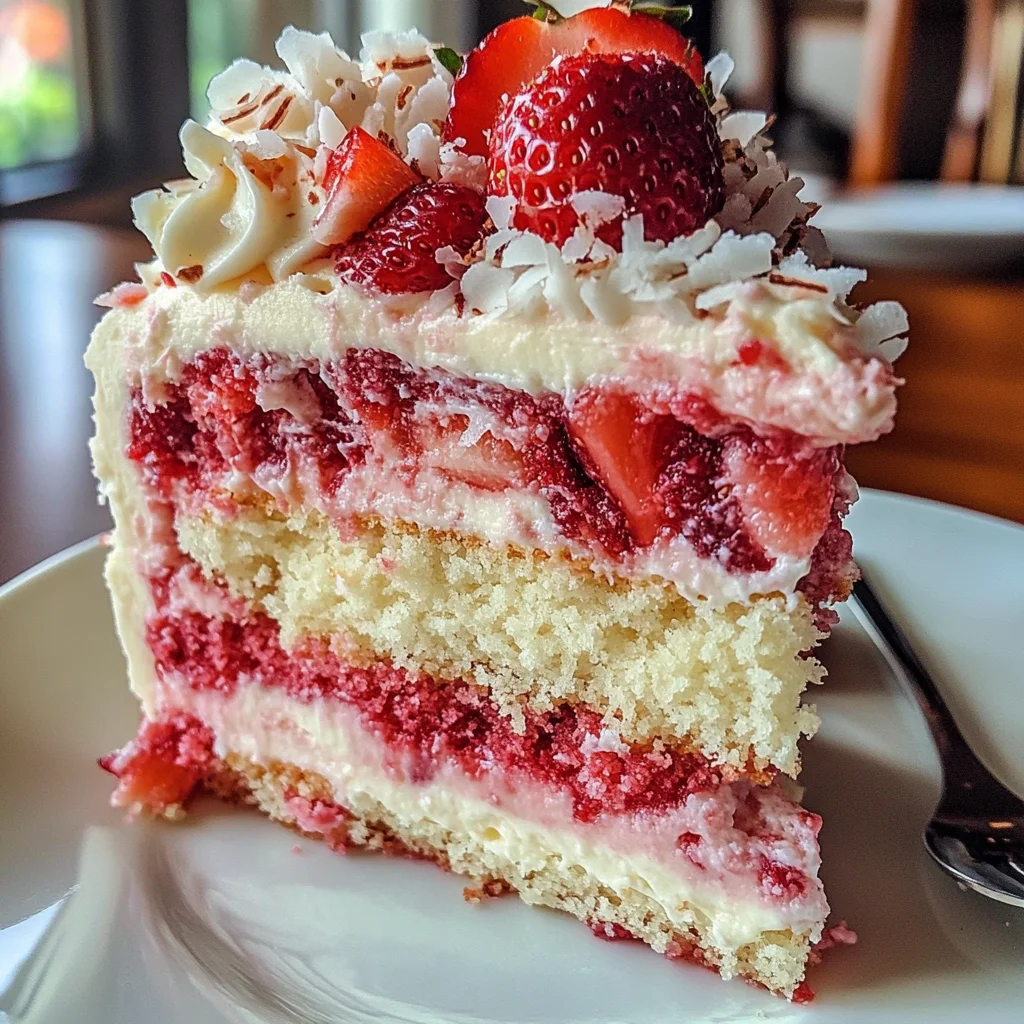
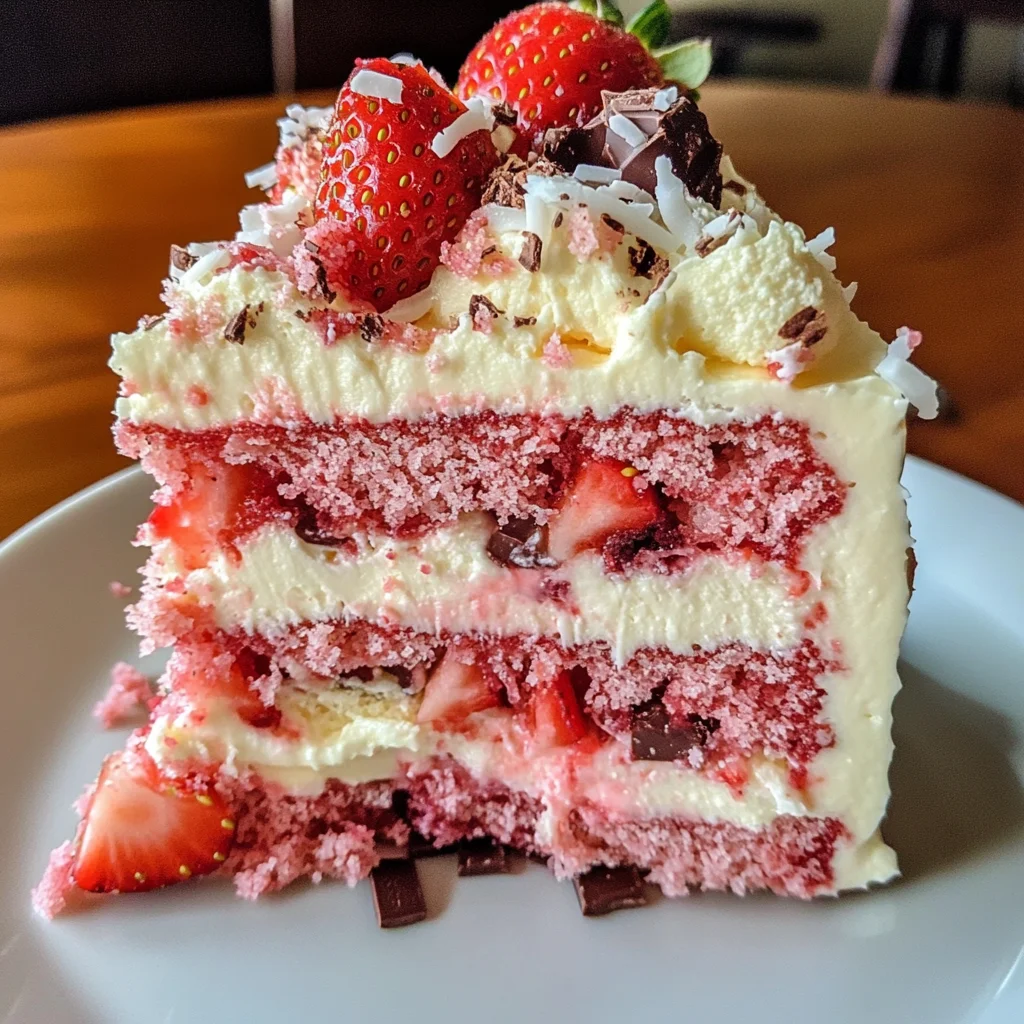
After cooling completely (which usually takes about another hour), take a sharp knife and gently run it along the edges before lifting out slices straight from the pan—it helps maintain those lovely layers we worked so hard on! Each piece should reveal enticing swirls—the pinkness against creamy white is sure to elicit gasps of delight from anyone fortunate enough to share in this moment with you.
And there you have it—your very own Strawberry Earthquake Cake! Each bite promises profound satisfaction—a celebration of summer flavors wrapped in moist cake perfection. Serve these slices at room temperature or slightly chilled with whipped topping or fresh strawberries on top if you’re feeling extra fancy! Whatever way you choose, I guarantee they’ll vanish faster than you can say “delicious.” Enjoy every crumb—you deserve this culinary triumph!
Storage and Enjoyment Tips for Your Strawberry Earthquake Cake
Now that you’ve baked this delightful Strawberry Earthquake Cake, the real fun begins! The aroma wafting through your kitchen is simply intoxicating, and I can hardly contain my excitement for you to dive right in. But let’s talk about how to keep this luscious dessert fresh so you can savor it long after the first slice. Trust me, sharing this cake with friends and family will create joyous moments that linger in everyone’s hearts!
Storing Leftover Strawberry Earthquake Cake
To store any leftover Strawberry Earthquake Cake (if there are any leftovers, which is often a big “if” in my household), I recommend using an airtight container. This ensures that every slice stays moist and flavorful. You can keep it at room temperature for up to three days, but if you want to extend its life, refrigerate it where it can stay fresh for up to a week. Here’s a little pro tip: placing a slice of bread in the container helps retain moisture—an absolute game-changer! As the cake sits, those beautiful flavors meld even more, creating an utterly satisfying treat that tastes just as good, if not better. When you’re ready to indulge again, simply let it come to room temperature or pop it in the microwave for a few seconds to warm it slightly; this brings out all those delicious flavors anew!
Freezing Strawberry Earthquake Cake for Later
If you find yourself with an abundance of this heavenly cake or simply want to prepare for future cravings, freezing is a fantastic option! To freeze your Strawberry Earthquake Cake properly, wrap individual slices tightly in plastic wrap and then place them into a freezer-safe bag or container. This method keeps them well-preserved while preventing freezer burn. Your cake will last about three months in the freezer without losing its divine texture or flavor. When you’re ready for a bite of nostalgia, simply thaw it overnight in the fridge or at room temperature for a couple of hours. The convenience of having this delightful dessert on hand makes it even sweeter—imagine pulling out a slice during a spontaneous gathering or an afternoon pick-me-up!
Dessert
Strawberry Earthquake Cake

Indulge in the delightful Strawberry Earthquake Cake, a moist and vibrant dessert that brings together the best of summer’s bounty. This cake features a luscious strawberry base swirled with rich cream cheese, complemented by sweet white chocolate and crunchy coconut. Each slice offers a symphony of flavors and textures that will transport you back to sun-drenched afternoons filled with laughter and warmth. Whether you’re celebrating a special occasion or simply treating yourself, this cake is sure to become a cherished favorite in your household.
- Prep Time: 15 minutes
- Cook Time: 45 minutes
- Total Time: 1 hour
- Yield: Serves approximately 12 slices 1x
- Category: Dessert
- Method: Baking
- Cuisine: American
Ingredients
- 1 box strawberry cake mix
- 1½ cups fresh or frozen strawberries (chopped)
- 1 cup white chocolate chips
- 1 cup sweetened shredded coconut
- ½ cup chopped pecans or walnuts (optional)
- 8 oz cream cheese (softened)
- ½ cup unsalted butter (softened)
- 2½ cups powdered sugar
- 1 teaspoon vanilla extract
Instructions
- Preheat your oven to 350°F (175°C) and grease a 9×13-inch baking pan.
- Prepare the strawberry cake mix according to package instructions, then gently fold in chopped strawberries, white chocolate chips, coconut, and nuts (if using).
- Pour half of the batter into the prepared pan.
- In a separate bowl, beat together softened cream cheese and butter until smooth; gradually mix in powdered sugar and vanilla extract until creamy.
- Drop spoonfuls of the cream cheese mixture over the batter, then pour the remaining batter on top.
- Use a knife to swirl through the layers gently.
- Bake for 40-45 minutes or until a toothpick comes out clean from the center.
- Allow to cool completely before slicing.
Nutrition
- Serving Size: 1 serving
- Calories: 320
- Sugar: 28g
- Sodium: 200mg
- Fat: 18g
- Saturated Fat: 10g
- Unsaturated Fat: 8g
- Trans Fat: 0g
- Carbohydrates: 36g
- Fiber: 2g
- Protein: 4g
- Cholesterol: 30mg