Grilled Fig and Goat Cheese Pizza Recipe
There’s something utterly intoxicating about the combination of sweet figs and creamy goat cheese. When you bring them together on a thin, crispy pizza crust, it becomes more than just a meal; it transforms into an experience that dances across your taste buds and warms your heart. This Grilled Fig and Goat Cheese Pizza Recipe is not just food; it’s a celebration of flavor that intertwines tradition with a modern twist. The rich, velvety goat cheese is whipped to perfection, creating a delightful contrast with the caramelized onions and the luscious sweetness of fresh figs. As you take that first bite, you’re met with a symphony of flavors—each ingredient contributing its own unique note to this culinary masterpiece. Trust me when I say that every slice offers a journey through taste, aroma, and nostalgia.
I’ve always been captivated by how certain dishes evoke memories of gatherings with friends and family. This pizza has become my go-to for any occasion—whether it’s a cozy night in or a festive get-together with loved ones. It’s one of those recipes that never fails to impress; people are always curious about how I pulled off such an extraordinary combination of flavors. The beauty lies in its simplicity: grilled figs, fresh herbs, and whipped goat cheese come together effortlessly, making it perfect for both casual dining or special celebrations. And let me tell you, the moment the broiler kisses those figs and cheese just right is absolutely paramount; it’s where the magic truly happens.
Grilled Fig and Goat Cheese Pizza Recipe: A Delightful Culinary Adventure
Welcome to this exciting culinary journey where we’ll create the most delicious Grilled Fig and Goat Cheese Pizza together! You’ll feel like you’re in an Italian trattoria as we bring together earthy caramelized onions with sweet figs atop a crispy crust. Let’s dive right in!
Ingredients:
As we embark on this flavorful adventure, let’s gather our ingredients which will play pivotal roles in elevating our pizza to new heights.
- 1/2 batch rustic pizza dough. This dough serves as the foundation of our pizza—a canvas waiting to be adorned with delightful toppings. Making your own dough may seem daunting at first, but it’s profoundly satisfying! If you’re short on time or feel adventurous, feel free to use store-bought dough; just ensure it’s high quality for the best results.
- 20 oz goat cheese. Creamy goat cheese is the star performer here! Its tangy flavor adds depth while its luscious texture creates an irresistible layer when whipped smooth. Look for fresh chevre if possible—it will make all the difference! If you’re not a fan of goat cheese (though I promise you’ll love it), consider using ricotta or even vegan cream cheese as alternatives.
- 3 tbsp extra virgin olive oil. This liquid gold drizzled over both the dough and incorporated into our cheese mixture adds richness and enhances flavor immensely. Always opt for high-quality extra virgin olive oil; it brings out vibrant notes that elevate each bite.
- 2 cups caramelized onions. Caramelizing onions is an art form that transforms their sharpness into deep sweetness through slow cooking until golden brown—an utterly intoxicating process! The result? An incredibly flavorful topping that complements our figs beautifully.
- 14 purple figs (sliced). These gems add natural sweetness and juiciness to our pizza! When selecting figs, look for ones that are plump and slightly soft to the touch—this indicates ripeness and optimal flavor. If purple figs aren’t available in your area, black mission or green figs can be excellent substitutes.
- 1/2 cup chives (chopped). Chives lend an onion-like bite without overpowering other flavors—perfectly balancing out our dish! Their vibrant green color also adds visual appeal while providing freshness; feel free to experiment with other fresh herbs like basil or parsley if chives aren’t available.
- 1/2 purple onion (thinly sliced) (optional). For those who enjoy a bit of crunch and piquancy, adding thin slices of raw purple onion can enhance flavor complexity wonderfully! Just remember to slice them very thinly so they don’t dominate the palate.
- 1 pinch sea salt. While it seems simple, salt plays an essential role by enhancing flavors throughout all components—from dough to toppings—making every layer sing!
- 1/2 cup fresh herbs or baby arugula (for garnish). Fresh herbs are non-negotiable when it comes to finishing touches! They brighten up each slice visually and add layers of flavor that harmonize beautifully with our rich toppings.
Equipment You’ll Need:
Having the right tools makes all the difference when cooking; they are your trusty companions on this culinary adventure! Let’s gather what we need:
- Large mixing bowl – This will be essential for mixing your dough ingredients together before letting them rise beautifully.
- Food processor – A must-have for whipping up our dreamy goat cheese mixture quickly and efficiently—you’ll achieve that luxurious texture in no time!
- Cast iron griddle or skillet – This versatile tool provides high heat retention necessary for achieving those gorgeous grill marks on our pizza crust while maintaining even cooking throughout.
- Broiler-proof baking tray – You’ll need this handy tray to transfer your grilled pizzas under the broiler safely—a vital step for achieving that final kiss from the heat!
Now that we have everything assembled let’s get those hands ready because we’re about to create something truly extraordinary!
Preparing the Grilled Fig and Goat Cheese Pizza Recipe
Step 1: Crafting Your Rustic Pizza Dough
Let’s start by making our rustic pizza dough—the foundation upon which all these fabulous flavors will rest! Begin by following your favorite pizza dough recipe—or if you’re using mine, combine flour, water, yeast, salt, and maybe a touch of olive oil in your large mixing bowl until everything comes together harmoniously into a cohesive ball. Knead gently yet thoroughly until you achieve smooth elasticity; think of it as giving some love back to your ingredients! Once kneaded well enough (about 5–7 minutes), let it rise at room temperature covered with a clean kitchen towel for about two hours—this step allows gluten development which gives us that beautiful chewy texture we crave in pizza crusts!
Step 2: Whipping Up That Irresistible Goat Cheese Mixture
While our dough is proofing away happily, let’s turn our attention toward creating that luscious whipped goat cheese spread! Add 20 ounces of creamy goat cheese into your food processor along with three tablespoons of extra virgin olive oil—a drizzle here will help us achieve maximum fluffiness once blended smoothly together—and don’t forget just a pinch of sea salt to elevate everything further! Puree these ingredients until they become incredibly airy within approximately 45 seconds—you want it lightened up nicely so every dollop feels like heaven on earth when spread onto your baked pizzas later on!
Step 3: Caramelizing Those Sweet Onions
Next up are those beautiful caramelized onions which will add depth upon depth of flavor profile throughout each bite taken from this divine creation! Start by slicing up two medium-sized yellow onions thinly before placing them into an oiled pan set over low heat—patience is key here dear friend because we want these beauties transformed from sharpness into sweetness gradually as they cook down slowly over time (think around thirty minutes). Stir occasionally so nothing sticks too much while also ensuring even browning occurs; their natural sugars will begin working wonders once they start turning golden brown—incredibly fragrant aromas filling your kitchen will be utterly irresistible!
Step 4: Forming Our Pizza Pies
Once you’ve achieved perfectly risen dough after two hours’ resting period earlier—it’s time now for shaping those lovely little pizza pies! Generously sprinkle flour onto clean work surfaces before dividing this glorious risen mass into either six or eight equal portions depending on preferred size—you can start shaping them gently using fingertips until they resemble small discs about ten inches wide (feel free to channel any personal creative flair!). Be sure not rush through forming process; take time here because creating air pockets ensures proper puffiness later during grilling stage ahead—a crucial step indeed!
I hope you’re feeling as excited as I am because we’re just getting started on this incredible journey towards crafting unforgettable Grilled Fig and Goat Cheese Pizza together! Each step builds upon itself seamlessly bringing us closer towards enjoying something special made entirely from scratch—a true testament reflecting love poured forth within every dish prepared lovingly by hand.
Step 5: Crafting Your Perfect Pizza Pies
Now that your dough has had its lovely moment to proof, you’ll want to create those perfect little pizza pies. This is where I get really excited! On a clean, floured surface, sprinkle a light dusting of flour—this will keep your dough from sticking and make it easier to handle. Gently press down each ball of dough with your palm to flatten it slightly before using a rolling pin or your hands to stretch it into a thin circle. Aim for about 10-12 inches in diameter; remember, the thinner the crust, the more delightful crunch you will achieve once grilled. Don’t rush this step! The art of stretching pizza dough is all about patience. As you work, you might feel the dough resisting a bit—just let it rest for a minute if it feels too tight; this relaxation allows the gluten to loosen up and makes shaping much simpler.
As you shape your pizzas, be sure to maintain an even thickness throughout. A uniform base ensures that every bite will be consistent and delicious. If you notice any tears or holes forming in your dough, simply pinch them together or patch them up with extra dough; trust me, no one will ever know! Once you’ve shaped all your pizzas, I recommend placing them on parchment paper for easy transfer to the griddle later. This small step can save you from potential disaster when trying to move delicate dough from countertop to griddle.
Step 6: Preheating Your Cast Iron Griddle
With your beautiful pizza bases ready and waiting, let’s turn our attention to preheating that cast iron griddle. Why a cast iron griddle? Well, my friend, nothing quite compares to the way cast iron retains heat and distributes it evenly—this is crucial for achieving those coveted grill marks and that irresistible crispy crust that we all adore. Place your griddle on medium-high heat and allow it to warm up for at least 5-10 minutes before cooking begins. You’ll know it’s ready when a few drops of water dance across the surface like tiny fairies before evaporating almost immediately.
This waiting period is absolutely paramount because starting with a hot griddle sets the tone for how well your pizzas will cook. If you skip this step or rush the process, you’ll end up with soggy crusts that just won’t do justice to our gorgeous toppings! So take this time to enjoy the enticing smell of heating metal; imagine how wonderful it will be once those pizzas hit the pan. Trust me on this—it’s worth every second!
Step 7: Grilling Your Pizza Pies
Now comes the exciting part—grilling! Carefully pick up one of your pizza pies (using parchment makes this so much easier) and gently transfer it onto the hot griddle. Listen closely—you should hear a satisfying sizzle as it hits the pan. This sound is music to my ears and signifies that we’re on our way to crispy perfection! Grill each side for about one minute or until you see those charming grill marks forming—a golden-brown color is what you’re aiming for here.
Use tongs to flip each pie carefully; I like to press down lightly with the tongs after flipping to ensure even contact with the griddle surface—it helps develop that beautiful crust we crave. Once both sides are grilled nicely, remove them from the heat and set aside on a cooling rack while you repeat this step with the remaining dough circles. The aroma wafting through your kitchen is going to be utterly intoxicating! Just imagine how delightful they’ll taste topped with creamy goat cheese and sweet figs!
Step 8: Broiling Your Masterpiece
Ah, we’re nearing the grand finale—the broiling stage! Preheat your broiler while you arrange your grilled pizza pies on a broiler-proof tray; this could be an oven-safe baking sheet or something equally sturdy because we want everything stable as we put our creation under intense heat. Spread a generous layer of that luscious whipped goat cheese over each pizza base; I like using about 1/4 cup per pie, but feel free to adjust according to your taste preferences—more cheese means more joy!
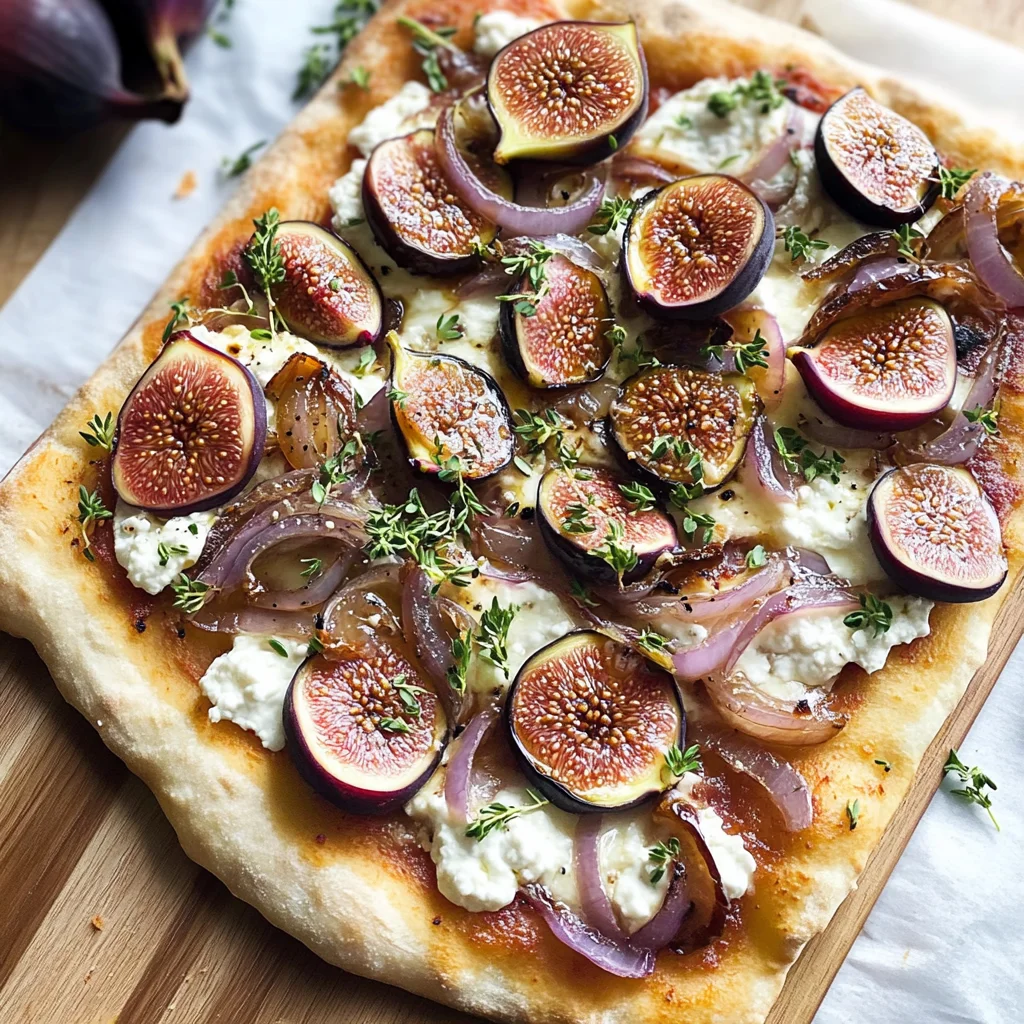
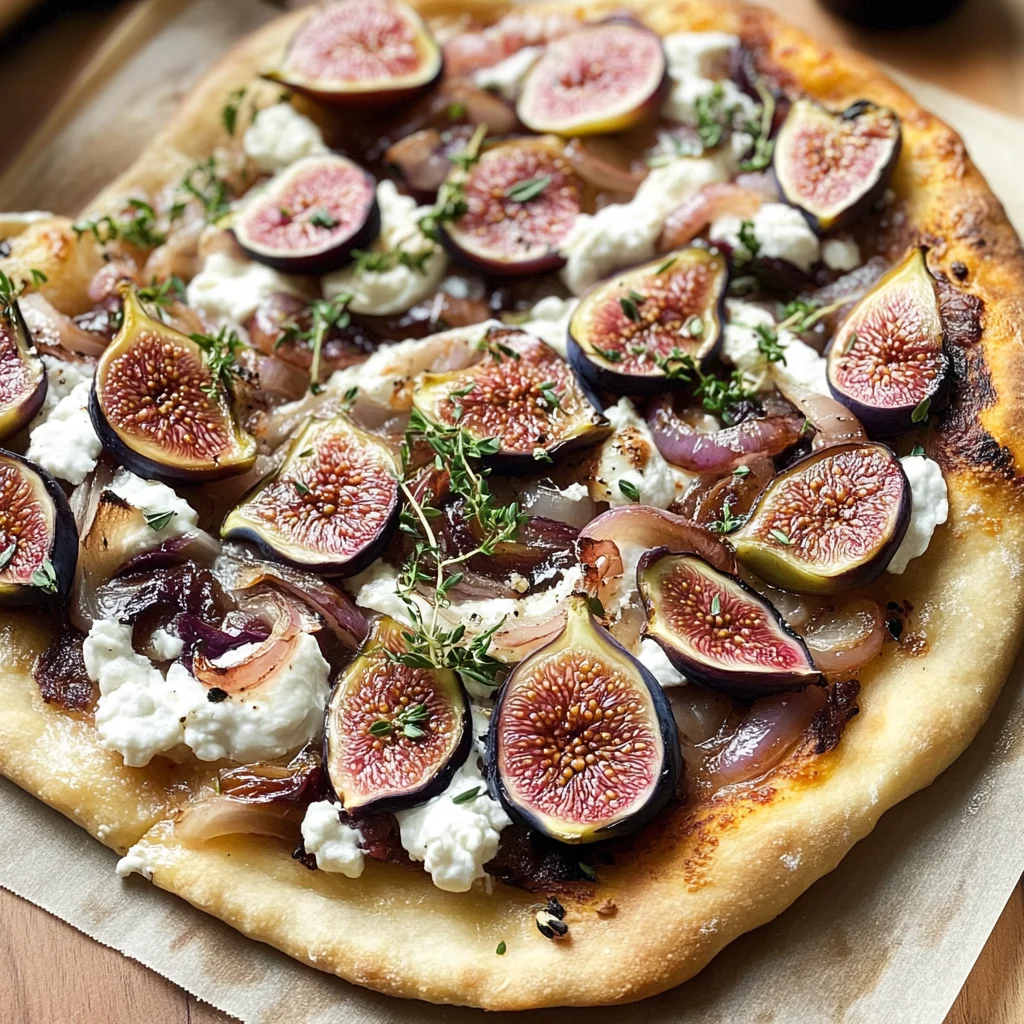
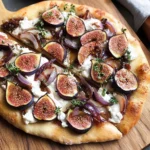
Next comes the star of our dish: those stunning sliced purple figs and caramelized onions! Sprinkle them artistically atop the whipped cheese—this isn’t just about flavor but also presentation; let’s make these pizzas Instagram-worthy! Then add those reserved caramelized onions as garnish for an extra touch of sweetness and texture after broiling. Now slide that tray under your preheated broiler but keep an eye on things—it only takes about one minute for those figs and cheese to begin bubbling and browning beautifully.
If you’re unsure whether they’re done, look for that slight char around the edges of both figs and cheese; they should emerge from the broiler looking gloriously kissed by flames—an absolutely extraordinary sight! Once out of the oven, let out an appreciative sigh before garnishing with fresh herbs or baby arugula—the vibrant greens add not only color but also fresh flavor that contrasts beautifully against all those rich toppings.
Final Touches: Serving Up Joy
At last, it’s time for that joyous moment when all your hard work pays off! Take each slice and present it proudly on a rustic wooden board or simple white plate—whatever showcases these beauties best in your home setting! As you prepare for serving, don’t forget about drizzling just a tad more extra virgin olive oil over top if you’re feeling indulgent—it adds another layer of richness that’s simply divine.
Serve these grilled fig and goat cheese pizzas warm; there’s something profoundly satisfying about watching friends’ faces light up as they take their first bite into those layers of creamy cheese mingling with sweet figs—all perfectly balanced by fragrant herbs. Encourage everyone around the table to share their thoughts because every mouthful carries stories waiting to unfold along with flavors dancing on their taste buds.
As always in cooking (and life), remember: don’t rush through these moments; savor every bite together because food isn’t just meant to fill our bellies—it nourishes our souls too! Enjoy making memories over this Grilled Fig and Goat Cheese Pizza Recipe—I promise you they’ll be some of your favorites yet!
Storage and Enjoyment Tips for Your Grilled Fig and Goat Cheese Pizza Recipe
And just like that, your Grilled Fig and Goat Cheese Pizza is ready to be devoured! The aroma wafting through your kitchen is an invitation you simply can’t resist, and I can guarantee that the first bite will transport you to a sun-drenched Italian terrace. But what if there’s some left? Don’t fret! This delightful pizza can be stored for later enjoyment, letting you savor its extraordinary flavors even after the party is over. Trust me, the joy of having this masterpiece on hand is something you’ll want to embrace!
Storing Leftover Grilled Fig and Goat Cheese Pizza Recipe
To keep your leftover Grilled Fig and Goat Cheese Pizza as delicious as the moment it came out of the oven, it’s crucial to store it properly. First, let it cool completely before transferring it to an airtight container; this helps maintain that precious crust’s crispness while preventing any sogginess – which we absolutely want to avoid! If you plan to enjoy your leftovers within three days, storing them in the refrigerator works beautifully. However, if you want to keep that divine flavor longer, consider freezing your slices. They can last up to three months in the freezer! When you’re ready to indulge again, simply reheat in the oven at 350°F (175°C) for about 10-15 minutes until warmed through and crisp. The flavors meld beautifully during storage; while fresh is fantastic, there’s something profoundly satisfying about enjoying a slice of this pizza on another day—the figs become a bit sweeter, and the goat cheese develops an even creamier texture.
Freezing Whipped Goat Cheese for Later
If you find yourself captivated by the whipped goat cheese component of this recipe—who wouldn’t be?—you might want to make a larger batch and freeze some for future pizza adventures! Start by portioning out your whipped goat cheese into small containers or even ice cube trays—this way, you can easily grab just what you need for your next culinary creation. Properly stored in the freezer, it can last for about three months without losing its creamy charm. When you’re ready to use it, just thaw it overnight in the fridge or leave it at room temperature for about an hour before serving. It’s such a convenient option because having this luscious spread on hand means you’re always prepared for impromptu gatherings or quick meals. Just imagine whipping up a fresh pizza with that rich goat cheese in no time—it’s pure bliss!
Grilled Fig and Goat Cheese Pizza
Experience the delightful fusion of sweet figs and creamy goat cheese with this Grilled Fig and Goat Cheese Pizza Recipe. This gourmet pizza captures the essence of summer, combining luscious grilled figs, rich caramelized onions, and velvety whipped goat cheese atop a perfectly crispy crust. Each bite provides a symphony of flavors that is both satisfying and sophisticated, making it ideal for gatherings or a cozy night in.
- Prep Time: 30 minutes
- Cook Time: 15 minutes
- Total Time: 45 minutes
- Yield: Serves 4
- Category: Dinner
- Method: Grilling/Broiling
- Cuisine: Mediterranean
Ingredients
- 1/2 batch rustic pizza dough
- 20 oz goat cheese
- 3 tbsp extra virgin olive oil
- 2 cups caramelized onions
- 14 purple figs (sliced)
- 1/2 cup chives (chopped)
- 1/2 purple onion (thinly sliced) (optional)
- 1 pinch sea salt
- 1/2 cup fresh herbs or baby arugula (for garnish)
Instructions
- Prepare the rustic pizza dough according to your recipe or use store-bought dough.
- In a food processor, blend goat cheese, olive oil, and sea salt until smooth and airy.
- Slice onions thinly and caramelize them on low heat until golden brown.
- Shape the dough into pizza bases about 10 inches in diameter.
- Preheat a cast iron griddle and grill each pizza base for one minute on each side until marked.
- Spread whipped goat cheese over each grilled base, then top with caramelized onions and sliced figs.
- Broil pizzas for one minute until the cheese bubbles slightly.
- Garnish with fresh chives and herbs before serving.
Nutrition
- Serving Size: 1 slice (approximately 200g)
- Calories: 350
- Sugar: 10g
- Sodium: 420mg
- Fat: 22g
- Saturated Fat: 10g
- Unsaturated Fat: 9g
- Trans Fat: 0g
- Carbohydrates: 30g
- Fiber: 3g
- Protein: 8g
- Cholesterol: 30mg