Peppermint Swirl Fudge
There’s something truly magical about the holiday season, isn’t there? The air fills with the scent of pine and cinnamon, while twinkling lights dance in rhythm with our hearts. It’s a time for connection, warmth, and of course, indulgence. One treat that perfectly embodies this spirit is Peppermint Swirl Fudge — a delightful confection that marries the rich depth of chocolate with the refreshing zing of peppermint. Each bite is like a warm hug on a cold day, combining creamy textures with bursts of flavor that bring back memories of cozy gatherings by the fire. I promise you, once you make this fudge, it will become a cherished part of your holiday traditions.
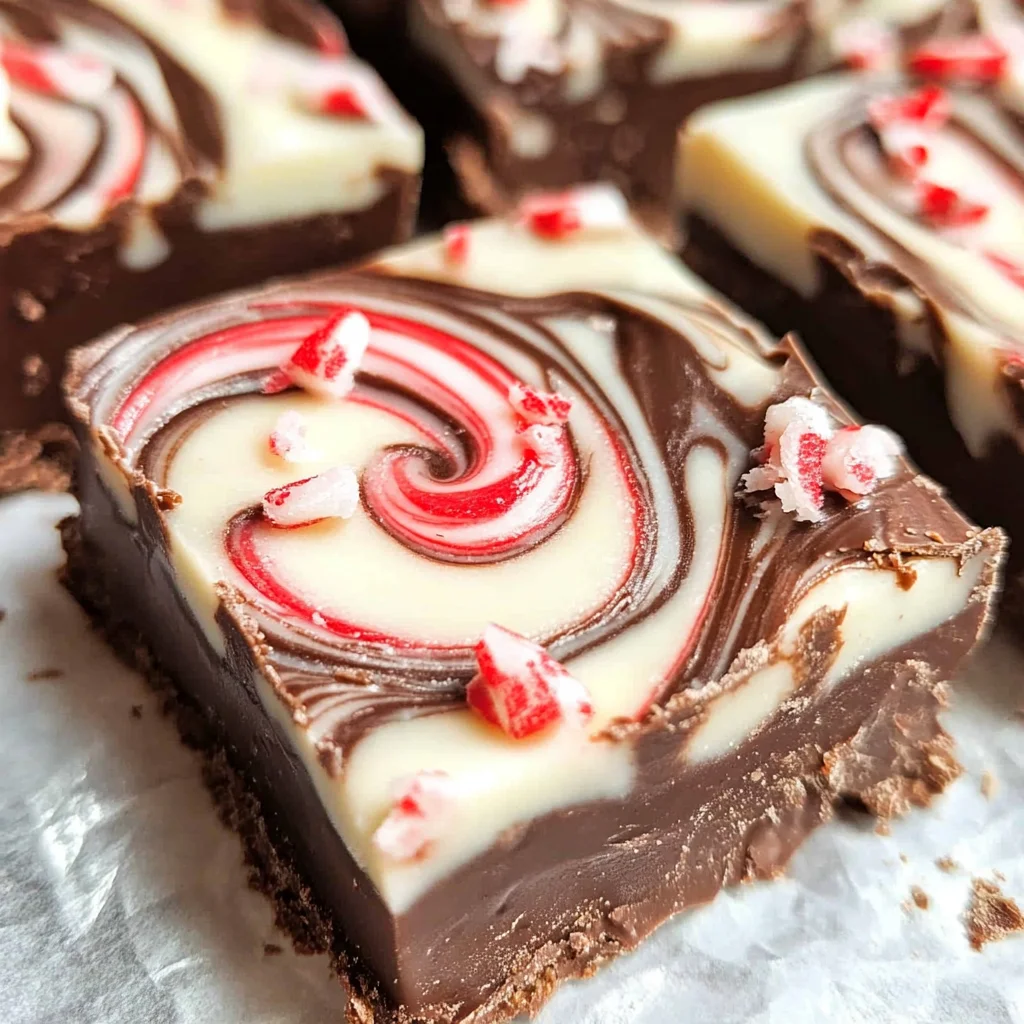
This Peppermint Swirl Fudge isn’t just a recipe; it’s an experience. Imagine slicing into a beautifully swirled block of fudge and revealing those mesmerizing red and white patterns that mimic the joy and festivity we all feel during this season. The best part? It’s incredibly simple to make! With just a handful of ingredients and minimal effort, you’ll have an irresistible treat that’s perfect for gifting or simply enjoying with loved ones as you watch your favorite holiday movies. Trust me, this fudge is destined to win over hearts (and sweet tooth cravings) alike!
Ingredients:
As we embark on this culinary journey to create our Peppermint Swirl Fudge, let’s take a moment to appreciate each ingredient’s role in crafting this extraordinary treat. Each element brings its own unique flavor and texture, contributing to the symphony of flavors we’re about to create.
- 2 cups semi-sweet or dark chocolate chips. This is where the magic begins! The semi-sweet chocolate chips provide a wonderful balance between sweetness and richness, melting into a luscious base for our fudge. If you’re feeling adventurous or want an even deeper chocolate flavor, go for dark chocolate chips; they’ll add complexity that elevates the entire dish. When shopping for chocolate chips, look for good-quality brands that use real cocoa butter rather than fillers – it truly makes all the difference in taste!
- 1 tablespoon unsalted butter. Adding butter not only enriches the fudge but also helps achieve that silky-smooth texture we crave in any good dessert. It allows the chocolate to melt more evenly, ensuring that every piece has that decadent mouthfeel we adore. Make sure your butter is at room temperature; this helps it blend seamlessly without clumping as it melts with the chocolate.
- 1 (14 oz) can sweetened condensed milk, room temperature. This liquid gold is absolutely crucial! Sweetened condensed milk adds sweetness and creaminess while acting as a binding agent in our fudge. I always recommend using it at room temperature because cold ingredients can cause chocolate to seize up unexpectedly—a situation none of us want when making fudge!
- ½ teaspoon peppermint extract. This ingredient infuses our fudge with that classic peppermint flavor that’s essential for capturing the holiday spirit. Be mindful of how much you use; peppermint extract is potent! A little goes a long way in creating that refreshing twist without overwhelming your palate.
- Pinch of salt. You might wonder why we’re adding salt to something sweet like fudge—it’s because salt enhances flavors! It balances out sweetness and brings out the rich notes of chocolate while highlighting the peppermint essence beautifully.
For The Peppermint Swirl Layer
- 1 ½ cups white chocolate chips (use real white chocolate, not almond bark). White chocolate adds both creaminess and visual appeal to our fudge with its pale hue contrasting against dark chocolate layers. When selecting white chocolate chips, ensure they are labeled real—this means they contain cocoa butter rather than waxy substitutes found in lower-quality products.
- ½ tablespoon unsalted butter. Just like in our chocolate layer, butter here ensures smooth melting and adds richness to our white chocolate layer too—making each bite delightfully creamy yet light!
- ⅓ cup sweetened condensed milk, room temperature. We’re using this again because it plays an essential role in creating that luscious texture throughout our fudge layers—plus it enhances sweetness in tandem with white chocolate so wonderfully.
- ½ teaspoon peppermint extract. Yes, we’re bringing more peppermint love into play! This will amplify those refreshing notes further within our swirled layer.
- 1–2 drops red gel food coloring. This isn’t just about aesthetics; while swirling together colors creates those beautiful marbled patterns visually enticing us before we even take a bite! Gel food coloring also provides vibrant hues without altering flavors—so have fun with it!
For The Topping
- ½ cup crushed peppermint candies or candy canes. These festive toppings add crunch and an extra burst of minty flavor! Plus, who doesn’t love that delightful pop of color on top? Crushing them adds texture contrast while their sweetness complements everything beneath perfectly.
Equipment You’ll Need:
Before diving into making our Peppermint Swirl Fudge, let’s gather some essential tools that will make this process smooth sailing! Having the right equipment not only helps you create beautiful treats but also makes cooking more enjoyable overall.
- 8×8-inch square pan – This will be your canvas for creating stunning layers of fudge! A square pan offers perfect proportions for cutting into bite-sized squares later on; plus lining it with parchment paper means easy removal once set—no sticky messes here!
- Heatproof bowls – These are pivotal for melting both our chocolate layers without fear of burning them—a common pitfall when working directly over heat sources! They must withstand hot temperatures while allowing smooth stirring—glass or ceramic works best!
- Double boiler or pot setup – If you don’t have an official double boiler handy (no worries!), simply place one heatproof bowl over simmering water inside another pot—the gentle steam ensures controlled melting so you don’t scorch those precious chocolates!
- Spatula or wooden spoon – A sturdy spatula is vital for scraping down sides while mixing ingredients together smoothly; wooden spoons are great too—they help incorporate everything gently without risking damage during stirring.
Let’s get excited about making this Peppermint Swirl Fudge together—it’s time to roll up those sleeves and spread some holiday cheer through delicious homemade treats!
Step 1: Prepping Your Canvas
First things first: let’s prep your pan! Lining an 8×8-inch square pan with parchment paper may seem like a small step but trust me—it’s absolutely paramount for ensuring easy removal later on when your fudge sets completely! Make sure there’s enough overhang on two sides so you can lift out your beautiful creation without fussing around too much once chilled! After lining it carefully (a quick spray of nonstick coating helps too), place it flat on a stable surface so we can start crafting those heavenly layers.
Step 2: Crafting the Chocolate Fudge Base
Now onto what I consider one of my favorite parts: making the rich chocolate base! In a heatproof bowl (remember this tip?!) combine your semi-sweet or dark chocolate chips along with unsalted butter and sweetened condensed milk at room temperature—a trio designed specifically for luxurious melting action ahead! Place this bowl over your simmering water setup—we call this double boiling—and stir constantly until everything becomes one smooth liquid gold masterpiece before removing from heat completely—this process is essential because direct heat could easily scorch delicate chocolates if left unattended even for seconds!
Once melted perfectly together (imagine how divine that aroma must be!), gently fold in half a teaspoon of peppermint extract along with just a pinch of salt—it may seem counterintuitive but I assure you…it brings forth incredible depths within flavors enhancing each morsel beyond expectation!
Step 3: Creating Our Peppermint Swirl Layer
Now let’s pivot towards crafting our delightful peppermint swirl layer which will really make things pop visually as well as tastefully too! Grab another clean heatproof bowl where we’ll combine white chocolate chips alongside half tablespoon unsalted butter plus sweetened condensed milk again (yes…again!). Place over simmering water just like before allowing them all melt gently until fully smooth—a comforting job indeed since watching these transformations unfold truly feels like pure alchemy!
Next comes my favorite moment: whisking in half teaspoon peppermint extract followed by adding one or two drops red gel food coloring—this simple act creates such vibrancy without changing any flavors whatsoever while simultaneously providing us those gorgeous swirls later on!
Step 4: Layering and Swirling
At last…we’re reaching the culmination point where artistry meets indulgence! Pour approximately three-quarters of your luscious chocolate mixture into prepared pan; gently spread evenly across bottom ensuring every inch gets covered beautifully allowing its richness shine through every single piece ahead! Now drop spoonfuls from red-and-white mixture atop surface randomly—don’t worry about perfection here…it’s meant to be whimsical after all!
Using either knife or skewer tool nearby (both will work wonders!), begin swirling gently through mixtures creating figure-eight patterns—a crucial step not only visually stunning but also seamlessly blending both flavors harmoniously throughout every single delightful bite ahead too—just remember not to overmix otherwise risk losing those enchanting marbled effects altogether!
Keep those spirits high—you’re doing wonderfully so far as we prepare ourselves next towards finishing touches soon coming up next…stay tuned friends because yummy goodness awaits us shortly ahead!
Step 5: Add the Topping with Holiday Cheer
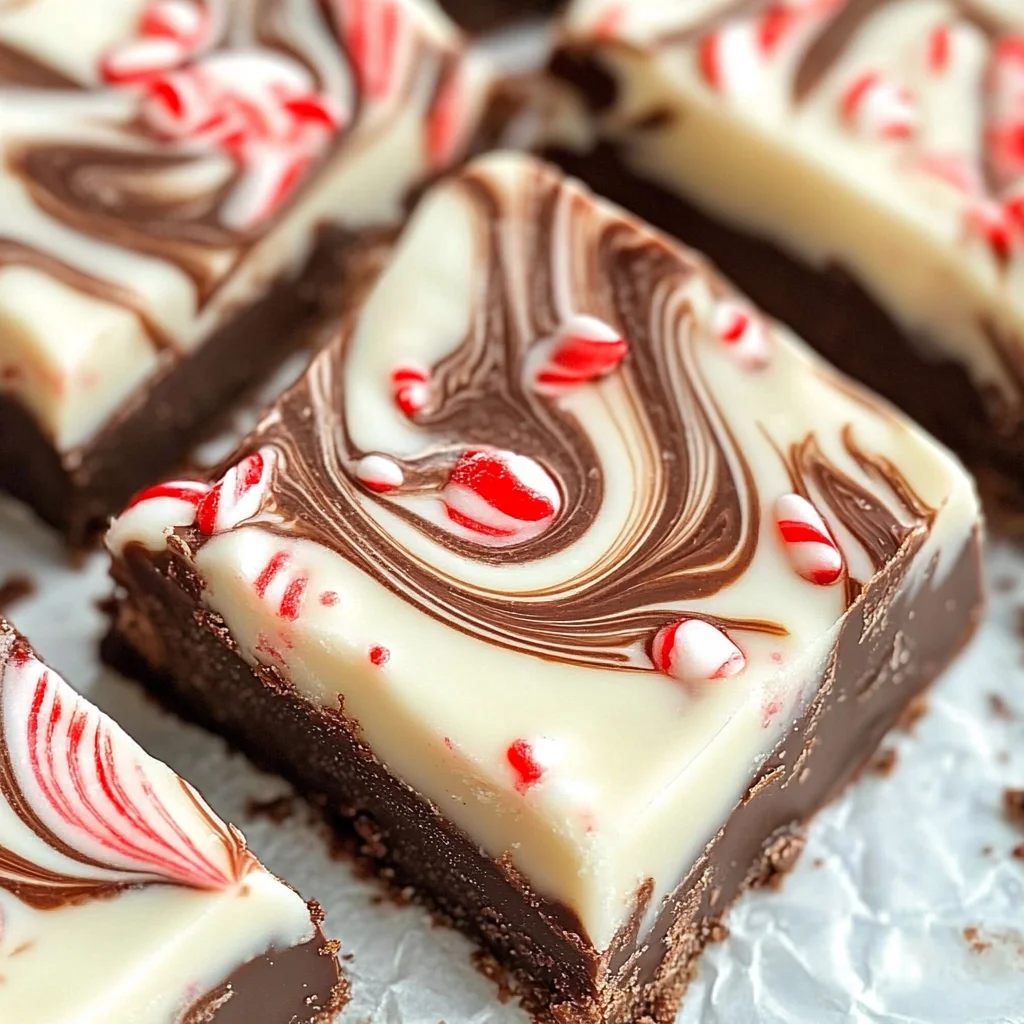
Sprinkling the crushed peppermint candies over the surface of your fudge is not just a finishing touch—it’s an essential step that brings both flavor and texture to this Peppermint Swirl Fudge. Imagine biting into a piece of rich, creamy fudge and encountering those delightful little bursts of minty freshness and crunch. Trust me, it’s utterly intoxicating! To do this, simply take your ½ cup of crushed peppermint candies or candy canes and evenly distribute them over the swirled fudge. Use your hands or a spoon to press them gently into the fudge; this helps ensure they’re not just sitting on top but are anchored in place for that perfect bite every time. This step is crucial because it not only adds visual appeal but also enhances the overall experience with a festive flair that’s synonymous with holiday gatherings.
As you press down, you’ll want to watch for any pieces that might want to escape—give them a gentle nudge back into place if necessary. The vibrant red and white contrast against the rich chocolate and creamy white layers makes for a beautiful presentation, reminiscent of snowflakes dusted over a winter landscape. This moment is all about patience and care; don’t rush through it! Take in the sights and smells—the sweet aroma of chocolate mingling with refreshing peppermint fills the air, creating an atmosphere so warm and inviting that it’s hard not to feel festive while you work.
Step 6: Chill and Set – A Test of Patience
Now comes one of the most important steps in making your Peppermint Swirl Fudge: chilling! You might be tempted to skip ahead or cut corners here, but I promise you—this waiting game is absolutely paramount to achieving that ideal texture. Once you’ve adorned your fudge with crushed peppermint, it’s time to slide that beautifully crafted pan into the refrigerator. Allow it to chill for at least 3 hours, though if you can wait until overnight, I wholeheartedly encourage you to do so! During this chilling period, the fudge will firm up beautifully, allowing those luscious layers to meld together while enhancing their flavors.
Why is this chilling time so transformative? When you let the fudge set properly, it allows all those exquisite flavors to develop fully. The cooling process solidifies our creamy base into something truly decadent yet sliceable. You’ll know it’s ready when you can press gently on its surface without leaving an indentation; it should feel firm yet slightly yielding—a perfect balance. If you find yourself unwrapping gifts or nibbling on snacks while waiting (which I totally understand!), just remember how rewarding it will be once you finally cut into that smooth, perfectly set fudge.
Step 7: Cut Into Perfect Squares
Once your fudge has chilled for the proper amount of time and transformed into a tantalizing treat, it’s time for one of my favorite moments: cutting it into squares! Carefully lift your creation out of the pan using the parchment paper overhang—it should come out easily if you’ve prepared correctly by lining your pan earlier. Now comes a little tip from my kitchen: use a sharp knife for cutting; this prevents any messy edges and ensures each piece looks as delightful as it tastes.
As you slice through those layers—first cutting down through one side before turning to create squares—you’ll notice how satisfying it is to see those swirls exposed with each cut revealing beautiful ribbons of chocolate intertwined with peppermint white chocolate. The contrast is simply stunning! Aim for about 25 squares; however, feel free to adjust sizes based on preference—who wouldn’t want a larger piece during holiday festivities? Just remember to wipe down your knife between cuts for clean lines because presentation matters when you’re sharing something so special.
Step 8: Finishing Touches – Share Your Sweet Creation
Now that you have these gorgeous squares of Peppermint Swirl Fudge ready, it’s time for my favorite part: sharing! Place them on a festive plate or arrange them in decorative boxes if you’re looking to gift some joy during this season. As you present them, take a moment to appreciate what you’ve created—the labor of love infused within each layer sings holiday spirit! Think about how delightful it will be when friends and family take their first bite; their expressions will likely say everything about how much they enjoy this treat.
While preparing for gifting or serving, consider adding a little extra touch by drizzling some melted dark chocolate over the top or even more crushed peppermint candies for an added crunch factor. These small details make such a big difference in presentation and taste—don’t underestimate their power! Remember also that storing any leftovers (if there are any!) should be done in an airtight container at room temperature or properly wrapped in parchment paper within your fridge; this keeps their texture intact while prolonging their deliciousness.
Final Thoughts on Your Peppermint Swirl Fudge Adventure
Making Peppermint Swirl Fudge isn’t just about combining ingredients; it’s about creating memories filled with laughter around loved ones during cozy evenings together. Each bite transports me back to cherished holidays spent with family when we would gather around baking sessions filled with joy and anticipation. I hope this recipe fills your home with warmth too!
So go ahead—make this extraordinary fudge today! It’s simple enough for anyone yet indulgent enough to impress even the pickiest sweet tooth at your gathering. I promise you’ll find joy not just in savoring every bite but also in sharing these lovingly crafted treats as tokens of affection throughout this magical season! Happy baking!
Storage and Enjoyment Tips for Your Peppermint Swirl Fudge
Now that you’ve crafted this delightful Peppermint Swirl Fudge, it’s time to dive into the best ways to enjoy and preserve your creation. This fudge is not only a visual treat but also a deliciously sweet indulgence that deserves to be savored. If you find yourself with any leftovers (though I doubt it!), fear not—there are simple ways to store your fudge, ensuring that its creamy texture and vibrant flavors remain intact for days to come.
Storing Leftover Peppermint Swirl Fudge
To keep your Peppermint Swirl Fudge fresh, store it in an airtight container at room temperature for up to a week. Make sure the container is well-sealed; this is crucial because exposure to air can lead to drying out, robbing your fudge of its luscious, melt-in-your-mouth quality. You could also place a slice of bread in the container with the fudge; this clever hack helps maintain moisture, making your fudge feel freshly made even after a few days! The flavors intensify as it sits, so don’t be surprised if each bite feels like a little celebration of peppermint bliss. When it’s time to serve, simply cut off a piece and let it sit at room temperature for a few minutes if you want to experience the ultimate creamy texture.
Freezing Peppermint Swirl Fudge for Later
If you want to prolong the joy of your Peppermint Swirl Fudge even further, freezing is an excellent option! To freeze your fudge properly, first cut it into squares and then wrap each piece tightly in plastic wrap or aluminum foil. Place them in a freezer-safe bag or container before tucking them away in the freezer where they’ll stay fresh for up to three months. When you’re ready for a sweet treat, just pull out as many pieces as you crave and allow them to thaw in the refrigerator or at room temperature. The convenience of having this festive treat on hand makes it perfect for unexpected guests or last-minute holiday gatherings. Trust me—you’ll thank yourself later!
Peppermint Swirl Fudge
Indulge in the festive flavors of our Peppermint Swirl Fudge, a creamy delight that perfectly combines rich chocolate and refreshing peppermint. Each bite offers a luxurious texture and vibrant swirls, making it an ideal holiday treat for sharing or gifting. With minimal effort and just a few key ingredients, you can create this mouthwatering fudge that is sure to become a favorite during the holiday season. Whether enjoyed with family during cozy movie nights or given as thoughtful gifts, this easy recipe captures the essence of winter festivities in every delicious square.
- Prep Time: 20 minutes
- Cook Time: None
- Total Time: 0 hours
- Yield: About 25 servings 1x
- Category: Dessert
- Method: No-bake
- Cuisine: American
Ingredients
- 2 cups semi-sweet or dark chocolate chips
- 1 tablespoon unsalted butter
- 1 (14 oz) can sweetened condensed milk (room temperature)
- ½ teaspoon peppermint extract
- Pinch of salt
- 1 ½ cups white chocolate chips
- ½ tablespoon unsalted butter (for the white chocolate layer)
- ⅓ cup sweetened condensed milk (room temperature, for the white chocolate layer)
- ½ teaspoon peppermint extract (for the white chocolate layer)
- 1–2 drops red gel food coloring
- ½ cup crushed peppermint candies or candy canes
Instructions
- Line an 8×8-inch square pan with parchment paper, leaving overhang for easy removal.
- In a heatproof bowl over simmering water, combine semi-sweet or dark chocolate chips, unsalted butter, and sweetened condensed milk. Stir until smooth.
- Remove from heat and fold in peppermint extract and a pinch of salt.
- In another bowl, melt white chocolate chips with unsalted butter and sweetened condensed milk over simmering water until smooth. Stir in peppermint extract and red gel food coloring.
- Pour three-quarters of the chocolate mixture into the lined pan, spreading evenly. Drop spoonfuls of the white chocolate mixture on top and swirl gently with a knife.
- Sprinkle crushed peppermint candies over the top and press down slightly.
- Refrigerate for at least 3 hours or overnight until set.
- Lift fudge out using parchment overhang, cut into squares, and enjoy!
Nutrition
- Serving Size: 1 square (30g)
- Calories: 150
- Sugar: 16g
- Sodium: 30mg
- Fat: 7g
- Saturated Fat: 4g
- Unsaturated Fat: 2g
- Trans Fat: 0g
- Carbohydrates: 19g
- Fiber: <1g
- Protein: <1g
- Cholesterol: 10mg