Toffee Apple Pie
There’s something truly magical about the combination of sweet, tart apples and rich, buttery toffee that draws us in and wraps us in a warm embrace. When I think of my beloved Toffee Apple Pie, I’m reminded not just of the flavors but of the moments spent in the kitchen, laughing and sharing stories as the aroma of baking fills the air. Each bite is a revelation, a delightful dance of textures and tastes that whispers comfort and nostalgia, reminding us of family gatherings and crisp autumn afternoons. This isn’t merely a dessert; it’s an experience that evokes joy and connection, bridging generations with each slice.
As you embark on this culinary journey, prepare to be enchanted by how simple ingredients can transform into something utterly extraordinary. The Toffee Apple Pie stands as a testament to the beauty of home cooking—it invites you to slow down, savor every moment, and take pride in creating something both delicious and heartwarming. With its flaky crust cradling tender apple slices bathed in liquid gold toffee, it’s sure to become a cherished recipe in your collection. So grab your apron, let’s dive into this delightful adventure together!
Toffee Apple Pie: A Symphony of Sweetness
This Toffee Apple Pie is not just another dessert; it’s an invitation to indulge in layers of flavor and texture that will leave you craving more. Imagine biting into perfectly spiced apples enveloped in a buttery crust, complemented by a luscious toffee sauce that weaves throughout each slice. It’s an exquisite contrast—tartness from the Granny Smith apples meets the sweetness of brown sugar, creating a harmonious balance that’s simply irresistible. Whether it’s Thanksgiving dinner or just a cozy weeknight treat, this pie has earned its place at any table.
Ingredients:
Let’s gather our ingredients for this delightful pie! Each component plays a vital role in crafting that perfect blend of flavors and textures we’re aiming for, so it’s essential to choose wisely.
- 8 Granny Smith apples (about 9 cups sliced). These tart beauties are the stars of our show! Their firm texture holds up beautifully during baking while their tangy flavor complements the sweetness of the toffee perfectly. When selecting apples, look for ones that are firm with smooth skin—any blemishes could indicate overripeness. If Granny Smiths aren’t available, other tart varieties like Honeycrisp or Braeburn can also work well but ensure they have enough acidity to balance out the sweetness.
- 2 tbsp butter. This little addition is integral for sautéing our apples before they go into the pie; it adds richness and depth while helping to create a silky texture when combined with sugar. Always opt for unsalted butter here so you can control the overall saltiness of your pie; plus, quality matters! European-style butter brings even more flavor thanks to its higher fat content.
- ½ cup sugar. Granulated sugar serves as our primary sweetener here; it helps caramelize during baking while enhancing the natural sweetness of our apples. You might wonder why we add sugar separately when we have brown sugar later—it’s all about layering flavors! If you’re looking for alternatives due to dietary preferences or restrictions, coconut sugar or even maple syrup can be interesting substitutes.
- 1 tsp cinnamon. Ahh… cinnamon—the spice that transforms any dish into something warm and inviting! Not only does it enhance the flavor profile of our filling but it also brings back fond memories for many—a hint of nostalgia wafts through the air as it bakes. Make sure you’re using fresh ground cinnamon; old spices can lose their potency over time.
- ¼ tsp nutmeg. A pinch goes a long way with nutmeg! It adds depth and warmth without overpowering other flavors—a dash will elevate your pie’s taste profile significantly.
- ¼ tsp allspice. This aromatic spice combines notes of cloves and cinnamon—it’s like bringing an entire spice cabinet into one little pinch! It’s absolutely non-negotiable if you want that classic fall flavor.
- ¼ tsp salt. Salt may seem counterintuitive when making desserts, but it enhances all flavors and balances sweetness beautifully! It helps bring out the complexity within your filling; trust me on this one!
- Juice of ½ lemon. The acidity from lemon juice doesn’t just prevent our apple slices from browning; it also brightens up their flavor profile beautifully! Freshly squeezed juice is always best—bottled varieties often lack vibrancy.
- 2 ½ cups flour. This forms our flaky crust—think about it as the protective layer cradling all those delicious fillings inside! It’s crucial to use all-purpose flour for structure while ensuring your dough stays tender rather than tough; this balance is paramount.
- 1 tsp salt (for crust). Just as before, adding salt here amplifies flavors wonderfully—don’t skip this step!
- 1 cup cold butter (diced). Cold butter is key for creating those coveted flaky layers we dream about in pies! As it melts during baking, it creates steam pockets within the dough—this results in that delicate flakiness we all love so much.
- ½ cup ice water. Adding cold water helps bind everything together without warming up your dough too much before baking—a crucial step if you want ideal texture!
- ¼ cup butter (for caramel). This rich addition melds beautifully with brown sugar later on—it forms that gorgeous sauce we’ll drizzle over our apple filling!
- ½ cup brown sugar. Dark brown sugar adds moisture along with a deeper caramel flavor compared to regular granulated types; its molasses undertones complement our filling wonderfully!
- ¼ cup heavy cream. This liquid gold gives our caramel richness—it thickens beautifully while adding creaminess that’ll make every bite feel indulgent!
- 4 tbsp cornstarch. Cornstarch acts as both thickener and stabilizer here; it ensures everything sets nicely when baked without turning too runny.
- 1 egg + 1 tbsp water (for egg wash). An egg wash creates that beautiful golden sheen on top of your crust—a visual cue signaling deliciousness ahead!
- 2 cups milk (for custard). Whole milk provides creaminess needed for our custard filling while keeping everything smooth without curdling during cooking.
- 3 egg yolks (for custard). Richer than whole eggs alone—they bring wonderful depth along with color!
- ⅓ cup sugar (for custard). Just enough sweetness mixed with creamy goodness will elevate this pie even further!
- 1 tbsp cornstarch (for custard). It’s essential here too—this time aiding in achieving desired thickness within custard filling without clumping!
- Pinch salt (for custard). Just like before—this tiny amount serves wonders balancing out sweetness from other ingredients perfectly!
- 2 tsp vanilla extract (for custard). Pure vanilla extract lends warmth & fragrance—a fragrant reminder that we’re creating magic right here!
- 1 tbsp butter (to finish). A final touch adds richness just before serving—totally worth it!
Once we’ve gathered these wonderful ingredients together—the magic truly begins!
Equipment You’ll Need:
Having the right tools makes all the difference when you’re embarking on your pie-making adventure! While they may not be ingredients, these kitchen companions are essential partners ensuring everything runs smoothly—from mixing dough effortlessly to achieving flawless crusts every time.
- Mixing bowl(s) – A large mixing bowl is imperative for combining your dry ingredients thoroughly before adding wet ones—it keeps things organized while preventing splatter everywhere else! Glass bowls are particularly great since they allow you to see your mixtures clearly as they come together beautifully.
- Rolling pin – This tool becomes your best friend when rolling out pastry dough evenly—you want consistent thickness throughout so every bite has perfect flakiness! Opt for one made from wood or marble—they provide excellent weight distribution during use.
- Pie dish or pan – Choosing an appropriate size matters greatly here since different pans yield different crust thicknesses & bake times! A ceramic or glass dish works best—they retain heat evenly resulting in perfectly baked pies every time.
- Sharp knife or peeler – Essential for slicing those lovely Granny Smith apples effortlessly—you want thin slices allowing them to cook evenly throughout baking process while still retaining some bite once finished!
Now that we’re fully equipped with knowledge about ingredients & necessary tools—it’s time we roll up those sleeves & get started preparing this Toffee Apple Pie masterpiece together…
Preparing the Toffee Apple Pie
Step 1: Slicing Up Those Apples
Start by peeling those glorious Granny Smith apples—you’ll want them sliced evenly so they cook uniformly inside our pie crust later on! I recommend cutting them into thin wedges rather than chunks; this allows maximum surface area exposure which means better caramelization during baking—that’s where you’ll gain incredible flavor depth! As you slice away, don’t forget about sprinkling some lemon juice over them immediately afterwards: this prevents browning while infusing freshness into each piece at same time—a double win if there ever was one!
Step 2: Sautéing The Apples
Next up comes one my favorite steps: sautéing those apple slices gently over medium heat alongside butter & granulated sugar until slightly softened yet still retaining their shape—imagine how tantalizing aromas fill your kitchen at this point—it’s pure bliss! Stir occasionally allowing sugars dissolve completely then sprinkle cinnamon/nutmeg mixture over top coating everything evenly: now you’ve created what feels like magic happening right before eyes resulting in an intoxicating symphony between sweet/tart flavors merging seamlessly together creating something utterly divine—not rushing through this step really pays off later down road trust me on this one…
Step 3: Crafting The Flaky Crust
Now let’s turn our attention toward making that flaky crust which will cradle all these delightful ingredients together perfectly within its embrace! In another bowl combine flour & salt then cut cold diced butter into mixture until resembling pea-sized crumbs—you should see small flecks appearing throughout giving promise towards future flakiness—we’re talking next-level pie crust vibes here folks… Next pour ice-cold water gradually mixing until dough forms: don’t overwork though—we want tenderness not toughness after all… Wrap tightly in plastic wrap then refrigerate letting chill while finishing preparation elsewhere—a crucial step ensuring proper texture down line too…
Step 4: Preparing The Caramel Sauce
With everything prepped let’s whip up some heavenly toffee sauce which will create gooey pockets found amidst those apple slices once baked through: start melting together remaining butter alongside brown sugar stirring until bubbling gently around edges where color shifts towards deep amber hue—that’s when things start getting interesting folks… Once melted remove heat carefully whisking heavy cream slowly incorporating until smooth luxurious mixture occurs—that subtle note from vanilla extract comes next followed by some cornstarch dissolved beforehand ensuring silky consistency prevails throughout once cooled prior pouring generously atop fruit filling nestled snugly under crust above waiting patiently awaiting glorious transformation soon-to-be experienced…
I hope you’re getting excited because we’re just getting warmed up here on this beautiful journey toward creating unforgettable memories around dining tables filled laughter shared amongst loved ones surrounding delectable desserts such as Our Toffee Apple Pie today… Let’s forge ahead bravely knowing perfection awaits ahead…
Step 5: Assemble the Apple Filling with Love
Now that we have our beautifully buttery crust chilling, it’s time to dive into creating the heart of our Toffee Apple Pie: the luscious apple filling. Grab those Granny Smith apples—there’s something so delightful about their tartness that pairs impeccably with the sweetness of caramel! Begin by peeling and slicing your apples into thin wedges; I like to aim for about ¼-inch thickness to ensure they cook evenly. As you slice, don’t forget to toss them in a bowl with the juice of half a lemon; this not only prevents browning but also adds a delightful brightness to the flavor.
Once all your apples are sliced, it’s time to sprinkle in the sugar, cinnamon, nutmeg, allspice, and salt. The aroma of these spices mingling with the fresh apple scent is nothing short of intoxicating. Gently fold everything together, ensuring each slice is coated in this symphony of flavors. Trust me on this: letting your filling sit for about 10-15 minutes allows those spices to permeate every bite and enhances the overall flavor profile. This step is crucial because it helps soften the apples slightly before baking, which leads to a perfectly tender filling that melts in your mouth while still holding its shape.
Step 6: Crafting Your Pie Crust – The Foundation of Flavor
With your apple filling resting and steeping in its own deliciousness, let’s get back to that chilled pie crust waiting patiently in the fridge. Remove it from its cool haven and place it on a lightly floured surface. Now here’s where the magic happens: gently roll out your dough using a rolling pin, applying even pressure as you go. Aim for about an 11-inch circle, which will give you enough overhang for crimping later on. If at any point you feel resistance or if the dough sticks, sprinkle a little more flour on your surface and keep going; patience is key here!
The reason we roll our dough out evenly is twofold: first, it ensures even baking throughout the crust (no soggy bottoms here!), and second, it helps create those flaky layers that we all adore. Once you’ve achieved that perfect circle, carefully lift your crust into your pie dish—don’t worry if it tears a bit; just patch it up with your fingers. Remember to leave some overhang for crimping later! It’s normal for pie-making to be a bit messy; embrace it! After all, cooking is an art form meant to be enjoyed.
Step 7: The Toffee – A Sweet Transformation
While your crust is nestled snugly in its dish, let’s make that utterly intoxicating toffee sauce that will elevate our pie from wonderful to truly extraordinary! In a medium saucepan over medium heat, combine ¼ cup butter and ½ cup brown sugar. As these ingredients melt together—bubbling away in glorious harmony—you’ll start to notice an enticing caramel aroma wafting through your kitchen. Stir constantly until everything is melted and combined smoothly; this process takes about 3-5 minutes.
Once melted and bubbly, slowly pour in ¼ cup of heavy cream while whisking vigorously—this step might seem trivial but trust me when I say it’s absolutely paramount! The cream not only enriches the sauce but creates a silky texture that will coat our apples beautifully. Allow this heavenly mix to simmer for another minute or so until it thickens slightly; you’ll know it’s ready when it coats the back of a spoon without running off too quickly. Set aside and let it cool slightly before drizzling generously over your spiced apples—this divine union brings together warmth and sweetness like no other.
Step 8: Filling Your Pie – Layering Love
Now comes one of my favorite parts—layering everything together! Preheat your oven to 425°F (220°C) while you prepare this masterpiece. Start by pouring half of your luscious apple mixture into the fitted pie crust, spreading it evenly across the base. Then grab that warm toffee sauce we prepared earlier and drizzle half over these beautiful apples—oh my goodness! Can you smell how incredible this already is? Don’t rush this step; take time to savor this moment because you’re building layers of flavor that will truly shine when baked.
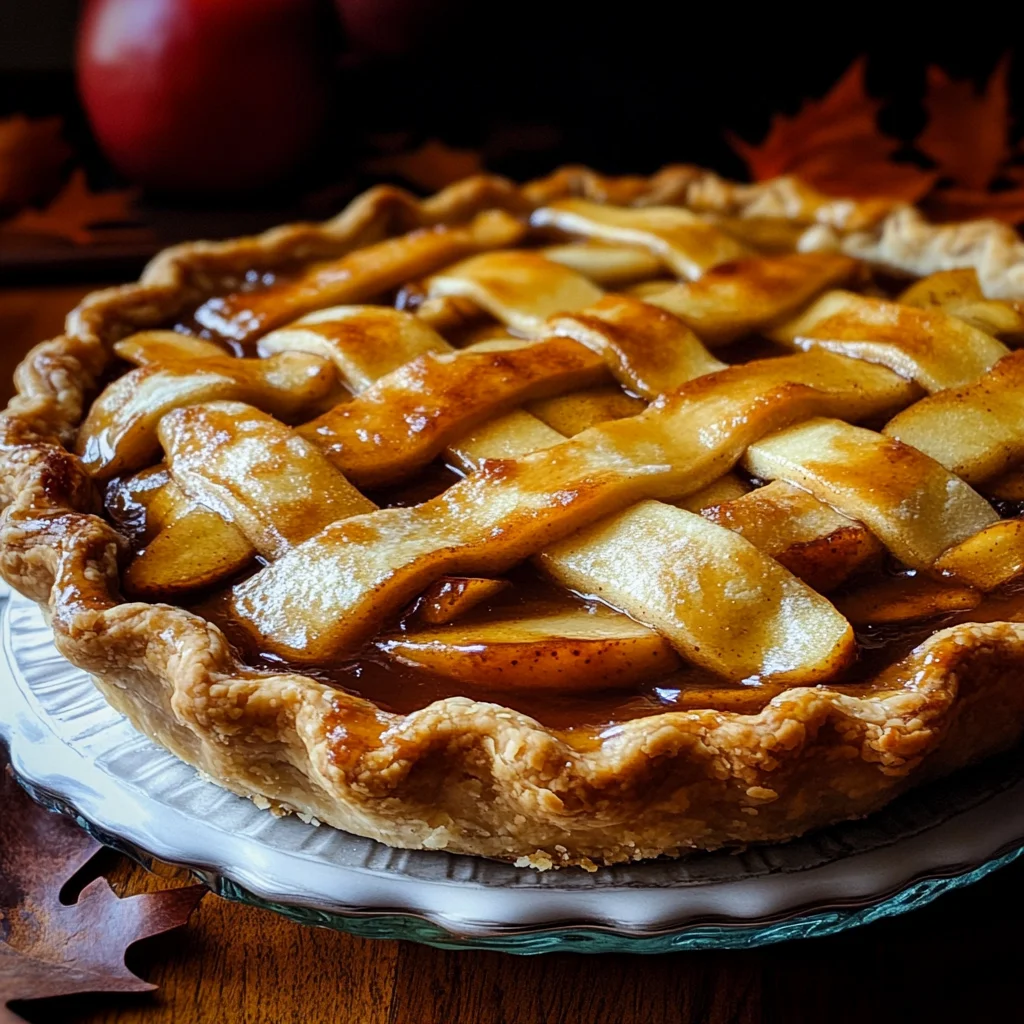
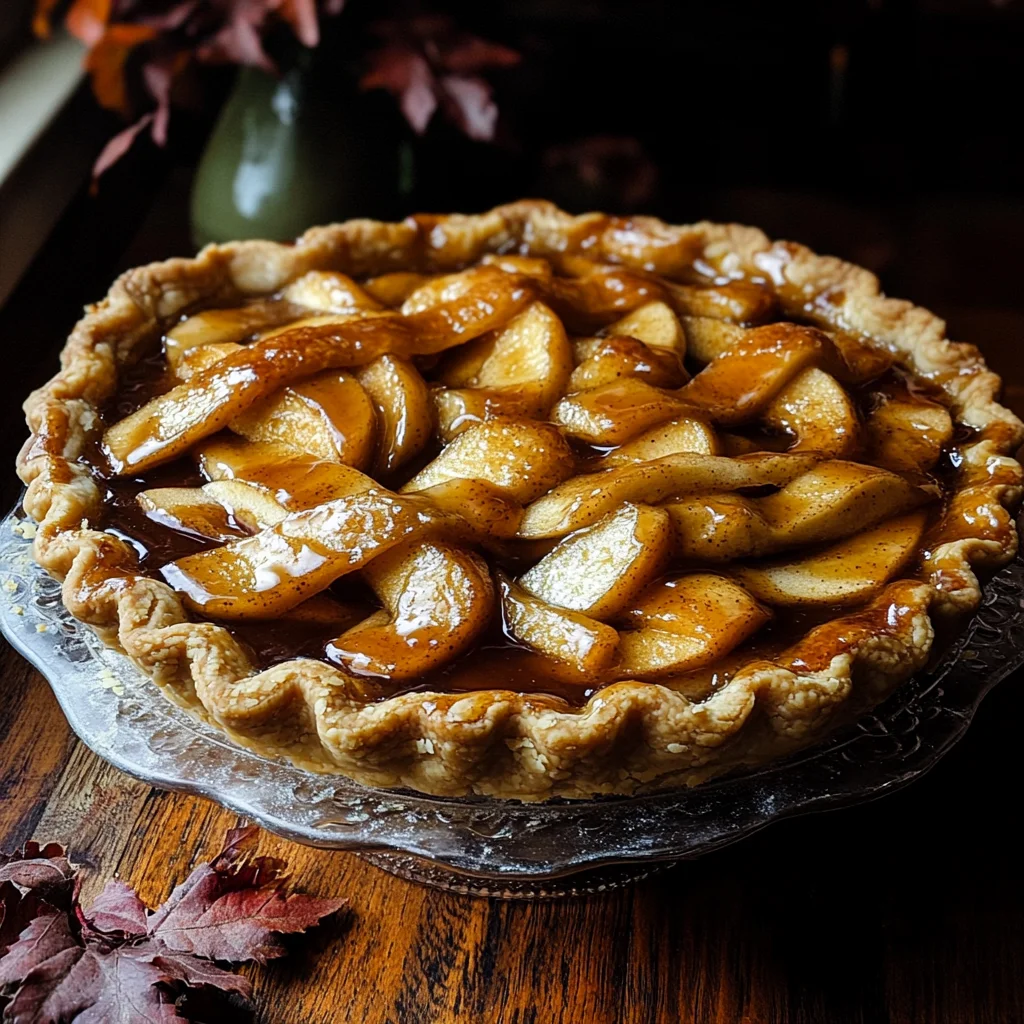
Next up, add in the remaining apple slices atop this gooey goodness and finish with another drizzle of that irresistible toffee sauce—it’s like icing on top of a cake! Now it’s time to roll out another piece of dough for our top crust. Again, aim for an even thickness as you cover your pie—but don’t worry if there are some gaps; they’ll allow steam to escape during baking which prevents sogginess inside (nobody wants sad apples!). Seal those edges by crimping them decoratively with your fingers or a fork—the visual appeal is just as important as taste!
Conclusion:
What an incredible journey we’ve taken together through this delightful recipe for Toffee Apple Pie! From selecting those perfectly tart Granny Smith apples to creating that silky-smooth caramel filling, every step is filled with love and passion that makes this dessert truly extraordinary. It’s not just about flavor – it’s about creating memories with each slice you serve at gatherings or cozy family dinners. The combination of sweet apples with that luscious layer of rich caramel creates an unforgettable symphony of flavors that dances on your palate and warms your heart.
Now, if I could only share one baking experience that encapsulates joy—this would be it! Not only does making this Toffee Apple Pie bring satisfaction as you watch it turn golden brown and bubbly in the oven, but sharing it also brings people together around the table like nothing else can. Imagine pulling this beauty out during Thanksgiving dinner or serving it as an indulgent treat during a chilly autumn evening with friends – these moments are what life is all about! The crispness of the crust combined with tender apple slices creates textures that keep every bite exciting until there’s nothing left but crumbs.
As you savor each slice while sipping on warm cider or maybe even a cup of coffee—consider how wonderful it would be paired with a scoop of vanilla ice cream melting into all those delicious layers. Picture yourself offering up generous portions while everyone around you closes their eyes in blissful enjoyment—it’s pure magic! For an afternoon pick-me-up or dessert after dinner, there’s no wrong occasion for this charming creation!
Feeling adventurous? This recipe is wonderfully adaptable! You could swap out Granny Smith apples for sweet Honeycrisps or even mix in some juicy pears – can you imagine how heavenly those would be? Or perhaps add some chopped nuts for delightful crunchiness? The possibilities are endless and waiting for your creative touch! So go ahead and make this Toffee Apple Pie your own; I invite you to share your experiences and variations too because cooking is all about connection and discovery. I’m genuinely excited to hear how your journey unfolds!
Toffee Apple Pie
Toffee Apple Pie is a heartwarming dessert that combines the perfect balance of sweet and tart flavors with a rich, velvety caramel sauce. This delightful treat features tender slices of Granny Smith apples enveloped in a flaky crust, creating an experience that evokes nostalgia and joy. Each slice is a celebration of home-cooked goodness, ideal for family gatherings or cozy nights at home. The intoxicating aroma wafting from the oven will fill your kitchen with warmth, inviting everyone to gather around the table and share in this comforting classic. Whether enjoyed warm with a scoop of vanilla ice cream or simply on its own, this Toffee Apple Pie is sure to become a cherished recipe in your collection.
- Prep Time: 30 minutes
- Cook Time: 30 minutes
- Total Time: 1 hour
- Yield: Serves approximately 8 people 1x
- Category: Dessert
- Method: Baking
- Cuisine: American
Ingredients
- 8 Granny Smith apples (about 9 cups sliced)
- 2 tbsp unsalted butter
- ½ cup granulated sugar
- ¼ cup heavy cream
- ½ cup brown sugar
- 2 ½ cups all-purpose flour
- 1 tsp ground cinnamon
- Juice of ½ lemon
- ¼ tsp nutmeg
- ¼ tsp allspice
- ¼ tsp salt
- 1 tsp salt (for crust)
- 1 cup cold butter (diced)
- ½ cup ice water
- 4 tbsp cornstarch
- 1 tbsp butter (to finish)
- 1 egg + 1 tbsp water (for egg wash)
Instructions
- Preheat your oven to 425°F (220°C).
- Peel and slice the Granny Smith apples into thin wedges, tossing them with lemon juice.
- In a skillet over medium heat, melt butter and add sugar; sauté apple slices until slightly softened. Add cinnamon and stir well.
- For the crust, combine flour and salt in a bowl; cut in cold diced butter until crumbly. Gradually add ice water until dough forms; chill.
- Roll out the dough and fit it into a pie dish, then fill it with the sautéed apple mixture.
- Prepare the caramel by melting butter with brown sugar; whisk in heavy cream until smooth.
- Drizzle half of the caramel over the apple filling.
- Roll out another dough layer for the top crust, seal edges, and create slits for steam.
- Brush with egg wash and bake for about 25-30 minutes or until golden brown.
Nutrition
- Serving Size: 1 slice (120g)
- Calories: 320
- Sugar: 22g
- Sodium: 150mg
- Fat: 15g
- Saturated Fat: 8g
- Unsaturated Fat: 5g
- Trans Fat: 0g
- Carbohydrates: 45g
- Fiber: 3g
- Protein: 2g
- Cholesterol: 30mg