Salted Caramel Apple Pies
There’s something truly magical about the combination of sweet caramel and tart apples nestled in a flaky, golden crust. When I think of Salted Caramel Apple Pies, I’m instantly transported to cozy afternoons spent in my kitchen, where the air is filled with the intoxicating aroma of baked apples and buttery pastry. The experience transcends mere cooking; it’s about creating memories that dance on your taste buds and linger in your heart. Each bite is a symphony of flavors—the sweetness of the caramel, the warmth of cinnamon, and that delightful hint of sea salt—coming together to form an utterly satisfying treat that speaks to all ages. It’s more than just dessert; it’s a heartfelt embrace, a reminder of cherished moments shared with loved ones.
As we embark on this culinary journey together, let’s take a moment to appreciate what makes these Salted Caramel Apple Pies so special. They embody that beautiful contrast between sweet and salty, which has captivated dessert lovers for generations. Picture yourself at a family gathering or holiday celebration, where these golden-brown pastries are passed around, each one bursting with juicy apple chunks and gooey caramel—it’s hard not to fall in love! These little pies are versatile enough for any occasion: from casual weeknight dinners to festive gatherings. Trust me when I say they will steal the show every time.
Salted Caramel Apple Pies: A Cozy Delight for All Occasions
I am beyond excited to share this recipe with you! It’s like hugging your favorite sweater on a chilly day—a comfort food classic that feels warm and inviting. With just a handful of ingredients and some love, you can create these delightful pies that not only taste phenomenal but also look incredibly charming. So roll up your sleeves, grab your apron, and let’s dive into the world of baking these Salted Caramel Apple Pies!
Ingredients:
As we gather our ingredients for these delectable Salted Caramel Apple Pies, remember that each component plays a vital role in crafting this comforting dessert. From the rich flavors of fresh apples to the crunchiness of pie crusts, let’s break down what you’ll need.
- 1 box refrigerated pie crust. Using refrigerated pie crust is an absolute game changer! It saves time without compromising on flavor or texture. Look for a brand that uses quality ingredients—you want that buttery goodness without any artificial preservatives. If you’re feeling adventurous and have time on your hands, homemade pie crust can elevate this dish even further! Just keep in mind that it’s important for it to be chilled before rolling out for optimal flakiness.
- 1 large apple, peeled and chopped into small pieces. The star of our show! I recommend using a tart variety like Granny Smith or Honeycrisp; their crispness holds up beautifully during baking and their tangy flavor balances perfectly with the sweetness from the caramel. Make sure to chop them into small pieces so they cook evenly and fit nicely into your tiny pies.
- 1/2 teaspoon ground cinnamon. This fragrant spice adds warmth and depth to our filling—think cozy autumn afternoons! Cinnamon complements apples beautifully by enhancing their natural sweetness while adding complexity to each bite. Don’t skimp on this; it’s non-negotiable for achieving that comforting aroma we all love!
- 1 teaspoon fresh squeezed lemon juice. A splash of lemon juice is crucial here! Not only does it add brightness to balance out the sweetness but it also prevents the apples from browning too quickly after peeling. Freshly squeezed is always best; bottled lemon juice can lack that vibrant flavor we’re aiming for.
- 1/8 cup sugar. Just enough sugar brings out the natural sweetness of those lovely apples while allowing us to achieve that perfect caramelization during baking! You could use brown sugar if you want an extra hint of molasses flavor—just be sure it complements rather than overwhelms.
- 1 teaspoon all-purpose flour. This is important for thickening our apple filling, ensuring it doesn’t turn watery during baking—nobody enjoys soggy pastry! The flour helps absorb excess juices released by the apples while they bake, creating a luscious filling that’s just heavenly.
- 6 store-bought caramels, diced into about 4 pieces each. These little nuggets are what make our pies extraordinary! Look for high-quality store-bought caramels; their gooeyness will melt beautifully within each pie pocket when baked. Make sure you cut them into small pieces so they distribute evenly throughout the filling!
- Sprinkle of sea salt. Ahh, this is where magic happens! A sprinkle of flaky sea salt brings out all those lovely sweet flavors while also adding an unexpected crunch—a delightful contrast that elevates our pies from ordinary to extraordinary!
- 1 large egg (for egg wash). An egg wash gives our pies that gorgeous golden finish once baked—a visual cue indicating how delicious they are going to be! Plus, it helps seal our crusts together during baking.
- 1 tablespoon water (to mix with egg). Adding water helps thin out the egg mixture slightly so it brushes on smoothly without clumping or tearing our delicate dough.
- Sugar in the raw for dusting on top. This adds an extra touch of sparkle and crunch to each pie’s surface—it’s purely aesthetic but oh-so-pretty!
- Optional: Caramel syrup (for drizzling). If you’re anything like me and can never have enough caramel sauce in your life, then feel free to drizzle some over your finished pies for an extra indulgent treat!
Equipment You’ll Need:
Having the right tools makes all the difference when creating something wonderful in the kitchen! Though not technically ingredients themselves, these trusty companions will help ensure your baking experience is as smooth as possible while making those delightful Salted Caramel Apple Pies.
- Mixing bowls – A set of mixing bowls in various sizes will be essential for combining your ingredients effectively without mess or hassle—having different sizes allows you flexibility based on how much you’re making.
- Measuring cups & spoons – Precision is key when baking; having quality measuring tools ensures accurate measurements which lead directly towards consistent results every time!
- Cookie sheet lined with parchment paper – This serves two purposes: preventing sticking during baking AND making cleanup effortless afterward—a true win-win situation!
- Rolling pin (if making homemade crust) – For those adventurous souls opting for homemade pie crusts instead of store-bought options—you’ll find rolling pins invaluable in achieving even thickness across dough sheets.
With everything gathered and prepared at hand—the magic can begin!
Preparing the Salted Caramel Apple Pies / Making Sweet Memories
Step 1: Preheat Your Oven
First things first: Let’s get that oven nice and hot by preheating it to 425 degrees Fahrenheit. This step is absolutely paramount because starting with a hot oven ensures even cooking throughout; if you toss those delicate little pies into cooler temps, you risk uneven baking—no one wants soggy bottoms on their beautiful creations! While waiting patiently as you prepare other components, go ahead and line a cookie sheet with parchment paper—it creates an easy-release surface post-baking while also absorbing excess moisture from below.
Step 2: Combine Your Filling
In a mixing bowl large enough to accommodate all those lovely ingredients without spilling over (trust me on this), combine your chopped apples with fresh lemon juice first—this prevents browning while tossing everything else together later on! Then sprinkle flour over them along with sugar followed by ground cinnamon before gently folding diced caramels through until uniformly distributed throughout—the key here being gentle movements so as not to mush up those precious apple pieces too much—instead we want them intact yet coated beautifully now ready for filling!
Step 3: Prepare Egg Wash
In another small bowl (yes—I know there are many!), crack open one large egg then whisk vigorously alongside one tablespoon water until fully combined—the goal here being achieving smooth consistency rather than clumpy bits which won’t brush well onto dough surfaces later down line during assembly steps ahead! Setting this aside allows us time focus solely upon rolling out dough circles next before returning back shortly thereafter preparing edges sealing process tightly shut once filled.
Step 4: Roll Out Pie Crusts
Now comes perhaps my favorite part—unrolling those beautiful refrigerated pie crusts onto lightly floured surfaces (this keeps everything neat!) With either circular cookie cutter or glass (about 3¼ inches wide works perfectly), cut out as many circles as possible per sheet; don’t forget about scraps leftover afterward either—they can be re-rolled multiple times yielding additional rounds if desired! Placing half circles upon lined cookie sheet ready awaits their respective fillings soon afterwards means we’re getting closer towards pulling together complete ensemble at last!
With these foundational steps laid out beautifully thus far—we’ve set ourselves up brilliantly towards crafting unforgettable memories through delicious bites ahead together! So hang tight as we continue onward delving deeper into assembly processes shortly…
Step 5: Sealing the Flavors with Love
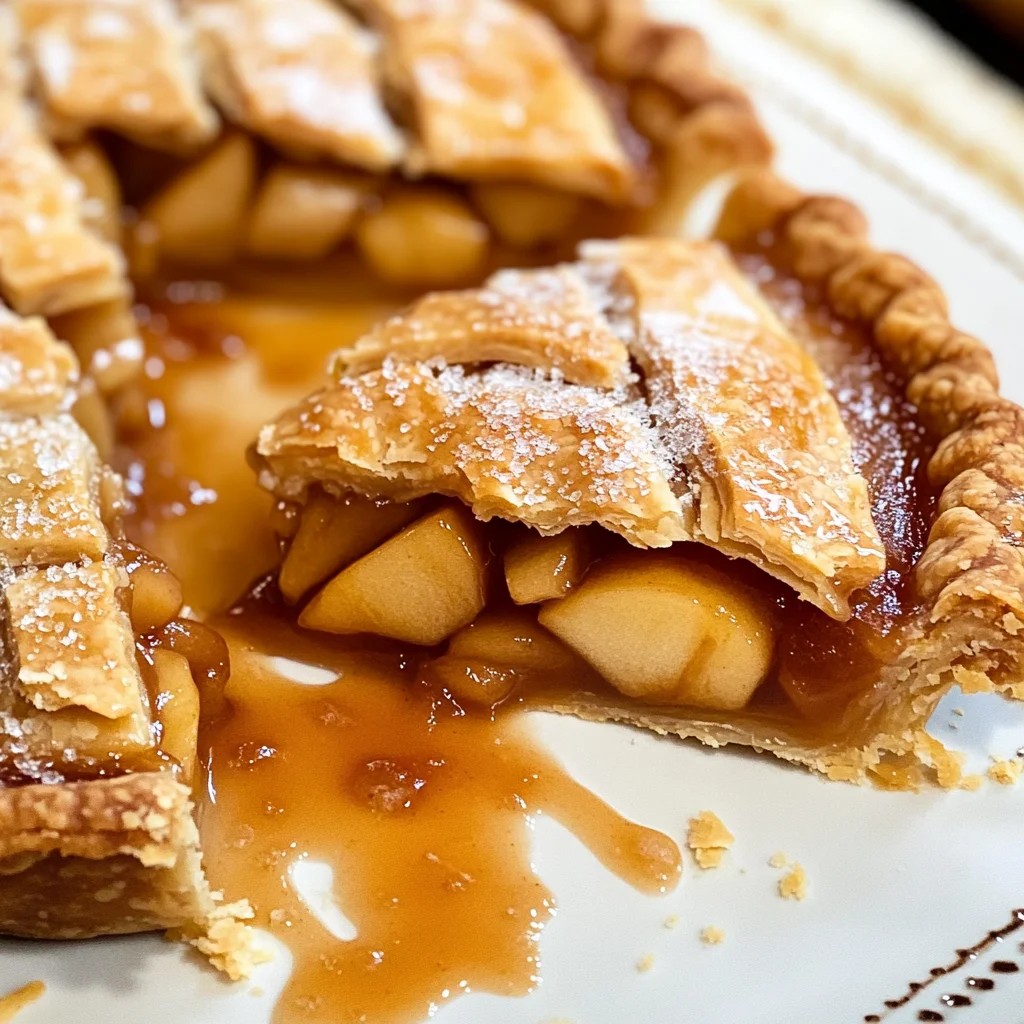
Now that you’ve prepared your delightful apple and caramel mixture, it’s time to bring everything together into these charming little pies. This is where the magic happens! Place half of your pie crust circles on the lined cookie sheet, allowing them to rest comfortably like little boats waiting to be filled with deliciousness. Each circle should have a generous spoonful of that intoxicating apple and caramel concoction placed right in the center. I encourage you to be generous here; each bite should be a burst of flavor! Aim for at least four pieces of caramel on each pie, as they melt during baking, creating that beautifully gooey filling that we all adore.
Once you’ve topped each base with this heavenly mixture, it’s time to sprinkle just a pinch of sea salt over the filling. This step is absolutely crucial because it enhances the sweetness of the caramel while balancing the flavors perfectly. The contrast between salty and sweet is what takes these Salted Caramel Apple Pies from ordinary to extraordinary, creating a sublime symphony of flavors that will dance on your palate. Now, take another pie crust circle and gently place it over the filling to create a top for your pie. Using the tines of a fork, press down firmly along the edges—this not only seals your pie but also gives it that charming decorative look. And don’t forget to make an X on top with a small knife; this allows steam to escape during baking and prevents any unfortunate explosions!
Step 6: The Golden Brush
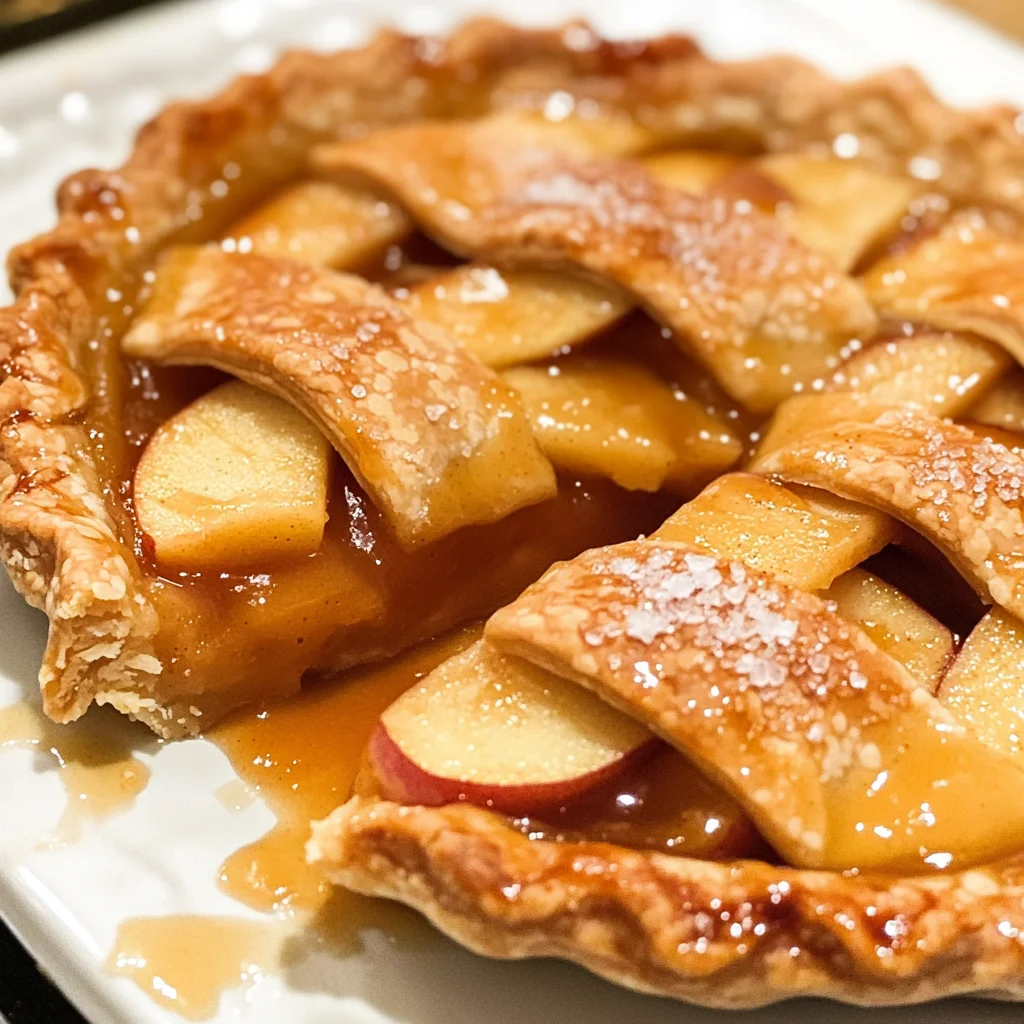
With your lovely little pies sealed and ready for their oven debut, let’s give them some extra love with an egg wash. In a small bowl, mix together one large egg with a tablespoon of water until it’s well combined—this simple mixture is going to create that beautiful golden sheen on your pies as they bake. Using a pastry brush or even just your fingers (I won’t tell!), gently brush the tops of each pie with this egg wash, making sure every edge gets some attention. This step isn’t just about looks; it plays a pivotal role in achieving that perfect texture and color.
When they come out of the oven, you want them to have that inviting golden brown hue that beckons you closer. It’s one of those visual cues that tells you they are ready to be devoured! After brushing the tops, sprinkle them lightly with sugar in the raw—this adds not only sweetness but also a delightful crunch on top that contrasts beautifully with the tender crust beneath. Trust me when I say you want this step; it elevates your pies from simple treats into decadent dessert stars worthy of any gathering.
Step 7: Baking – The Transformative Heat
Ah, now we arrive at one of my favorite parts—the baking! Preheat your oven to 425 degrees Fahrenheit if you haven’t already; this high temperature is essential because it helps create that flaky texture we crave in our crusts while cooking the filling just right without becoming mushy. Once you’ve prepped everything and placed your pies in the oven, keep an eye on them—baking time typically ranges from 12 to 15 minutes depending on your oven’s temperament. You’ll know they’re ready when they turn gloriously golden brown and start emitting that utterly intoxicating aroma of warm apples and caramel wafting through your kitchen.
It’s important not to rush this step; patience is key here! If you’re peeking into the oven (which I highly encourage), remember not to open it too often as this can cause temperature fluctuations leading to uneven baking. If you’re using an older oven or one that’s known for hot spots, consider rotating your cookie sheet halfway through for even browning—trust me; it’ll make all the difference! When they’re done baking, allow them some time on a cooling rack; this helps them set perfectly so when you take that first bite, everything stays intact instead of spilling out like an overzealous volcano.
Step 8: The Sweet Finishing Touches
Once you’ve allowed those beautiful Salted Caramel Apple Pies to cool slightly—just enough so they don’t burn your mouth but still warm enough for those flavors to shine—it’s time for one last flourish before serving. Drizzling caramel syrup over each pie is completely optional but oh-so-worth-it if you want an extra layer of indulgence! Picture this: as you drizzle that luscious syrup over your pies, it cascades down their sides like liquid gold, adding both beauty and richness.
When serving these delightful treats, consider pairing them with a scoop of vanilla non-dairy ice cream or whipped coconut cream for added decadence—a scoop melting slowly atop warm pie creates an utterly divine experience that’s simply unforgettable. As you slice into these beauties, watch how the filling oozes out—it’s truly a sight meant for sharing! Remember, these Salted Caramel Apple Pies are more than just desserts; they’re about creating memories around the table with loved ones who will relish every bite alongside you.
The Joyous Finale: Sharing Your Creation
Now comes perhaps my favorite part—sharing these little parcels of joy with friends and family! Whether it’s at Thanksgiving dinner or simply a cozy gathering at home, these Salted Caramel Apple Pies will undoubtedly steal the show. I promise you’ll receive compliments galore as folks savor each morsel filled with sweet apples and rich caramel goodness topped off with buttery crusts kissed by salt.
As you enjoy these delightful treats together, take a moment to reflect on how food has this incredible power to bring us closer—it transcends mere nourishment and becomes part of our stories. So go ahead and whip up these pies again and again; let each batch become part of your cherished moments in life! Happy baking!
Storage and Enjoyment Tips for Your Salted Caramel Apple Pies
Oh, my friends, we’ve finally reached the moment of pure bliss! Those heavenly Salted Caramel Apple Pies are out of the oven, golden brown and bubbling with that intoxicating aroma of sweet apples and rich caramel. I can almost hear you exclaiming in delight! But before you dive into these little pockets of joy, let’s talk about how to ensure they stay just as delightful after your first taste. Trust me; there’s nothing quite like savoring a warm pie later on, bringing back those wonderful memories with every bite.
Storing Leftover Salted Caramel Apple Pies
To keep your leftover Salted Caramel Apple Pies in tip-top shape, I recommend placing them in an airtight container. This is crucial because it helps lock in that delightful moisture while keeping them fresh and flavorful. If you store them properly at room temperature, they’ll maintain their deliciousness for up to 2 days. However, if you want to extend their life a bit longer—say up to a week—refrigerating them is the way to go. Now here’s a little pro tip: if you really want to keep those crusts from getting too soggy, pop a slice of bread into the container with the pies. The bread will absorb excess moisture while helping to maintain that beautiful texture we all adore! After storage, you’ll find these pies still wonderfully satisfying; simply reheat them in the oven for a few minutes at 350 degrees until they’re warm and inviting again. I promise you; the combination of gooey caramel and tender apples will make your taste buds dance all over again!
Freezing for Later
If you’re looking to save some of that scrumptious goodness for another day—or maybe even share with friends later on—freezing these delightful pies is an excellent option! To freeze them properly, allow the baked pies to cool completely before wrapping each one tightly in plastic wrap or aluminum foil. This will keep freezer burn at bay and preserve all those incredible flavors for up to 3 months. When you’re ready to enjoy one straight from the freezer, simply pop it into a preheated oven at 350 degrees for about 20-25 minutes, and watch as it transforms back into that mouthwatering masterpiece you fell in love with initially. The convenience of having these treats ready and waiting for you makes this method not only smart but absolutely exciting! Just think about how easy it would be to pull out a pie during a cozy gathering or even as a last-minute dessert when unexpected guests arrive!
Salted Caramel Apple Pies

Indulge in the delightful experience of making Salted Caramel Apple Pies, where the sweet and tart flavors of fresh apples beautifully intertwine with rich caramel, all enveloped in a flaky golden crust. These charming mini pies are not only a feast for the eyes but also a comforting treat that evokes warm memories of cozy afternoons spent in the kitchen. Perfect for any occasion—whether it’s a family gathering or a simple weeknight dessert—these little gems will surely steal the spotlight. With just a handful of ingredients and some love, you can create these delectable pies that are sure to impress everyone at your table.
- Prep Time: 20 minutes
- Cook Time: 15 minutes
- Total Time: 35 minutes
- Yield: Makes approximately six mini pies 1x
- Category: Dessert
- Method: Baking
- Cuisine: American
Ingredients
- 1 box refrigerated pie crust
- 1 large apple, peeled and chopped
- 1/2 teaspoon ground cinnamon
- 1 teaspoon fresh squeezed lemon juice
- 1/8 cup sugar (or brown sugar)
- 1 teaspoon all-purpose flour
- 6 store-bought caramels, diced
- Sprinkle of sea salt
- 1 large egg (for egg wash)
- 1 tablespoon water (for egg wash)
- Sugar in the raw (for dusting)
Instructions
- Preheat your oven to 425°F and line a cookie sheet with parchment paper.
- In a mixing bowl, combine chopped apples, lemon juice, flour, sugar, cinnamon, and diced caramels.
- Roll out the pie crusts and cut into circles.
- Place half of the circles on the cookie sheet, fill with the apple mixture, sprinkle sea salt on top, and cover with another circle. Seal edges with a fork.
- Brush tops with egg wash and sprinkle with raw sugar.
- Bake for 12 to 15 minutes until golden brown.
Nutrition
- Serving Size: 1 serving
- Calories: 210
- Sugar: 10g
- Sodium: 100mg
- Fat: 10g
- Saturated Fat: 3g
- Unsaturated Fat: 6g
- Trans Fat: 0g
- Carbohydrates: 30g
- Fiber: 1g
- Protein: 2g
- Cholesterol: 30mg