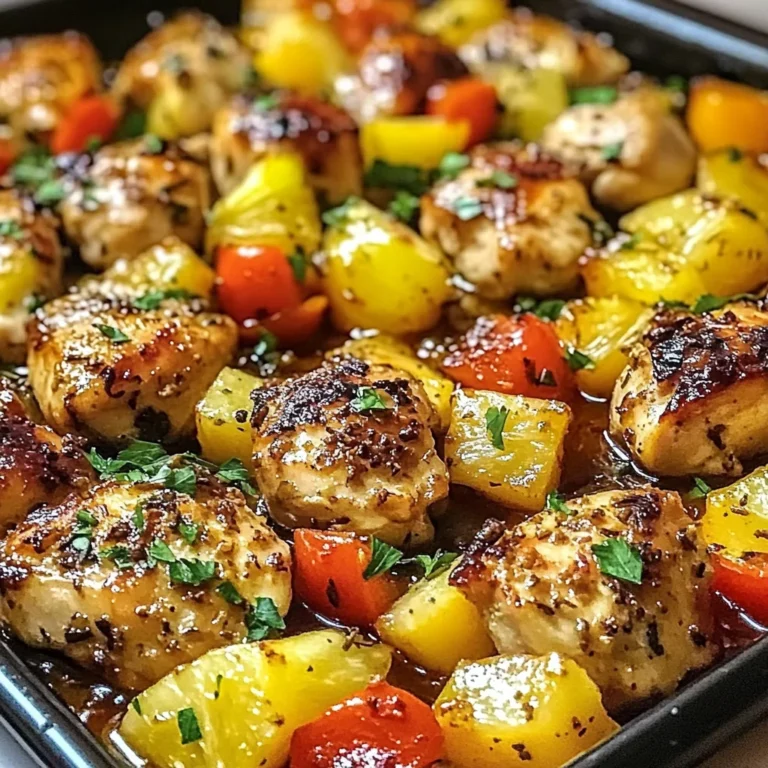
Thai Grilled Chicken
There’s something utterly magical about the fusion of flavors in Thai cuisine, and today, I’m thrilled to share a recipe that embodies that spirit beautifully: Thai Grilled Chicken. This dish is more than just a meal; it’s an experience steeped in vibrant flavors, an aromatic symphony that dances on your palate and warms your heart. Imagine succulent chicken thighs marinated in a blend of fresh herbs, zesty lime juice, and the sweet heat of Thai chili sauce. As they grill to perfection, the air fills with an intoxicating aroma that beckons everyone to gather around the table. Trust me, this is not just dinner; it’s a celebration of life and culture!
What I love most about this recipe is its simplicity and versatility—perfect for a weeknight meal or a weekend gathering with friends. The marinade is where the magic begins; it’s a delightful concoction that not only infuses the chicken with flavor but also tenderizes it beautifully. Each ingredient plays a crucial role, creating layers of taste that make each bite profoundly satisfying. Whether you choose to fire up the grill or pan-sear these beauties, you can expect juicy chicken that’s bursting with flavor. So grab your apron and let’s dive into this culinary adventure together!
Thai Grilled Chicken: A Flavorful Journey Awaits
This Thai Grilled Chicken recipe is one you’ll want to make time and again! With its tantalizing marinade and ease of preparation, it’s bound to become a staple in your kitchen repertoire.
Ingredients:
As we embark on this culinary journey together, let’s take a moment to appreciate each ingredient that contributes to our delightful Thai Grilled Chicken. Each one adds its unique flair, making this dish truly extraordinary.
- 2.5 lbs chicken thighs. Choosing chicken thighs over breasts for this recipe is absolutely paramount—they are juicier and more flavorful due to their higher fat content. This richness allows them to hold up wonderfully against our bold marinade without drying out during cooking. Look for thighs with smooth skin and good color; if possible, opt for organic or free-range options for better quality and taste.
- 1 tbsp cilantro (chopped). Fresh cilantro provides a burst of herbaceous brightness that lifts the entire dish! It complements the other flavors beautifully—think of it as the fresh perspective in our flavor story. When selecting cilantro, look for vibrant green leaves without any wilting or browning; they should smell fragrant and earthy.
- 2 tbsp Thai sweet chili sauce. This luscious sauce is liquid gold—it combines sweetness with just enough heat to create depth in our marinade! It acts as both a flavor enhancer and a sticky glaze when grilled, giving our chicken an irresistible finish. You can find various brands at your local market; just be sure to choose one without artificial additives for the best flavor.
- 1/4 cup fish sauce. Don’t let its name deter you! Fish sauce adds umami—a savory depth that rounds out all other flavors—and there’s nothing quite like it in terms of authenticity in Thai cuisine. When shopping for fish sauce, look for high-quality brands made from fermented anchovies; they should have a rich aroma rather than an overpowering fishy scent.
- 1 tbsp soy sauce. Another essential player in our flavor lineup! Soy sauce brings saltiness and complexity while enhancing the overall taste profile of our marinade. If you’re looking for alternatives due to dietary preferences or restrictions, coconut aminos can be a fantastic substitute that offers similar umami notes but less sodium.
- 3 tbsp vegetable oil. This ingredient may seem simple, but it plays an important role by helping to carry flavors throughout the marinade while also ensuring our chicken gets that beautiful char on the grill! Look for oils with high smoke points like canola or grapeseed; they’re perfect for grilling without burning.
- 3 tbsp brown sugar. Sweetness balances out the tanginess and saltiness in our marinade; think of it as the harmonizer among contrasting flavors! Brown sugar also helps achieve caramelization when grilling—creating those delightful crispy edges we all crave! If you’re out of brown sugar, feel free to use honey or maple syrup as alternatives.
- 3 tbsp lime juice. The bright acidity from lime juice cuts through richness and brings everything together wonderfully! Freshly squeezed lime juice is non-negotiable here—bottled versions often lack depth and freshness which are so vital in this dish’s success.
- 3-4 cloves garlic. Garlic isn’t just aromatic; it’s packed with flavor! It adds warmth and earthiness while helping tenderize our meat through its enzymatic properties—trust me on this one! Fresh garlic cloves are key; avoid pre-minced options if you can because nothing beats that pungent kick from freshly minced garlic.
- 1 inch ginger root (peeled). Ginger introduces warmth and spice—a perfect complement to our other ingredients while adding layers of complexity! When selecting ginger at the store, look for firm pieces with smooth skin—this ensures maximum freshness and potency.
- 1/2 shallots. Shallots provide a milder onion flavor with hints of sweetness—a lovely addition here that deepens the overall taste profile without overpowering other elements! Choose shallots that are firm with no soft spots or sprouting green shoots for optimal results.
- 1/2 tsp red pepper flakes (optional). If you’re looking to turn up the heat just a notch, red pepper flakes add an exciting zing! Remember, though: spice levels vary greatly between brands so start small—you can always add more if desired!
Equipment You’ll Need:
Now let’s talk about tools—the unsung heroes behind every successful dish! Having the right equipment not only makes cooking easier but also enhances your overall experience in the kitchen as you create something wonderful.
- Blender or food processor – These appliances are essential for quickly blending all your marinade ingredients into a smooth mixture that’s ready to infuse those delicious chicken thighs! If you don’t have either on hand, don’t fret—you can finely mince everything by hand using a chef’s knife instead; however, blending provides better consistency.
- Mixing bowl – A large mixing bowl comes in handy when combining ingredients for your marinade before adding them directly onto your chicken thighs—it allows ample space for mixing without making too much mess!
- Grill or skillet – Depending on whether you’re grilling outside or pan-searing indoors, having either option readily available ensures flexibility based on your mood or weather conditions! Both methods yield fantastic results but keep in mind that grilling will impart smokiness while pan-searing gives you greater control over temperature!
With all these essentials lined up before us, we’re ready to dive into crafting our delectable Thai Grilled Chicken!
Step 1: Marinating Magic Begins
To kick things off brilliantly, gather all your marinade ingredients and toss them into your blender or food processor—this step is crucial because we want everything well combined so every piece of chicken receives equal love from those vibrant flavors! Blend until smooth—it should resemble a thick dressing rather than watery liquid gold—and pour it into your mixing bowl over those waiting chicken thighs nestled comfortably within their own space below. Give them some time together: allow at least 4 hours marinating time (or even up to 24 hours if you’re prepping ahead); this step deepens their flavor profile beautifully while tenderizing each bite!
Step 2: Sizzle Time
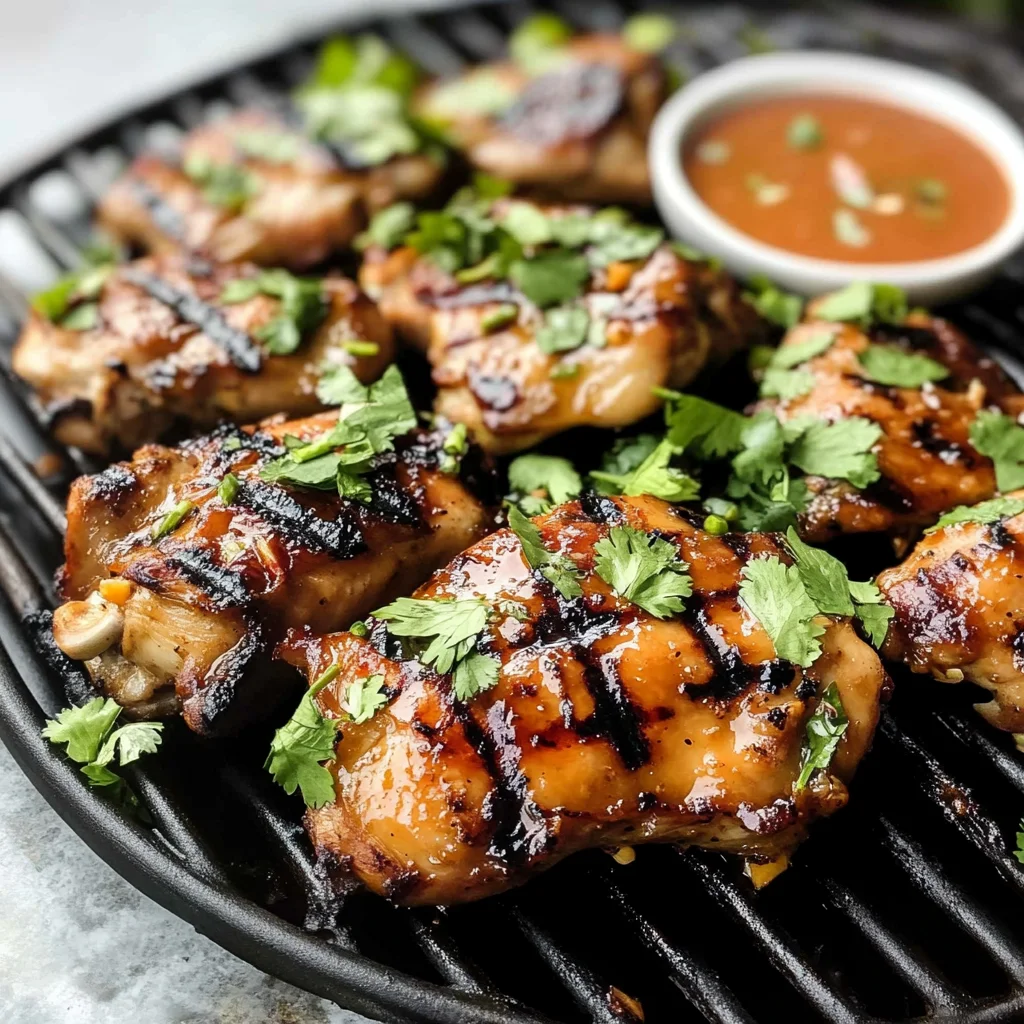
Once marinated blissfully enough (I promise you won’t regret waiting), it’s time to heat things up! Preheat either your grill or skillet over medium-high heat until nice and hot—you’ll know it’s ready when water droplets sizzle upon contact if testing on skillet versus seeing smoke rising gently above flames outdoors indicating readiness on grill side! Carefully place each thigh skin-side down onto heated surface ensuring there’s space between them (don’t overcrowd!). Cook undisturbed until golden brown—this usually takes around 6–7 minutes—then flip carefully using tongs ensuring not too much marinade clings still behind onto grill surface!
Step 3: Cooking Through
After flipping those gorgeous thighs over gently onto their other side now exposed toward heat source below—continue cooking until internal temperature reaches 165ºF (this ensures safety while maintaining juiciness). Use an instant-read thermometer inserted into thickest part without touching bone if applicable as guide here—it’s non-negotiable folks; we want perfectly cooked meat every single time!
Step 4: Finishing Touches
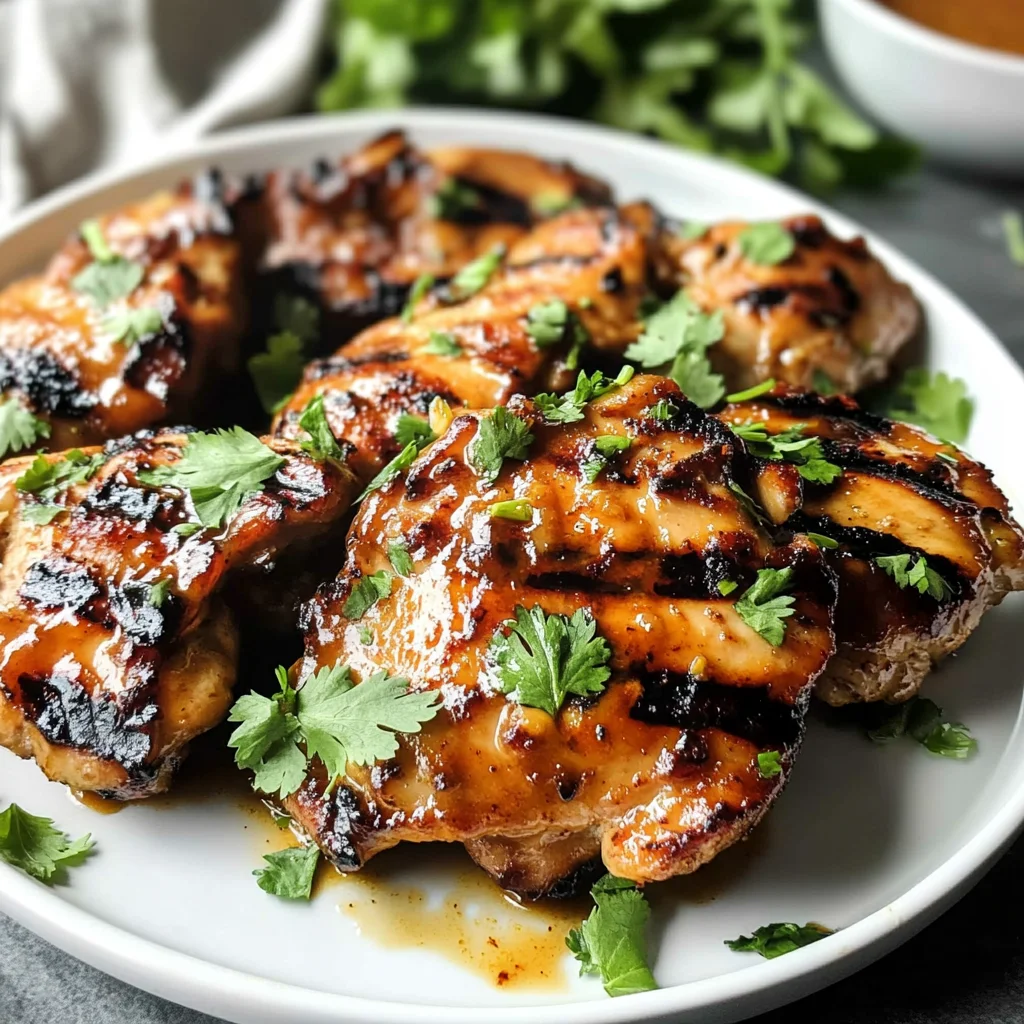
Once cooked through beautifully yet still moist inside—we’ll remove them from heat immediately allowing residual warmth enveloping around those gorgeous pieces as they rest briefly before serving garnished generously atop freshly chopped cilantro leaves scattered artfully across plate presenting final touch adding color contrast alongside visual appeal inviting guests eagerly toward table spread awaiting deliciousness ahead!
And there you have it—a journey full of flavor culminating into delightful moments shared amongst family & friends enjoying each bite together savoring deeply rooted connections forged through food itself… Enjoy every last morsel my dear friend—you deserve nothing less than extraordinary experiences after all!
Step 5: Let the Marinade Work Its Magic
Now that we’ve blended our marinade into a luscious, aromatic concoction, it’s time to introduce our chicken thighs to this flavor-packed mixture. I cannot emphasize enough how crucial this step is—this is where the magic really happens! You want to take your beautifully trimmed chicken thighs and immerse them in the marinade, ensuring every inch is coated in that vibrant, fragrant sauce. I recommend using a large resealable plastic bag or a glass dish with a lid for marinating. This not only helps in evenly distributing the marinade but also allows for easier cleanup later on.
Once you’ve placed the chicken in its marinade bath, press out any excess air from the bag (if using) and seal it tightly. Now, here’s where patience becomes your best friend: let those thighs soak up all those incredible flavors for at least four hours, but if you can manage to wait until twenty-four hours, your taste buds will thank you tenfold. Why so long? The longer they marinate, the more tender and flavorful they become as the acid from the lime juice begins to break down proteins in the chicken, making them juicier and more succulent. Trust me on this one—you want to give these flavors time to marry!
Step 6: Preparing Your Grill or Skillet
While your chicken is luxuriating in that marvelous marinade, it’s time to think about how you’re going to cook this delicious masterpiece. Whether you choose a grill or a skillet depends on your mood and what’s available to you, but I promise you, both methods yield stunning results! If you’re opting for the grill—which adds that beautiful charred flavor—preheat it on medium-high heat for about 10-15 minutes until it’s nice and hot. Aim for an internal temperature of around 400°F if you have a thermometer handy. This step is absolutely paramount; cooking on a properly heated grill ensures that you’ll get those gorgeous grill marks while locking in juices.
If you’re more inclined towards pan-searing—perhaps because it’s raining outside or you’re simply craving that delectable golden crust—heat up your skillet over medium-high heat as well. Add a splash of vegetable oil once it’s hot enough; listen for that satisfying sizzle as it hits the pan! This sound signals that you’re about to create some magic. When preparing either cooking method, be sure to remove excess marinade from the chicken before placing it on your grilling surface or skillet; too much liquid can lead to steaming rather than searing, which we definitely want to avoid.
Step 7: The Cooking Process – Searing Perfection
Once your grill or skillet is sizzling away like it means business, it’s time to lay down those marinated chicken thighs with care. Place them skin-side down (if applicable) and let them cook undisturbed for about 5-6 minutes on that first side. Don’t be tempted to flip them too soon! The golden-brown crust that’s forming is not just aesthetically pleasing; it’s essential for developing depth of flavor through caramelization—a true symphony of flavors unfolding right before your eyes! As they cook, keep an eye out for that lovely golden color creeping up the sides of each thigh; this visual cue means things are progressing beautifully.
After you’ve let them bask in their searing glory, it’s time for a gentle flip! Use tongs (never a fork—let’s keep those juices intact) and carefully turn each thigh over. Now reduce your heat slightly if you’re using a skillet—this will allow them to cook through without burning on the outside while maintaining their juicy tenderness inside. For grilled thighs, continue cooking until they reach an internal temperature of 165°F, which should take around another 5-7 minutes. Remember that every piece of chicken is unique; some may take a little longer depending on thickness and heat distribution.
Step 8: Resting – The Key to Juiciness
Ahh! You’ve reached the moment of triumph—the tantalizing aroma fills your kitchen (or backyard), and it’s almost time to dig in! But hold onto your forks just yet; there’s one last crucial step before serving: resting the chicken thighs. After removing them from heat, place them onto a plate or cutting board and cover loosely with aluminum foil—this will help keep them warm while allowing steam to escape gently.
Why rest? Well, during cooking, juices are pushed toward the center of the meat due to heat distribution; if you cut into them right away, all those delicious juices will flee onto your plate instead of staying nestled inside where they belong! Letting them rest for at least 5-10 minutes allows those juices to redistribute throughout each thigh as they cool slightly—a transformative effect indeed! You’ll be rewarded with moist bites bursting with flavor when you finally slice into them.
Final Touches – Gilding Your Culinary Masterpiece
Step 9: Garnishing & Serving with Love
With patience comes reward! After letting those beautiful Thai Grilled Chicken thighs rest perfectly, it’s time for my favorite part—garnishing and serving! Take a sharp knife and slice through each thigh if you’d like; however, I often find serving them whole makes such an impressive statement at dinner parties or family gatherings—it feels special!
Now let’s talk garnishes because presentation matters just as much as taste! A generous sprinkle of freshly chopped cilantro not only adds an appealing pop of green but also enhances that fresh herbaceous note which complements our Thai flavors beautifully. Think about serving alongside some extra Thai Sweet Chili Sauce; its sticky sweetness provides just the right contrast against savory grilled goodness—a match made in culinary heaven!
As you gather everyone around the table—or perhaps set up a lovely outdoor picnic—don’t forget to share stories while savoring each bite together. Food has this magical ability to create connections among people we love most—I promise you’ll create lasting memories with every mouthful filled with these extraordinary flavors!
Enjoy every moment spent enjoying this dish because it truly embodies everything wonderful about home-cooked meals: warmth, love, and unforgettable taste experiences shared among friends or family. Bon appétit!
Storage and Enjoyment Tips for Your Thai Grilled Chicken
Oh, the moment has finally come! Your Thai Grilled Chicken is sizzling, fragrant, and ready to dazzle your taste buds. But before you dive in, let’s talk about how to preserve those delightful flavors for another day. I know that sometimes leftovers can be a bit of a disappointment, but trust me when I say that with the right storage techniques, you can keep that incredible taste alive!
Storing Leftover Thai Grilled Chicken
To ensure your leftover Thai Grilled Chicken remains as succulent as the first bite, it’s essential to store it properly. I recommend using an airtight container—this is crucial because it prevents moisture loss and keeps those wonderful flavors locked in. Place the container in the refrigerator, where your chicken will stay fresh for up to four days. If you want to maintain its juicy texture, consider placing a slice of bread inside the container; this little trick absorbs any excess moisture while keeping the chicken tender and flavorful. When you’re ready to savor those leftovers, simply reheat them in a skillet over medium heat or pop them in the microwave—just be careful not to rush this step, as gentle reheating helps retain all that deliciousness.
Freezing Thai Grilled Chicken for Later
Now, if you’re looking to save some of this mouthwatering dish for future enjoyment, freezing is a fantastic option! First things first: allow your grilled chicken to cool completely before wrapping it tightly in plastic wrap or placing it into a freezer-safe bag. This way, you’ll avoid freezer burn and keep all those enticing flavors intact. When stored properly, your Thai Grilled Chicken can last up to three months in the freezer without losing its essence. When it’s time for a quick meal later on, simply take it out and defrost it overnight in the fridge or use the microwave’s defrost function. The convenience factor here is absolutely paramount; imagine coming home after a long day and pulling out this sumptuous chicken—what could be better?
Thai Grilled Chicken

Thai Grilled Chicken is a mouthwatering dish that captures the essence of Thai cuisine with its vibrant flavors and aromatic ingredients. This recipe features tender chicken thighs marinated in a delightful blend of zesty lime juice, fragrant herbs, and sweet chili sauce. Whether you’re hosting a weekend gathering or preparing a quick weeknight dinner, this dish promises to impress with its succulent texture and bold taste. The grilling process brings out a beautiful char while enhancing the overall flavor profile, making each bite an unforgettable experience. Serve it alongside jasmine rice or fresh salads for a complete meal that will have everyone coming back for seconds!
- Prep Time: 15 minutes
- Cook Time: 15 minutes
- Total Time: 30 minutes
- Yield: Approximately 6 servings 1x
- Category: Main
- Method: Grilling
- Cuisine: Thai
Ingredients
- 2.5 lbs chicken thighs
- 1 tbsp cilantro (chopped)
- 2 tbsp Thai sweet chili sauce
- 1/4 cup fish sauce
- 1 tbsp soy sauce
- 3 tbsp vegetable oil
- 3 tbsp brown sugar
- 3 tbsp lime juice
- 3–4 cloves garlic (minced)
- 1 inch ginger root (peeled and minced)
- 1/2 shallots (minced)
- 1/2 tsp red pepper flakes (optional)
Instructions
- In a blender or food processor, combine cilantro, sweet chili sauce, fish sauce, soy sauce, vegetable oil, brown sugar, lime juice, garlic, ginger, shallots, and red pepper flakes. Blend until smooth.
- Place chicken thighs in a resealable plastic bag or shallow dish and pour marinade over them. Seal the bag or cover the dish, ensuring chicken is well coated. Marinate in the refrigerator for at least 4 hours (up to 24 hours for deeper flavor).
- Preheat grill or skillet over medium-high heat.
- Remove excess marinade from chicken and place on the hot grill or skillet skin-side down. Cook for about 6–7 minutes without moving.
- Flip the chicken and cook until internal temperature reaches 165°F (about another 6–7 minutes).
- Let the chicken rest for 5–10 minutes before serving garnished with fresh cilantro.
Nutrition
- Serving Size: 1 serving
- Calories: 290
- Sugar: 8g
- Sodium: 820mg
- Fat: 15g
- Saturated Fat: 3g
- Unsaturated Fat: ~11g
- Trans Fat: 0g
- Carbohydrates: 12g
- Fiber: <1g
- Protein: 29g
- Cholesterol: 115mg