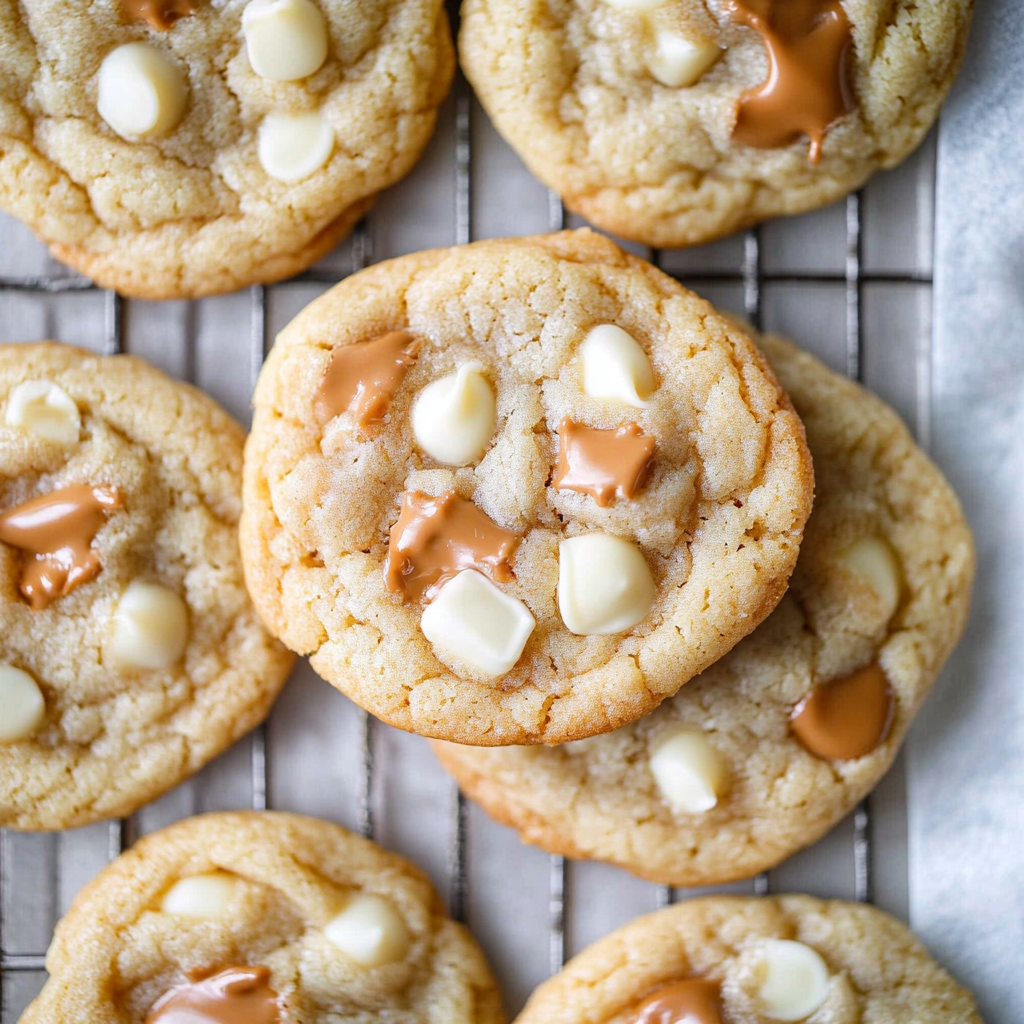
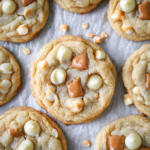
Salted Caramel White Chocolate Cookies
There’s something truly magical about the alchemy of baking, isn’t there? When flour, sugar, and butter come together in a warm kitchen, it feels like an invitation to create a moment that transcends the ordinary. Today, I want to share with you a recipe for Salted Caramel White Chocolate Cookies that is more than just a treat; it’s a delightful experience that marries sweet and salty in every bite. Imagine pulling these cookies from the oven, their golden edges crisp yet soft centers practically begging to be devoured. The aroma wafting through your home will wrap around you like a cozy blanket, making it impossible not to smile. I promise you, these cookies are not just dessert; they are moments of joy waiting to happen.
What makes these Salted Caramel White Chocolate Cookies so special is that harmonious blend of flavors and textures—each cookie is a tiny masterpiece! The rich, buttery dough cradles pools of melted caramel and creamy white chocolate chips, while the sea salt dances on your tongue, elevating each bite into something truly extraordinary. Whether you’re baking for a holiday gathering or just because you need a little sweetness in your life, this recipe is perfect for any occasion. Trust me when I say that once you taste them, you’ll find it hard to stop at just one!
Salted Caramel White Chocolate Cookies: A Sweet Symphony of Flavor
Let’s dive into this lovely recipe together! The process is simple but oh-so-rewarding. As we embark on this culinary journey, each ingredient plays its unique role in creating something profoundly satisfying. So grab your apron and let’s make some magic happen!
Ingredients:
As we gather our ingredients for these irresistible cookies, think of each one as a vital note in our sweet symphony. They all come together to create that perfect balance of flavors and textures.
- 1 cup unsalted butter (straight from fridge or room temperature). Butter is the foundation of our cookies’ flavor and texture. Using unsalted butter gives you control over the saltiness of your final product—this allows the sweetness of the caramel and white chocolate to shine without being overwhelmed by saltiness. It’s important that your butter is cold but malleable; if it’s too soft or warm, it won’t cream properly with the sugars, leading to flatter cookies that lack that delightful chewy interior.
- ¾ cup brown sugar. Brown sugar introduces moisture and depth to our cookies thanks to its molasses content. It also contributes to that lovely chewiness we all crave! When selecting brown sugar, look for one that’s fresh and packed tightly—old brown sugar can dry out and lose its flavor.
- 1 cup granulated sugar. This is where we get the necessary sweetness and contribute to the cookie’s structure through crystallization during baking. It also helps achieve those beautifully golden edges! Feel free to experiment with different types of granulated sugars if you’re feeling adventurous; some can add unique flavors.
- 2 large eggs. Eggs act as binding agents in our dough while also providing richness and moisture. Using large eggs is key here since they provide just the right amount of liquid needed to bring everything together harmoniously.
- 2 teaspoons vanilla. Vanilla extract not only enhances the sweetness but adds an aromatic quality that elevates all other flavors present in your cookies. Always opt for pure vanilla extract over imitation—it makes a world of difference in taste!
- 3 ½ cups all-purpose flour. Flour is essential as it provides structure to our cookies; too little will lead them to spread too much while too much will create dense hockey pucks instead of chewy delights! When measuring flour, remember that spooning it lightly into your measuring cup rather than packing it down will yield better results.
- 1 teaspoon baking soda. This acts as our leavening agent—helping our cookies rise beautifully while contributing slight nuttiness due to its alkaline nature when combined with brown sugar.
- ½ teaspoon baking powder. While similar to baking soda, this ingredient has a slightly different function: it ensures our cookies have an airy texture without being overly dense.
- 1 teaspoon salt. Salt enhances every flavor present in our cookies; it’s absolutely non-negotiable! It might seem counterintuitive when making something sweet but trust me: a touch of salt will balance out those sweet notes beautifully.
- 10 oz bag HERSHEY’S Kitchens Sea Salt Caramel Chips. These chips are where the magic happens! Their rich caramel flavor combined with just enough sea salt creates bursts of flavor in each bite—making them utterly intoxicating as they melt perfectly within your cookie dough.
- 1 cup white chocolate chips. Creamy white chocolate adds another layer of sweetness that complements the salted caramel beautifully; their smoothness contrasts perfectly against the chewy cookie base!
- Optional: 1 ½ cups soft caramel bits (like Kraft or Nuts.com). If you’re feeling indulgent (and who wouldn’t?), adding these bits creates even more gooey pockets of caramel throughout your cookies—a treat no one can resist!

Equipment You’ll Need:
Before we roll up our sleeves and get started, let’s gather some essential tools that will help us craft these delicious cookies smoothly and efficiently—think of them as your trusty sidekicks during this culinary adventure!
- Mixing bowls – A good set of mixing bowls in various sizes allows you flexibility when combining ingredients at different stages without any hassle.
- Electric mixer (handheld or stand) – While you could mix by hand if you’re up for a workout (and I applaud you!), an electric mixer saves time and helps achieve fluffy batter effortlessly—especially important when creaming butter with sugars!
- Spatula or wooden spoon – Essential for scraping down sides while mixing; you want every last bit incorporated well into your dough!
- Cookie scoop or tablespoon – Using these makes portioning out uniform-sized dough balls easy—ensuring even baking throughout!
- Baking sheets lined with parchment paper or Silpat mats – These prevent sticking and promote even browning; they’re worth their weight in gold for any baker!
Now that we’ve gathered everything we need let’s get ready to prepare these delightful Salted Caramel White Chocolate Cookies!
Preparing the Salted Caramel White Chocolate Cookies
Step 1: Preheat Your Oven
First things first—let’s preheat that oven! Set it to 350 degrees Fahrenheit because we want it nice and hot by the time we’re ready to bake those beautiful cookies! Preheating is crucial as it ensures even cooking right from the start—the last thing we want is unevenly baked treats with gooey insides while having burnt edges! While that’s heating up, line two baking sheets with parchment paper or Silpat mats to create non-stick surfaces for easy removal after baking.
Step 2: Cream Butter & Sugars
In a medium-sized mixing bowl, it’s time for some serious magic: let’s cream together our cold unsalted butter with both sugars until light and fluffy—a process known as creaming! This step incorporates air into the mixture which creates lift as our cookies bake—the result? Soft centers with a slight chewiness! Start by adding chunks of butter into your bowl followed by both brown sugar and granulated sugar before mixing on medium speed until well combined—about 2 minutes should do nicely! You’ll know when it’s ready—it should look pale yellow with a fluffy texture resembling whipped frosting!
Step 3: Add Eggs & Vanilla
Now’s where things get even more exciting—add those large eggs one at a time along with two teaspoons of pure vanilla extract before continuing to beat until fully incorporated! The eggs provide moisture while adding richness; meanwhile vanilla deepens all those sweet notes we love so much! Just watch how everything comes together beautifully—it’ll feel like pure love flowing through every ingredient—a true testament to home cooking at its finest!
Step 4: Combine Dry Ingredients
In another bowl (yes—we promise it’s worth it!), whisk together flour, baking soda, baking powder, and salt until uniformly mixed before gradually adding this mixture into your wet ingredients using low speed on your electric mixer until just combined! Don’t rush this step—the goal here isn’t just blending but ensuring each particle interacts harmoniously creating an excellent foundation for what lies ahead—it’ll transform into luscious cookie dough soon enough!
Stay tuned as we continue crafting these delicious Salted Caramel White Chocolate Cookies—I can already smell their heavenly aroma wafting through my kitchen! There’s nothing quite like sharing baked goods made from scratch; let’s keep spreading those good vibes one cookie at a time…
Creating Irresistible Cookies: The Magic of Salted Caramel White Chocolate Cookies
As we dive deeper into this delightful recipe, I want you to really embrace the process. Baking is not just about following steps; it’s about the experience, the love, and the joy that comes with creating something truly scrumptious. So, roll up your sleeves and let’s make some cookies that will not only fill your kitchen with an intoxicating aroma but also warm your heart and delight your taste buds!
Step 5: Scooping Out Perfection
Now comes one of my favorite parts—scooping the dough! Using a cookie scoop, which is my trusty sidekick in the kitchen, helps ensure that each cookie is uniform in size. I generally opt for a 1/4 cup scoop for these cookies because it yields a perfectly generous portion that gives you that satisfying bite. As you scoop, gently drop the dough onto your lined baking sheet, making sure to leave about two inches of space between each mound. This spacing might seem trivial, but it’s absolutely paramount! You see, as these cookies bake, they will spread and expand beautifully. If they’re too close together, they risk merging into one giant cookie—while tempting in theory, we want those distinct chewy delights!
Take a moment here to appreciate how the mixture looks. With the salted caramel chips glistening like little jewels amidst the dough, it’s hard not to feel excited about what’s to come. Trust me on this—you’ll be rewarded handsomely for your patience in waiting for these beauties to bake!
Step 6: Into the Oven We Go
With our sheet filled and our hearts brimming with anticipation, it’s time to slide those cookies into a preheated oven set at 350 degrees Fahrenheit. Now this step is crucial—oven temperatures can vary significantly from one appliance to another. It’s always a good idea to check if your oven runs hot or cold. I recommend setting a timer for 12 minutes initially and then keeping an eye on them. You’ll know they’re ready when the edges start turning a light golden brown while still maintaining that soft center—this contrast is what makes them so utterly delicious.
While they’re baking away, take a moment to breathe in that sweet scent wafting through your kitchen—it’s truly extraordinary! Just remember: resist the urge to open the oven door too early; doing so can cause them to deflate slightly due to temperature fluctuation. Patience is key here!
Step 7: The All-Important Cooling Phase
Once those cookies reach their perfect golden state after about 15 minutes (or until they look just right), carefully remove them from the oven and let them cool on the baking sheet for about five minutes before transferring them to a wire rack. This cooling phase might feel tedious, but I promise you it’s non-negotiable! Allowing these cookies to sit on the baking sheet helps them firm up just enough so that when you transfer them, they retain their shape without crumbling apart.
During this time, take a moment to admire what you’ve created—a lovely golden-brown batch of salted caramel white chocolate cookies waiting patiently for their turn at glory! When you transfer them to a wire rack after those five minutes are up, let them cool completely before diving in; I know it’s hard to wait when they smell so divine!
Step 8: The Final Touches of Deliciousness
After allowing your cookies to cool completely on the wire rack—this may take another 10-15 minutes—you’ll be greeted by an irresistible sight! Each cookie should have a slightly crisp edge while still being soft and chewy in the center. And if you opted for those optional caramel bits? They should be meltingly gooey within each piece—a true testament to why we chose this recipe!
Now here comes my favorite part—eating them! But wait! Before indulging in this heavenly creation, consider drizzling some extra melted white chocolate over each cookie or sprinkling a pinch of sea salt right on top for an extra touch of flavor contrast that will make every bite sing with joy. This finishing touch isn’t just decoration; it enhances that sweet-salty dynamic we adore so much.
Putting Your Heart Into It: Enjoying Every Bite
As you gather your friends or family around—because believe me; you’ll want to share these gems—take a moment to relish not just the flavors but also the memories created during this baking adventure. Each bite of these Salted Caramel White Chocolate Cookies is not only deeply satisfying but also profoundly connects us through shared experiences and laughter over warm treats fresh from your oven.
So go ahead; indulge guilt-free knowing that you’ve made something truly special—from scratch—with love and care. Enjoy every single crumb!
Storage and Enjoyment Tips for Your Salted Caramel White Chocolate Cookies
Now that you’ve baked up a batch of these scrumptious Salted Caramel White Chocolate Cookies, it’s time to dive into the delightful experience of enjoying them! This recipe brings together the sweet, rich flavors of white chocolate and salted caramel, creating a perfect harmony that’s simply irresistible. Whether you’re indulging in one (or three) right away or planning to savor them later, knowing how to store and enjoy them will only enhance your cookie adventure.
Storing Leftover Salted Caramel White Chocolate Cookies
To keep your cookies fresh and delicious, I recommend placing them in an airtight container at room temperature. This is absolutely crucial because it locks in the moisture, ensuring they remain soft and chewy for days! If you’ve made a big batch (and who wouldn’t want to?), these cookies can last for about a week—though I promise they’ll be gone long before then! For an added tip to maintain their delightful texture, consider placing a slice of bread in the container with your cookies; the bread will absorb any excess moisture while keeping your cookies perfectly soft. Trust me, even after a few days, these cookies still offer that wonderfully rich flavor and satisfyingly chewy bite. If you’re tempted to enjoy them warm again, just pop them in the microwave for about 10-15 seconds; you’ll be rewarded with that gooey goodness once more!
Freezing Cookies for Later
If you’re like me and love having a stash of treats ready for those unexpected cravings or surprise guests, freezing your Salted Caramel White Chocolate Cookies is an excellent option! To freeze them properly, ensure they’re completely cooled before placing them in a single layer on a baking sheet lined with parchment paper; this prevents them from sticking together. Once they are frozen solid—usually about an hour—transfer them to a freezer-safe bag or container. They can stay in the freezer for up to three months without losing their charm! When you’re ready to enjoy one (or several), simply remove them from the freezer and let them thaw at room temperature for about 30 minutes. The convenience factor here is fantastic—you’ll always have something sweet on hand without any fuss!
Salted Caramel White Chocolate Cookies
Indulge in the delightful experience of baking Salted Caramel White Chocolate Cookies. These cookies are a perfect blend of sweet and salty, featuring rich caramel chips and creamy white chocolate that create an unforgettable flavor combination. With their golden edges and soft centers, these cookies not only fill your kitchen with an irresistible aroma but also promise to create joyful moments for you and your loved ones. Whether you’re celebrating a special occasion or simply treating yourself, these cookies are sure to be a hit!
- Prep Time: 15 minutes
- Cook Time: 12–15 minutes
- Total Time: 0 hours
- Yield: Approximately 24 cookies 1x
- Category: Dessert
- Method: Baking
- Cuisine: American
Ingredients
- 1 cup unsalted butter
- ¾ cup brown sugar
- 1 cup granulated sugar
- 2 large eggs
- 2 teaspoons vanilla extract
- 3 ½ cups all-purpose flour
- 1 teaspoon baking soda
- ½ teaspoon baking powder
- 1 teaspoon salt
- 10 oz bag sea salt caramel chips
- 1 cup white chocolate chips
Instructions
- Preheat your oven to 350°F (175°C) and line baking sheets with parchment paper.
- In a mixing bowl, cream together the cold unsalted butter, brown sugar, and granulated sugar until light and fluffy.
- Add the eggs one at a time, followed by the vanilla extract, mixing until fully incorporated.
- In another bowl, whisk together flour, baking soda, baking powder, and salt. Gradually add this mixture to the wet ingredients until just combined.
- Fold in the sea salt caramel chips and white chocolate chips.
- Using a cookie scoop or tablespoon, drop dough onto prepared baking sheets, leaving space between each cookie.
- Bake for approximately 12-15 minutes or until the edges are lightly golden while centers remain soft.
- Allow cookies to cool on the baking sheet for five minutes before transferring them to a wire rack to cool completely.
Nutrition
- Serving Size: 1 cookie (30g)
- Calories: 150
- Sugar: 14g
- Sodium: 90mg
- Fat: 7g
- Saturated Fat: 4g
- Unsaturated Fat: 2g
- Trans Fat: 0g
- Carbohydrates: 20g
- Fiber: <1g
- Protein: 2g
- Cholesterol: 20mg