Air Fried Corn on the Cob
There’s something profoundly satisfying about the simple act of cooking corn on the cob, isn’t there? The moment you peel back the husk and reveal those golden kernels, you can almost hear the whispers of summer days past—days spent at picnics, barbecues, and family gatherings where laughter dances in the air alongside the aroma of freshly grilled fare. This Air Fried Corn on the Cob isn’t just a recipe; it’s an invitation to rediscover joy in simplicity. With each bite, you experience a delightful crunch followed by that sweet juiciness that makes your taste buds sing. Cooked to perfection in an air fryer, this method marries the best parts of grilling and boiling, resulting in corn that’s not only tender but boasts those irresistible charred bits we all crave. I promise you; this dish will become a staple around your dinner table!
Now, let’s talk about why using an air fryer for corn is such a game-changer. Traditional methods can sometimes leave us with soggy or unevenly cooked cobs, but with this technique, you’re embracing innovation without losing the essence of what makes corn delicious. The beauty lies in how the air fryer circulates hot air around each ear of corn, creating that perfect texture while enhancing its natural sweetness. Picture yourself biting into a piece of corn that has just enough crispness to give way to juicy kernels bursting with flavor—it’s absolutely extraordinary! Whether you’re serving it at a summer barbecue or as a cozy side dish during a chilly evening, this recipe is guaranteed to bring smiles and satisfaction.
Air Fried Corn on the Cob: A Sweet Symphony of Flavor
As we embark on this culinary journey together, get ready for an experience that’s not just about cooking but also about connecting with flavors that speak to our hearts. This Air Fried Corn on the Cob is incredibly easy to make and will elevate any meal with its vibrant taste and delightful texture. Let’s dive into the ingredients you’ll need to create this classic dish with just a modern twist.
Ingredients:
To create your Air Fried Corn on the Cob, you’ll need just three essential ingredients that work harmoniously together to bring out the best in each other.
- 4 ears corn (shucked and trimmed to fit your air fryer). Choosing fresh ears of corn is key here; look for those with bright green husks and plump kernels underneath. The fresher the corn, the sweeter it will be when cooked—a principle I always stand by! When shucking, take care to remove all silks as they can burn during cooking and detract from that beautiful clean flavor we’re after. Trimming them down ensures they fit perfectly in your air fryer basket without any fuss.
- 1 tablespoon olive oil (or spray oil). This ingredient serves multiple purposes: it not only adds a lovely richness but also helps achieve that coveted golden color while keeping your corn moist during cooking. Olive oil is my go-to for its health benefits and flavor profile; however, if you’re looking for a lighter option or want to save time, a good spray oil works wonders too! Just remember—coating every inch of those cobs ensures even seasoning and cooking.
- salt & pepper (generous). Seasoning might seem simple, but trust me when I say it’s absolutely paramount! Generously seasoning your corn enhances its natural sweetness and brings out flavors you didn’t know were hiding beneath the surface. Use good quality sea salt or kosher salt for an extra layer of flavor; don’t be shy with your pepper either—its warmth complements the sweetness beautifully.
Equipment You’ll Need:
Having the right tools makes all the difference in achieving culinary success! While these items aren’t ingredients, they are essential partners in creating something truly wonderful.
- Air Fryer – This appliance is crucial for our recipe; it cooks food quickly while giving it that crispy texture reminiscent of grilling without needing hot coals outside! If you don’t have one yet, consider investing in one because it opens up so many possibilities for healthy cooking without sacrificing flavor.
- Baking Brush – A soft-bristled brush will help you evenly coat your corn with olive oil. You could use paper towels too if needed; however, having a dedicated brush allows you better control over how much oil you apply—ensuring no kernel goes unseasoned!
- Tongs – These handy tools are perfect for turning your cobs halfway through cooking without burning yourself or making a mess! Tongs allow for precision—ensuring every kernel gets equal attention as they turn golden brown.
Now that we’ve gathered everything we need let’s roll up our sleeves and prepare this delightful dish!
Step 1: Prepare Your Corn
Start by removing those vibrant green husks from each ear of corn—you’ll want to do this carefully so as not to tear any silk strands left behind. Once you’ve peeled them back completely and removed all silk threads (this step is crucial!), give each ear a quick rinse under cool water—it’s like giving them a refreshing shower before their big moment! Now comes one of my favorite parts: brushing them generously with olive oil on all sides. This not only adds richness but also helps our seasonings adhere beautifully as they cook.
Step 2: Seasoning Time!
After coating your cobs with olive oil like they’re getting their very own spa treatment, it’s time to sprinkle them generously with both salt and pepper! Don’t skimp here; seasoning right before cooking allows those flavors to penetrate deeper into each kernel during cooking—a little culinary magic if you will! Take care to ensure every inch is coated because trust me—the finished product will thank you later when it bursts with flavor upon tasting!
Step 3: Preheat Your Air Fryer
Before we dive into cooking, let’s make sure our air fryer is ready for action! Preheat it at 350°F for at least five minutes—this step might seem simple but believe me when I say it’s absolutely non-negotiable if you want evenly cooked results without any sogginess! Think about it: preheating allows those hot air currents within to circulate effectively around your cobs from start to finish—leading us straight into perfectly charred goodness!
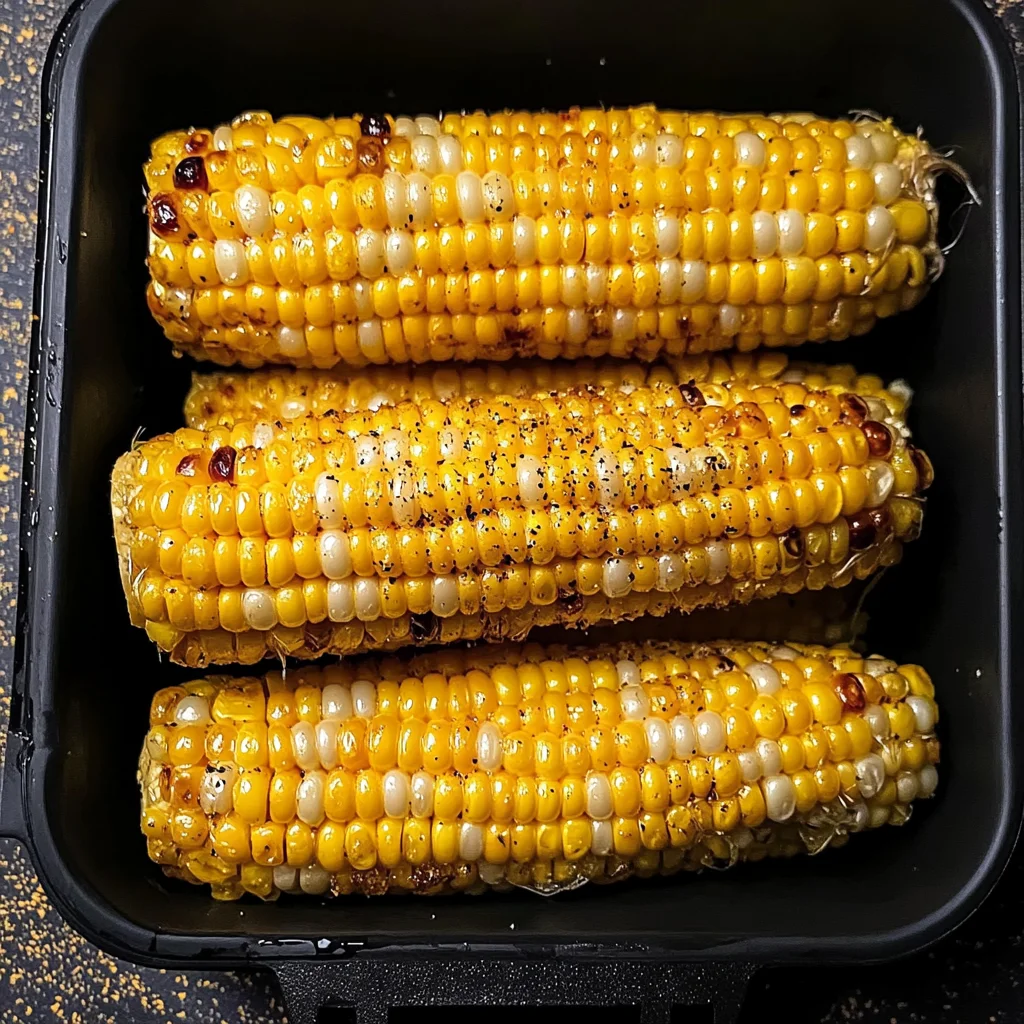
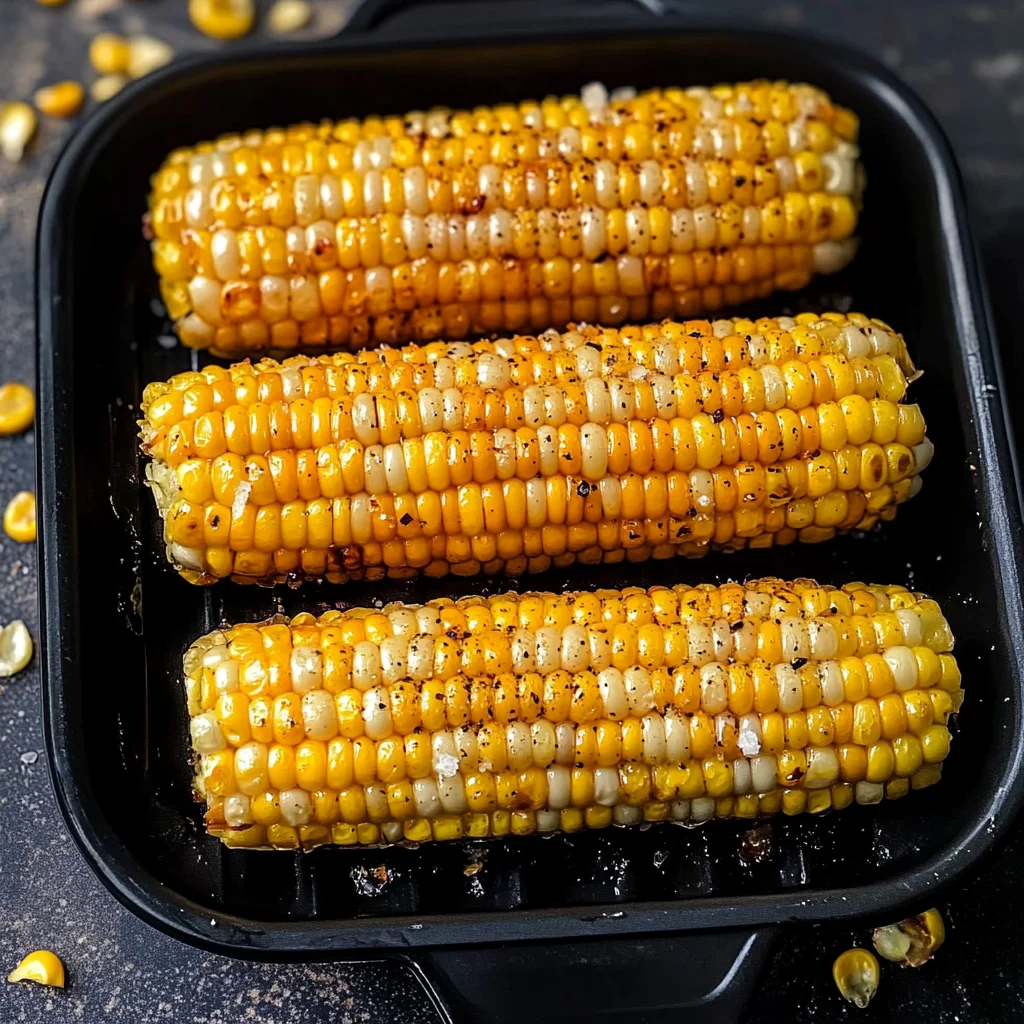
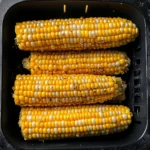
Step 4: Cooking Those Cobs
Once preheated, carefully place your seasoned cobs into the basket—it’s okay if they’re touching slightly; they’ll still cook beautifully together! Set the timer for about 13-15 minutes; halfway through (around minute 7), gently turn each ear using tongs so they brown evenly on all sides—watching them transform into golden delights is part of what makes this process so special! As they cook away within their cozy little chamber filled with hot air blissfully swirling around them—you’ll begin smelling that intoxicating aroma wafting through your kitchen like summer itself has arrived early!
Stay tuned as we continue crafting this unforgettable dish together—and I promise you’ll never look at corn on the cob quite the same way again!
The Art of Air Fried Corn on the Cob
Step 5: Cooking to Perfection – A Dance of Heat and Time
Now that your corn is prepped and seasoned with that luscious olive oil, it’s time to step into the magical world of air frying. This cooking method isn’t just a trendy alternative; it’s a transformative technique that delivers beautifully cooked corn with a texture that’s both tender and slightly crisp. You’ll want to preheat your air fryer to 350°F for at least 5 minutes—this is absolutely paramount because a properly heated fryer ensures an even cook throughout, allowing those golden kernels to char just enough while locking in all their sweet juices. Imagine the warmth radiating from your air fryer as you prepare for this symphony of flavors!
Once your air fryer reaches the desired temperature, carefully place the corn in the basket. Don’t worry if they touch; they’re friends now, and friends can share space! During cooking, you’ll let them bask in that hot air for about 13-15 minutes. But here’s where patience comes into play—you’ll need to turn the corn halfway through cooking, around the 7-minute mark. This critical step ensures each ear gets maximum exposure to those hot circulating currents, resulting in beautifully charred bits that enhance the natural sweetness of the corn. Keep an eye on them; you’ll know they’re done when you see those lovely golden spots emerging, promising a flavor explosion.
Step 6: The Flipping Point – Ensuring Even Cooking
At this juncture, it’s important to embrace your culinary instincts. When it’s time to flip your corn—don’t rush this step! Gently grasp an ear with tongs and turn it over, ensuring each side gets its fair share of that delightful heat. You might notice a faint sizzling sound as they hit those hot surfaces again—this is music to any home cook’s ears! Trust me on this: flipping helps achieve that heavenly caramelization that transforms ordinary corn into something truly extraordinary.
As you flip each cob, take a moment to appreciate what’s happening; the sugars are caramelizing and creating those gorgeous charred bits I mentioned earlier. It’s like magic unfolding right before your eyes! If you find any kernels starting to peek out from between the husks, no worries—just make sure they are nestled comfortably back within their leafy layers before returning them to their cozy heat bath. After another 6-8 minutes of cooking bliss, you’ll be rewarded with perfectly cooked corn on the cob that is tender yet retains its satisfying crunch.
Step 7: The Aroma Explosion – Timing is Everything
Timing in cooking is everything—it’s like choreography in a dance performance where each move matters! Once your corn has finished its air frying session, remove it from the basket and let it rest for a minute or two before digging in. Yes, I know how tempting it is to dive right into that golden goodness—after all, who can resist? However, giving it this brief resting period allows those juices inside each kernel to redistribute throughout—this means every bite will be profoundly satisfying and bursting with flavor.
As you wait patiently (I promise it’s worth it!), take a moment to breathe in those intoxicating aromas wafting from your freshly made corn on the cob. It’s almost as if they’re calling out to you! This resting phase also gives you time to think about what delicious toppings or seasonings you might want to sprinkle over them just before serving—perhaps some fresh herbs or a squeeze of lime? We’re building layers here; every little detail counts toward crafting an unforgettable experience!
Step 8: Finishing Touches – Elevating Your Corn Experience
Now comes one of my favorite parts—the finishing touches that elevate your Air Fried Corn on the Cob from delightful side dish to star attraction at any meal! Once your beautiful cobs have had their moment of repose, grab your favorite toppings. A light drizzle of melted vegan butter can add richness without overpowering those sweet kernels; think of it as liquid gold enhancing an already fabulous dish!
You might also consider tossing some freshly chopped cilantro or parsley over top for vibrant color and freshness—a symphony of visual appeal alongside taste! If you’re feeling adventurous (and trust me, I encourage adventure), sprinkle a pinch of chili powder or smoked paprika for an exciting kick that pairs beautifully with sweet corn. Remember, balance is key; we’re looking for harmony among flavors rather than competing elements. So go ahead and get creative! The beauty of this recipe lies not only in its simplicity but also in how easily it adapts to suit your personal tastes.
Final Touches and Serving Suggestions
As you gather everyone around the table with these irresistible Air Fried Corn on the Cob glistening under whatever toppings you’ve chosen, prepare yourself for compliments galore! This dish isn’t just food; it’s an experience waiting to happen—a chance for laughter shared over bites of pure joy. Serve them hot while still wearing their enticing aroma like a warm hug from summer itself.
Feel free to accompany these delightful cobs with various dips or sides such as creamy avocado sauce or zesty salsa—it creates opportunities for everyone at your gathering to personalize their taste experience even further. Each bite will remind you why you’ve embarked on this culinary journey together; food has such profound power to bring people closer.
So there you have it! A simple yet utterly intoxicating recipe for Air Fried Corn on the Cob that’s bound to become one of your favorites as well as mine—a testament not only to convenience but also creativity in our kitchens! Enjoy every moment spent savoring this dish because good food should always be celebrated as part of life’s greatest pleasures!
Storage and Enjoyment Tips for Your Air Fried Corn on the Cob
Now that you’ve created this delightful masterpiece of air fried corn on the cob, the moment of enjoyment is finally here! Picture yourself at a backyard picnic or cozy family dinner, where the aroma of freshly cooked corn wafts through the air, mingling with laughter and joy. But there’s more to this recipe than just the immediate pleasure; it also offers some fantastic storage options to help you savor every last bit. If you find yourself with any leftover corn, don’t worry! I’ve got you covered with some simple tips to keep that sweet taste intact.
Storing Leftover Air Fried Corn on the Cob
When it comes to storing your leftover air fried corn on the cob, choosing the right container is absolutely paramount. Opt for an airtight container or wrap each ear tightly in plastic wrap to lock in that irresistible moisture. Place your container in the fridge, where your delicious creation can stay fresh for up to three days—though honestly, it never lasts that long in my house! To maintain its quality, try placing a slice of bread inside the container; this little trick helps absorb excess moisture while keeping your corn delightfully tender. When you’re ready to enjoy it again, simply reheat it in your air fryer at 350°F for about 5 minutes; trust me—the flavor will still be as vibrant as when you first cooked it!
Freezing Air Fried Corn on the Cob for Later
If you want to extend that joy even further, freezing your air fried corn on the cob is a fantastic option! Begin by letting each ear cool completely before wrapping them individually in foil or placing them into freezer-safe bags—removing as much air as possible is crucial here. You can keep them frozen for about three months, which gives you plenty of time to use them whenever those cravings hit. When you’re ready to indulge again, just pop them straight into your air fryer from frozen and cook for a few extra minutes until they’re warmed through. The convenience of having delicious corn ready at a moment’s notice makes this method not just practical but also truly exciting! Imagine pulling out perfectly preserved ears of corn from your freezer, bringing back all those memories of summer barbecues and family gatherings.
Air Fried Corn on the Cob
Experience the delightful crunch and sweetness of Air Fried Corn on the Cob, a dish that perfectly captures the essence of summer! With just a few simple ingredients, this recipe transforms fresh corn into a mouthwatering side dish that’s both easy to prepare and bursting with flavor. Utilizing an air fryer, you’ll achieve that coveted charred texture without the hassle of traditional grilling. Whether served at a backyard barbecue or as a cozy accompaniment to your favorite meal, this corn on the cob promises to be a crowd-pleaser at any gathering. Get ready to elevate your cooking game and enjoy every juicy bite!
- Prep Time: 10 minutes
- Cook Time: 15 minutes
- Total Time: 25 minutes
- Yield: 4 servings 1x
- Category: Side Dish
- Method: Frying
- Cuisine: American
Ingredients
- 4 ears of corn (shucked and trimmed)
- 1 tablespoon olive oil (or spray oil)
- Salt and pepper to taste
Instructions
- Carefully shuck each ear of corn, removing all silks. Rinse under cool water and dry.
- Brush each cob generously with olive oil, ensuring even coverage.
- Season with salt and pepper, coating all sides well.
- Preheat your air fryer to 350°F for 5 minutes.
- Place the seasoned corn in the air fryer basket, making sure they are touching slightly.
- Cook for 13-15 minutes, turning halfway through at around 7 minutes for even browning.
- Once done, remove from the fryer and let rest for a minute before serving.
Nutrition
- Serving Size: 1 ear of corn (90g)
- Calories: 77
- Sugar: 6g
- Sodium: 2mg
- Fat: 1g
- Saturated Fat: 0g
- Unsaturated Fat: 1g
- Trans Fat: 0g
- Carbohydrates: 17g
- Fiber: 2g
- Protein: 3g
- Cholesterol: 0mg