Apple Cider Cheesecake
If you’re looking for a dessert that captures the essence of fall, then you’ve come to the right place! This Apple Cider Cheesecake is a delightful treat that combines the creamy texture of cheesecake with the tangy, autumnal flavor of fresh apple cider. It’s not just a dessert; it’s an experience that brings warmth and joy to any gathering. Whether it’s a cozy dinner with family or a festive celebration with friends, this cheesecake is sure to impress!
I love making this Apple Cider Cheesecake because it’s both comforting and elegant. The rich flavors are perfect for chilly evenings, and every bite reminds me of crisp apples and warm spices. Plus, it can easily be made ahead of time, allowing you to enjoy your company without any last-minute stress.
Why You’ll Love This Recipe
- Delicious Flavor: The combination of reduced apple cider and mulling spices creates a unique taste that’s perfect for fall.
- Easy Preparation: With straightforward steps, this recipe is simple enough for bakers of all skill levels.
- Make-Ahead Friendly: Prepare this cheesecake a day in advance, so it’s ready when you are!
- Family-Friendly Appeal: Kids and adults alike will love the creamy texture and sweet-tart flavor.
- Stunning Presentation: A beautiful cheesecake that’s sure to be the star of your dessert table.
Ingredients You’ll Need
To make this delicious Apple Cider Cheesecake, you’ll need some simple and wholesome ingredients. Each one plays a role in creating that creamy, dreamy dessert we all adore.
For the Crust
- 2 cups digestive cookies or graham crackers (270g)
- ½ cup butter (melted) (113g)
- 1/4 teaspoon salt
- 2 tablespoons powdered sugar
For the Filling
- 3 cups fresh apple cider (honeycrisp cider is more tart!)
- Mulling spices
- 3 cream cheese bricks (227g each, softened at room temperature)
- 1 cup brown sugar (220g)
- ½ teaspoon salt
- 2 teaspoons pure vanilla extract
- 1 cup sour cream (240g)
- 1/3 cup reduced apple cider (from above)
- 1 teaspoon cinnamon
- 3 large eggs
- 2 tablespoons all-purpose flour
Variations
This recipe is wonderfully flexible! Feel free to experiment based on your preferences or what you have on hand.
- Try Different Spices: Swap out mulling spices for nutmeg or ginger for a different twist.
- Add a Fruit Layer: Consider folding in chopped apples or pears into your cheesecake mixture before baking.
- Change Up the Crust: Use crushed nuts or gluten-free cookies for an alternative crust option.
- Top It Off: Drizzle caramel sauce or serve with whipped coconut cream for an extra special touch.
How to Make Apple Cider Cheesecake
Step 1: Reduce the Cider
Start by boiling the fresh apple cider with mulling spices in a large pot over high heat. This step is crucial because reducing the cider intensifies its flavor, giving your cheesecake that wonderful apple essence. After about an hour, you should have about 1/3 cup of thick syrup. Set it aside to cool—this will be folded into your filling later.
Step 2: Preheat Your Oven
Preheat your oven to 350°F (175°C). This ensures that your cheesecake will bake evenly from start to finish.
Step 3: Make the Crust
In your food processor, pulse the digestive cookies until finely ground. Then add melted butter, salt, and powdered sugar. Pulse until it forms wet crumbs. Press this mixture firmly into an 8” round springform pan or cake pan lined with parchment paper. Bake for about 10 minutes until set, then let it cool before chilling in the fridge.
Step 4: Prepare the Filling
Lower your oven temperature to 325°F (160°C). In a stand mixer fitted with the paddle attachment, beat together softened cream cheese and brown sugar until completely smooth and lump-free. This step takes some time but is essential for achieving that creamy texture we all love!
Step 5: Combine Ingredients
Next, add sour cream, vanilla extract, salt, cinnamon, and your reduced apple cider into the bowl. Mix well until everything is combined smoothly—don’t forget to scrape down the sides!
Step 6: Add Eggs and Flour
Now it’s time to add eggs and flour to your creamy mixture. Beat gently just until combined; overmixing can lead to cracks in your cheesecake later.
Step 7: Bake in Water Bath
Place your prepared springform pan inside a larger baking dish filled with hot water—this water bath helps cook the cheesecake gently and evenly. Pour your filling into the crust and bake for about 90 minutes until set around the edges but still jiggly in the center.
Step 8: Cool Gradually
When it’s done baking, turn off the oven but leave the cheesecake inside. Use a wooden spoon to crack open the oven door slightly—this gradual cooling helps prevent cracks from forming on top. Let it sit there for about 30 minutes before removing it from the oven.
Step 9: Chill Before Serving
Allow your cheesecake to cool completely on a counter before transferring it to the fridge for at least 8 hours—or overnight if you can wait! Chilling helps develop those delicious flavors even further.
Now you’re ready to enjoy this lovely Apple Cider Cheesecake! Perfectly creamy with bursts of autumn flavor—it’s bound to become a favorite at any gathering!
Pro Tips for Making Apple Cider Cheesecake
Baking can be a delightful adventure, and these tips will help you create the perfect Apple Cider Cheesecake that your friends and family will love!
-
Use room temperature ingredients: Ensuring that your cream cheese, eggs, and sour cream are at room temperature helps them blend more smoothly. This prevents lumps and gives you that creamy texture we all adore.
-
Don’t overmix the batter: Once you add the eggs, mix until just combined. Overmixing can introduce too much air into the batter, leading to cracks in your cheesecake as it bakes.
-
Create a water bath: Baking your cheesecake in a water bath (bain-marie) helps regulate the temperature and moisture level, resulting in a creamier texture and preventing cracks on the surface.
-
Cool slowly: After baking, let your cheesecake cool gradually in the oven with the door ajar. This gentle cooling method helps prevent sudden temperature changes that can lead to cracks.
-
Chill overnight: For the best flavor and texture, allow your cheesecake to chill in the fridge for at least 8 hours (or overnight) before serving. This allows all those delicious flavors to meld beautifully.
How to Serve Apple Cider Cheesecake
Presenting your Apple Cider Cheesecake can make it an even more inviting dessert! Here are some ideas to elevate its appearance and flavor profile.
Garnishes
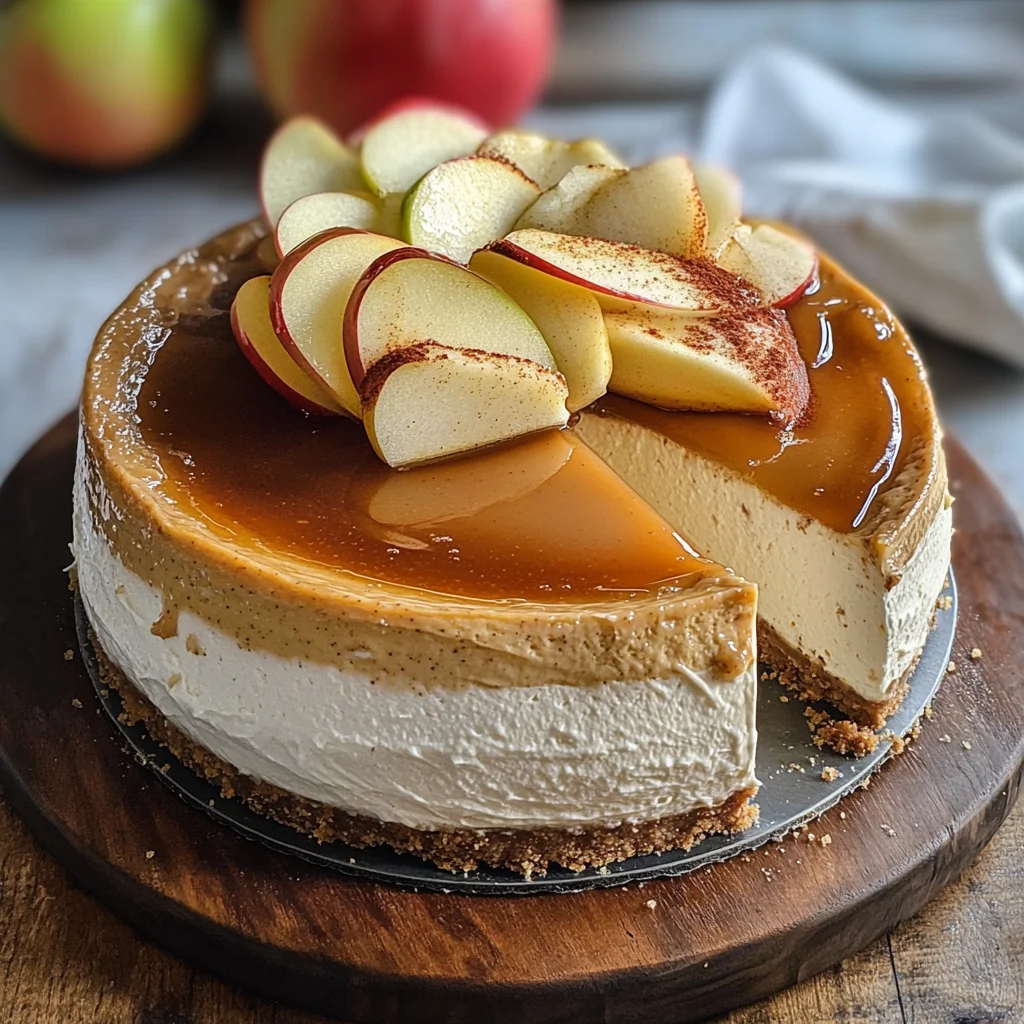
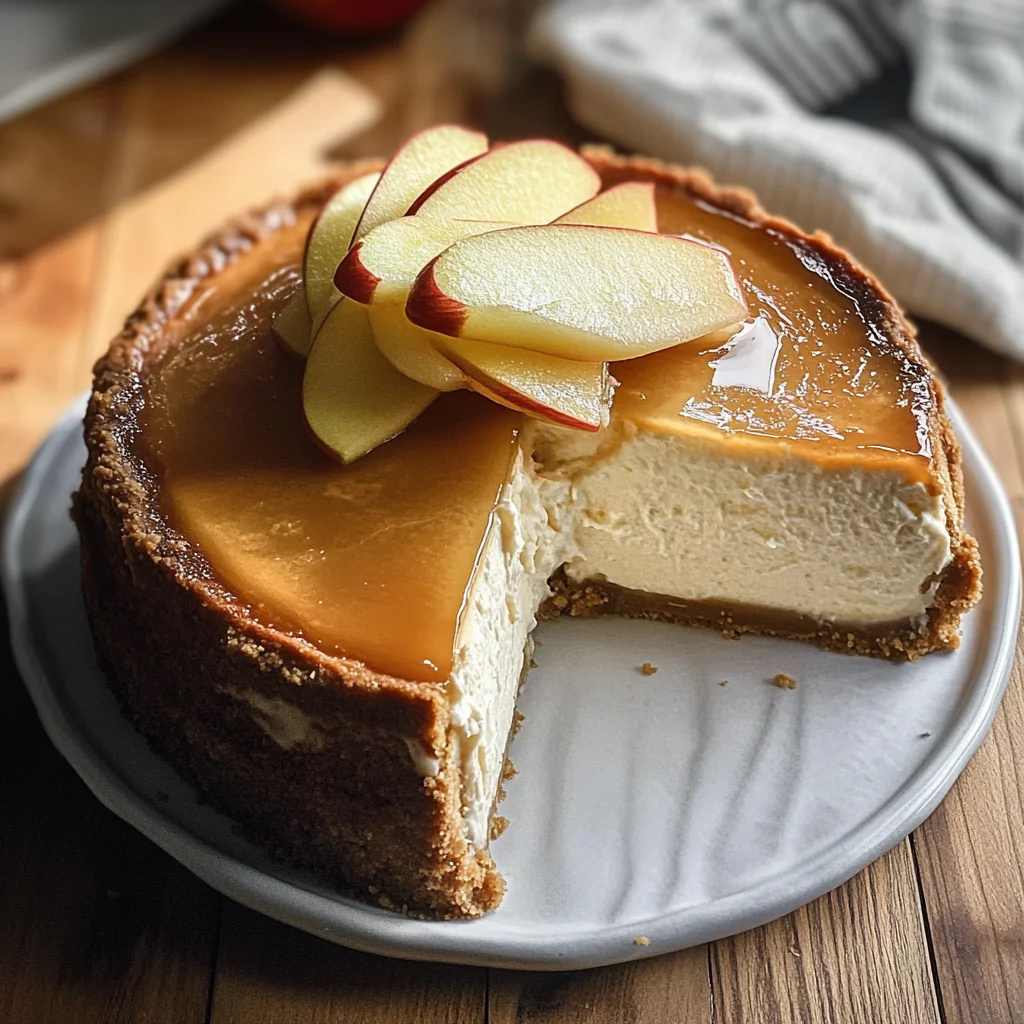
- Caramel drizzle: A light drizzle of caramel sauce over each slice adds sweetness and a touch of elegance.
- Whipped coconut cream: A dollop of whipped coconut cream on top provides a lovely contrast to the dense cheesecake while remaining dairy-free.
- Cinnamon dusting: A sprinkle of cinnamon on top not only enhances the autumnal flavor but also makes for a beautiful presentation.
Side Dishes
- Warm spiced apple slices: Sauté sliced apples with cinnamon and nutmeg for a warm accompaniment that complements the flavors of your cheesecake perfectly.
- Vanilla ice cream: A scoop of vanilla ice cream offers a classic pairing that adds a creamy element to every bite.
- Coffee or tea: Serving warm beverages like spiced chai or rich coffee enhances the dessert experience, making it cozy and comforting.
- Nut-based granola: Adding a sprinkle of nutty granola gives an unexpected crunch that balances out the creamy texture of the cheesecake.
Now you’re all set to wow your guests with this delightful Apple Cider Cheesecake! It’s sure to become a cherished recipe in your collection. Enjoy every bite!
Make Ahead and Storage
This Apple Cider Cheesecake is not only a delicious dessert but also perfect for meal prep! You can make it ahead of time and store it, making it an easy addition to any gathering or special occasion.
Storing Leftovers
- Cover the cheesecake with plastic wrap or aluminum foil.
- Store in the refrigerator for up to 5 days.
- For best texture, slice individual pieces before storing.
Freezing
- Wrap the cheesecake tightly in plastic wrap and then in aluminum foil.
- Freeze for up to 3 months.
- Thaw in the refrigerator overnight before serving.
Reheating
- If you prefer your cheesecake slightly warmer, slice a piece and let it sit at room temperature for about 15-20 minutes before enjoying.
- Alternatively, warm individual slices in the microwave for 10-15 seconds.
FAQs
Here are some common questions you might have about this delightful dessert!
Can I use any type of apple cider for Apple Cider Cheesecake?
You can use any variety of fresh apple cider, but honeycrisp cider offers a lovely tartness that enhances the flavor of the cheesecake. Experiment with different types to find your favorite!
How long does Apple Cider Cheesecake last in the fridge?
Apple Cider Cheesecake can be stored in the refrigerator for up to 5 days. Just make sure it’s properly covered to maintain its delicious flavor and texture.
Can I freeze Apple Cider Cheesecake?
Yes! You can freeze Apple Cider Cheesecake for up to 3 months. Just wrap it well to prevent freezer burn and thaw it in the refrigerator when you’re ready to enjoy.
What makes this Apple Cider Cheesecake special?
The unique flavor comes from reducing fresh apple cider, which gives it a tangy, autumn-inspired taste that’s perfect for fall gatherings or holiday celebrations.
Final Thoughts
I hope you find joy in creating this wonderful Apple Cider Cheesecake! Its creamy texture combined with that delightful apple flavor makes it truly special. Don’t hesitate to share this recipe with friends and family; I’m sure they’ll love it just as much as you will. Happy baking!
Apple Cider Cheesecake
Indulge in the flavors of fall with this delightful Apple Cider Cheesecake. Perfectly creamy and reminiscent of crisp apples and warm spices, this dessert is an instant crowd-pleaser for any gathering. The unique twist comes from reduced apple cider and aromatic mulling spices, creating a rich flavor profile that evokes cozy autumn evenings. This make-ahead cheesecake allows you to focus on your guests while ensuring a stunning centerpiece for your dessert table. With its elegant presentation and comforting taste, this cheesecake is destined to become a cherished recipe in your collection.
- Prep Time: 30 minutes
- Cook Time: 90 minutes
- Total Time: 2 hours
- Yield: Serves 12 1x
- Category: Dessert
- Method: Baking
- Cuisine: American
Ingredients
- 2 cups digestive cookies or graham crackers
- ½ cup melted butter
- 3 cups fresh apple cider
- Mulling spices
- 3 bricks cream cheese (softened)
- 1 cup brown sugar
- ½ teaspoon salt
- 2 teaspoons pure vanilla extract
- 1 cup sour cream
- 1/3 cup reduced apple cider
- 1 teaspoon cinnamon
- 3 large eggs
- 2 tablespoons all-purpose flour
Instructions
- Reduce the apple cider with mulling spices in a pot over high heat until thickened to about 1/3 cup; set aside to cool.
- Preheat your oven to 350°F (175°C).
- Crush digestive cookies into fine crumbs, combine with melted butter, salt, and powdered sugar. Press into the base of an 8” springform pan and bake for about 10 minutes.
- Lower oven temperature to 325°F (160°C). Beat softened cream cheese and brown sugar until smooth.
- Mix in sour cream, vanilla extract, salt, cinnamon, and reduced apple cider until well combined.
- Gently incorporate eggs and flour; pour filling into cooled crust.
- Bake in a water bath for approximately 90 minutes until edges are set but center is slightly jiggly.
- Gradually cool in the oven before chilling in the fridge for at least 8 hours.
Nutrition
- Serving Size: 1 slice (116g)
- Calories: 352
- Sugar: 25g
- Sodium: 305mg
- Fat: 23g
- Saturated Fat: 14g
- Unsaturated Fat: 7g
- Trans Fat: 0g
- Carbohydrates: 33g
- Fiber: 1g
- Protein: 5g
- Cholesterol: 86mg