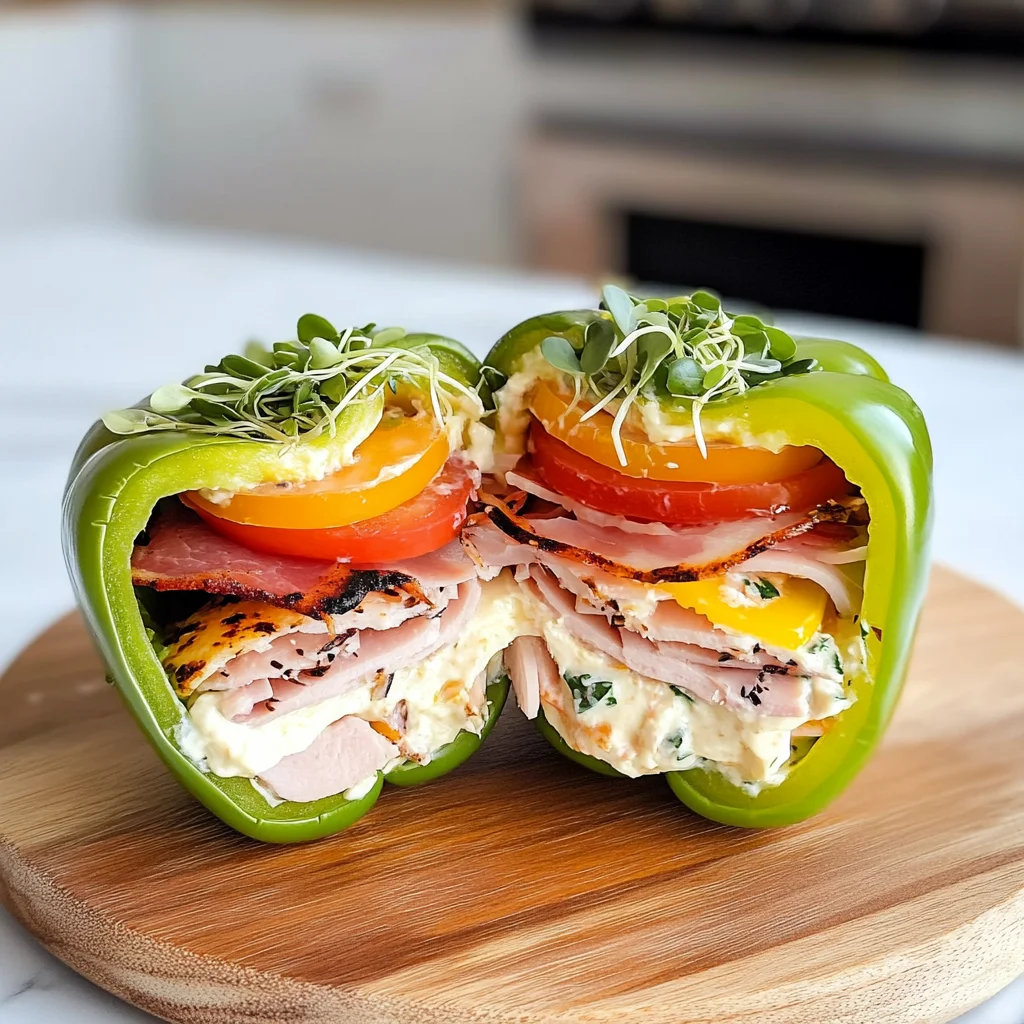
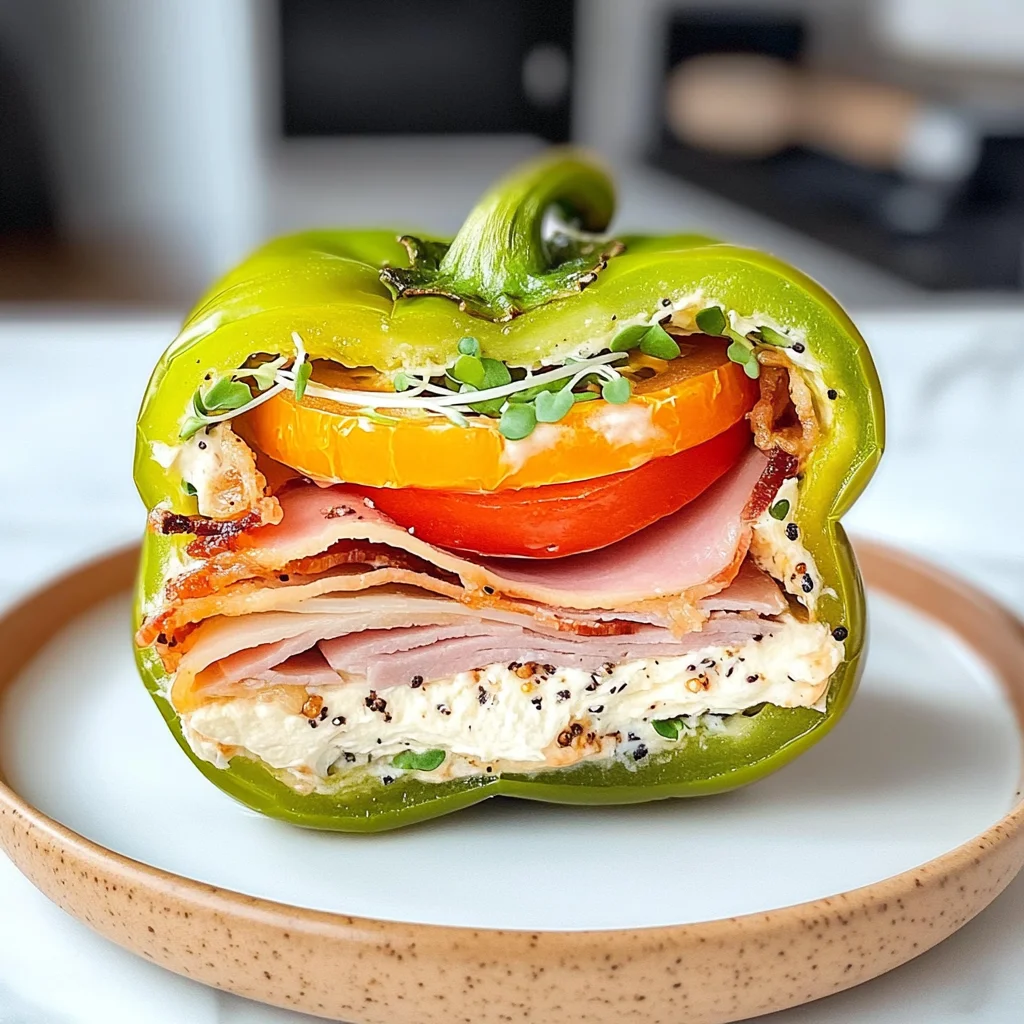
Bell Pepper Sandwich
Sometimes, a recipe transcends the mere act of cooking; it becomes a cherished ritual, a bridge that connects us to our memories and to one another. The Bell Pepper Sandwich is one such revelation for me. At its core, this dish embodies the essence of simplicity and freshness, wrapped in the vibrant colors of bell peppers that beckon with their crispness and crunch. When I take a bite into this delightful creation, it’s not just about flavors dancing on my palate—it’s about the joy of crafting something beautiful and nourishing with my own hands. Imagine the buttery cream cheese mingling with savory turkey and chicken ham, all enveloped in the satisfying crunch of a fresh bell pepper. It’s a symphony of textures, where each layer tells its own story.
What truly excites me about this sandwich is how it reflects both tradition and innovation. Swapping out bread for bell peppers not only gives you a low-carb delight but also elevates your lunch game to something utterly extraordinary. This could easily be a show-stopping dish at your next gathering or a quick yet fulfilling meal when time feels scarce. Can you envision those sunny afternoons when you want something light yet satisfying? This is your answer! It’s easy to prepare, incredibly versatile, and refreshingly healthy—everything we want in our busy lives today.
Bell Pepper Sandwich: A Crunchy Delight for Your Lunch Hour
Welcome to one of my favorite lunchtime treasures! This Bell Pepper Sandwich is more than just a meal; it’s an experience that allows us to appreciate fresh ingredients while enjoying our modern culinary journey. With just five minutes of prep time and no cooking required, this recipe is perfect for those days when you’re craving something light yet packed with flavor. So grab your ingredients, roll up your sleeves, and let’s embark on this delicious culinary adventure together!
Ingredients:
As we dive into creating this beautiful Bell Pepper Sandwich, let’s take a moment to appreciate each ingredient that will contribute to our masterpiece. Each component plays its own crucial role in bringing flavor and texture to life.
- 1 bell pepper. The star of our show! Choose a firm bell pepper with vibrant skin—be it red, yellow, or green—as they each bring their unique sweetness and crunch to the table. The pepper acts as our sandwich “bread,” offering not just structural integrity but also an additional layer of nutrition thanks to its vitamins A and C. When selecting your bell pepper, look for ones that feel heavy for their size; they should have smooth skin without any blemishes or soft spots.
- 2 oz cream cheese, softened. Ah, creamy goodness! Cream cheese adds an incredible velvety richness that binds all the flavors together while providing that luxurious mouthfeel we crave in any sandwich. I always recommend ensuring your cream cheese is at room temperature before spreading; this makes it easier to work with and allows for even distribution across the pepper halves. If you’re looking for alternatives due to dietary preferences or restrictions, consider using herbed goat cheese or even dairy-free cream cheese options—they can add delightful twists!
- 2 slices deli cut turkey. Lean turkey slices provide protein without overwhelming the dish with heaviness—plus their mild flavor complements the vibrant notes from the bell pepper beautifully. When choosing deli meat, look for high-quality options that are free from artificial preservatives; organic or nitrate-free varieties are excellent choices that taste better too! Don’t be shy about experimenting here; smoked turkey can lend an unexpected depth if you’re feeling adventurous.
- 2 slices deli cut chicken ham. Similar in texture and flavor profile to turkey but slightly sweeter in taste, chicken ham rounds out our protein offerings perfectly while keeping things light and enjoyable. As with the turkey, seek out all-natural options that are minimally processed—this ensures you’re savoring every moment without any lurking nasties ruining your culinary experience.
- 2 slices cooked bacon. Oh yes! Bacon brings that irresistible crispy texture along with a smoky richness that takes this sandwich over the top! Whether you choose traditional bacon or turkey bacon as an alternative (trust me—it still delivers!), be sure it’s well-cooked so it adds just the right amount of crunch without being overly greasy.
- 1 slice tomato. Adding fresh tomato contributes juiciness and acidity—elements that brighten up each bite and balance out the richness of cream cheese and bacon beautifully. Look for ripe tomatoes with vibrant color; heirloom varieties can offer complex flavors if you want to elevate your sandwich even further!
- Handful of sprouts. These little gems are like nature’s confetti! Sprouts add crunch as well as nutrients like vitamins K and C along with antioxidants—making them an excellent finishing touch that enhances both health benefits and taste profiles alike.
Equipment You’ll Need:
Before we dive into assembling our gorgeous Bell Pepper Sandwich, let’s ensure we have all the right tools at hand! The right equipment not only makes cooking smoother but also adds joy to the process.
- Sharp knife: A good quality chef’s knife is essential here—a sharp blade will make slicing through your bell pepper simple and clean without squishing it down too much during prep time! A serrated knife will later help you cut through your finished sandwich effortlessly without losing any precious ingredients.
- Cutting board: Opt for a sturdy cutting board where you can safely chop up your ingredients without fear of slipping or sliding around—wooden boards are often preferred for their durability and ease on knives.
- Spreader or butter knife: Having something handy to spread your cream cheese evenly onto both halves of the bell pepper will ensure every bite has that delightful creamy richness we’re after!
Preparing the Bell Pepper Sandwich
Step 1: Slicing Your Bell Pepper Perfectly
To begin crafting this lovely sandwich, slice your bell pepper in half lengthwise from stem to base using your sharp knife. Be gentle yet firm as you work through—the aim here is not only precision but also preserving each half’s integrity so they can hold all those delicious fillings later on! Once halved, carefully remove any seeds or ribs from inside—this step is non-negotiable since leftover bits can interfere with an otherwise perfect bite experience later on.
Step 2: Spreading Cream Cheese Magic
Now comes one of my favorite parts: spreading that glorious cream cheese inside both halves of your bell pepper! Grab your spreader (or butter knife), dip it into the softened cream cheese (it should be smooth like liquid gold), then generously coat both inner sides until every nook feels luxurious under its creamy embrace. Trust me on this step—it creates cohesion among all other ingredients while adding moisture so each bite melts beautifully in your mouth!
Step 3: Layering Your Proteins
Next up is layering those lovely deli meats within each half—the turkey first followed by chicken ham creates harmony between textures while offering contrasting flavors that’ll dance on your tongue as you chew thoughtfully through each layer! Take two slices from their packaging (don’t forget freshness counts!) before placing one slice onto each side gently pressing down ever so slightly—it helps meld everything together nicely without making things soggy!
Step 4: Adding Crispy Bacon Bliss
Now let’s elevate our Bell Pepper Sandwich even further by introducing crispy bacon goodness into play! Take two slices (or halves) from earlier cooked strips before nestling them snugly atop either side—you want enough crunch here so every mouthful feels indulgent yet freshened by those veggies below them too! Pay attention here because timing matters; if left sitting too long before assembly begins wilts any delicate structures beneath crunchy toppings making them less appealing visually later on…
Stay tuned as we continue building upon our foundation—the next steps will bring everything together beautifully!
Crafting Your Satisfying Bell Pepper Sandwich
Oh, my dear friend, as we dive deeper into the creation of this utterly delightful Bell Pepper Sandwich, I can’t help but feel the excitement bubbling up within me! This isn’t just a meal; it’s an experience that transports you to a sun-drenched picnic or a cozy lunch at home. So, let’s get right back into it!
Step 5: Layering Flavors with Cream Cheese
Now that you’ve prepared your bell pepper halves, it’s time for one of my favorite parts: slathering on that luscious cream cheese. Trust me when I say this step is absolutely paramount to achieving that creamy richness that so beautifully balances the crunchiness of the pepper. Take your softened cream cheese—ideally at room temperature to ensure it spreads like liquid gold—and apply a generous layer to the insides of both pepper halves. You want to cover every nook and cranny; this isn’t just about flavor but also moisture. Remember, we’re building layers here because each bite should be an explosion of taste and texture. The cream cheese acts as a glue, holding everything together while adding a smoothness that contrasts perfectly with the crispness of the pepper.
As you spread, use a small offset spatula or even the back of a spoon for ease; don’t rush this step! You want to take your time and make sure every bit is coated evenly. Why? Because uneven spreading can lead to some bites being overly dry while others are overwhelming with cream cheese. We’re aiming for harmony here in our Bell Pepper Sandwich symphony!
Step 6: Stacking Up Protein Power
Next comes the star protein players—your deli meats! For my sandwich, I love using two slices each of turkey and chicken ham, but feel free to mix it up based on what you have on hand! Lay those slices directly atop your creamy canvas; they should fit snugly into the bell pepper crevices without overflowing too much. Each slice adds not only flavor but also essential nutrients like protein, making this lunch more than just delicious—it’s sustaining!
Now here’s where things get exciting: we can’t forget about our crispy bacon! Cut those slices in half (making sure they’re already cooked and gloriously crispy), and nestle them right on top of your deli meats. The contrast between the savory meatiness and that crunchy bacon is truly extraordinary. Take a moment here to savor what you see—the vibrant colors of red tomatoes, fresh sprouts, and green peppers dancing together in delicious harmony—it’s almost too pretty to eat! But remember: we’re not done yet!
Step 7: Adding Freshness with Tomato and Sprouts
The next layer brings in freshness that elevates our Bell Pepper Sandwich from good to absolutely divine—tomato and sprouts! A single slice of ripe tomato lends its juicy goodness to our creation, while those delicate sprouts add an earthy crunch that dances delightfully on your palate. When placing the tomato slice atop one side of your sandwich assembly, make sure it sits firmly without slipping off; we want stability here!
Sprouts might seem like just another topping, but trust me—they bring an additional layer of flavor that’s hard to resist. They also offer a lovely textural contrast against all those rich ingredients beneath. As you stack these fresh elements onto your sandwich, take a moment to appreciate how they not only enhance flavors but also boost nutritional value significantly—after all, who doesn’t want their sandwiches packed with vitamins?
Step 8: The Perfect Assembly
Now comes an exciting moment: assembling your masterpiece! Gently place the half with fewer toppings on top of the other half—this will create a delightful little pocket filled with all those gorgeous flavors we’ve layered in there. This isn’t just any assembly; it’s about bringing everything together so each bite delivers pure joy! With both halves nestled together snugly, use a serrated knife for cutting—this step is crucial because it allows for clean edges without squishing all those beautiful ingredients out.
I recommend cutting straight down the middle so that each half reveals its colorful cross-section—a feast for the eyes before it even reaches your mouth! And let me tell you; as soon as you take that first bite, you’ll experience an explosion of textures and tastes—the refreshing crunch from the bell pepper mingling with creamy cheese and savory meats creates a truly unforgettable sensation. Don’t rush through this last part; enjoy every moment!
Final Touches
Now that you’ve assembled this gorgeous Bell Pepper Sandwich, it’s time to relish in your accomplishment before diving in.
Step 9: Enjoying Your Culinary Creation
Take a moment to admire your handiwork before taking that first glorious bite—you’ve earned it! The vibrant colors glistening under natural light beckon you closer as if saying, “Come savor me!” The anticipation builds as you hold this sandwich in hand; feel free to turn it slightly to see all those marvelous layers peeking through each other.
When you finally sink your teeth into this sensational creation, I promise you’ll understand why I adore it so much—it’s like tasting summer itself wrapped up in crunchy goodness! Each ingredient plays its part beautifully—the creaminess of cheese enveloping savory meats balanced by fresh veggies creates such profound satisfaction I could eat one every day.
And there you have it—a Bell Pepper Sandwich that’s not only low-carb but also packed with flavors that’ll brighten up any lunch hour. Whether you’re enjoying it solo or sharing with friends during a picnic gathering or casual lunch date at home, this sandwich will surely impress everyone lucky enough to take a bite!
So go ahead—make yourself this delightful dish today and treat yourself (and maybe someone special) because life is simply too short not to indulge in something profoundly satisfying like this glorious Bell Pepper Sandwich!
Storage and Enjoyment Tips for Your Bell Pepper Sandwich
Now that you’ve whipped up this delightful Bell Pepper Sandwich, it’s time to dive into the joy of enjoying your creation! The crisp crunch of the bell pepper, paired with the creamy richness of cream cheese and savory deli meats, is an experience you won’t want to miss. But what happens when you’re left with a half-eaten sandwich or want to prepare in advance? Let’s explore how to store it properly so every bite remains as fresh and vibrant as the first!
Storing Leftover Bell Pepper Sandwich
To keep your leftover Bell Pepper Sandwich in tip-top shape, I recommend using an airtight container. This helps lock in that delicious flavor while keeping out any unwanted moisture that could dampen your crunchy bell pepper. Ideally, you should store it in the fridge where it’ll stay fresh for about 2 days. I’ve found that if you place a piece of parchment paper between the sandwich and the lid, it absorbs excess moisture and prevents sogginess—this little trick is absolutely paramount for maintaining that delightful crunch! As for taste after storage, it holds up surprisingly well; the flavors meld beautifully over time, creating a profoundly satisfying bite even after chilling. If you decide to enjoy it cold, simply pull it out of the fridge and savor each mouthful. Trust me; it’s just as enticing!
Freezing Components for Later
If you find yourself enamored with this recipe (and who wouldn’t?), consider freezing some components for future enjoyment! You can freeze bell pepper halves before assembling your sandwich—just make sure they’re blanched briefly in boiling water followed by an ice bath to preserve their vibrant color and crunch. Once cooled, pack them into freezer-safe bags or containers, and they’ll keep well for up to 3 months. When you’re ready to indulge again, simply thaw them overnight in the refrigerator before filling them with your favorite ingredients. This method not only saves time but also ensures you always have a fresh base on hand for a quick lunch or snack! Imagine opening your freezer on a busy day and finding these colorful treasures waiting to be transformed into a delicious meal—it’s pure convenience at its best!
Bell Pepper Sandwich

Enjoy a refreshing Bell Pepper Sandwich made with cream cheese and deli meats—a delicious low-carb option perfect for lunch! Try it today!
- Prep Time: 5 minutes
- Cook Time: 0 minutes
- Total Time: 5 minutes
- Yield: Serves 1
- Category: Lunch
- Method: No Cooking
- Cuisine: American
Ingredients
- 1 bell pepper (red, yellow, or green)
- 2 oz cream cheese (softened)
- 2 slices deli cut turkey
- 2 slices deli cut chicken
- 1 slice tomato
- Handful of sprouts
Instructions
- Slice the bell pepper in half lengthwise and remove seeds.
- Spread cream cheese evenly inside both halves.
- Layer turkey and chicken on one half.
- Add a slice of tomato and top with sprouts.
- Place the other half of the bell pepper on top to complete the sandwich.
- Cut in half and enjoy!
Nutrition
- Serving Size: 1 serving
- Calories: 250
- Sugar: 3g
- Sodium: 550mg
- Fat: 12g
- Saturated Fat: 6g
- Unsaturated Fat: 5g
- Trans Fat: 0g
- Carbohydrates: 18g
- Fiber: 4g
- Protein: 22g
- Cholesterol: 70mg