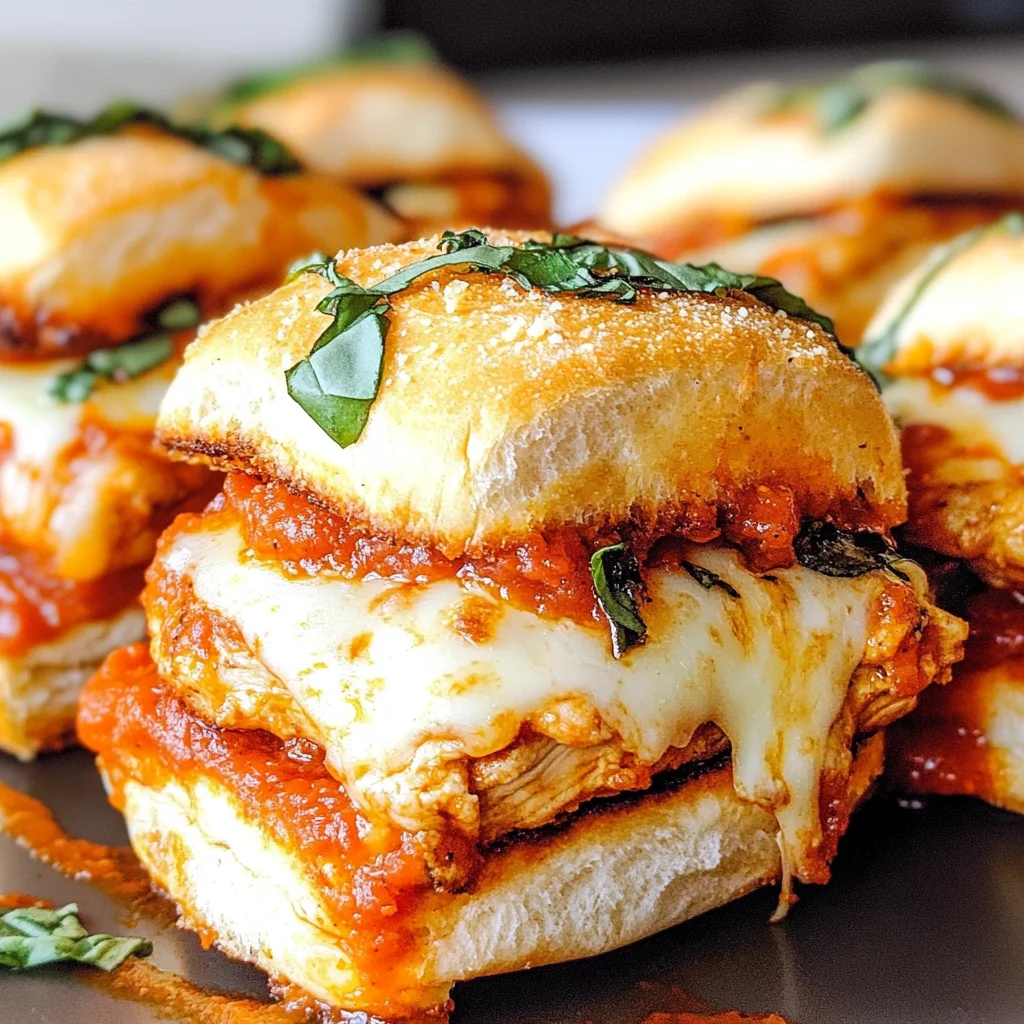
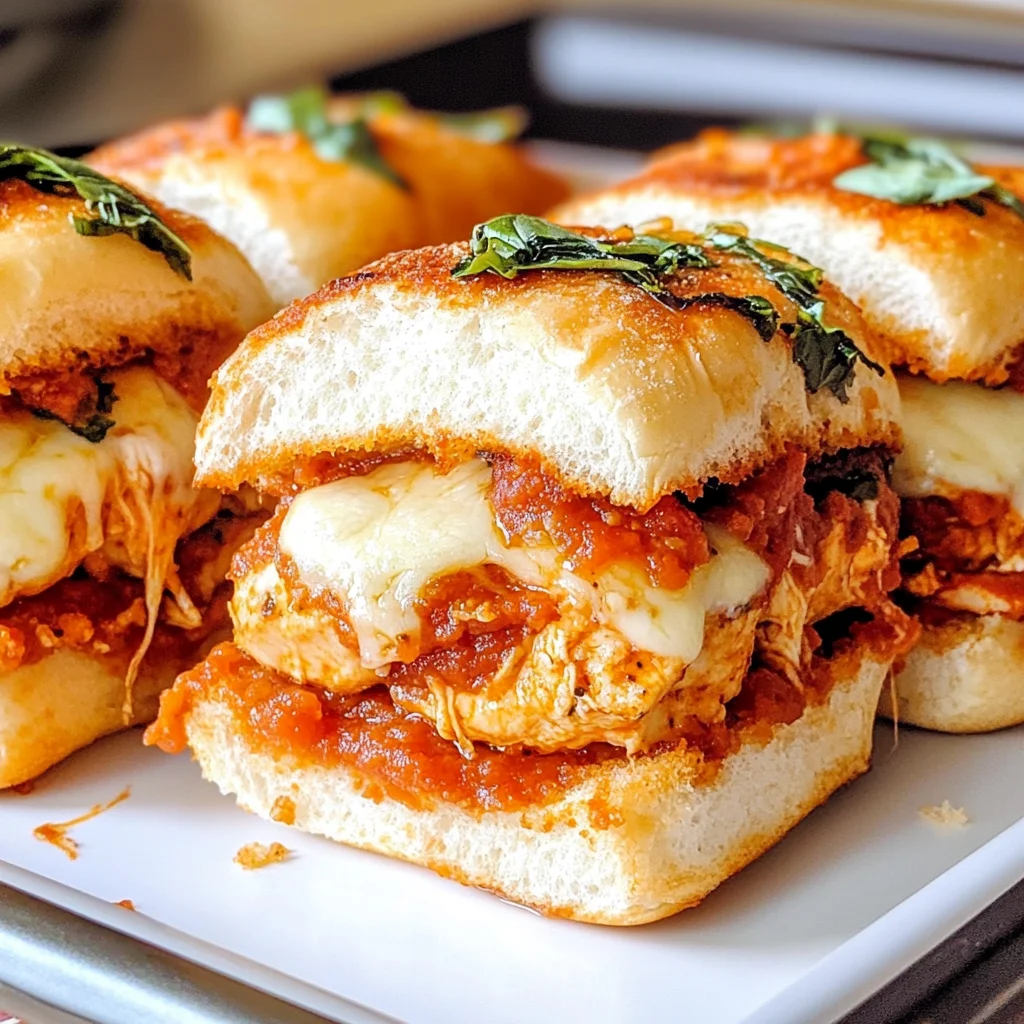
Chicken Parmesan Sliders
There’s something absolutely magical about the way food can weave memories into our lives, isn’t there? Take, for instance, the delightful Chicken Parmesan Sliders—a dish that doesn’t just tantalize your taste buds but also transports you to cozy family gatherings where laughter fills the air and the aroma of warm, cheesy goodness dances around the room. With each bite, you’re not just enjoying a meal; you’re indulging in a beloved tradition that marries Italian-American flavors with a comforting, casual twist. Picture this: tender chicken bathed in rich marinara sauce, nestled between soft and slightly sweet rolls, all topped with layers of gooey cheese. It’s an experience that beckons you to savor every moment and share it with those you hold dear. I promise you; these sliders will become a staple in your culinary repertoire.
Now, let’s take a moment to appreciate why Chicken Parmesan Sliders have won the hearts of so many. This recipe is not only versatile but also incredibly forgiving—perfect for both seasoned chefs and those who may still be finding their footing in the kitchen. Whether it’s game day or a cozy movie night with friends, these sliders are guaranteed to steal the spotlight. The blend of textures—from crispy tops to melty cheese and succulent chicken—creates a symphony of flavors that promises satisfaction with every bite. Trust me when I say that once you’ve shared these at your gathering, you’ll be asked for the recipe time and again!
Chicken Parmesan Sliders: A Cozy Italian-American Delight
Let’s dive into making these scrumptious Chicken Parmesan Sliders together! I can’t wait for you to experience how easily they come together while still delivering that extra special touch we all crave when hosting friends and family.
Ingredients:
Embarking on this culinary journey begins with gathering the right ingredients—each one plays a crucial role in crafting perfect Chicken Parmesan Sliders. Let’s explore what we need:
- 12 Kings Hawaiian rolls. These little treasures are more than just bread; their soft texture and slight sweetness perfectly complement the savory flavors we’re about to build upon. When choosing your rolls, look for freshness—softness is key here! Plus, their size is just right for sliders, making them easy to manage when you’re serving up these delicious bites at your next gathering.
- 1 pound chicken tenders (cooked). Using cooked chicken tenders makes this dish not only simple but also quick! You can roast or pan-fry them ahead of time or even use leftover rotisserie chicken if you’re in a pinch. This ingredient is essential as it adds protein and heartiness while soaking up all those lovely flavors from the marinara and cheeses.
- ½ cup marinara sauce. A rich, flavorful marinara is an absolute must here—it brings depth and moisture to our sliders. You can opt for store-bought or homemade; either way, choose one that’s robustly flavored without too much acidity as it should complement rather than overpower our other ingredients.
- 8 slices provolone cheese. Provolone adds that delightful creaminess and slight tang which balances beautifully with the other components of this dish. When selecting your cheese, try to find fresh slices from the deli counter if possible; they melt better and lend a more authentic flavor profile.
- 8 ounces fresh mozzarella cheese (sliced). Fresh mozzarella is like liquid gold when it comes to melting! Its creamy texture transforms into gooey perfection under heat—the ultimate indulgence! Ensure your mozzarella is high quality; it should feel moist but not soggy, creating that delicious stretch we all adore.
- ¼ cup fresh basil (chopped). Fresh basil brings a burst of aromatic freshness that cuts through richness—a non-negotiable element for elevating our sliders! If you can get your hands on fragrant basil leaves from the farmer’s market or grocery store herb section, do so; they’ll make an enormous difference in flavor.
- ¼ cup (57g) butter (melted). This ingredient acts as a magical glaze over our rolls before baking! It adds richness and helps achieve that beautiful golden crust on top—it’s truly paramount for ensuring our sliders are as irresistible as they look!
- 1 teaspoon sea salt. Salt enhances every flavor in this dish—it’s absolutely critical! It will bring out the natural tastes of our ingredients while ensuring they harmonize well together. Don’t skip this step!
- 3 teaspoons garlic (minced). Garlic infuses warmth and depth into our sliders; it’s truly extraordinary how such a small amount can elevate everything! Use fresh garlic if possible—its vibrant flavor will shine through far better than powdered options.
- 1 tablespoon fresh parsley (finely chopped). Parsley isn’t just for garnish—it provides color and a hint of freshness that complements our dish beautifully without overwhelming it.
- 1 tablespoon grated parmesan cheese. This final sprinkle of parmesan adds an additional layer of umami flavor while also contributing to that desired crispy texture on top post-baking!
Equipment You’ll Need:
Cooking becomes so much smoother when you’re equipped with the right tools! While these items may not be ingredients, they are essential partners in creating something wonderful:
- Baking dish – A good quality baking dish ensures even cooking and browning throughout your sliders. Ideally, choose one that’s large enough to accommodate all your rolls without crowding them together—that way they can bake evenly!
- Aluminum foil – Covering your sliders with foil during baking helps retain moisture while allowing cheese to melt perfectly without burning on top too early—a technique that’s absolutely paramount for achieving slider perfection!
- Sharp knife – A sharp knife will make it easy to slice through those soft rolls cleanly without squishing them—this is crucial for preserving structure when serving.
With these ingredients prepped and tools ready at hand, we’re set to dive into crafting these delightful Chicken Parmesan Sliders together!
Step 1: Preheat Your Oven With Love
First things first: let’s preheat your oven to 350°F (175°C). This step might seem trivial but trust me; starting with a properly heated oven ensures even cooking throughout all layers of your sliders—no one likes cold cheese or undercooked chicken! As the oven warms up, take a moment to breathe in deeply—you’re about to create something incredible.
Step 2: Prepare Your Rolls
Now grab those Kings Hawaiian rolls! Carefully split them in half horizontally without tearing them apart completely—they need to hold all that delicious filling later on! Place just the bottom halves snugly in your prepared baking dish like little beds waiting for their toppings. The softness of these rolls provides such an inviting base; I always find myself smiling at how effortlessly they cradle everything else we’re about to add!
Step 3: Layering Flavors
Here comes my favorite part—layering everything together! Start by placing six glorious slices of provolone cheese over those bottom buns; this forms a divine cheesy barrier between bread and chicken later on, preventing any sogginess while adding depth right from the start—even as it melts into creamy bliss during baking! Next up goes our cooked chicken tenders; arrange them generously atop that luscious provolone layer followed by dollops of rich marinara sauce drizzled over each piece so every bite bursts forth with flavor—the combination promises comfort food greatness.
Step 4: Add More Cheese & Freshness
Once you’ve got those tenders lovingly covered in marinara sauce, it’s time for another layer—this time using eight ounces of sliced fresh mozzarella cheese atop everything else we’ve built thus far! As this melts beautifully during baking alongside its companions below, expect ridiculously gooey perfection that’ll make everyone eager for seconds before they’ve even taken their first bite! To finish off this magnificent stack? Sprinkle chopped fresh basil generously over top; its fragrance elevates every element involved here while adding brightness—I dare say it’s like sunshine captured within each slider!
With these steps completed expertly under your belt already—we’re well on our way toward slider success! Keep reading as we continue layering flavors until they’re ready for their final transformation into scrumptiously golden bites full of cheesy goodness…
Chicken Parmesan Sliders: A Symphony of Comfort and Flavor
Oh, my dear friend, if you’re anything like me, there’s something utterly captivating about the way food can bring people together. These Chicken Parmesan Sliders are not just an appetizer; they are a warm embrace on a plate, steeped in the rich Italian-American tradition that fills the air with mouthwatering aromas and creates memories that linger long after the last bite. As we dive deeper into this recipe, I promise you’ll find yourself enchanted by the simplicity and depth of flavors that come together so effortlessly. Ready to make some culinary magic? Let’s continue!
Step 5: Crafting the Irresistible Butter Topping
Now, let’s talk about that heavenly butter topping. In a small bowl, you’ll want to combine your melted butter with minced garlic, chopped fresh parsley, grated Parmesan cheese, and sea salt. This mixture isn’t just a simple enhancement; it’s a transformative element that elevates your sliders to extraordinary heights. The garlic will infuse the buttery goodness with its aromatic essence while the parsley adds a splash of freshness. Trust me on this: this step is absolutely crucial because it creates a golden crust on top of your sliders that is both visually inviting and deliciously satisfying.
As you whisk these ingredients together, take a moment to enjoy how they meld into a lovely liquid gold. You want to ensure everything is evenly combined because every slider deserves to bask in this luscious topping! When you brush this mixture over the rolls before baking, you’re not just adding flavor; you’re creating a beautiful contrast between the soft interior of the bread and that crispy exterior. It’s like a little hug for each slider! Don’t rush this step—make sure every inch of those tops gets coated with this buttery goodness; it’s non-negotiable for achieving slider perfection.
Step 6: The Art of Assembly
Now comes one of my favorite parts—the assembly! Carefully place the top half of your Kings Hawaiian rolls aside for just a moment; we need to build these sliders with love and attention. Start by laying down six slices of provolone cheese directly onto the bottom half nestled in your prepared baking dish. This cheese is going to melt beautifully, creating a gooey layer that binds all those glorious flavors together. The provolone has such a mild creaminess that complements our chicken and marinara perfectly.
Next up, it’s time for those cooked chicken tenders! Lay them generously on top of the provolone; don’t skimp here! Each slider should be filled with enough chicken to make every bite truly satisfying. Then drizzle your rich marinara sauce over the top—this is where things get exciting! The marinara not only brings moisture but also infuses each slider with that unmistakable Italian flavor profile we crave. Follow up with slices of fresh mozzarella and a sprinkle of chopped basil for an aromatic lift—this fragrant herb works wonders in brightening up our dish! Once everything is stacked high with love, gently place the top half back on those amazing rolls, sealing in all those tempting ingredients.
Step 7: Covering Up for Cozy Cooking
With our sliders assembled and looking oh-so-inviting, it’s time to cover them up for their cozy baking journey. Grab some aluminum foil and cover your baking dish snugly, creating a little sauna effect inside as they bake at 350°F (175°C). This steaming process is vital because it lets all those flavors meld together beautifully while keeping everything moist—nobody wants dry sliders! During these first twenty minutes, as they bask under their foil blanket, you’ll notice how the cheeses begin to melt into one another—ahh, can you already smell it?
It’s crucial during this phase to resist the urge to peek too soon! Keeping them covered allows steam to work its magic without letting precious heat escape. I promise you’ll thank yourself later when you pull out warm sliders bubbling with cheesy goodness instead of dry bread! So set your timer for twenty minutes and use this time wisely—perhaps prep an accompanying salad or gather around with friends who are eager for what’s coming next!
Step 8: The Golden Finish
After twenty minutes have passed in cheesy bliss, it’s time for our sliders’ grand unveiling! Carefully remove the foil—be cautious as hot steam will escape—and prepare yourself for an utterly intoxicating aroma wafting through your kitchen. At this point, you should see that beautiful melted cheese glistening under warm light—a true testament to what we’ve created together.
Now comes another essential step: we’re going back into the oven uncovered for an additional five minutes or until those tops turn a delightful golden brown. You’ll want to keep an eye on them during this stage because we’re looking for that perfect crispness without burning them—every oven varies slightly after all! What you’re aiming for is that stunning contrast between crunchy tops and oozing cheesy interiors which makes every bite unforgettable.
As they finish baking away happily in your oven, take a moment to experience that sweet anticipation—think about how satisfying it will be when you finally slice into these beauties!
Final Touches: Serving Up Love
Step 9: Slicing and Serving with Joy
Once you’ve pulled those glorious Chicken Parmesan Sliders from the oven—and if I may say so myself—they should be simply irresistible at this point! Let them sit for just two minutes before slicing; this brief resting period helps everything settle nicely so they hold their shape better when you serve them up. Use a sharp knife to cut through these divine layers carefully—you want distinct portions without losing any of that gooey goodness!
Now comes one of my favorite parts: serving! Arrange these warm sliders on a platter and watch as everyone gathers around eagerly; it’s always heartwarming to see friends come together over good food. If you’d like (and I wholeheartedly encourage this), feel free to offer extra marinara sauce on the side for dipping or even more fresh basil leaves sprinkled atop right before serving—it adds such vibrancy!
These Chicken Parmesan Sliders are not just food—they’re an experience filled with laughter and warmth shared among loved ones. So go ahead and dig in; each bite promises comfort wrapped in nostalgia and flavor that’s profoundly satisfying. Remember my friend—food tastes better when shared, so enjoy every moment as much as every morsel!
Storage and Enjoyment Tips for Your Chicken Parmesan Sliders
Now that you’ve pulled your Chicken Parmesan Sliders from the oven, with their golden tops beckoning you like a warm hug, it’s time to dig in! But let’s not forget about those glorious leftovers that deserve just as much love. The best part about these sliders is that they’re not only delicious fresh out of the oven but also keep exceptionally well, ensuring that every bite remains delightful. With a little care in storage, you can savor that Italian-American flavor long after your first serving.
Storing Leftover Chicken Parmesan Sliders
To keep your Chicken Parmesan Sliders in tip-top shape, I recommend placing them in an airtight container or wrapping them tightly in aluminum foil. This will help seal in moisture and prevent any unwanted drying out—a crucial step because no one wants their soft, pillowy rolls to turn into sad little bricks! When stored properly, they can last in the refrigerator for up to three days. If you’re anything like me, you might even find yourself sneaking bites straight from the fridge! To maintain their delightful texture, consider placing a slice of bread inside the container; this old kitchen trick helps absorb moisture and keeps the rolls pleasantly soft. When you’re ready to enjoy them again, simply pop them in the oven at 350°F for about 10 minutes until they’re heated through and that ooey-gooey cheese is bubbling once more.
Freezing Chicken Parmesan Sliders for Later
If you’re looking to extend your enjoyment even further—or if you simply want to prepare ahead—freezing these sliders is an excellent option! To freeze them properly, allow any leftover sliders to cool completely before wrapping each one individually in plastic wrap and then placing them in a freezer-safe bag. This double-wrapping action is absolutely paramount for keeping freezer burn at bay! You can store them like this for up to three months without losing any of their charm. When the craving strikes, there’s no need to thaw; just place the frozen sliders directly onto a baking sheet and heat at 350°F for about 15-20 minutes until they’re warmed through and wonderfully melty. Trust me when I say this convenience factor makes meal planning a breeze—imagine having these scrumptious bites ready at a moment’s notice!
With these storage tips tucked away, you’re all set to enjoy your Chicken Parmesan Sliders now and later—what could be better?
Chicken Parmesan Sliders
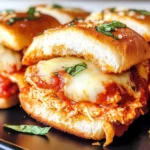
Chicken Parmesan Sliders are a crowd-pleasing delight that brings together tender chicken, rich marinara sauce, and gooey cheese, all nestled in soft, slightly sweet rolls. Perfect for game day, family gatherings, or a cozy movie night, these sliders offer a comforting taste of Italian-American cuisine that will have everyone asking for the recipe. With layers of melted provolone and fresh mozzarella topped with aromatic basil, each bite is an explosion of flavor wrapped in nostalgia. Easy to prepare and even easier to enjoy, these sliders are destined to become a staple in your culinary repertoire.
- Prep Time: 15 minutes
- Cook Time: 25 minutes
- Total Time: 40 minutes
- Yield: Serves approximately 6 (2 sliders each) 1x
- Category: Dinner
- Method: Baking
- Cuisine: Italian-American
Ingredients
- 12 Kings Hawaiian rolls
- 1 pound cooked chicken tenders
- ½ cup marinara sauce
- 8 slices provolone cheese
- 8 ounces sliced fresh mozzarella cheese
- ¼ cup chopped fresh basil
- ¼ cup melted butter
- 1 teaspoon sea salt
- 3 teaspoons minced garlic
- 1 tablespoon finely chopped fresh parsley
- 1 tablespoon grated parmesan cheese
Instructions
- Preheat your oven to 350°F (175°C).
- Split the Kings Hawaiian rolls in half without tearing them apart.
- Place the bottom halves in a baking dish. Layer with six slices of provolone cheese.
- Add the cooked chicken tenders on top and drizzle with marinara sauce.
- Layer eight ounces of sliced fresh mozzarella on top, followed by chopped basil.
- Cover with the top halves of the rolls.
- In a bowl, mix melted butter with minced garlic, parsley, grated parmesan, and sea salt; brush over the roll tops.
- Cover the baking dish with aluminum foil and bake for 20 minutes.
- Remove foil and bake for an additional 5 minutes until golden brown.
Nutrition
- Serving Size: 1 slider (90g)
- Calories: 275
- Sugar: 3g
- Sodium: 540mg
- Fat: 15g
- Saturated Fat: 8g
- Unsaturated Fat: 6g
- Trans Fat: 0g
- Carbohydrates: 24g
- Fiber: 1g
- Protein: 15g
- Cholesterol: 55mg