Chicken Wellington
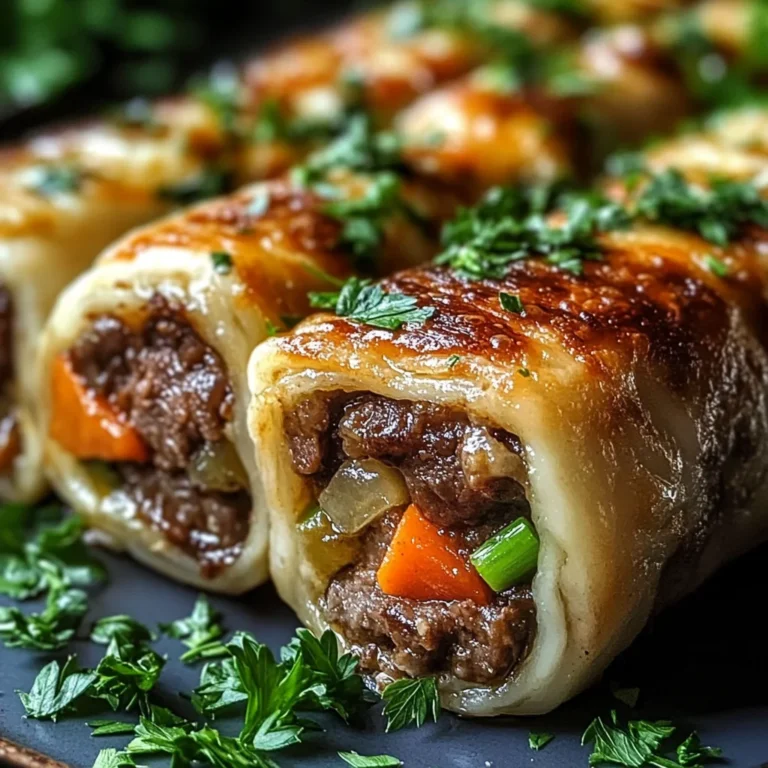
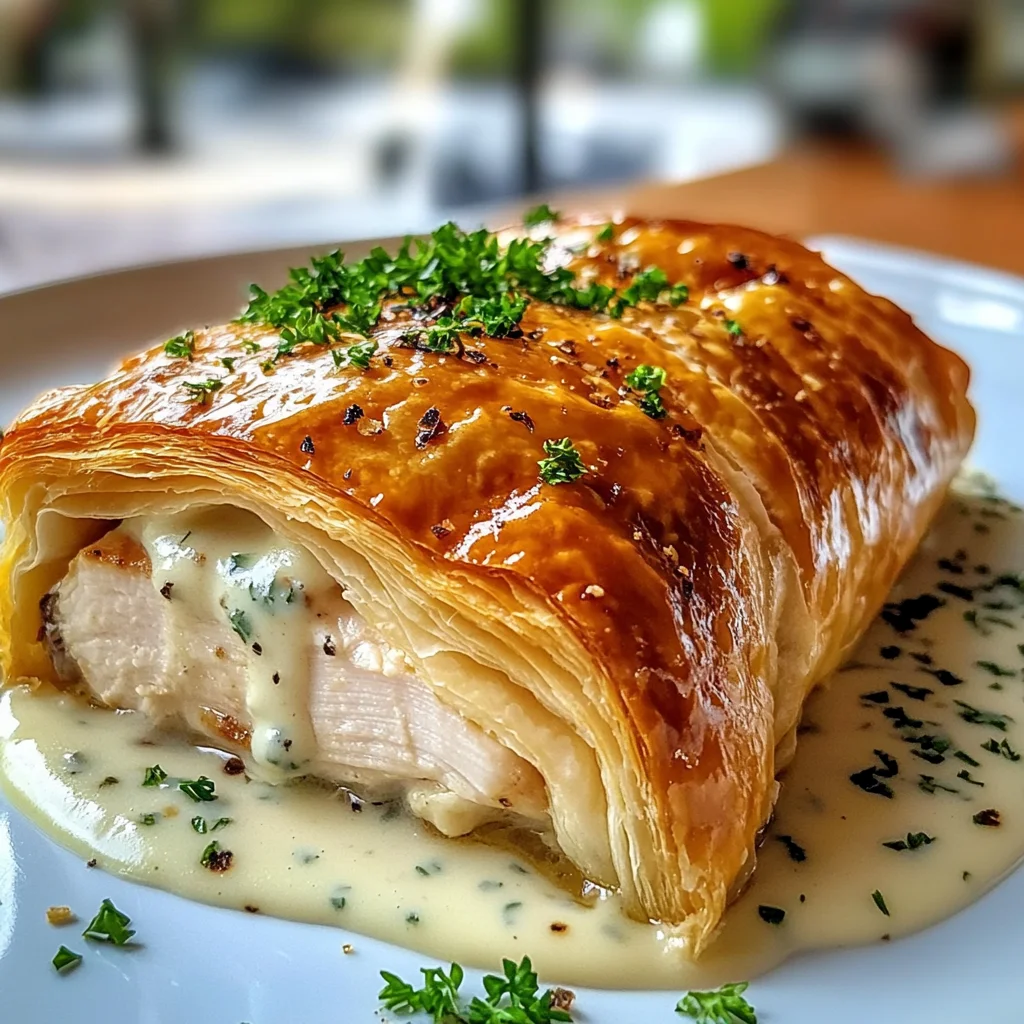
There’s something profoundly comforting about the act of cooking, don’t you think? It’s like weaving together a tapestry of flavors, aromas, and textures that connect us to our loved ones and memories. When I think of Chicken Wellington, I’m reminded not just of a dish, but a moment. Picture this: the golden, flaky puff pastry enveloping succulent chicken breast and a luscious béchamel sauce. As it bakes in the oven, the aroma wafts through the air like an invitation to gather around the table. This isn’t just food; it’s an experience that transforms an ordinary evening into something truly special.
I’ve always been captivated by how Chicken Wellington marries simplicity with elegance. It’s perfect for casual weeknight dinners or festive gatherings—its gourmet appearance is sure to impress! Each bite is a symphony of flavors and textures: the crunch of the pastry gives way to juicy chicken, while the creamy sauce adds depth and richness that feels like a warm hug on a plate. Trust me when I say this recipe will become one of your cherished go-tos—my friends can’t get enough of it!
Ingredients:
As we embark on this culinary journey together, let’s gather our ingredients. Each component plays a vital role in crafting our Chicken Wellington, and understanding their significance will elevate your cooking game!
- 2 boneless skinless chicken breasts. This is where our dish begins—the star of the show! The chicken should be fresh and plump; look for breasts that are firm to the touch without any discoloration. Searing them until they’re golden not only enhances their flavor through caramelization but also seals in juices, keeping them tender during baking—a non-negotiable step for achieving juicy perfection.
- 1 sheet puff pastry, thawed. Ah, puff pastry! This magical dough is what turns our dish from simple to sensational. When baked, it puffs up into layers that create an airy yet crispy shell around our filling. Make sure it’s fully thawed before use; otherwise, it won’t roll out properly. If you’re feeling adventurous, you can even make your own pastry from scratch—though I promise you that store-bought saves time without sacrificing quality!
- 1 tablespoon olive oil. A staple in many kitchens, olive oil adds flavor and helps achieve that lovely sear on our chicken. Choose extra virgin olive oil for its rich taste and health benefits—it enriches our dish with healthy fats while enhancing every bite with its fruity notes.
- 2 tablespoons butter. Butter is pure liquid gold in this recipe! It not only adds richness but also helps create a beautifully sautéed garlic mixture that forms the base of our creamy sauce. Using unsalted butter allows you to control the saltiness of your dish—always a good practice in cooking!
- 2 cloves garlic, minced. Garlic brings warmth and depth to any meal; it’s aromatic magic! When sautéed just right (not too long or it’ll burn), it infuses everything around it with its intoxicating fragrance—a must-have for elevating flavors.
- 1 cup mushrooms, finely chopped (optional). If you’re adding mushrooms (and I highly recommend them!), they lend an earthy flavor and wonderful texture to your filling that complements the chicken beautifully. Look for fresh mushrooms—cremini or button varieties work well—and make sure to chop them finely so they meld seamlessly into the béchamel sauce.
- 2 tablespoons all-purpose flour. This ingredient is crucial for thickening our creamy sauce into something luxurious! Once cooked briefly with butter (a technique called roux), it creates a rich base that binds everything together without being gloopy—a common pitfall if you rush through this step.
- 1 cup whole milk or cream. The choice between milk or cream depends on how indulgent you want to be! Cream will give you a velvety finish and richer flavor profile while whole milk works perfectly as well—just keep in mind that cream will elevate this dish into true comfort food territory.
- 1 teaspoon Dijon mustard. This tangy element is what brings balance to our béchamel sauce! It cuts through richness with acidity while enhancing flavors; trust me when I say it’s absolutely paramount for achieving depth in every bite.
- 1 egg beaten (for egg wash). The egg wash does wonders by creating that beautiful golden crust on top of your pastry; it’s like giving your Chicken Wellington its own shiny coat! Make sure it’s well-beaten so you can brush it evenly over the pastry before baking.
- Salt and black pepper to taste. Seasoning is vital—it brings life to all our ingredients! Be generous but mindful; remember we can adjust later as needed while tasting along the way.
- 1 tablespoon chopped fresh parsley (for garnish). While this might seem like just a finishing touch, fresh herbs add brightness and color that makes any dish pop visually and flavor-wise! Plus, who doesn’t love a little green on their plate?
Now that we’ve gathered everything we need let’s make some magic happen!
Equipment You’ll Need:
Having the right tools makes all the difference when bringing your culinary creations to life! These essential partners will ensure your Chicken Wellington comes together smoothly and beautifully.
- Skillet – A sturdy skillet allows for even heat distribution which is crucial when searing chicken or sautéing garlic and mushrooms; look for one that’s non-stick or has good seasoning if it’s cast iron.
- Rolling pin – For rolling out your puff pastry evenly, ensuring it bakes uniformly without tough spots—a vital tool in achieving that perfect flaky crust!
- Baking sheet lined with parchment paper – This prevents sticking while making cleanup easy peasy! Plus, parchment enhances browning by allowing hot air circulation around each piece of pastry.
- Meat thermometer – Trust me on this—investing in a reliable meat thermometer takes away any guesswork when checking if your chicken has reached safe internal temperature (165°F/74°C). No more cutting into meat only to find it undercooked!
Now we’re ready for what I believe is truly one of the most exciting parts: preparing our Chicken Wellington!
Step 1: Seasoning is Key
First off, let’s talk seasoning because this step lays down such an important foundation for flavor! Generously sprinkle salt and black pepper on both sides of each chicken breast—you want every morsel seasoned perfectly from start to finish because blandness will be unforgivable here! Let those breasts sit while you heat up your skillet over medium-high heat until hot enough that water droplets sizzle upon contact—but not so hot you risk burning anything either!
Step 2: Searing the Chicken
Once your skillet is ready, carefully drizzle olive oil into it—you’ll hear a delightful sizzle as soon as it hits! Place each seasoned chicken breast gently into the pan without overcrowding; leave space for them to breathe so they can develop that golden brown crust we’re aiming for at this stage (which means no moving them around too much either!). Allow about 2–3 minutes per side until beautifully browned—you’ll know they’re ready when they release easily from the pan without sticking!
Step 3: Cooling Down
After searing both sides until golden brown perfection emerges before your eyes—it’s time to remove those beauties from heat! Set them aside on a clean plate or cutting board allowing them some time to cool slightly before proceeding further—this resting period lets juices redistribute throughout giving us even more tenderness when baked later on!
Step 4: Creating Flavorful Depth
In that same skillet where all those glorious flavors remain trapped within? We’re going full steam ahead by melting butter next—and trust me when I say letting any leftover drippings mingle here only intensifies taste beyond belief! Add minced garlic right after melting butter until fragrant but avoid burning—it should take roughly 30 seconds max before introducing finely chopped mushrooms if you’re including them too at this point (they’ll soak up extra goodness!). Cook these together stirring often allowing moisture from mushrooms evaporate hence concentrating flavors before adding flour next…
The excitement builds as we continue working through these steps toward culinary delight together—stay tuned as we dive deeper still into crafting each layer of deliciousness within our Chicken Wellington masterpiece!
Continue Crafting Your Chicken Wellington
Step 5: Whipping Up a Creamy Béchamel
Now, let’s dive into the heart of our dish—the creamy béchamel sauce. This step is where your Chicken Wellington begins to transform from simple ingredients into something truly extraordinary. In the same skillet where we seared our chicken, melt 2 tablespoons of butter over medium heat, allowing it to become a rich, velvety base for your sauce. As the butter melts and starts to bubble gently, add in your minced garlic. The moment that garlic hits the pan, it releases an utterly intoxicating aroma that fills your kitchen with warmth and promise. Sauté it for about 1-2 minutes until it’s fragrant but not browned—browning can add bitterness that we want to avoid in this delicate sauce.
Next, sprinkle in 2 tablespoons of all-purpose flour while continuously whisking. This technique is called making a roux, and it’s absolutely paramount because it serves as the thickening agent for our béchamel. Cook this mixture for about a minute; you’ll notice it becomes slightly golden and nutty in fragrance. This step is crucial as it helps eliminate that raw flour taste and creates a beautiful foundation for our creamy concoction. Slowly pour in 1 cup of whole milk or cream while whisking vigorously to prevent lumps from forming. Keep stirring until the mixture thickens—this should take about 3-5 minutes. You want to achieve a smooth, velvety texture that clings beautifully to the back of a spoon; this ensures every bite of chicken will be cloaked in creamy goodness.
Step 6: Adding Flavor and Final Touches
Once your béchamel has thickened to that glorious consistency, it’s time to elevate its flavor profile further. Stir in 1 teaspoon of Dijon mustard—this not only adds a delightful tang but also infuses your sauce with depth and sophistication that will make every mouthful pop with flavor. Season generously with salt and freshly cracked black pepper; trust me when I say this is non-negotiable! A well-seasoned sauce is what truly takes your Chicken Wellington from good to spectacular.
Let this mixture simmer on low heat for another minute or two, allowing all those flavors to meld together harmoniously. The aroma wafting through your kitchen will be utterly inviting—can you imagine how wonderful this will taste enveloping tender chicken? Once satisfied with the seasoning, turn off the heat and set the béchamel aside for just a moment while you prep the puff pastry.
Step 7: Preparing the Puff Pastry Canvas
Now comes one of my favorite parts—the puff pastry! This flaky wonder is what makes Chicken Wellington feel so indulgent and special. On a lightly floured surface, roll out your thawed sheet of puff pastry gently, taking care not to stretch it too thin; we want those lovely layers intact! Ideally, you’re aiming for about an inch larger than your chicken breasts on all sides—this extra space allows us to wrap everything up snugly without any potential leaks during baking.
Once you have rolled it out perfectly, cut it into two rectangles that are large enough to enclose each chicken breast completely. If you’re feeling particularly creative, consider cutting decorative shapes or slits into any leftover pastry scraps—you can place these on top for added flair! Just remember: presentation matters as much as flavor when you’re crafting something elegant like Chicken Wellington.
Step 8: Assembling Your Culinary Masterpiece
Now comes the moment you’ve been waiting for—assembly time! Place one rectangle of puff pastry on your work surface and scoop some of that luscious béchamel sauce right into the center. Use just enough sauce to create a cozy bed for your chicken breast without overwhelming the pastry; think of it as laying down a soft pillow for dinner! Nestle one seared chicken breast atop the sauce and then drizzle a little more béchamel over the top—it’s like giving your chicken a luxurious bath before tucking it into bed!
Fold the edges of the puff pastry carefully over each piece of chicken, ensuring they overlap slightly at the seams but leaving no gaps; this is crucial because we want everything sealed tightly so those flavorful juices don’t escape during baking! Use your fingers or a fork to crimp down those edges securely—it’s surprisingly therapeutic! Once wrapped snugly like a precious gift (and trust me, that’s exactly what this will be!), place each parcel seam-side down onto a lined baking sheet.
Next Major Phase: Baking Your Perfect Chicken Wellington
Now that we’ve assembled our Chicken Wellington parcels beautifully, let’s get ready for them to shine in the oven!
Step 9: The Golden Transformation
Preheat your oven to a sizzling 400°F (200°C), which is essential because we’re creating an environment perfect for puffing up that pastry into golden perfection! As you wait for it to reach temperature (and I promise you won’t have long!), brush each parcel generously with beaten egg—this egg wash gives them their alluring golden hue once baked and creates an eye-catching finish that begs everyone at the table to dig in immediately!
Before sliding them into the oven, don’t forget to cut small slits on top of each wrapped masterpiece; this tiny yet important step allows steam to escape during cooking while also providing an artistic touch. It’s like giving them little vents so they can breathe while they bake! Place them delicately into your preheated oven and let them work their magic for about 25-30 minutes. Keep an eye on them as they bake; you’ll know they’re done when they are gloriously golden brown on top and have reached an internal temperature of 165°F (75°C).
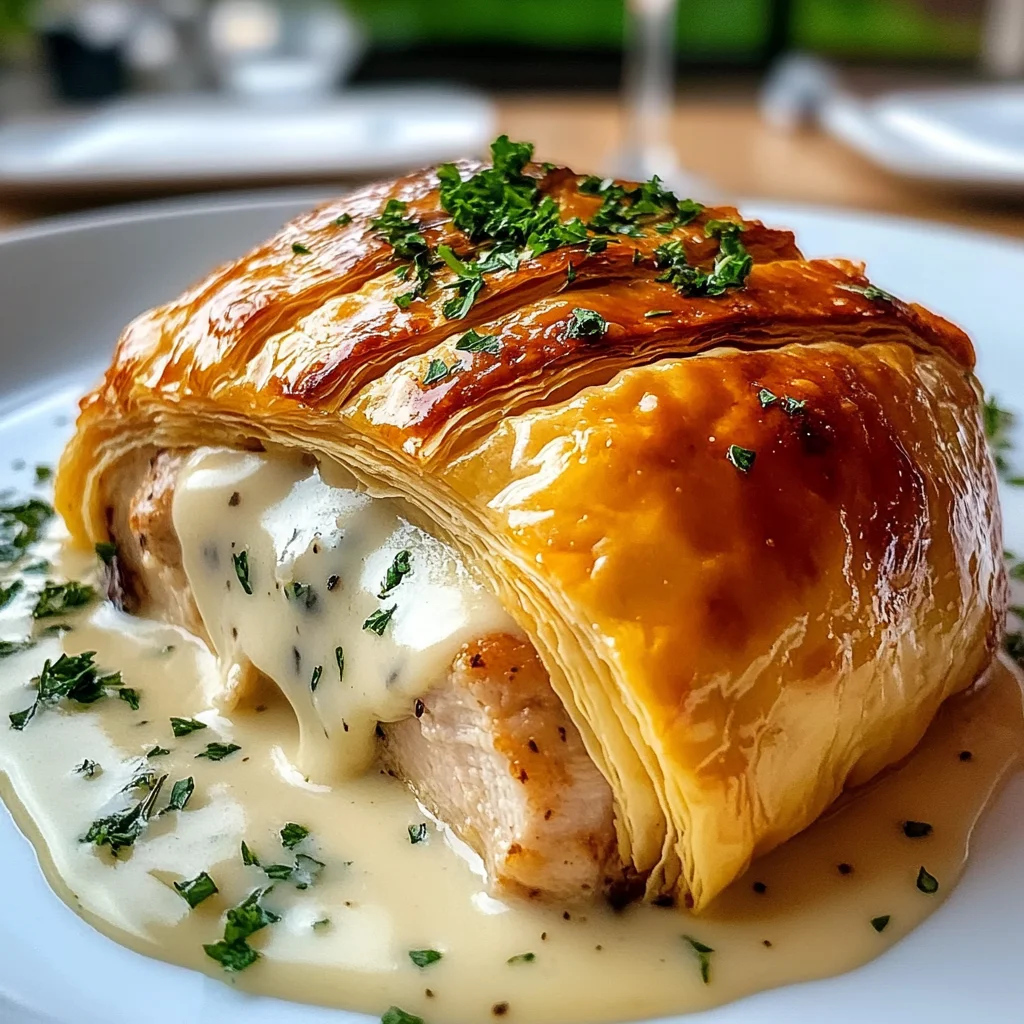
Can you smell that? The scent wafting through your kitchen would make anyone’s heart skip a beat—a symphony of savory aromas filling every corner! Once they emerge from the oven looking like edible jewels glistening in their pastry shells, allow them to rest briefly before serving; this resting period lets those juices redistribute within each chicken breast making each bite profoundly satisfying.
And there you have it—your very own Chicken Wellington! Garnish with fresh parsley if desired before slicing into these marvelous parcels filled with creamy goodness and tender chicken bliss. Trust me when I say this dish will leave everyone at your table marveling at both its beauty and flavor—it’s comfort food elevated with finesse! Enjoy every moment as you share this culinary treasure with friends and family!
Storage and Enjoyment Tips for Your Chicken Wellington
Ah, the moment has arrived! Your Chicken Wellington is golden-brown, perfectly flaky, and bursting with that creamy béchamel sauce. But what happens when you have leftovers? Don’t worry; I’ve got you covered with some fantastic storage tips to ensure every bite remains as delicious as the first. After all, this dish deserves to be enjoyed well beyond the dinner table!
Storing Leftover Chicken Wellington
To store your heavenly Chicken Wellington, simply place any leftovers in an airtight container. That’s right—keeping it sealed is crucial for maintaining its delightful texture and flavor! You can pop it in the fridge where it will stay fresh for about 3 days. Now, here’s a little pro tip: if you want to retain that glorious flakiness, consider adding a slice of bread into the container along with your Wellington. This simple trick helps absorb excess moisture, keeping your pastry from getting soggy. When you’re ready to enjoy it again, you might notice that while the pastry won’t be quite as crisp as when fresh out of the oven, the flavors meld beautifully during storage, offering a comforting bite that’s still utterly satisfying. Reheating is a breeze; just pop it back in the oven at 350°F (175°C) for about 15-20 minutes until warmed through. Trust me; it’s worth the wait!
Freezing Chicken Wellington for Later
If you’re looking to prepare ahead or save some for a rainy day (and who doesn’t love a good freezer meal?), freezing your Chicken Wellington is absolutely fantastic! To do this properly, make sure your Wellingtons are completely cooled before wrapping them tightly in plastic wrap and then placing them in a freezer-safe bag or container. This method not only prevents freezer burn but also locks in that mouthwatering flavor! They’ll keep well frozen for about 2-3 months—perfect for those nights when cooking feels like too much effort. When you’re ready to indulge again, simply bake from frozen at 400°F (200°C) for about 35-40 minutes or until heated through and golden. The convenience of having this elegant dish ready at your fingertips will remind you why meal prepping can feel so rewarding!
Chicken Wellington

Chicken Wellington is a delightful culinary creation that combines tender chicken breasts with a rich, creamy béchamel sauce, all wrapped in flaky puff pastry. This dish transforms an ordinary meal into a gourmet experience, making it perfect for both weeknight dinners and festive gatherings. The golden crust gives way to juicy chicken enveloped in luscious flavors, creating a comforting yet elegant dish that will impress your family and friends. With simple ingredients and straightforward preparation steps, you’ll find that making Chicken Wellington at home is not just achievable but incredibly rewarding.
- Prep Time: 20 minutes
- Cook Time: 30 minutes
- Total Time: 50 minutes
- Yield: Serves 4
- Category: Main
- Method: Baking
- Cuisine: American
Ingredients
- 2 boneless skinless chicken breasts
- 1 sheet puff pastry, thawed
- 1 tablespoon olive oil
- 2 tablespoons butter
- 2 cloves garlic, minced
- 1 cup mushrooms, finely chopped (optional)
- 2 tablespoons all-purpose flour
- 1 cup whole milk or cream
- 1 teaspoon Dijon mustard
- 1 egg (beaten for egg wash)
- Salt and black pepper to taste
- Fresh parsley for garnish
Instructions
- Preheat the oven to 400°F (200°C).
- Season chicken breasts with salt and black pepper. Sear in a skillet with olive oil over medium-high heat until golden brown on both sides (about 2–3 minutes each). Remove and let cool slightly.
- In the same skillet, melt butter and sauté minced garlic until fragrant. Add finely chopped mushrooms if using, cooking until moisture evaporates.
- Sprinkle in flour to create a roux, cooking for about a minute before gradually whisking in milk or cream until thickened (3–5 minutes). Stir in Dijon mustard and season with salt and pepper.
- Roll out puff pastry on a floured surface into two rectangles large enough to wrap around each chicken breast.
- Place some béchamel sauce in the center of each pastry rectangle, add the seared chicken, then top with more sauce. Fold pastry over to seal securely.
- Brush the tops with beaten egg and cut small slits for steam vents.
- Bake for 25–30 minutes until golden brown and cooked through.
Nutrition
- Serving Size: 1 Chicken Wellington (200g)
- Calories: 410
- Sugar: 3g
- Sodium: 680mg
- Fat: 25g
- Saturated Fat: 10g
- Unsaturated Fat: 13g
- Trans Fat: 0g
- Carbohydrates: 30g
- Fiber: 2g
- Protein: 18g
- Cholesterol: 70mg