high protein air fryer bagels (quick recipe)
There’s something utterly enchanting about the way certain recipes can transport us back to cherished moments, isn’t there? As I stand in my kitchen, the aroma of freshly baked bagels wafting through the air, I can’t help but smile. These high protein air fryer bagels (quick recipe) are not just a meal; they’re a celebration of texture and taste, an experience that marries convenience with that homemade warmth we all crave. Imagine biting into a bagel that’s crispy on the outside and soft within—each bite bursting with flavor from the subtle hint of garlic. This delightful creation is perfect for busy mornings or as a satisfying snack any time of day. Trust me when I say, once you make these, you’ll find yourself reaching for them time and again.
This recipe came to life from my desire to create something nourishing yet indulgent—a kind of culinary magic that allows us to enjoy our favorite comfort foods without compromising on health. The beauty of these high protein air fryer bagels is their simplicity; they come together in just about 25 minutes, making them an ideal option for those hectic days when time feels like a luxury we can scarcely afford. Whether you’re looking to impress friends at brunch or simply want a quick breakfast before heading out the door, this recipe has got you covered. It’s not just about eating; it’s about creating memories and savoring each moment spent in the kitchen, surrounded by flavors that truly resonate with the heart.
high protein air fryer bagels (quick recipe): A Deliciously Simple Delight
Let’s dive into this delicious endeavor together! These high protein air fryer bagels (quick recipe) will not only satisfy your cravings but also provide a nutritious boost to your day. Picture yourself pulling these warm beauties from your air fryer; they’re perfect for slathering with cream cheese or enjoying plain. With just a handful of ingredients and minimal effort, you’ll soon be basking in the glory of having made your very own bagels at home—no boiling water or long waiting times required!
Ingredients:
As we embark on this culinary journey together, let’s take a moment to appreciate each ingredient that plays a vital role in crafting these delightful bagels. The right ingredients can elevate even the simplest recipes into something extraordinary.
- 1 cup (240g) Greek yogurt: This creamy goodness is absolutely paramount for adding moisture and richness to our dough while also boosting its protein content—perfect for those seeking healthier options! Greek yogurt contributes tenderness while providing that lovely tanginess that balances perfectly with the garlic powder. When choosing yogurt, opt for full-fat or low-fat varieties depending on your dietary preference; avoid non-fat as it may lead to a drier texture in your bagels. The incorporation of yogurt not only enhances flavor but also serves as a binding agent, helping everything come together beautifully.
- 1 cup (120g) self-rising flour: This is where our bagel magic begins! Self-rising flour is crucial as it contains baking powder and salt already mixed in, which gives our dough that wonderful lift without needing additional leavening agents. If you’re unable to find self-rising flour, you can easily create your own by combining all-purpose flour with baking powder and salt—just mix 1 cup of all-purpose flour with 1 ½ teaspoons of baking powder and ¼ teaspoon salt for every cup needed. The result should be light and fluffy—a true joy to bite into!
- 1/2 tsp garlic powder: Ah, garlic powder—the secret weapon in our bagel arsenal! This ingredient adds depth and an irresistible savory note that elevates our bagels from ordinary to extraordinary. When selecting garlic powder, look for brands that offer pure garlic with no added fillers; fresh ingredients always yield better flavor! Plus, this subtle infusion pairs beautifully with whatever toppings you choose later on—think cream cheese or avocado spread.
- 1 egg (optional): While this ingredient is optional, brushing your formed bagels with an egg wash before air frying creates a gorgeous golden-brown crust that’s visually stunning and adds an extra layer of richness. If you prefer a vegan option or want to skip the egg altogether, you can brush them with almond milk instead—it works beautifully too! This small step makes all the difference in presentation—trust me on this one!
Equipment You’ll Need:
Having the right tools makes cooking a breeze and transforms what could feel like a chore into an enjoyable experience filled with creativity! While these items may not be ingredients themselves, they are essential partners in bringing our high protein air fryer bagels (quick recipe) to life.
- Air fryer: This magical appliance does wonders for achieving that wonderfully crispy exterior while keeping things inside tender and fluffy—without all that oil used in traditional frying methods! If you don’t have an air fryer yet, consider investing in one; they save time and energy while delivering consistently delicious results.
- Mixing bowl: A good mixing bowl is fundamental for bringing together all those beautiful ingredients seamlessly. Choose one that’s large enough so you have space to mix without worry—it should feel comfortable in your hands as you combine everything into one harmonious dough.
- Baking mat or parchment paper: Lining your air fryer basket with either ensures easy cleanup while preventing sticking—a non-negotiable step if you want stress-free cooking! Both options allow adequate airflow around your bagels while they cook.
- Rolling pin: Although we won’t be rolling out dough extensively here like traditional bakers do, having a rolling pin handy can help shape your dough into perfect rounds if desired! It’s great for achieving uniform thickness when forming those delightful bagel shapes.
Now that we’ve gathered our ingredients and tools let’s move on to preparing those scrumptious high protein air fryer bagels!
Step 1: Bringing It All Together
Begin by combining your Greek yogurt and self-rising flour in your mixing bowl along with the garlic powder. As you stir gently but thoroughly using either a spatula or wooden spoon—you’ll notice how quickly it transforms into a cohesive dough! This process allows each ingredient’s unique properties—like moisture from yogurt—to meld perfectly with the dry elements while activating any leavening agents present in the self-rising flour. Don’t rush this step; give yourself enough time so everything binds well without overworking the dough which might lead it becoming tough rather than tender.
Step 2: Divide Up Your Dough
Once you’ve achieved that lovely blend—or what I like to call dough bliss—it’s time to divide it into four equal portions. You can use your hands here; just pinch off pieces until they’re roughly similar sizes—or weigh them out if precision is more your style! Shaping them evenly ensures consistent cooking throughout—the last thing we want is some undercooked while others are perfectly golden brown! Each portion will soon become its own glorious little bagel waiting patiently for its transformation.
Step 3: Shaping Your Bagels
Now comes one of my favorite parts—the shaping! Take each piece of dough between both hands and gently roll it into a ball before poking your finger through its center to form that classic ring shape we’re familiar with from traditional bagels. Twirl it gently around until it reaches your desired size; don’t worry if they aren’t perfect circles—the imperfections add charm! Just remember not too stretch too thinly because we want them fluffy inside once cooked through; aim for about an inch thick around each hole instead.
Step 4: The Finishing Touches
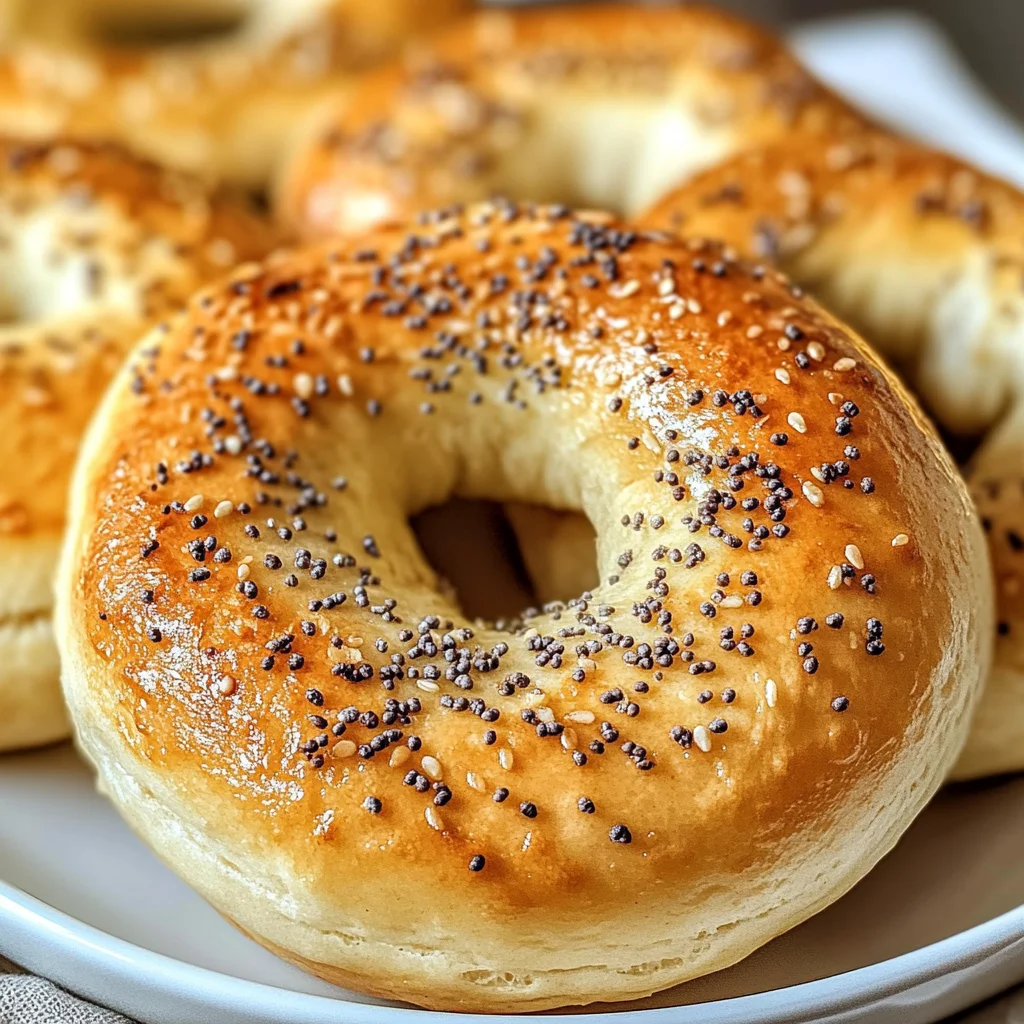
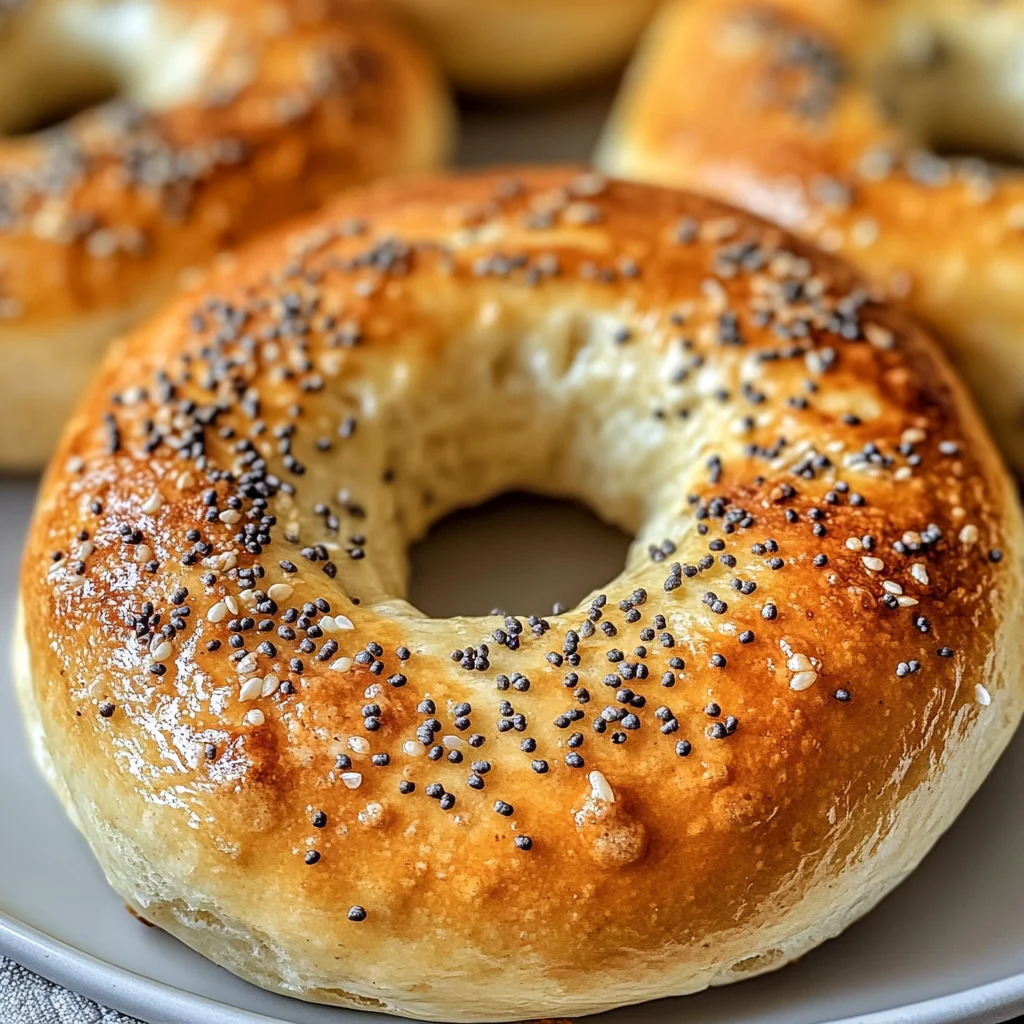
If you’d like extra prettiness—and who wouldn’t?—brush each formed bagel lightly with beaten egg before placing them carefully into preheated air fryer basket lined up side-by-side without overcrowding. This egg wash gives an almost glossy finish upon cooking which makes them even more irresistible visually speaking—but skip this step entirely if desired! Now set temperature at 180°C (around 356°F) then let these beauties work their magic over approximately 12–15 minutes until they’re puffed up beautifully golden brown outside while remaining pillowy soft within!
Keep an eye out during those final moments as aromas fill up space reminding us why we love cooking so much—the anticipation builds excitement around indulging soon after!
Stay tuned as we explore further steps leading towards enjoying these delectable treats straight off warm from our trusty air fryers…
Step 5: The Art of Shaping Your Bagels
Now that we’ve mixed our dough into a delightful, cohesive mixture, it’s time to roll up our sleeves and shape these little beauties into bagels. This step is not only about aesthetics; the way you form your bagels influences their texture and overall enjoyment. Begin by dividing your dough into four equal portions. Trust me, using a kitchen scale can be a game-changer here—precision leads to consistency! Each piece should weigh around 100 grams, ensuring uniform size for even cooking.
To shape the bagels, start with one portion and gently flatten it slightly with your palm. This creates a base that will give it a nice rise while cooking. Then, using your fingers, poke a hole through the center and gradually stretch it out, twirling the dough around your fingers to create that classic bagel shape. It’s crucial to be gentle here; we want to maintain air pockets within the dough for that delightful soft interior. If you notice any cracks forming, just pinch them together—no stress! Remember, this process is where love meets technique; each bagel should feel like a little handmade treasure.
Step 6: The Egg Wash – A Glorious Glaze
Before we send our shaped bagels on their journey to crispy perfection in the air fryer, let’s talk about the egg wash—a step that elevates the experience from good to utterly extraordinary. If you choose to use an egg wash (which I highly encourage for that beautiful golden sheen), whisk one egg in a small bowl until it’s frothy. Using a pastry brush or even your fingertips (yes, I said it!), generously brush the tops of each bagel with this golden liquid gold. This process isn’t merely decorative; it also adds an additional layer of flavor and helps the bagels achieve that coveted crunchy exterior.
But what if you’re opting for an egg-free version? No worries at all! Simply brush with a bit of water or plant-based milk instead—it works wonders too! The moisture will still help create that crispiness without compromising on taste. I promise you’ll still end up with lovely-looking bagels! This step is absolutely paramount because it seals in moisture while allowing for beautiful browning during cooking—so don’t skip it!
Step 7: Air Frying – The Magic Begins
Now comes the moment we’ve all been waiting for—the air frying! Preheat your air fryer to 180°C (approximately 356°F). This step is essential because starting with a hot air fryer ensures that those little pockets of steam inside each bagel expand beautifully as they cook, creating that perfect fluffy interior while achieving an irresistible outer crunch. Carefully place your shaped and brushed bagels in the basket, making sure they don’t touch each other. They need some personal space to puff up and shine!
Set your timer for 12-15 minutes. As they cook, you’ll witness something magical—your kitchen will fill with an utterly intoxicating aroma that beckons everyone to gather around. Keep an eye on them during the last few minutes; every air fryer can vary slightly in heat distribution and cooking time so check for that glorious golden-brown hue that’s developed on top of your creations. You’re looking for a color reminiscent of freshly brewed honey—stunningly inviting! When they are done baking, carefully remove them from the basket using tongs or a spatula as they will be hot but oh-so-worth-it!
Step 8: Cooling – Patience is Key
The final touch before indulging in these high protein air fryer bagels (quick recipe) is essential—the cooling phase! I know it’s tempting to dive right in as soon as they come out of the air fryer, but trust me on this one: patience is key here. Allowing your freshly baked bagels to cool on a wire rack for about 5-10 minutes will enhance their texture tremendously by letting excess steam escape and firming up their crust just right.
Picture this: as you allow them to cool, you can almost hear the subtle crackle of their crusts—a sound so satisfying! If you slice into them too soon, you may find yourself facing chewy insides rather than pillowy softness—definitely not what we’re after! So take this moment to breathe in those delicious scents wafting through your kitchen; let your senses revel in anticipation because these high protein air fryer bagels are just moments away from being savored!
Conclusion:
As we wrap up our journey through this delightful recipe, I can’t help but feel a sense of excitement bubbling within me—I hope it’s contagious! Making these high protein air fryer bagels isn’t just about mixing yogurt and flour; it’s about creating something profoundly satisfying that brings comfort and joy into your kitchen. The combination of ingredients results in such a lovely balance: the creamy tang of Greek yogurt mingling with garlic powder creates an utterly intoxicating flavor that elevates these bagels beyond the ordinary. Each bite encapsulates that perfect harmony between crispy exterior and soft interior—a true symphony of flavors that will have your taste buds dancing!
Why is this recipe a must-try? Well, not only does it deliver on taste, but it also invites you into the wonderful world of cooking where simplicity meets deliciousness. Picture yourself in your kitchen: the enticing aroma wafting through the air as you shape those doughy rounds into perfect little rings. This experience becomes unforgettable when shared; whether enjoyed solo with your favorite spread or served at brunch with friends, these bagels shine on any occasion—from cozy Sunday mornings to lively weekend gatherings. There’s something magical about pulling them from the air fryer—the golden color beckoning you closer—and biting into their warm softness.
Imagine savoring one with creamy avocado smashed atop it, sprinkled lightly with chili flakes for an extra kick; or perhaps slathered with rich almond butter and drizzled honey for an afternoon pick-me-up—oh my goodness, can you hear the angels singing? For a truly decadent experience, pair one with smoked salmon and dill cream cheese; every mouthful becomes an indulgent delight! Don’t forget about all those wonderful toppings you could explore—think fresh herbs, sun-dried tomatoes, or even sweet cinnamon sugar if you’re feeling adventurous!
Feeling adventurous? This recipe is wonderfully adaptable to suit whatever flavor profile suits your fancy! You might consider folding in chopped olives or roasted red peppers into the dough for an Italian twist; or perhaps add some finely grated cheese right into the mix for an extra savory punch! Each variation brings its own personality to these already fantastic bagels—imagine experimenting until you find your ultimate favorite version! I wholeheartedly encourage you to try this recipe today; share your creations and stories because cooking truly connects us all. Your kitchen is waiting—let’s get baking!
High Protein Air Fryer Bagels (Quick Recipe)
Experience the joy of homemade high protein air fryer bagels with this quick and easy recipe that blends convenience with delightful flavor. Imagine biting into a warm, crispy bagel infused with subtle garlic notes, perfect for busy mornings or as a satisfying snack. Made with simple ingredients like Greek yogurt and self-rising flour, these protein-packed bagels come together in just 25 minutes, making them an ideal choice for health-conscious foodies. Whether you enjoy them plain, topped with cream cheese, or dressed up with savory spreads, these bagels are sure to become a staple in your kitchen. Get ready to impress your friends and family with this delightful treat!
- Prep Time: 10 minutes
- Cook Time: 15 minutes
- Total Time: 25 minutes
- Yield: 4 servings 1x
- Category: Breakfast
- Method: Air Frying
- Cuisine: American
Ingredients
- 1 cup Greek yogurt (240g)
- 1 cup self-rising flour (120g)
- 1/2 tsp garlic powder
- 1 egg (optional)
Instructions
- In a mixing bowl, combine Greek yogurt, self-rising flour, and garlic powder until a cohesive dough forms.
- Divide the dough into four equal portions and shape each into a bagel by forming a ball and poking a hole through the center.
- Optionally, brush each bagel with beaten egg for a golden finish.
- Preheat the air fryer to 180°C (356°F) and cook the bagels for 12-15 minutes until golden brown.
Nutrition
- Serving Size: 1 serving
- Calories: 190
- Sugar: 2g
- Sodium: 250mg
- Fat: 3g
- Saturated Fat: 1g
- Unsaturated Fat: 2g
- Trans Fat: 0g
- Carbohydrates: 35g
- Fiber: 2g
- Protein: 10g
- Cholesterol: 30mg