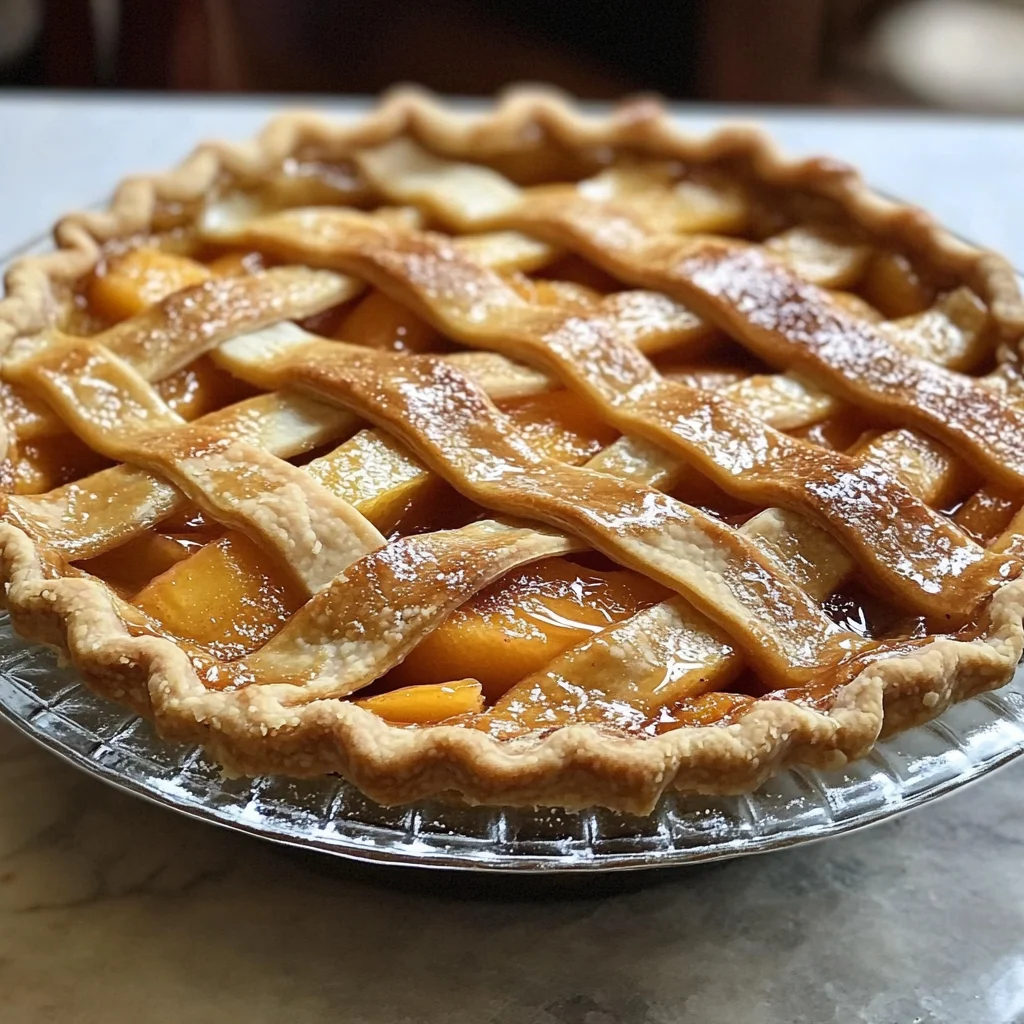
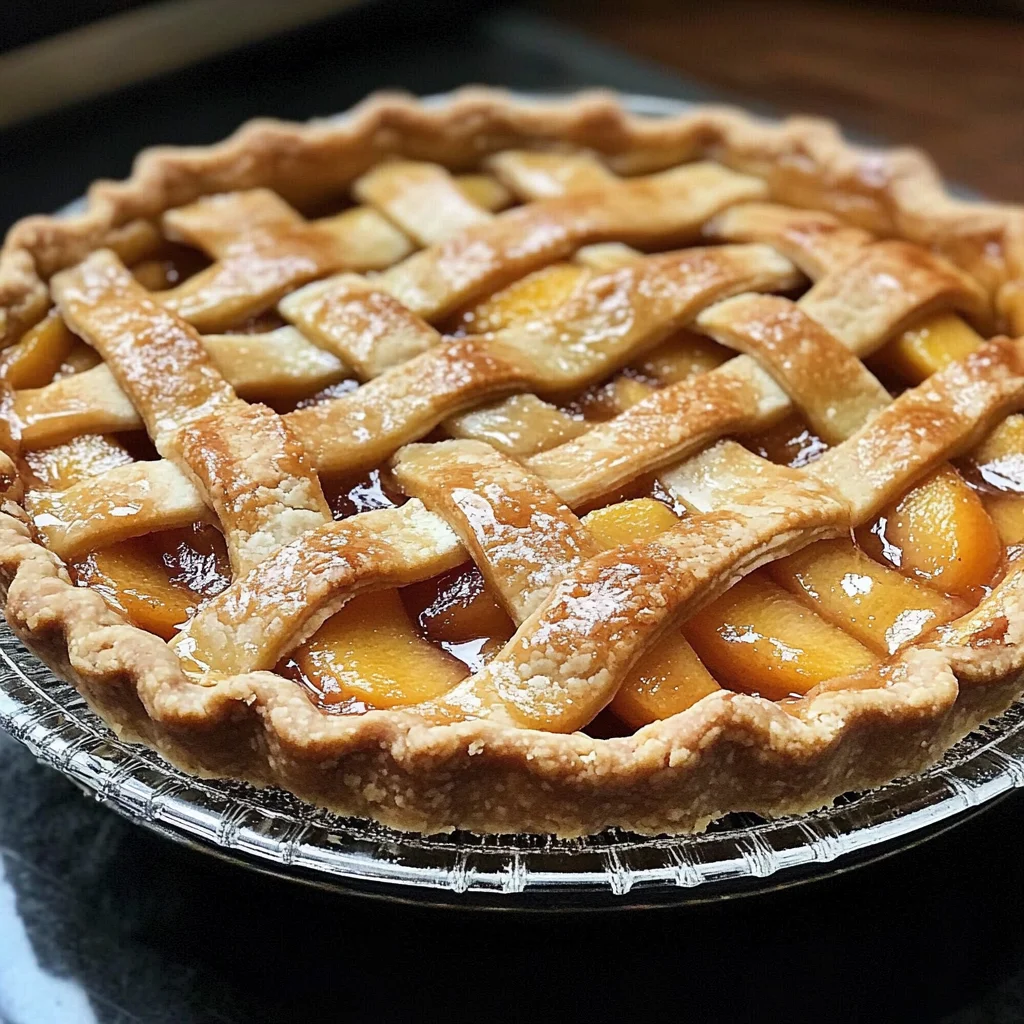
Ina Garten’s Perfect Peach Pie
What is it about the simple act of making a pie that brings such joy and satisfaction? Perhaps it’s the way the buttery crust cradles a treasure trove of ripe, juicy fruit, or maybe it’s the intoxicating aroma wafting through your kitchen as it bakes to golden perfection. Ina Garten’s Perfect Peach Pie is more than just a dessert; it’s an experience steeped in tradition and love. Picture this: summer peaches, plump and fragrant, mingling with a hint of orange zest and sugar, all wrapped up in a flaky, homemade pie crust that practically melts in your mouth. This isn’t just a recipe; it’s a celebration of summer, friendship, and the art of baking.
As you dive into this culinary journey, you’ll find that every step holds its own magic. From selecting the ripest peaches to perfecting that delicate lattice crust, each moment spent crafting this pie is an opportunity to connect to something greater—your inner baker! I can promise you that once you take that first bite of sweet, peachy goodness, you’ll understand why this pie has found a special place in my heart and at my table. So let’s roll up our sleeves and get started on creating Ina Garten’s Perfect Peach Pie together!
Ingredients:
Before we embark on this delightful adventure into pie-making bliss, let’s gather our ingredients. Each one plays a vital role in creating that quintessential peach pie experience.
- 2 1/2 lb. ripe peaches (6-7 large peaches, peeled). Choosing the right peaches is crucial for achieving that fresh flavor we crave in a summer pie. Look for peaches that are slightly soft to the touch with a fragrant aroma—this indicates they are ripe and ready to shine in our dessert. When peeling these beauties, I recommend blanching them first: a quick dip in boiling water makes their skins slip off effortlessly! The sweetness of perfectly ripe peaches combined with their juicy texture creates an utterly intoxicating filling.
- 1/2 C. sugar, plus extra for sprinkling on lattice. Sugar is not just here for sweetness; it helps to balance the tartness of the peaches while drawing out their natural juices. The extra sprinkle on top before baking adds an appealing sparkle and slight crunch to your finished pie crust—a small detail that elevates the overall presentation!
- 2 tbsp. cornstarch. This ingredient acts as our thickening agent for the peach filling, ensuring that we avoid any soupy mishaps when slicing into our pie. Cornstarch works by absorbing excess juices from the peaches as they cook down, creating a luscious syrupy filling that clings beautifully to each slice.
- 1/2 tsp. grated orange zest. Adding zest brings brightness and aromatic depth to our filling—it’s like capturing sunshine in your pie! The citrus notes complement the sweet peaches wonderfully, enhancing their flavor without overpowering them.
- 1/4 C. freshly squeezed orange juice. Similar to the zest, fresh orange juice adds acidity that balances sweetness while also contributing moisture to our filling without making it too wet.
- 1 tbsp. unsalted butter. A little pat of butter goes a long way! It adds richness to the filling and helps enhance those warm flavors as it bakes—think of it as liquid gold infusing your pie with decadence.
- All-purpose flour. We’ll need flour primarily for rolling out our pie crust but also for dusting surfaces during preparation—this prevents sticking! It contributes structure and stability to our crust while ensuring each bite has that satisfying flakiness we adore.
- 1 recipe of double-crust pie crust (Perfect Pie Crust recipe follows). The foundation of any great pie begins with its crust; it’s what holds all those delicious fillings together! A well-made crust should be tender yet sturdy enough to support its contents without falling apart under pressure.
- 1 egg beaten with 1 tablespoon water, for egg wash. This mixture will give us that beautiful golden-brown finish on our crust—not only does it make for stunning presentation, but it also helps seal edges so no precious filling escapes!
For the Pie Crust:
- 12 tbsp. very cold butter. Using cold butter ensures we achieve those wonderful flaky layers within our crust instead of having it become dense or tough—a non-negotiable step in any pastry-making process!
- 3 C. all-purpose flour. The backbone of our dough! Flour provides structure but must be measured accurately; too much can lead to dryness while too little may result in stickiness.
- 1 tsp. kosher salt. Salt enhances flavors beautifully and balances out sweetness so don’t skip this essential ingredient—it’s crucial for building depth!
- 1 tbsp. sugar. Just like with our peach filling, sugar adds another layer of complexity here! It not only sweetens but also encourages browning during baking for that lovely golden hue.
- 1/3 C. very cold vegetable shortening (or use more butter if desired). Shortening helps create an even flakier texture than using butter alone—it’s often preferred by bakers who seek maximum tenderness.
- 1/2 C. ice water (more if needed). Ice water is key because it keeps everything cold during mixing; warm temperatures could melt fats prematurely leading us astray from perfect flakiness!
Equipment You’ll Need:
Now that we have all our ingredients lined up like eager participants waiting for their cue on stage, let’s talk about some essential tools you’ll want by your side during this process! Trust me when I say having reliable equipment can make all the difference between an enjoyable baking experience or one filled with frustration.
- Food processor – This handy machine will save you time and effort when mixing your pie dough together seamlessly! By cutting butter into flour quickly without warming up those fats too much—ensuring we maintain ideal flakiness!
- Rolling pin – An indispensable tool for rolling out your dough evenly so you can create those beautiful circles needed for both bottom and top crusts without tearing or stretching—choose one that’s comfortable in hand!
- 9 or 10-inch pie pan – Opt for glass or ceramic pans which allow you visibility throughout baking—that way you can monitor browning levels easily as well as ensure even cooking across all areas without burning edges prematurely!
- Sharp knife or pastry cutter – Perfectly slicing through finished pieces once baked requires precision! Use either tool depending on preference; each offers unique benefits when cutting lattice designs versus traditional rounds.
With everything gathered around us—the ingredients poised like actors ready for their roles—the stage is set for an extraordinary culinary performance: preparing Ina Garten’s Perfect Peach Pie! Now let’s dive right into making this sweet masterpiece step by step…
Step 1: Crafting the Perfect Pie Crust
Let’s start with creating our double-crust masterpiece because every great peach pie begins here! First things first: dice your very cold butter into small cubes before returning them back into refrigeration until you’re ready to use them again; keeping everything chilled is absolutely paramount when making pastry dough since warmth leads directly towards undesirable textures later down line! Next up—a food processor will become your best friend: combine flour with salt & sugar inside its bowl before pulsing just enough times until blended well together (think short bursts rather than continuous whirring!). Once mixed thoroughly add chilled pieces from earlier along with shortening then pulse again until mixture resembles coarse crumbs about pea-sized or smaller—that flaky consistency we’re aiming towards!
The next part can feel intimidating but trust me on this—it’s simple once you get going: turn machine back on while slowly pouring ice-cold water through feed tube until mixture starts forming ball shape around blade edges—that means we’ve achieved proper hydration levels without overworking gluten within flour which would yield tough results instead of tender ones! Dump contents out onto lightly floured surface gently bringing everything together forming cohesive dough ball shape (you want minimal handling here). Wrap tightly using plastic wrap then chill inside refrigerator roughly half-hour while preparing other components needed later down line—it’ll be worth every minute waited once baked!
Step 2: Prepare the Peach Filling
In a large bowl, combine your sliced peaches with sugar, cornstarch, orange zest, and fresh orange juice. Toss everything gently until the peaches are evenly coated.
In a small saucepan, melt the butter and pour it over the peach mixture, stirring lightly. This step creates a rich, glossy filling that will thicken beautifully as it bakes.
Step 3: Combine & Enhance the Flavors
Let the peach mixture sit for about 10–15 minutes so the juices release naturally. This is key for flavor development.
Give it one more gentle stir to ensure the cornstarch is fully dissolved and evenly distributed—this prevents a runny pie and gives you that perfect, jammy texture.
Step 4: Assemble the Pie
Roll out your chilled pie dough and place one layer into your pie dish.
Pour the prepared peach filling evenly into the crust.
Roll out the second dough and either place it on top بالكامل or cut it into strips to create a lattice design.
Seal the edges, trim excess dough, and lightly press with a fork or your fingers to secure everything in place.
Step 5: Prepping the Filling – The Heart of Your Peach Pie
Now, let’s dive into the magic of preparing the filling, which is truly the heart and soul of any pie. First things first, preheat your oven to a cozy 400 degrees Fahrenheit—this is the temperature that will transform our lovely ingredients into golden-brown perfection. While the oven warms up, line a sheet pan with parchment paper; this step may seem trivial, but trust me, it’s absolutely paramount for catching any potential drips from your bubbling pie. Now, grab those beautiful peaches! You’ll need to peel and slice all but one of them. If you’ve ever found peeling peaches a chore, Ina Garten has an incredible trick that makes it feel like a breeze. Boil a pot of water and carefully slip your peaches in for about 15 seconds to 2 minutes—just enough to loosen their skins—and then transfer them to a bowl of cool water. This method not only saves time but also ensures you retain that juicy flesh underneath.
After you’ve expertly peeled and sliced your peaches, chop that last peach into small pieces and set it aside. This chopped peach is going to add an extra burst of flavor and texture that brings everything together beautifully. In a small saucepan over medium heat, whisk together the half cup of sugar, cornstarch (which acts as our thickening agent), grated orange zest (for a hint of brightness), freshly squeezed orange juice (to balance out the sweetness), and the magical touch of butter—yes, butter! Bring this mixture to a gentle boil; watch as it transforms into a luscious syrup that will envelop your sliced peaches in utter delight. Lowering the heat allows you to simmer this concoction for about 2-3 minutes until it thickens slightly. This step is crucial because it creates that wonderfully syrupy goodness that holds everything together in your pie filling. Pour this syrup over your fresh peach slices along with one or two tablespoons of flour to ensure the filling doesn’t become soupy during baking. I promise you, this combination will sing with flavor when baked!
Step 6: Assembling Your Peach Pie – The Artistry Begins
Now comes one of my favorite parts—the assembly! Picture this moment: you have all your components ready—the crust cradling your vibrant peach filling, waiting patiently to be topped off with its final layer. Carefully pour that delightful peach mixture into your prepared pie crust nestled snugly in your pie dish. But before we cover it up, take a moment to brush the edges of the crust with some egg wash made from beating an egg with a tablespoon of water; this simple step helps create that golden sheen on your finished pie and ensures that our top crust adheres beautifully to its base. Trust me on this—it’s those little details that elevate the whole experience!
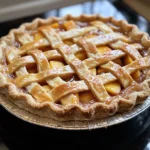
Now, remove the other half of your pie dough from the fridge—it should be firm yet pliable at this point—and roll it out into another circle that’s just larger than your pie pan. Cutting strips from this larger circle gives you creative freedom; you can weave them into an intricate lattice design or simply lay them flat over the top for a rustic look—the choice is yours! If you’re going for the lattice (which I highly recommend because it’s visually stunning), just remember: don’t rush this step! Weaving takes patience but results in such a beautiful presentation that will impress everyone at your table. As you weave those strips, use a fork to pinch and seal where they meet the bottom crust; cutting off excess dough helps keep things tidy while ensuring none of your delicious filling escapes during baking.
Step 7: The Finishing Touches – Elevating Flavor and Presentation
With our pie crust artfully woven or placed atop our precious peach filling, it’s time for some final touches before we send it off to bake! Brush that glorious egg wash generously over every nook and cranny of your lattice or top crust—this not only enhances color but also adds a slight sheen that’s simply irresistible when it comes out from the oven. And while we’re at it, sprinkle some extra sugar over the top; imagine how wonderful that will taste as it caramelizes during baking—creating delightful crispy bits against soft fruit filling… Isn’t that mouthwatering? This layer is essential for adding just enough sweetness on top without overwhelming those luscious peaches beneath.
Before sliding our masterpiece into the oven, place it on that prepared parchment-lined sheet pan—it’s so important because as tempting as it may be to skip this step, trust me when I say no one wants a sticky mess at the bottom of their oven! Baking at 400 degrees for about 45 minutes will do wonders; you’ll want to watch closely as those edges turn golden brown and juices begin bubbling through gaps in the lattice—a truly intoxicating sight! Halfway through baking, give your pie a gentle rotation for even cooking; if those edges start browning too quickly, don’t hesitate to cover them lightly with foil—this simple adjustment can save them from burning while allowing ample time for the center to finish cooking.
Step 8: Cooling Down – The Anticipation Builds
Once you’ve experienced those tantalizing aromas wafting through your kitchen signaling it’s almost time—remove your glorious creation from the oven and let it cool down on a wire rack for at least an hour before slicing into it. I know waiting can feel torturous when you’re staring down at something so beautiful—but cooling is non-negotiable here! Letting it rest allows all those juices inside to settle rather than run wild when you cut into it; after all, we want each slice beautifully intact rather than swimming in syrupy chaos.
As my friends often say when they see my pies emerge from their cooling phase—patience truly pays off! Once cooled slightly—and yes, warm slices are also divine—serve up generous portions either on their own or accompanied by an indulgent scoop of dairy-free vanilla ice cream or whipped coconut cream if you’re feeling fancy! Each bite promises layers upon layers of flavor—a symphony where sweet summer peaches dance harmoniously with buttery crusts underpinned by hints of citrus zest.
Conclusion:
What an incredible journey we’ve had through this recipe! From selecting those ripe peaches bursting with flavor to mastering that flaky double-crust pie dough, creating Ina Garten’s Perfect Peach Pie truly transforms an ordinary day into something special. Each bite offers a symphony of sweetness from those fresh peaches harmoniously blended with zesty orange undertones—a combination that’s not just delicious but profoundly satisfying as well. Baking this pie isn’t just about following steps; it’s about crafting memories infused with love and warmth.
This recipe is indeed a must-try—not just because of its irresistible taste but also due to the joy it brings during its creation. Whether you’re impressing guests at a summer barbecue or relishing quiet evenings at home with loved ones, this peach pie shines brightly at any occasion. Imagine pulling it from the oven, golden brown and bubbling slightly from that luscious filling—the anticipation is almost as delightful as the first bite! The comforting aroma wafting through your home alone makes it worth every moment spent preparing.
When serving this splendid dessert, consider pairing it with scoops of vanilla bean ice cream that slowly melt into those warm slices; it’s utterly intoxicating! Or perhaps drizzle some homemade caramel sauce over each piece for an extra touch of decadence. For an afternoon pick-me-up, serve slices alongside freshly brewed coffee or herbal tea—the contrast between hot and cold will dance beautifully on your palate.
Feeling adventurous? This recipe is wonderfully adaptable! You might swap out some peaches for plump blueberries or raspberries if you’re feeling fruity; these variations will add exciting depth to each slice. Or try mixing spices like cinnamon or nutmeg into your filling for warm undertones—a twist that elevates this classic dish even further. I invite you not just to make this pie but to share your experiences with friends and family—your kitchen will soon become their favorite gathering spot!
Ina Garten’s Perfect Peach Pie
Indulge in the sweet delights of summer with Ina Garten’s Perfect Peach Pie, a beloved dessert that brings forth the essence of juicy peaches and buttery, flaky crust. This recipe transforms ripe peaches into a luscious filling, complemented by hints of orange zest and sugar, all encased in a beautifully crafted double crust. With its enticing aroma wafting through your kitchen, this pie is not just a treat but a celebration of seasonal flavors and cherished moments shared with loved ones. Whether served warm with a scoop of dairy-free ice cream or enjoyed on its own, each slice promises to deliver joy and satisfaction.
- Prep Time: 30 minutes
- Cook Time: 45 minutes
- Total Time: 1 hour 15 minutes
- Yield: Serves approximately 8 slices 1x
- Category: Dessert
- Method: Baking
- Cuisine: American
Ingredients
- 2 1/2 lbs. ripe peaches (6–7 large peaches, peeled)
- 1/2 cup sugar (plus extra for sprinkling)
- 2 tbsp. cornstarch
- 1/2 tsp. grated orange zest
- 1/4 cup freshly squeezed orange juice
- 1 tbsp. unsalted butter
- All-purpose flour (for rolling crust)
- Double-crust pie crust
Instructions
- Preheat your oven to 400°F and prepare a baking sheet lined with parchment paper.
- Peel and slice the peaches, reserving one chopped peach for added texture.
- In a saucepan over medium heat, combine sugar, cornstarch, orange zest, orange juice, and butter. Stir until bubbling and thickened (about 2-3 minutes).
- Pour the syrup over the sliced peaches and mix in one or two tablespoons of flour.
- Pour the peach filling into your prepared piecrust.
- Roll out the second half of the dough and create a lattice top or simply cover it flat over the filling.
- Brush with egg wash and sprinkle with sugar.
- Bake on the prepared sheet for about 45 minutes until golden brown.
- Allow to cool for at least an hour before serving.
Nutrition
- Serving Size: 1 serving
- Calories: 270
- Sugar: 20g
- Sodium: 150mg
- Fat: 12g
- Saturated Fat: 7g
- Unsaturated Fat: 4g
- Trans Fat: 0g
- Carbohydrates: 37g
- Fiber: 3g
- Protein: 2g
- Cholesterol: 30mg