Hot Italian Sub Sliders
It’s a chilly evening, and I can already feel the warmth of the oven wrapping around me like a cozy blanket. The anticipation in the air is almost palpable as I prepare to make my beloved Hot Italian Sub Sliders. There’s something incredibly magical about the combination of gooey provolone cheese melting over layers of turkey and chicken ham, complemented by the zing of pickled peppers. This recipe is more than just food; it’s a celebration of flavors that transports you straight to an Italian deli, filled with the scent of freshly baked bread and savory meats. These sliders are not merely snacks; they are an experience that beckons friends and family to gather around the table, laughter echoing through the room as you savor each delicious bite.
Now, let me just say that these Hot Italian Sub Sliders have been my go-to for tailgates, parties, or even cozy nights at home when I want something that feels indulgent yet comforting. The beauty of this dish lies not only in its taste but also in its ease of preparation. In just 35 minutes from start to finish, you can create something truly extraordinary that will leave everyone begging for seconds—trust me on this! The way the buttery tops crisp up while the insides become a melty haven creates a symphony of textures and flavors that simply cannot be missed.
Hot Italian Sub Sliders: A Flavorful Journey into Comfort Food
Let’s embark on this culinary adventure together! These sliders are delightfully simple to make and require minimal prep time, making them perfect for any occasion where good food and good company come together. With their flavorful layers and rich textures, these sliders are bound to become your new favorite recipe. Picture this: golden-brown rolls glistening with seasoned butter atop layers of savory meats, tangy peppers, and melty cheese—what’s not to love? Are you ready? Let’s dive into the details!
Ingredients:
As we prepare to create our mouthwatering Hot Italian Sub Sliders, let’s take a moment to appreciate each ingredient that plays a crucial role in bringing this dish to life.
- 12 pack rolls, halved lengthwise (I recommend Kings Hawaiian rolls). These sweet rolls are not only soft and fluffy but also add a delightful hint of sweetness that balances perfectly with the savory fillings. When choosing your rolls, look for options that are fresh and have a slightly glossy finish; this indicates quality baking. If you’re feeling adventurous or need gluten-free options, consider substituting with gluten-free dinner rolls—just ensure they’re soft enough to hold all those delicious fillings without crumbling.
- 6 oz package of chicken ham, thinly sliced. This ingredient is essential for introducing layers of flavor without overpowering the sliders. Chicken ham provides a subtle smokiness that’s wonderfully complemented by other ingredients. When selecting chicken ham, opt for brands with minimal additives; it should be juicy and tender so it melds beautifully with the other components in our sliders.
- 5 oz package of turkey slices, thinly sliced. Turkey adds a lean yet hearty element to our sliders while still keeping them light enough for easy eating at gatherings. Look for high-quality turkey slices that are free from preservatives; they’ll enhance both texture and taste while ensuring your sliders stay as fresh as possible.
- 5 oz package of turkey pepperoni, thinly sliced. What makes turkey pepperoni special is its ability to deliver that classic pepperoni flavor without being overly greasy—a non-negotiable when it comes to achieving slider perfection! Make sure you choose pepperoni that’s well-seasoned; this small addition packs quite a punch in flavor while adding an enticing spiciness that rounds out our recipe beautifully.
- 9 slices provolone cheese. This creamy cheese melts like liquid gold and provides a luscious mouthfeel that ties together all those wonderful flavors in our sliders. Aged provolone has an exquisite depth that enhances every bite—don’t hesitate to splurge on a good quality cheese here! For those who prefer alternatives, mozzarella works wonderfully too if you’re after something milder.
- 1/3 cup pepperoncini, sliced. These tangy peppers introduce just the right amount of acidity to balance out the richness from the meats and cheese. They’re like little bursts of sunshine within each slider! Look for pickled varieties in jars—they should be vibrant and firm rather than limp or overly mushy.
- 1/3 cup pickled hot cherry peppers, sliced. Adding these spicy beauties elevates your sliders into another realm entirely! They provide heat without overwhelming your palate—perfectly invigorating! When shopping for these peppers, select jars labeled hot if you want an extra kick or mild if you’re serving guests with varying spice tolerances.
- 1/4 cup salted butter, melted. This ingredient is absolutely paramount! Not only does it help create that glorious crispy top layer on our sliders but it also locks in moisture throughout baking. Always choose high-quality salted butter here—it adds depth while enhancing all those rich flavors we’re bringing together.
- 1 tsp Italian seasoning. A blend of herbs brings forth familiar tastes reminiscent of sunny Mediterranean days—think basil, oregano, thyme… It’s really what makes everything sing harmoniously together! To get the freshest flavor possible from your spices, store them properly away from light and heat.
- 2 cloves garlic, crushed (I recommend fresh over jarred). Fresh garlic not only infuses incredible aroma during cooking but also adds robust flavor profiles throughout our dish—it transforms simple ingredients into something profoundly satisfying! Crushing garlic releases essential oils; don’t skip this step—it’s crucial for maximizing flavor!
- 1 cup marinara sauce. Serving our sliders alongside marinara sauce creates an irresistible dipping experience—you can never go wrong with warm marinara! Whether homemade or store-bought (look for options without added sugars), ensure it’s rich and flavorful; after all, it’s going to be paired with all those delightful layers we’ve created!
Equipment You’ll Need:
Having the right tools at hand makes any cooking experience smoother and more enjoyable—like having trusted friends join you on this culinary journey! While these may not be ingredients per se, they play vital roles in helping us achieve slider success.
- Baking sheet or pan – A sturdy baking sheet is essential for holding all those delicious ingredients snugly together while they bake evenly in your oven. If you have one lined with parchment paper or foil (for easy cleanup), even better!
- Small mixing bowl – You’ll need this bowl for combining melted butter with Italian seasoning and garlic before brushing it over your sliders—a key step in ensuring every bite is packed full of flavor!
- Foil – This humble ingredient serves multiple purposes: covering your sliders while they bake ensures moisture retention which prevents dryness as they cook through—and keeps them warm until serving time!
Now that we’ve gathered everything we need—the ingredients are prepped beautifully waiting on us—we can finally dive into preparing those utterly intoxicating Hot Italian Sub Sliders!
Step 1: Preheat Your Oven & Prepare Your Rolls
Before anything else starts happening in our kitchen saga today (and trust me—it gets exciting!), let’s preheat our oven to 350 degrees Fahrenheit (175 degrees Celsius). This temperature is crucial because it allows both doughs inside their respective rolls to rise slightly while developing golden brown exteriors during baking—not too fast nor slow; just perfect timing! Once preheated adequately (which takes about 10 minutes), lay out the bottom halves of your chosen rolls side by side onto either a large baking sheet or pan—this will serve as their cozy base during their transformation into sliders extraordinaire!
Step 2: Layering Deliciousness
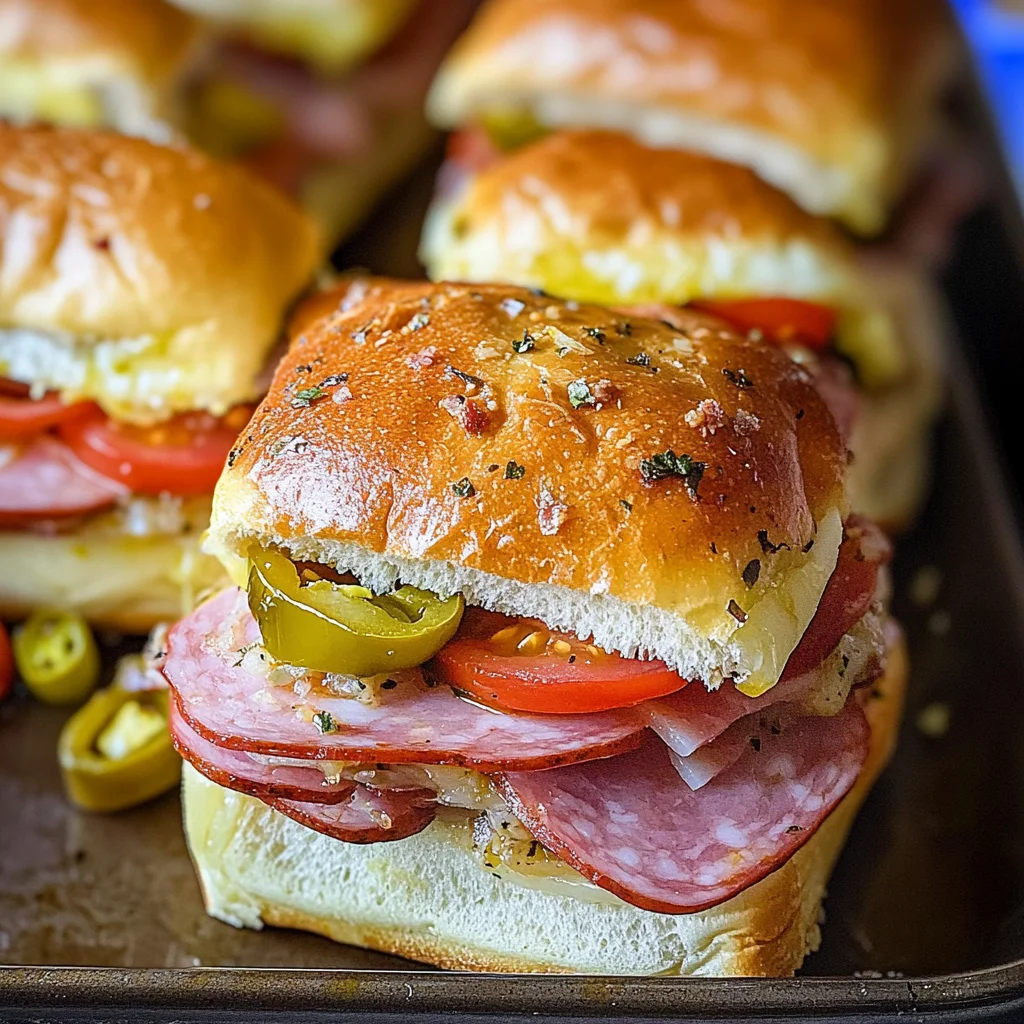
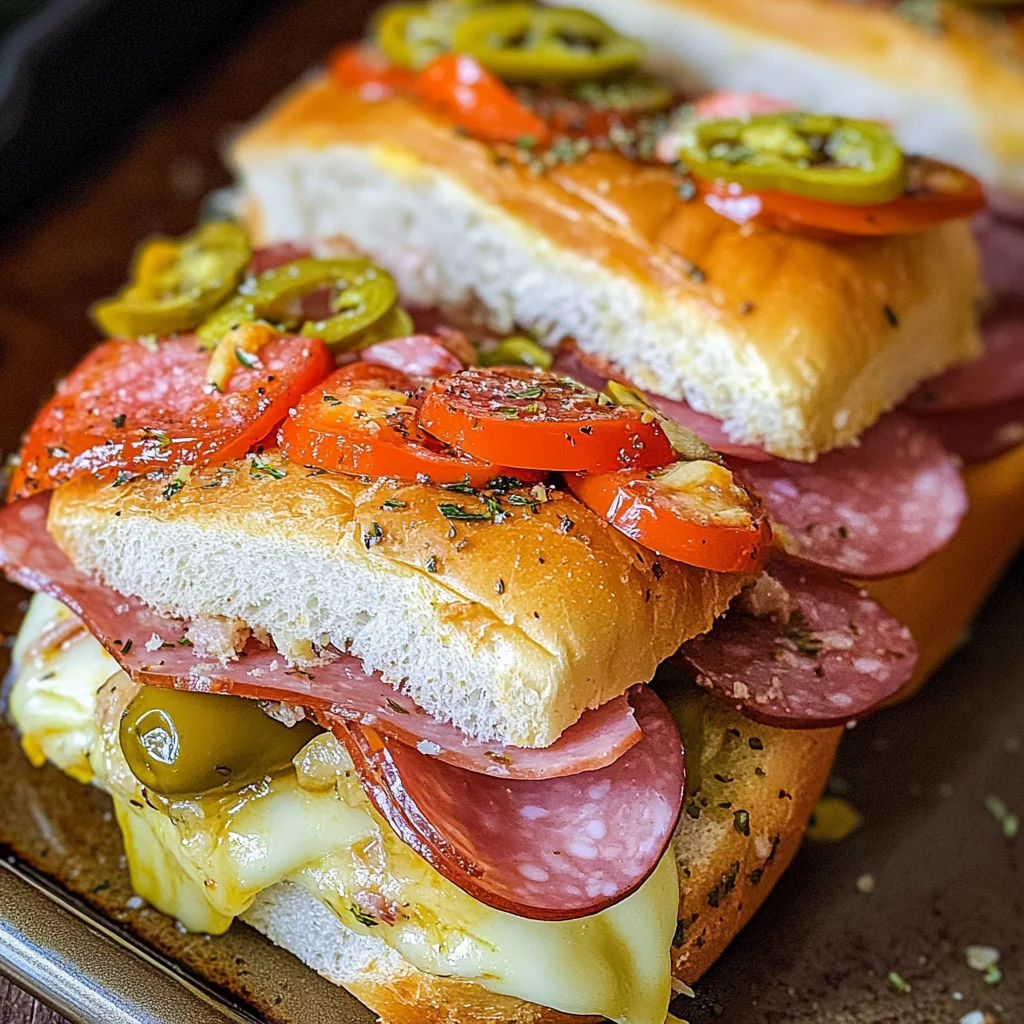
Now comes one of my favorite parts—the layering process where we build our masterpiece! Begin by placing slices of chicken ham generously atop each roll half—don’t skimp here; it sets up fantastic initial flavors followed closely by turkey slices layered next which add additional texture along with some savory depth before sprinkling down evenly across all surfaces some turkey pepperoni followed lastly by heavenly provolone cheese layered generously above everything else like icing frosting atop cake layers waiting patiently below… Ahh blissful anticipation indeed!
Step 3: Spice It Up!
After achieving our desired layering heights (and trust me—you’ll want those layers nice & thick!), grab hold onto those vibrant slices from earlier: hot cherry peppers followed by their equally zesty counterpart pepperoncini—let them rain down gently atop everything already laid so far underneath—to bring forth bright pops against richer tones below while simultaneously adding bites bursting forth vivid Flavor Explosion™ moments within every single slider when devoured later on… Honestly speaking? You won’t regret indulging yourself here!
Step 4: The Magic Butter Mixture
Let’s take what could potentially elevate these delights even further than imagined—a magical butter mixture made simply using melted salted butter combined flawlessly alongside aromatic Italian seasoning plus crushed garlic cloves mingling beautifully together within small mixing bowl previously mentioned earlier… Pro tip: Allowing fat content from butter meld together fully allows flavors penetrate deeper into all surrounding elements creating utter harmony throughout dish altogether ultimately leading towards sublime experiences upon tasting later down line too!
The anticipation builds as we continue assembling these Hot Italian Sub Sliders into masterpieces worthy enough not only grace tables everywhere but tantalize taste buds beyond comprehension—all culminating shortly thereafter once they emerge shimmering golden brown ready devour amidst joyous celebrations shared amongst loved ones gathered near & dear… Stay tuned—the best moments await us ahead!
Baking Your Perfect Hot Italian Sub Sliders
Step 5: Covering and Preparing for the Oven
Now that our hearty layers are assembled, let’s cover those sliders with foil. This step is more than just a protective layer; it’s about creating a steamy environment that allows all those flavors to meld beautifully together. When you cover the sliders, the heat will circulate, gently warming the fillings while keeping the bread from getting too hard or crunchy at this stage. You want your rolls to be tender and pillowy, so trust me when I say this step is crucial.
Before you pop them into your preheated oven, take a moment to admire your creation. The vibrant colors of the peppers peek out through the provolone like little jewels, promising an explosion of flavor in every bite. Once you’ve covered them securely with foil, slide that baking sheet into the oven at 350 degrees Fahrenheit. Bake for about 30 minutes. During this time, something magical happens: the cheese melts into a gooey embrace around the turkey and chicken ham, while the flavors of garlic and Italian seasoning waft through your kitchen like a warm hug. Keep an eye on them towards the end; you’ll know they’re ready when the edges of the bread begin to turn golden brown, and you can smell that utterly intoxicating aroma filling your home.
Step 6: Unveiling Your Culinary Masterpiece
After that tantalizing 30 minutes in the oven, it’s time for one of my favorite moments—the reveal! Carefully remove the foil from your sliders. Be cautious here; steam will escape—an aromatic cloud that promises delicious bites ahead! At this point, check how they’ve transformed. The provolone should be melted to perfection, oozing slightly over the sides, while those layers of meat and peppers blend harmoniously into what can only be described as a symphony of flavors.
Don’t rush this step! Allow them to rest for just a couple of minutes before slicing; this patience pays off generously by letting everything settle together nicely. If you slice them too soon, you might end up with a gooey mess instead of perfectly portioned sliders. Use a sharp knife for this task—it makes all the difference in achieving clean cuts without squashing those glorious layers inside.
Step 7: Slicing with Precision
As you prepare to slice these divine Hot Italian Sub Sliders into individual portions, think about how you want to serve them. Do you prefer small squares or larger halves? Trust me on this—having a plan makes serving easier and adds to the presentation! Gently press down on each slider with your palm as you cut; this helps keep everything intact while ensuring each piece holds its shape beautifully.
When slicing, aim for equal portions so everyone gets a taste of that irresistible melted cheese alongside each savory layer of meat and pepper. Picture it now: taking that first bite where all those elements come together—each mouthful bursting with flavor that dances on your palate! It’s not just food; it’s an experience meant to be shared and savored among friends or family gathered around your table.
Step 8: The Finishing Touches
Now comes one last essential touch before diving in—the perfect dip! I highly recommend serving these sliders with a side of marinara sauce for dipping. Not only does it add an extra layer of flavor—a slightly tangy contrast to all that richness—but it also brings back memories of sharing plates at beloved Italian restaurants where we would linger long after our meals ended. Just warm up your marinara sauce on low heat until it’s bubbling gently, enhancing its flavor even further.
As you plate these delightful sliders alongside your warm marinara sauce, take a moment to appreciate not just how they look but also how they make everyone feel—the excitement bubbling over as friends gather around, ready to indulge in something truly extraordinary together. Whether it’s game day or an intimate gathering, these Hot Italian Sub Sliders have an uncanny ability to bring people together over food that’s filled with love and laughter.
Conclusion:
As we wrap up our journey through crafting these unforgettable Hot Italian Sub Sliders together, I can’t help but feel a rush of excitement! From the moment we layered those sumptuous meats and cheeses to brushing on that aromatic garlic butter mixture, each step has been infused with love and passion—a true labor of joy! What truly makes this recipe stand out is its brilliant combination of flavors: the savory turkey pepperoni paired with zesty pickled peppers creates a symphony that dances on your palate while the gooey provolone brings it all together in one glorious bite. Trust me when I say that each slider is an experience waiting to happen!
This recipe isn’t just another dish; it’s an invitation to create moments filled with laughter and happiness around your table. Perfect for game days or casual get-togethers with friends and family alike, these sliders are incredibly versatile—you could even serve them at parties or gatherings where they’ll be gone before you know it! Imagine pulling that golden-brown tray from your oven—there’s something so satisfying about watching guests eagerly gather around as they inhale the tantalizing aroma wafting through the air. It’s more than food; it’s about connection and shared experiences.
Now let’s talk pairings because no slider should stand alone! Imagine savoring one with a side of creamy potato salad for a picnic vibe or perhaps alongside crispy sweet potato fries for a comforting evening treat. For an afternoon pick-me-up with friends, serve some refreshing lemonades or iced teas alongside those steaming sliders; they complement each other beautifully! And if you’re feeling indulgent? Drizzle some extra marinara sauce over those sliders right before serving—it adds an utterly luxurious touch that elevates everything.
Feeling adventurous? This recipe is wonderfully adaptable! You might try swapping out turkey pepperoni for spicy salami or adding grilled vegetables like zucchini or bell peppers for added freshness. For those who crave a bit more heat, consider slathering on some spicy mustard or aioli between layers—each variation opens up new avenues of flavor exploration! So go ahead—experiment with ingredients that excite you because cooking should always be an adventure filled with creativity. I can’t wait to hear how your Hot Italian Sub Sliders turn out—so please share your stories and experiences with me!
Hot Italian Sub Sliders

Savor every bite of irresistible Hot Italian Sub Sliders packed with flavor! Perfect for gatherings – try this easy recipe today!
- Prep Time: 10 minutes
- Cook Time: 30 minutes
- Total Time: 40 minutes
- Yield: Serves approximately 12 sliders 1x
- Category: Main
- Method: Baking
- Cuisine: Italian
Ingredients
- 12 pack rolls, halved lengthwise
- 6 oz thinly sliced chicken chicken ham
- 5 oz thinly sliced turkey
- 5 oz thinly sliced turkey turkey pepperoni
- 9 slices provolone cheese
- 1/3 cup sliced pepperoncini
- 1/3 cup sliced pickled hot cherry peppers
- 1/4 cup melted salted butter
- 1 tsp Italian seasoning
- 2 cloves crushed garlic
- 1 cup marinara sauce
Instructions
- Preheat your oven to 350°F (175°C).
- Arrange the bottom halves of the rolls on a baking sheet.
- Layer the chicken chicken ham, turkey, turkey pepperoni, and provolone cheese on the rolls.
- Add the sliced pepperoncini and hot cherry peppers on top.
- In a small bowl, mix melted butter with Italian seasoning and crushed garlic. Brush this mixture over the assembled sliders.
- Cover with foil and bake for about 30 minutes until heated through and cheese is melted.
- Remove foil and let cool slightly before slicing into individual sliders.
- Serve alongside warm marinara sauce for dipping.
Nutrition
- Serving Size: 1 slider (approximately 100g)
- Calories: 250
- Sugar: 2g
- Sodium: 780mg
- Fat: 15g
- Saturated Fat: 7g
- Unsaturated Fat: 6g
- Trans Fat: 0g
- Carbohydrates: 20g
- Fiber: 1g
- Protein: 12g
- Cholesterol: 40mg