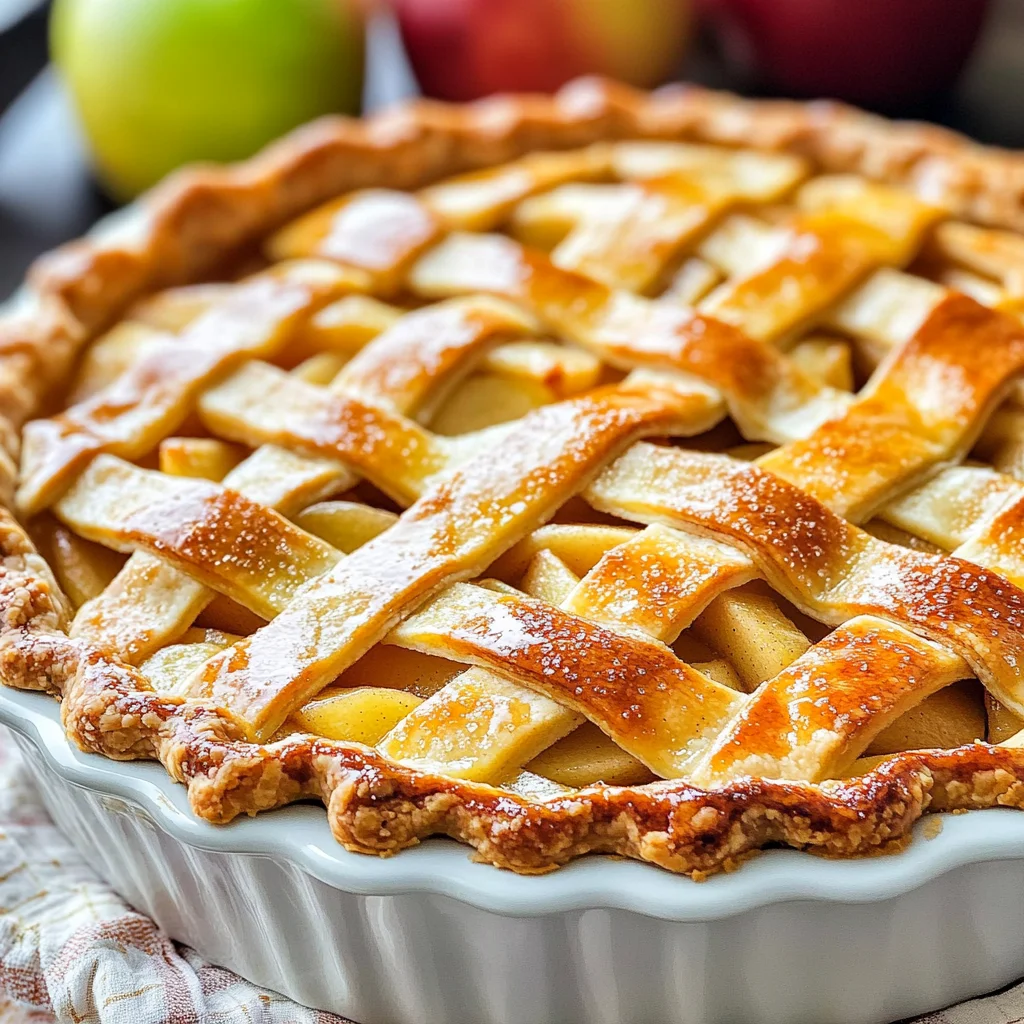
Easy Apple Pie
There’s something utterly magical about the scent of freshly baked apple pie wafting through your home. It’s an aroma that feels like a warm hug, an invitation to gather around the table and share stories with loved ones. Whenever I make this Easy Apple Pie, I’m not just crafting a dessert; I’m weaving together memories and traditions that have been passed down through generations. Imagine biting into a slice of this pie, where the tender, flaky crust cradles sweet, spiced apples that dance on your palate—each bite is a symphony of flavors that sings of comfort and nostalgia. Trust me when I say, this recipe isn’t just about food; it’s about creating moments that linger long after the last crumb has been savored.
As you embark on this culinary journey, let me assure you that making an apple pie from scratch is not only easier than you might think, but it’s also profoundly satisfying. The combination of tart Granny Smith apples kissed with sugar and fragrant spices like cinnamon and nutmeg creates a filling that’s simply irresistible. This Easy Apple Pie recipe captures the essence of autumn in every bite while honoring the timeless charm of homemade desserts. Whether you’re sharing it at holiday gatherings or enjoying a quiet evening at home, each slice tells a story—a tale of love, warmth, and perhaps a little magic.
Easy Apple Pie: A Slice of Comfort in Every Bite
This Easy Apple Pie is truly the epitome of comfort food! With its tender yet flaky homemade pie crust enveloping perfectly spiced apple slices, it’s a dessert that brings joy to anyone who takes a bite. The beauty lies not only in its delicious flavor but also in its simplicity—this recipe is approachable for both novice bakers and seasoned pros alike. So grab your apron and let’s dive into this delightful baking adventure!
Ingredients:
Before we get our hands floury, let’s gather everything we need for our apple pie masterpiece. Each ingredient plays a vital role in crafting this delightful dessert, so let’s explore what makes them essential.
- 2 (9) pie crusts. A good pie starts with an exceptional crust. The beauty of making your own lies in its buttery flakiness—it should melt in your mouth! If you’ve got time, I highly recommend preparing my favorite homemade crust; it requires chilling to achieve that perfect texture (it’s crucial!). However, if time is short or you’re feeling a bit lazy (we all have those days!), store-bought pie crusts work beautifully too—just be sure to follow the package directions carefully.
- 7 large Granny Smith apples (peeled, cored and sliced into 1/2 inch slices). The star of our show! Granny Smith apples are favored for their crispness and tartness; they provide the perfect balance against the sweetness from our sugars. When selecting your apples, look for firm ones without bruises or soft spots—this ensures they’ll hold their shape during baking and provide that delightful texture contrast.
- 1/2 cup granulated sugar. This sugar works its magic by drawing out the natural juices from our apples while adding sweetness to balance their tartness. The combination of sugars helps create that luscious syrupy filling we all dream about when we think of apple pie.
- 1/2 cup light brown sugar (loosely packed). Brown sugar adds depth to our filling with its subtle molasses notes—a flavor that’s utterly intoxicating when paired with warm spices. Make sure to pack it loosely as instructed; if it’s too tightly packed, it might add excess moisture to our filling.
- 2 tablespoons all-purpose flour. This seemingly simple ingredient serves as our thickening agent. It absorbs excess juices released by the apples as they cook down, ensuring we end up with a beautifully cohesive filling rather than a soupy mess!
- 1 teaspoon ground cinnamon. Ahh… cinnamon—the warm hug for our taste buds! Its aromatic presence elevates our dish beyond basic apple pie status into something extraordinary. I recommend using fresh cinnamon for more potent flavor; trust me on this one!
- 1/8 teaspoon ground nutmeg. Just a pinch goes a long way here! Nutmeg adds complexity and warmth—it’s like adding a secret spice that enhances everything without stealing the spotlight from our beloved apples.
- 1 tablespoon lemon juice (plus the zest of half of a lemon). Lemon juice brightens up our filling while preventing browning on those lovely apple slices! The zest adds an extra layer of citrusy brightness that cuts through sweetness beautifully—a non-negotiable for any great apple pie!
- 1 large egg (lightly beaten in a small bowl for egg wash). An egg wash is essential for achieving that golden-brown sheen on your crust—it’s the finishing touch that makes your pie look as fabulous as it tastes!
- 2 tablespoons sanding sugar (optional). While totally optional, sprinkling sanding sugar on top gives your pie an eye-catching sparkle and extra crunch! It’s those little details that can take your homemade dessert from ordinary to extraordinary.
Equipment You’ll Need:
Now that we’ve gathered all our ingredients, it’s time to talk tools! Having the right equipment makes the entire baking experience smoother and more enjoyable—not to mention essential for achieving success.
- Mixing bowl – A large mixing bowl will be your best friend when combining those sweet apple slices with sugars and spices evenly. Choose one that’s big enough so you can toss everything together without fear of spilling!
- Rolling pin – Whether you’re rolling out homemade dough or smoothing store-bought crusts into shape, this handy tool ensures even thickness—a crucial element for achieving that perfectly flaky texture we adore.
- Pie plate – Using a deep dish pie plate allows plenty of room for all those delectable apple slices while also ensuring even cooking throughout—no soggy bottoms here!
- Sharp knife or peeler – You’ll need something sharp to slice those apples efficiently! A good-quality paring knife will help you peel them quickly while keeping your fingers safe—always important in any kitchen endeavor!
- Baking sheet – Placing your assembled pie on a baking sheet catches any drips as it bakes—and believe me; there will be some juicy goodness bubbling over!
Preparing the Easy Apple Pie
Step 1: Crafting Your Flaky Pie Crust
To begin this delicious journey toward creating an easy apple pie, start by preparing your flaky pie crust if you’re opting for homemade! This step involves chilling your dough before rolling it out—something my grandmother always insisted upon because she believed it was key to achieving tenderness in every buttery bite. You see, chilling allows gluten strands to relax which leads us to beautifully flaky layers instead of tough crusts! If you’re making your own dough from scratch (which I wholeheartedly encourage), make sure you allow it at least one hour in the fridge before rolling out; otherwise opt for store-bought if time doesn’t permit!
Step 2: Prepping Your Oven & Apples
While waiting on dough prep time—and let’s face it; we could use those moments wisely—let’s preheat our oven to 400°F (204°C) so it’s ready when we are! As you wait patiently (don’t rush this step!), go ahead and peel those seven glorious Granny Smith apples—we want them sliced into half-inch pieces now too! Combine them lovingly in another mixing bowl along with granulated sugar, light brown sugar flour mixture plus warming spices like cinnamon/nutmeg along with zingy lemon juice/zest—all working harmoniously together here! Toss everything until each slice is coated evenly; trust me—you want every bite bursting with flavor!
Step 3: Assembling Our Beautiful Creation
Next comes one of my favorite parts—the assembly where artistry meets deliciousness! Remove chilled pastry dough from resting state after allowing around ten minutes at room temperature first—it’ll roll out much easier then! On lightly floured surface roll one disc into approximately twelve inches wide circle at eighth-inch thickness carefully laying it over bottom side deep dish plate thereafter spooning prepared apple filling generously atop ensuring juices stay behind within bowl—those are too watery anyway! Now roll out second disc similarly placing overtop sealing edges together gently pressing where they meet—this process known as crimping creates beautiful patterns alongside securing delightful contents inside!
Step 4: Ventilation & Final Touches
Now we’re getting close—the final touches make all difference here folks! Using sharp knife trim excess dough along edge before cutting four slits across center allowing steam escape while baking creating golden brown delightfulness instead soggy mess later down line—isn’t that smart? Place assembled beauty onto baking sheet lined parchment paper beforehand catching drips during cooking process keep oven clean too—I mean who wants cleaning hassle post-party? Lastly brush surface generously egg wash followed by sprinkling sanding sugar optional but oh-so-worth-it trust me—and don’t forget covering edges either using foil/pie shield prevent burning during initial bake time frame about twenty-five minutes total before lowering temp continuing additional thirty-five more minutes until bubbling perfection reached—isn’t anticipation exciting?
Stay tuned as we continue unraveling secrets behind creating perfect easy apple pie…
Step 5: Spoon the Sweet Symphony of Flavors
Now comes one of my favorite parts of making this Easy Apple Pie — layering in that luscious apple filling! Once you’ve rolled out your bottom crust and laid it lovingly into your pie plate, it’s time to bring that apple mixture to life. Gently spoon the apple filling over the bottom crust, allowing those beautifully spiced apples to nestle snugly together. It’s crucial to discard any excess juices that may have pooled at the bottom of the bowl. Why, you ask? Those juices, while tempting, can lead to a soggy crust rather than the crisp, flaky texture we adore. Your goal here is to create a harmonious balance between sweetness and spice without compromising the integrity of that stunning crust.
As you place the apple filling in, take a moment to appreciate the vibrant colors and enticing aroma wafting through your kitchen. The sweet smell of sugar melding with cinnamon and nutmeg is absolutely intoxicating! Trust me on this: every layer will contribute to a truly extraordinary experience when you take that first bite. Once you’ve arranged those apples like a work of art, it’s time to roll out your second disc of pie crust. Optically it should be a similar size — around 12 inches in diameter and about 1/8 inch thick — so it can beautifully cover your apple masterpiece.
Step 6: Securing Your Creation with Care
Next up is one of the more delicate steps in our Easy Apple Pie journey: sealing the edges. Now that you’ve rolled out your top crust, carefully lay it over the apple filling like a protective blanket. This step is not just about aesthetics; sealing those edges properly ensures that all those delightful juices stay tucked inside during baking, creating a wonderfully flavorful pie experience. Use a sharp knife to trim any excess dough hanging over the edge of your pie plate—this helps maintain an elegant finish while preventing burnt bits from spoiling our lovely dessert.
Here’s where precision matters! Lift where the two crusts meet gently but firmly, pressing them together with your fingers for that perfect seal. Fold them under themselves in a neat fashion; this creates a beautiful border and strengthens the structure of your pie. As you rotate your pie plate, repeat this process until you’re satisfied with how it looks—think rustic charm rather than perfection! And don’t forget to cut four small slits into the top dough; this is absolutely paramount for allowing steam to escape while baking. You want all those delicious flavors contained without turning into an overflowing mess!
Step 7: The Finishing Touches
Ah, we’re almost there! Now it’s time for what I consider one of the most enjoyable aspects of pie-making — giving your Easy Apple Pie its final touches before it heads off into the glorious heat of our oven. First things first: brush that surface with lightly beaten egg wash! This step is essential for achieving that golden-brown finish we all crave—it adds both flavor and visual appeal. A light touch is key here; you want just enough egg wash for color without saturating the dough.
Once you’ve brushed on that liquid gold, sprinkle some sanding sugar over the top if you’re feeling indulgent (it’s totally optional but oh-so-delicious!). The sugar will caramelize as it bakes, forming a sweet crust that’s simply irresistible. Covering the edges with either a pie shield or strips of aluminum foil is non-negotiable during those first 25 minutes in the oven; this prevents potential over-browning while ensuring our crust bakes evenly throughout.
Step 8: Baking Your Perfect Easy Apple Pie
Now we enter perhaps one of the most exhilarating phases—the baking process! Preheat your oven to 400°F (204°C) and place your beautiful creation on a baking sheet lined with parchment paper (trust me on this). It’s vital because pies can sometimes bubble over, so let’s avoid cleaning up burnt sugar later on! Bake at this high temperature for exactly 25 minutes before carefully removing your pie shield or foil covering.
As you continue baking at reduced heat (375°F or 190°C), keep an eye on how things are progressing; you’re looking for visual cues such as bubbling juices peeking through those slits along with perfectly golden-brown edges—this is where magic happens! Depending on your individual oven’s quirks and characteristics (because let’s face it, every oven has its personality), you may need an additional 30-35 minutes after lowering that temperature. When finished baking, allow your Easy Apple Pie to cool at room temperature for at least three hours before slicing into it.
This cooling period might feel torturous—believe me, I understand—but trust me when I say it’s absolutely worth it! Cooling allows those juicy flavors to meld beautifully together while letting our filling set properly so each slice holds its shape when served.
Final Touches: Presenting Your Easy Apple Pie
With patience finally rewarded through tantalizing aromas filling your home, it’s time for presentation—an art form in itself! When slicing into your Easy Apple Pie after cooling, you’ll discover perfectly tender apples nestled within their flaky embrace—each bite bursting with warm spices and sweet goodness. Serve warm or at room temperature alongside a scoop of dairy-free vanilla ice cream or fresh whipped cream if you’d like—a pairing made in dessert heaven!
As you share this cherished family recipe with friends or loved ones, remember that each slice carries love and warmth from my kitchen straight to yours. Enjoy every moment spent savoring this classic dessert because food isn’t just about nourishment—it’s about connection and celebration too! Happy baking!
Storage and Enjoyment Tips for Your Easy Apple Pie
Now that your Easy Apple Pie has emerged from the oven, with its golden-brown crust and intoxicating aroma wafting through the air, it’s time to celebrate! There’s nothing quite like the satisfaction of creating this masterpiece, and while indulging in a slice fresh out of the oven is undeniably delightful, knowing how to preserve this delicious creation will allow you to bask in its glory for days to come. Let’s dive into some helpful tips for storing your pie, ensuring that every bite remains as scrumptious as the first!
Storing Leftover Easy Apple Pie
To keep your Easy Apple Pie in peak condition after you’ve savored your initial slice (or two!), gently cover it with plastic wrap or foil. Alternatively, you can place it in an airtight container—trust me when I say that preserving that lovely flaky crust is non-negotiable! If stored properly at room temperature, your pie will stay fresh for about 2-3 days. For longer storage, a cool spot in the fridge works wonders and can extend its life up to a week. To maintain that heavenly texture, consider placing a slice of bread inside the container; it’s a charming little trick that helps absorb moisture without sacrificing flavor. After a day or two, you might find the pie has developed an even richer flavor profile as those spices mingle and deepen over time—what could be better than that? When you’re ready to enjoy another slice, simply pop it in the oven at 350°F (175°C) for about 10-15 minutes until warmed through; this will revive that inviting aroma and crisp up any soft spots.
Freezing Components for Later
If you’ve made more than one pie or simply want to save some for later indulgence (and let me tell you, it’s a fantastic idea!), freezing is an excellent option. To freeze your Easy Apple Pie, allow it to cool completely before wrapping it tightly with plastic wrap followed by aluminum foil—this double-layer ensures no freezer burn will sneak into your dessert. You can also freeze individual slices if you prefer smaller portions; just make sure they’re well-wrapped! Your pie can last up to three months in the freezer while still maintaining its delightful flavors. When you’re ready to bring back this sweet treat from its frosty slumber, simply let it thaw overnight in the refrigerator before baking it at 375°F (190°C) until warmed through and bubbly again. The convenience of having homemade apple pie ready at your fingertips is absolutely magical—I promise you’ll find yourself reaching for those frozen slices on cozy evenings or unexpected gatherings!
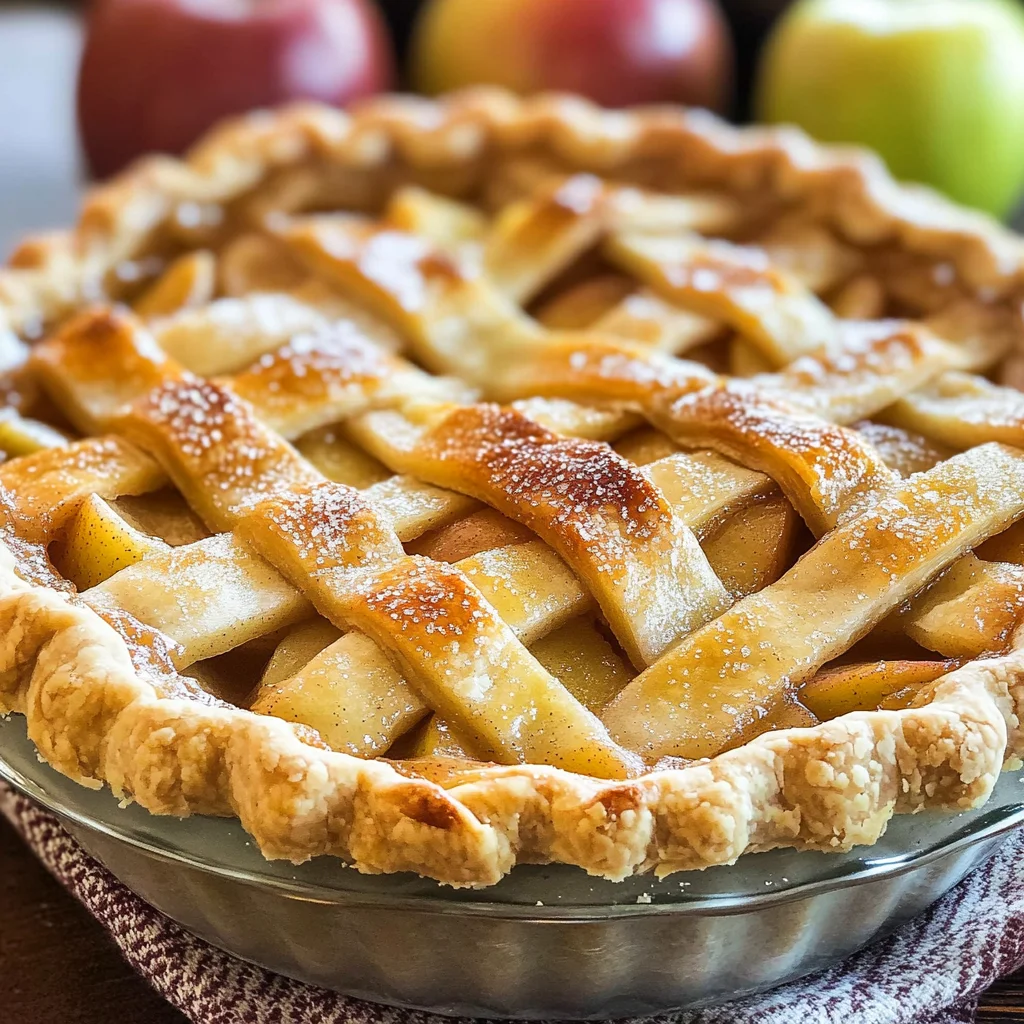
Easy Apple Pie

There’s nothing quite like the comforting aroma of freshly baked Easy Apple Pie filling your home, inviting everyone to gather around and indulge in a slice of nostalgia. This classic dessert features a flaky homemade crust that cradles a delightful filling of spiced Granny Smith apples, sweetened just right to balance their natural tartness. Each bite offers a perfect blend of warmth and sweetness, making it an ideal treat for family gatherings or cozy evenings at home. Whether served warm with a scoop of dairy-free ice cream or enjoyed on its own, this pie is sure to create cherished moments and delicious memories.
- Prep Time: 30 minutes
- Cook Time: 60 minutes
- Total Time: 1 hour 30 minutes
- Yield: Serves approximately 8 slices 1x
- Category: Dessert
- Method: Baking
- Cuisine: American
Ingredients
- 2 (9") pie crusts (homemade or store-bought)
- 7 large Granny Smith apples (peeled, cored, and sliced)
- 1/2 cup granulated sugar
- 1/2 cup light brown sugar (loosely packed)
- 2 tablespoons all-purpose flour
- 1 teaspoon ground cinnamon
- 1/8 teaspoon ground nutmeg
- 1 tablespoon lemon juice (plus zest from half a lemon)
- 1 large egg (for egg wash)
- Sanding sugar (optional)
Instructions
- Preheat the oven to 400°F (204°C).
- Prepare your pie crusts: Roll out one crust and place it in a deep dish pie plate.
- In a mixing bowl, combine sliced apples, granulated sugar, brown sugar, flour, cinnamon, nutmeg, lemon juice, and zest. Toss until apples are evenly coated.
- Spoon the apple mixture into the pie crust.
- Roll out the second crust and place it over the filling. Seal the edges by crimping them together and cut slits in the top for ventilation.
- Brush the top with lightly beaten egg wash and sprinkle with sanding sugar if desired.
- Bake for 25 minutes at 400°F before reducing the temperature to 375°F (190°C) and baking for an additional 30-35 minutes until golden brown and bubbling.
Nutrition
- Serving Size: 1 slice (100g)
- Calories: 250
- Sugar: 20g
- Sodium: 200mg
- Fat: 10g
- Saturated Fat: 4g
- Unsaturated Fat: 6g
- Trans Fat: 0g
- Carbohydrates: 39g
- Fiber: 3g
- Protein: 2g
- Cholesterol: 20mg