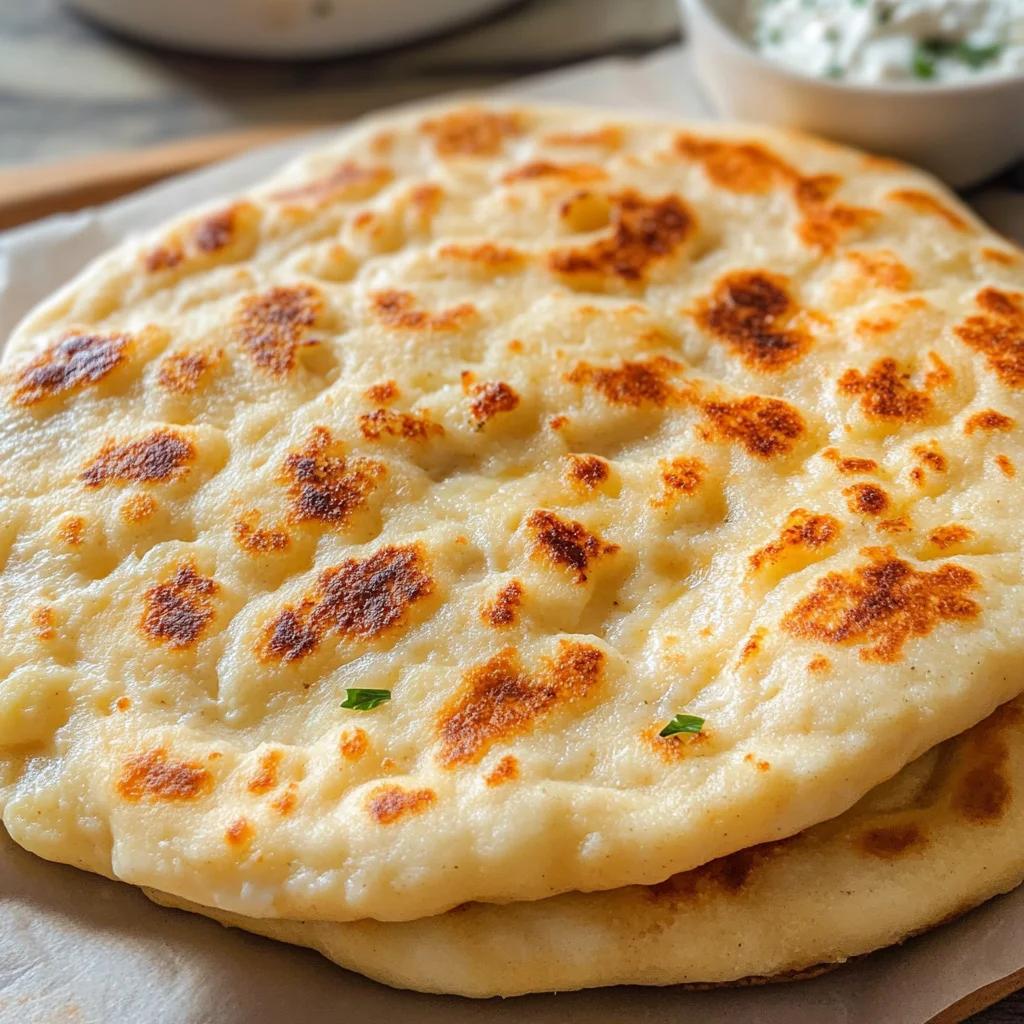
Cottage Cheese Flatbread Recipe
There’s something profoundly satisfying about creating a dish that embodies both comfort and creativity, and today, I want to share with you one of those gems: the Cottage Cheese Flatbread Recipe. This isn’t just any flatbread; it’s a delightful fusion that marries the creamy, rich texture of cottage cheese with the crispy, warm embrace of freshly cooked flatbread. Imagine pulling a soft, golden piece from the skillet, and as you tear into it, the steam rises, carrying with it an aroma that beckons you to take a bite. It’s an experience that transcends mere sustenance—each bite is a little love letter to your taste buds. Trust me when I say that this recipe is not only quick and easy but also bursting with potential for customization. Whether you enjoy it as a snack or as part of a meal, this flatbread will quickly become a staple in your kitchen.
What makes this Cottage Cheese Flatbread so special? Well, for starters, cottage cheese often gets overlooked in recipes—it’s like the quiet friend who surprises you with their remarkable talents once you get to know them. Rich in protein, this ingredient adds not only creaminess but also nutrition to our flatbread, making it a truly versatile option. The beauty of this dish lies in its simplicity; it can be enjoyed on its own or paired beautifully with savory dips like hummus or aromatic curries. Plus, it’s perfect for gatherings—imagine serving these warm flatbreads alongside a colorful array of toppings and dips at your next get-together! The possibilities are endless, and I’m excited for you to dive in.
Cottage Cheese Flatbread Recipe: A Delightful Snack Experience
Let’s embark on this culinary journey together! Making cottage cheese flatbreads is straightforward yet incredibly rewarding. With just a handful of ingredients likely already in your pantry, you’ll find yourself creating something truly delightful in no time.
Ingredients:
Starting with the right ingredients is key to crafting delicious cottage cheese flatbreads that are not only easy to make but also deeply satisfying.
- 1 cup cottage cheese. This creamy ingredient is at the heart of our recipe. It adds moisture and richness while also providing a surprising amount of protein—making these flatbreads perfect for keeping hunger at bay. When selecting cottage cheese, look for one that’s fresh and has a smooth texture; avoid anything overly watery or lumpy if possible. If you’re feeling adventurous or have dietary preferences, you can try using ricotta or even Greek yogurt as substitutes!
- 1 cup all-purpose flour. Flour serves as the backbone of our flatbread dough—it provides structure and stability while allowing our creation to puff up beautifully when cooked. For the best results, opt for unbleached all-purpose flour; it has more flavor and retains nutrients better than its bleached counterpart. If you’re looking for alternatives due to dietary restrictions or personal preference, whole wheat flour can work too! Just be aware that it might yield denser flatbreads.
- 1 tsp baking powder. This little powerhouse is crucial for giving our flatbreads that lovely rise we’re aiming for! Baking powder works by releasing carbon dioxide during cooking which causes the dough to expand; without it, we’d end up with dense little disks instead of fluffy delights! Always check your baking powder’s freshness by adding a teaspoon to water—if it bubbles vigorously, you’re good to go!
- 1/2 tsp salt. Salt might seem basic but it’s absolutely paramount in elevating flavors in any dish—including our flatbreads! It enhances the natural sweetness of the other ingredients while balancing out their flavors beautifully. Use fine sea salt or kosher salt for even distribution throughout the dough; just remember not to skip this step as it transforms your flatbreads from bland to extraordinary!
- 2 tbsp olive oil. This liquid gold not only adds flavor but also contributes to achieving that perfectly crisp exterior we desire in our flatbreads! Olive oil brings richness and complexity; plus its healthy fats make these snacks even more satisfying. When choosing olive oil, extra virgin is ideal because its robust flavor will shine through wonderfully—don’t settle for lower quality oils here!
Equipment You’ll Need:
Having the right tools on hand makes cooking more enjoyable and efficient; think of them as your trusty companions on this culinary adventure! You certainly don’t need fancy gadgets—just some essentials will do wonders.
- Mixing bowl: A sturdy mixing bowl is where all the magic begins! It should be large enough to accommodate all your ingredients without spilling over when you’re mixing them together—a medium-sized glass or ceramic bowl works perfectly here.
- Wooden spoon or spatula: This trusty tool will help you bring everything together into a cohesive dough without damaging your mixing bowl. A wooden spoon allows for easier mixing without scratching surfaces—and there’s something so nostalgic about using one!
- Rolling pin (optional): While shaping each piece into rough circles can be done by hand (and I recommend embracing their rustic charm), if you’d like thinner flatbreads or want uniformity in size, a rolling pin could come in handy.
- Non-stick skillet: A good-quality non-stick skillet ensures your flatbreads won’t stick while cooking—this means less mess and more deliciousness! Make sure it’s preheated properly before adding your dough; you’ll know it’s ready when drops of water sizzle upon contact.
Now that we have our ingredients and tools ready, let’s dive into making these delicious cottage cheese flatbreads!
Step 1: Start the Dough
Begin by combining your cottage cheese and all-purpose flour in your mixing bowl along with baking powder and salt—this initial mix sets the foundation for our delightful dough! The cottage cheese needs no prior preparation; simply scoop it straight from its container into the bowl where it’ll blend seamlessly with dry ingredients when stirred together gently. Don’t rush through this step; take time to ensure everything combines well without over-mixing—the goal is creating a soft yet slightly sticky dough that’s workable but not too wet.
Step 2: Bring It Together Gently
Once you’ve mixed everything until combined—think tender care rather than force—you’ll notice how beautiful textures start forming within your bowl! This process creates networks between proteins from both flour and cottage cheese which contributes significantly towards achieving those lovely puffs later on during cooking time! It’s okay if it’s not perfect; what matters most here is achieving cohesion without turning everything into mushy chaos.
Step 3: Let the Dough Relax
Now comes an essential yet often overlooked step: letting our dough rest covered tightly under plastic wrap or simply within its mixing bowl for about 5–10 minutes does wonders! During this brief respite period, gluten relaxes allowing flavors to meld harmoniously while making handling easier later down the line when shaping each piece into individual flatbreads—they’ll feel softer post-resting which helps prevent tearing!
Step 4: Divide Into Portions
When time’s up (and trust me—this waiting game pays off!), gently transfer your rested dough onto a lightly floured surface where you’ll deftly divide it into palm-sized portions using either your hands or a sharp knife—it doesn’t need precision here folks! Aim for roughly equal sizes so they cook evenly but embrace imperfections—they add character after all! Each portion should feel supple yet hold its shape nicely when rolled into balls before moving onto flattening them out.
As we continue through these steps together towards crafting mouthwatering cottage cheese flatbreads lovingly made from scratch—remember every detail matters—from ingredient selection down through technique execution—to ensure success every single time! I can already envision how wonderful these will turn out—and I can’t wait for you to experience them too!
Stay tuned as we explore further steps in preparing these delightful creations…
Cottage Cheese Flatbread Recipe: A Culinary Embrace
Oh, my dear friend, if you’ve ever found yourself daydreaming about the warmth of freshly baked bread wafting through your kitchen, then you are in for a treat with this Cottage Cheese Flatbread Recipe. This delightful creation is more than just a flatbread; it’s an experience, a journey of flavors and textures that come together in perfect harmony. With the creamy richness of cottage cheese enveloped in a crispy exterior, every bite is a celebration of simplicity and joy. Trust me, once you start making these, they’ll become a staple in your kitchen!
Step 5: Transforming the Dough into Delightful Portions
Now that your dough is beautifully relaxed and pliable after its brief rest (which is absolutely crucial to allow the gluten to develop without becoming tough), it’s time to take it to the next level by dividing it into portions. I like to envision this step as giving each little piece of dough its moment to shine. Grab your dough and place it on a lightly floured surface—this will prevent any unwanted sticking (and we definitely want to avoid that)! Using your hands, gently knead it just enough to make it cohesive, which should take only about a minute or two.
Once kneaded, use a bench scraper or your hands to cut the dough into small pieces—roughly the size of your palm works best here. You’re aiming for about four portions from this batch but feel free to adjust based on how large or small you’d like each flatbread to be. Each piece should feel soft yet slightly tacky; if it’s too sticky, don’t hesitate to sprinkle a little more flour on top. This tactile connection with the dough is what makes cooking so special—it’s all about feeling and intuition. Don’t rush this step; each portion deserves care and attention because they will soon transform into puffy delights that will fill your home with irresistible aromas.
Step 6: Sculpting Your Flatbreads
With your portions ready, we now enter the creative phase where you get to shape each piece into what will soon be golden-brown flatbreads! Take one portion at a time and place it back onto your floured surface. Using your fingers or a rolling pin (if you wish), flatten it out into a rough circle—don’t worry about perfection here! The beauty of homemade fare lies in its charming imperfections. Aim for about 1/4 inch thick; this thickness allows them to cook evenly while puffy enough for that lovely texture we adore.
As you shape each flatbread, think about how they will be enjoyed—perhaps alongside some spicy curry or even as a base for fresh toppings like hummus and veggies. Remember that this process is not just about creating food; it’s about expressing creativity and passion! Keep in mind that if you press too hard or roll them too thin, they may end up crispier than intended. So handle them gently and lovingly—after all, food made with love tastes infinitely better!
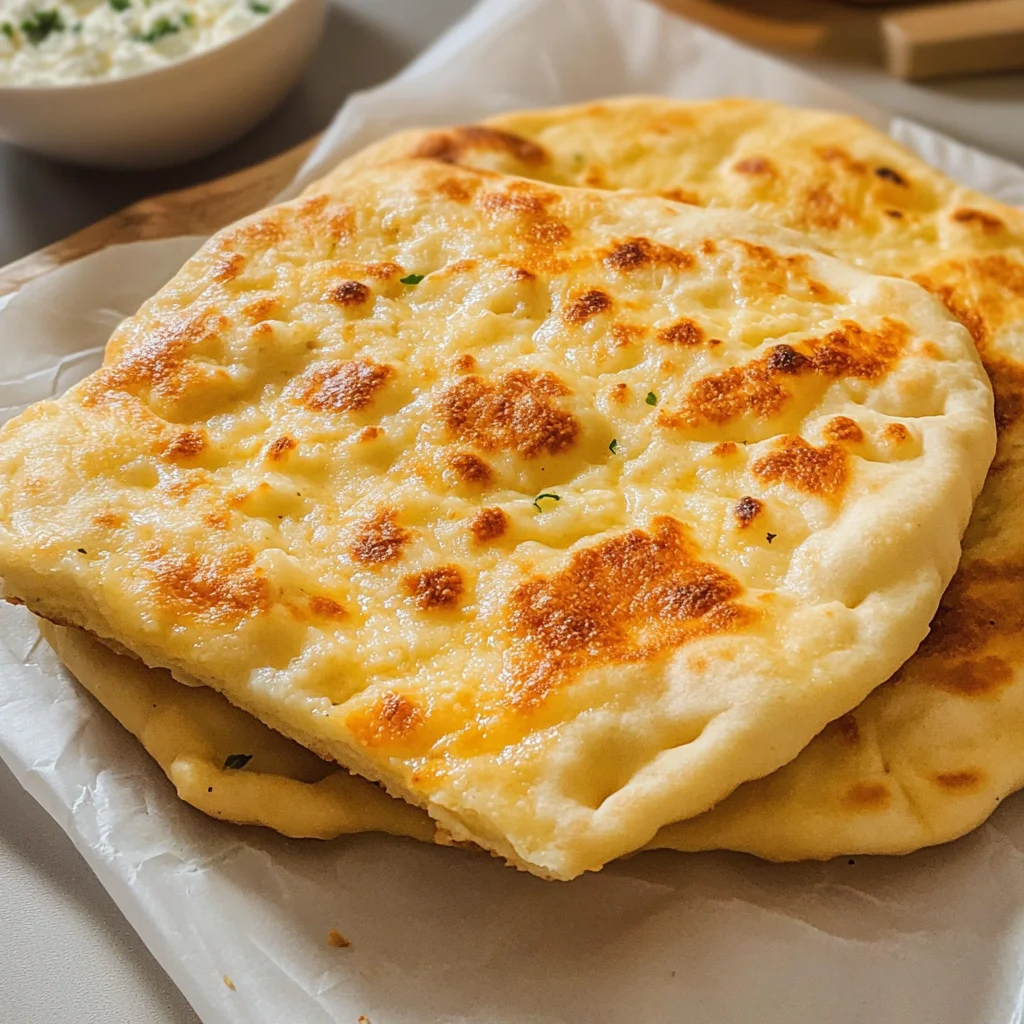
Step 7: Toasting Each Flatbread
Now comes one of my favorite moments—cooking these beautiful flatbreads! Heat up your skillet over medium heat; I can already hear the sizzle as the heat begins to build! While waiting for the skillet to warm up (which usually takes around 3-5 minutes), brush or drizzle a bit of olive oil onto its surface. This simple act serves two purposes: first, it prevents sticking (which we simply cannot have!), and second, it contributes that delicious golden color we all look forward to.
Once your skillet is ready—look for subtle waves dancing across the surface—you can start laying down those delightful rounds of dough one at a time. I recommend cooking them in batches depending on how large your skillet is; give them space to breathe! Cook each flatbread for about 2-3 minutes on one side until they start puffing slightly and turning golden brown. You’ll know they’re ready when you can smell that intoxicating aroma filling the air—absolutely divine! When it’s time to flip them over, use a spatula with confidence; this moment is where all your efforts begin transforming into something magical.
Step 8: The Art of Stacking and Softening
Once cooked to perfection on both sides—golden brown with those charming little puffs—you’ll want to stack these beauties under a clean kitchen towel right away. This step is non-negotiable if you want soft and pillowy flatbreads rather than dry ones. The steam trapped underneath the towel works wonders magically keeping them warm while also ensuring they maintain their tender texture.
As each one comes off the skillet, just imagine how wonderful they’ll taste paired with whatever dish you’re serving—or even as an afternoon snack just by themselves! Don’t be tempted to skip this resting period; allowing them time under the towel lets their flavors meld while keeping moisture intact. If you’re cooking for guests or family—and trust me they’ll be so impressed—you can keep them warm in an oven set at low heat until everyone’s ready at the table.
Final Touches: Enjoying Your Cottage Cheese Flatbreads
Step 9: Bringing It All Together
And now, my friend, we stand at the glorious finish line! Your creations are complete—the aroma wafting through your home must be utterly intoxicating by now. These Cottage Cheese Flatbreads are not just food; they’re an invitation for connection—a way to share love around the table with family and friends alike. As you prepare them for serving, consider what accompaniments might elevate their presence even further. They pair wonderfully with vibrant dips like hummus or creamy yogurt infused with garlic and herbs; think about how these flavors will dance together!
Remember that food isn’t merely sustenance—it carries stories from our kitchens straight into our hearts. Whether enjoyed during cozy evenings alone or shared during lively gatherings filled with laughter, these flatbreads are bound to leave lasting memories woven through every bite. So go ahead—serve them up warm and watch as smiles bloom around you. You’ve created something truly extraordinary today!
I promise you’ll find joy not only in savoring these delectable creations but also in sharing them with those you cherish most. Happy cooking!
Storage and Enjoyment Tips for Your Cottage Cheese Flatbread Recipe
Now that you’ve created this delightful Cottage Cheese Flatbread, the only thing left is to savor it! I can already picture you gathering around the table with friends or family, sharing stories and laughter over warm, crispy flatbreads. But what if you end up with some leftovers? Don’t worry; you can easily store them for later enjoyment. The beauty of this recipe is not just in its immediate satisfaction but also in its ability to be enjoyed over several days. Simply place your flatbreads in an airtight container or zip-top bag and tuck them away in the fridge. They’ll stay fresh for about 3-4 days, retaining that wonderful texture and flavor. To maintain their delightful quality, try placing a slice of bread in the container with them; this will keep the flatbreads from drying out too much. When you’re ready to enjoy them again, simply reheat them in a skillet over medium heat for a couple of minutes on each side or pop them into a toaster oven until they’re warm and slightly crisped. Trust me—there’s nothing quite like rediscovering a homemade treat!
Storing Leftover Cottage Cheese Flatbread Recipe
When storing your leftover Cottage Cheese Flatbread, it’s essential to use an airtight container to lock in moisture and prevent any unwanted odors from mingling. Keeping them in the refrigerator is key; they will stay deliciously fresh for about 3-4 days. If you find yourself with more than you can eat right away (which is totally understandable considering how irresistible they are!), I recommend layering them between parchment paper before placing them in the container. This little trick helps to prevent sticking while preserving their soft texture. After being stored, these flatbreads might lose a bit of their initial puffiness, but don’t fret! A quick reheat brings back that comforting warmth and soft bite that makes each one feel like a hug from the inside out.
Freezing Cottage Cheese Flatbread for Later
If you’re looking to extend the life of your Cottage Cheese Flatbread even further, consider freezing them! It’s incredibly simple—just allow your flatbreads to cool completely before wrapping each one individually in plastic wrap and then placing them all together into a freezer-safe bag or container. They’ll keep beautifully frozen for up to three months without losing their charm. When you’re ready to enjoy one again, there’s no need to thaw! Just grab one directly from the freezer and warm it up on a skillet or in the oven until it’s heated through; this ensures that every bite remains fluffy and full of flavor. This freezing method offers such convenience—you’ll have homemade goodness at your fingertips whenever those snack cravings hit!
Cottage Cheese Flatbread

Indulge in the comfort of homemade Cottage Cheese Flatbreads, a delightful fusion of creamy cottage cheese and warm, crispy goodness. This quick and easy recipe is perfect for any occasion, whether as a satisfying snack or an accompaniment to your favorite dips and dishes. Imagine pulling apart a golden flatbread, releasing steam that carries a heavenly aroma—each bite offers rich flavor and texture that will leave you smiling. With just a handful of simple ingredients, you can create fluffy flatbreads with endless customization potential.
- Prep Time: 10 minutes
- Cook Time: 15 minutes
- Total Time: 25 minutes
- Yield: Makes approximately four servings 1x
- Category: Snack
- Method: Frying
- Cuisine: Global
Ingredients
- 1 cup cottage cheese
- 1 cup all-purpose flour (or whole wheat flour)
- 1 tsp baking powder
- 1/2 tsp salt
- 2 tbsp olive oil
Instructions
- In a mixing bowl, combine cottage cheese, flour, baking powder, and salt until a soft dough forms.
- Let the dough rest for 5–10 minutes to relax the gluten.
- Divide the rested dough into palm-sized portions and shape each into a rough circle about 1/4 inch thick.
- Heat a non-stick skillet over medium heat and add a drizzle of olive oil.
- Cook each flatbread for 2-3 minutes on each side until golden brown and puffed.
- Stack cooked flatbreads under a towel to keep warm and soft.
Nutrition
- Serving Size: 1 flatbread (60g)
- Calories: 155
- Sugar: 2g
- Sodium: 250mg
- Fat: 6g
- Saturated Fat: 1g
- Unsaturated Fat: 5g
- Trans Fat: 0g
- Carbohydrates: 20g
- Fiber: 1g
- Protein: 7g
- Cholesterol: 5mg