Baked Chickpea and Rice Balls
There’s something truly magical about the act of cooking, isn’t there? It’s not merely about the food; it’s a tapestry woven from memories, sensations, and love. When I think of my time spent in the kitchen, I am reminded of the warmth radiating from the oven, the intoxicating aromas wafting through the air, and the joyful laughter shared over a delicious meal. Today, I’m thrilled to introduce you to a recipe that embodies all these beautiful moments: Baked Chickpea and Rice Balls. These delightful little bites are not just food; they are an experience—a fusion of textures and flavors that sing together in perfect harmony. Imagine sinking your teeth into a crispy exterior that gives way to a savory, flavorful center—each bite is a testament to what happens when love meets creativity!
This recipe holds a special place in my heart, as it beautifully bridges tradition and innovation. Chickpeas, often celebrated for their versatility and nutritional value, bring both protein and creaminess to these rice balls. With their golden crust and herby freshness from parsley and chives, they make for an utterly satisfying snack or appetizer. Whether you’re hosting friends for game night or simply craving something wholesome to nibble on while catching up on your favorite show, these chickpea and rice balls will surely impress! So let’s embark on this culinary adventure together; trust me, you’ll want to savor every moment.
Baked Chickpea and Rice Balls: Crunchy on the Outside, Creamy on the Inside
Welcome to a delightful journey where flavor meets health! These Baked Chickpea and Rice Balls are not only easy to prepare but also incredibly satisfying. If you’ve ever found yourself rummaging through your pantry for something nutritious yet delicious, this is your answer. Packed with protein from chickpeas and carbohydrates from rice, these little gems are perfect for any time of day—whether as a mid-afternoon snack or as part of a cozy dinner spread.
Ingredients:
As we gather our ingredients for this culinary treasure trove, take a moment to appreciate each component’s role in creating something truly special. This recipe is not just about combining items; it’s about harmonizing flavors and textures that come together effortlessly!
- 1 (15-ounce) can of chickpeas (garbanzo beans): Rinsed, drained, and patted very dry. These little legumes serve as the protein-packed heart of our dish! Their creamy texture when mashed infuses our rice balls with richness while providing essential nutrients. Make sure to choose high-quality canned chickpeas—look for those without added preservatives or sodium if possible. If you’re feeling adventurous, you could also use dried chickpeas that have been soaked overnight; just remember they’ll need extra cooking time prior to mashing.
- 1 ½ cups cooked rice: Chilled. Leftover rice is perfect here since its drier texture helps bind everything together beautifully. Brown or white rice both work well—brown rice adds a nutty flavor while white provides a milder base that lets other ingredients shine. The key is ensuring it’s chilled because warm rice can make your mixture too mushy.
- 1/2 cup Panko breadcrumbs: Plus an additional 1/2 cup for coating. Panko breadcrumbs are essential for achieving that irresistibly light and crispy exterior we crave! Unlike regular breadcrumbs, Panko has larger flakes that create air pockets during baking—resulting in an airy crunch that’s simply divine.
- 1/4 cup finely chopped fresh parsley: This herb adds not just vibrant color but also a burst of fresh flavor that elevates our dish! Look for bright green leaves with no wilting; fresh parsley should smell fragrant rather than musty.
- 2 tablespoons finely chopped fresh chives: They lend a delicate onion flavor that complements our ingredients without overpowering them—a subtle touch that rounds out the overall taste profile beautifully.
- 1 large egg: Acting as our primary binder here, this ingredient ensures our balls hold their shape during baking while adding moisture to keep them tender.
- 2 cloves garlic: Minced—because garlic is life! Its pungent aroma fills your kitchen with warmth while deepening the savory notes in our mixture.
- 1 teaspoon onion powder: This ingredient offers sweetness along with savory undertones more evenly distributed than fresh onion could achieve—it’s an unsung hero in enhancing depth without becoming overwhelming.
- 1/2 teaspoon smoked paprika: Our secret weapon! It adds smoky depth that transforms ordinary bites into something extraordinary—trust me; you’ll want it in your pantry!
- 1/2 teaspoon salt: Essential for enhancing all other flavors—seasoning is crucial here! Adjust according to taste later on if needed.
- 1/4 teaspoon black pepper: Freshly ground for optimal flavor—this adds just the right amount of warmth without stealing attention from other ingredients.
- 2 tablespoons olive oil: For brushing on before baking—it ensures our rice balls develop a gorgeous golden-brown color while becoming perfectly crisp!
Equipment You’ll Need:
Before we dive into preparing these delectable bites, let’s take stock of some essential tools that will make our cooking experience smoother and more enjoyable. While they may not be ingredients, having the right equipment at hand can truly elevate your culinary creations!
- Large mixing bowl – A spacious bowl is crucial for combining all those lovely ingredients without making too much mess. It allows ample room for mixing with ease.
- Potato masher or fork – This tool helps break down those chickpeas into just the right texture! You want some chunks left intact; this creates delightful texture contrast within each bite.
- Spatula or sturdy spoon – Ideal for folding ingredients gently together without overmixing—a gentle hand ensures our final product remains tender rather than tough!
- Parchment paper – Line your baking sheet with parchment paper; it prevents sticking while making cleanup effortless—a simple step that’s absolutely paramount!
- Pastry brush – Perfectly applies olive oil onto each ball before baking; this tiny tool makes achieving even browning so much easier!
Now that we’ve gathered our ingredients and equipment let’s get started on creating these delightful Baked Chickpea and Rice Balls!
Step 1: Preheat & Prepare
First things first: preheat your oven to 400°F (200°C) because we want it nice and hot when it’s time to bake those beauties! Line a large baking sheet with parchment paper—it’s crucial for keeping our rice balls from sticking during cooking while also making cleanup an absolute breeze afterward. Set aside your prepared baking sheet so it’s ready when we start rolling those flavorful morsels!
Step 2: Mash Those Chickpeas
In a large mixing bowl, add your rinsed, drained, and thoroughly dried chickpeas (remember how important drying them well was!). Using either a potato masher or simply the back of fork will do wonders here as you mash away until they’re mostly broken down yet still retain some texture—we’re aiming for rusticity rather than smoothness like hummus would be! Keep an eye out for small chunks; they’ll add delightful surprises when biting into each ball later!
Step 3: Combine Core Ingredients
Once you’ve achieved satisfactory mashed chickpeas (they should feel creamy but not soupy), it’s time to bring together those core elements we discussed earlier! Into your bowl filled with mashed magic goes chilled cooked rice along with half cup Panko breadcrumbs—you’ll notice how nicely these all blend together once mixed well! Next add finely chopped parsley plus chives followed by minced garlic along with onion powder—and finally sprinkle in smoked paprika alongside salt & freshly ground black pepper too because seasoning matters immensely at every stage!
Step 4: Add The Binder
Now we need one more key player—the egg! Crack open one large egg into another small bowl then give it a gentle whisk using fork—just enough to combine yolk & white harmoniously before pouring its golden goodness directly onto our mixture waiting patiently inside mixing bowl below! Now comes one of my favorite parts—you’ll want clean hands here because using them ensures everything gets incorporated perfectly without overworking dough which can lead us astray toward tough outcomes instead of tender delights like we’re after today!
That wraps up our initial steps toward crafting these irresistible Baked Chickpea & Rice Balls! Remember every detail counts—from how well those chickpeas are mashed down right through ensuring mixture stays moist yet cohesive enough once formed into beautiful shapes ahead… Can’t wait until next time when we’ll tackle forming & baking magic together!
Step 5: Chill to Perfect Ball Forming
Now comes a step that might test your patience, but trust me, it’s absolutely crucial for achieving the perfect Baked Chickpea and Rice Balls. Once you’ve combined all those delightful ingredients into a cohesive mixture, it’s time to cover the bowl with plastic wrap and pop it in the refrigerator for at least 30 minutes. This isn’t just idle time; it’s a transformative phase where the magic happens. Chilling allows the rice and breadcrumbs to absorb moisture from the chickpeas, which creates a firm structure that holds everything together when you roll them into balls. If you skip this step or rush through it, you’re setting yourself up for a potential disaster where your balls could collapse in the oven.
As the mixture chills, the flavors will meld beautifully, making each bite even more delectable. I promise you’ll be amazed at how much richer and more harmonious the taste becomes after just a short wait. So, while you’re twiddling your thumbs waiting for that timer to go off, take a moment to appreciate how such simple ingredients can come together in such an extraordinary way. And remember, good things come to those who wait!
Step 6: Forming Your Flavorful Balls
Once your mixture is chilled and ready to go, it’s time to roll up your sleeves and get your hands a little messy—this is where the fun really begins! Start by preparing your coating station; pour the remaining 1/2 cup of Panko breadcrumbs onto a shallow dish or plate. This makes it easy for you to generously coat each ball with that sought-after crispy exterior. Now, using a spoon or your hands (I prefer my hands for that personal touch!), scoop out about 2 tablespoons of the chilled mixture at a time. Gently compress it in your palm before rolling it into a firm ball about 1.5 inches in diameter.
The texture should be moist enough to hold together without crumbling but not so wet that it sticks excessively to your fingers. You want these balls to have some substance while still being light enough to bake up beautifully crisp! As you form each ball, take a moment to appreciate how satisfying this process can be; there’s something wonderfully therapeutic about shaping food with your hands. Remember not to rush—this is an essential part of creating those perfectly formed Baked Chickpea and Rice Balls!
Step 7: Coat and Arrange for Crispy Perfection
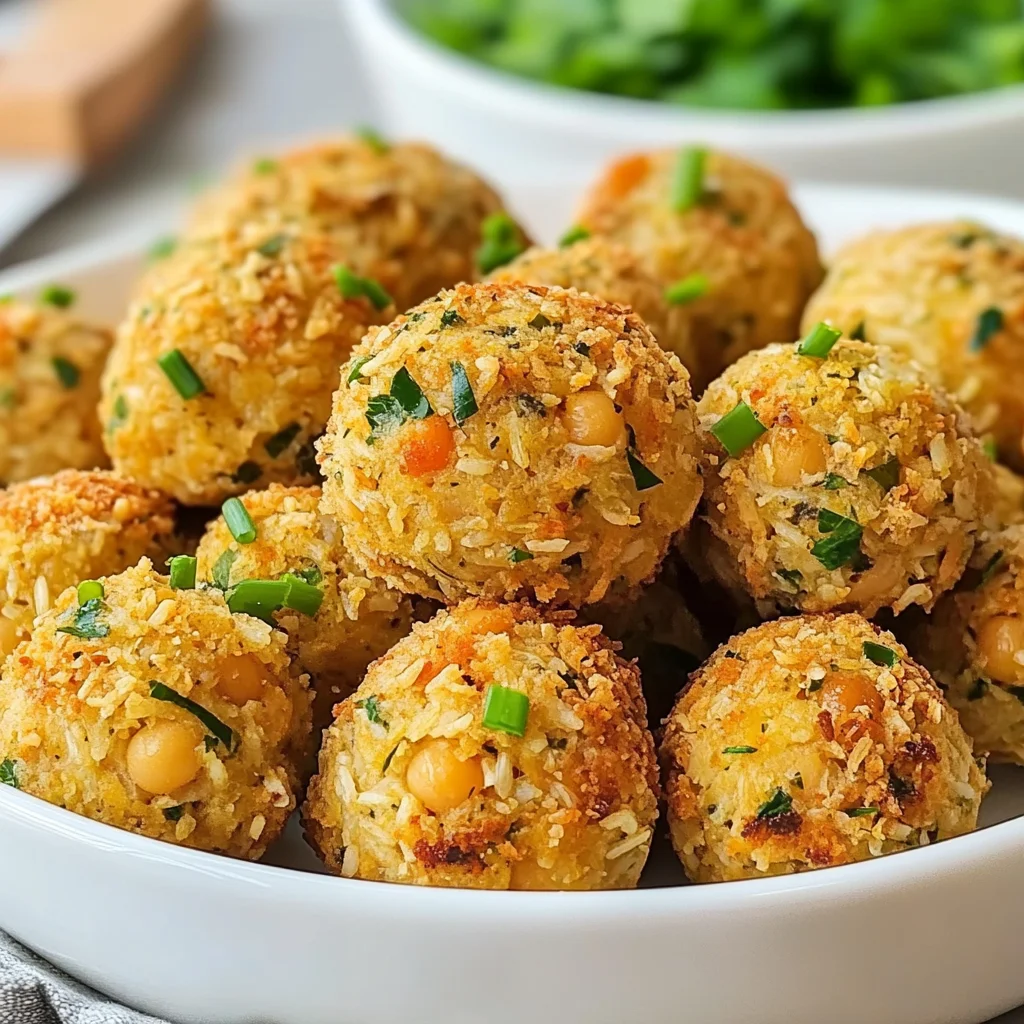
Now that you have rolled out all those adorable chickpea balls, it’s time for their makeover! This is one of those steps that makes all the difference between just okay and utterly intoxicatingly crispy Baked Chickpea and Rice Balls. Take each little sphere you’ve lovingly crafted and roll it gently in the Panko breadcrumbs until fully coated on all sides. This breadcrumb layer acts as armor during baking—ensuring they emerge golden brown and crisp rather than soft or soggy.
As you arrange these beauties on your prepared parchment-lined baking sheet, make sure there’s some space between each ball; this allows hot air from the oven to circulate freely around them, promoting even cooking and browning. Think of this as giving them room to breathe! It might seem like an insignificant detail now, but trust me when I say that giving them space means you’ll end up with perfectly cooked bites every single time.
Step 8: Bake Your Way to Golden Perfection
Finally, we arrive at one of my favorite moments—the baking phase! Preheat your oven to 400°F (200°C) if you haven’t already done so; this temperature is absolutely paramount for achieving that perfect golden crust while keeping the interior moist and flavorful. Once heated, slide your baking tray into the oven with anticipation bubbling inside you! Set a timer for 20-25 minutes because this is where transformation truly occurs—those lovely little balls will puff up slightly as they bake.
At around the halfway mark—about 12 minutes in—carefully pull out your baking sheet so you can turn each ball over gently using tongs or a spatula. This step ensures they cook evenly on both sides; nobody wants lopsided balls! You’re looking for that gorgeous golden-brown hue as visual confirmation of their doneness; if they are starting to look too dark too quickly, don’t hesitate to lower your oven’s temperature slightly—it’s always better to err on caution when achieving perfection.
As they finish baking, allow yourself some anticipation; soon enough you’ll be rewarded with an aroma wafting through your kitchen that’s nothing short of heavenly! The combination of garlic and smoked paprika filling the air will have everyone gathering around asking what deliciousness is emerging from your oven.
Final Touches: Cooling and Serving Your Masterpieces
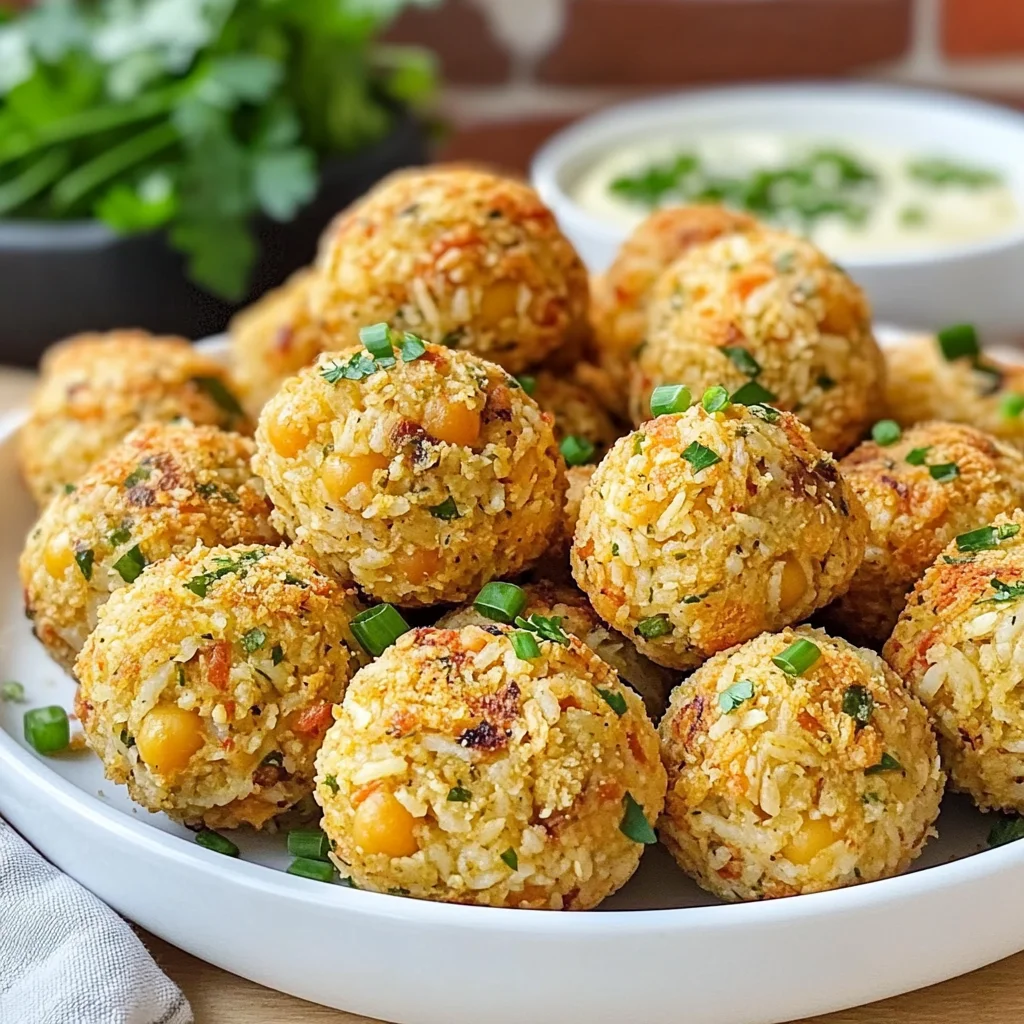
Once those beautiful Baked Chickpea and Rice Balls are out of the oven—golden brown with an irresistible crunch—you’ll want to let them cool on the baking sheet for just a few minutes before diving in. Now why cool? Well, as they sit for those brief moments, they firm up slightly which makes them easier to handle without falling apart when served. Not only does this resting period enhance their texture further but also gives you just enough time to whip up any dipping sauce you’ve been dreaming about!
Imagine serving these warm delights alongside homemade tahini dip or even zesty marinara sauce—the possibilities are endless! Each bite will be profoundly satisfying—a delightful blend of nutty chickpeas enveloped in crispy goodness paired with fresh herbs that burst forth like sunshine on a summer day. Gather around friends or family; these Baked Chickpea and Rice Balls are meant for sharing—and I promise they won’t last long once everyone gets a taste!
Storage and Enjoyment Tips for Your Baked Chickpea and Rice Balls
Now that your Baked Chickpea and Rice Balls are golden brown, crisp on the outside, and utterly irresistible, it’s time to dive into how to enjoy them to the fullest! Whether you’ve made a big batch for a gathering or just a cozy dinner for yourself, knowing how to store these delightful bites will help you savor their deliciousness long after they come out of the oven. So let’s talk about preserving those crispy gems, ensuring they remain as flavorful and satisfying as when they first came out of the oven.
Storing Leftover Baked Chickpea and Rice Balls
To keep your leftover Baked Chickpea and Rice Balls fresh and delectable, transfer them into an airtight container—this is absolutely crucial for maintaining their texture and flavor. You can store them in the refrigerator for up to five days. If you want to elevate your storage game, consider placing a slice of bread in the container with the rice balls; this little trick helps retain moisture without making them soggy. When stored properly, these beauties will still offer that fun crunch on the outside while remaining tender inside when reheated. For warming them back up, simply pop them in the oven at 350°F (175°C) for about 10 minutes until they regain their crispiness or microwave them for a quick treat—though I recommend the oven if you want to preserve that delightful texture!
Freezing Baked Chickpea and Rice Balls for Later
If you’re looking to prepare ahead or save some for later indulgence, freezing your Baked Chickpea and Rice Balls is an excellent option! To freeze them properly, lay each ball out on a baking sheet lined with parchment paper and place it in the freezer until they are firm—about an hour should do it. Once frozen solid, transfer them into a freezer-safe bag or container. They can be stored this way for up to three months! The convenience factor here is truly magical; imagine pulling a few from the freezer on a busy weekday evening! Simply bake them straight from frozen at 400°F (200°C) for about 25-30 minutes, adding an extra few minutes if needed until they’re heated through and crispy again. This makes weeknight meals so much easier while still delivering that comforting homemade taste!
Baked Chickpea and Rice Balls

Baked Chickpea and Rice Balls are a delightful blend of textures and flavors that bring joy to any occasion. These crispy bites feature protein-packed chickpeas combined with wholesome rice, fresh herbs, and aromatic spices, all baked to perfection for a golden crust that’s irresistible. Whether served as an appetizer at your next gathering or enjoyed as a nutritious snack, these flavorful morsels are sure to impress. Easy to make and highly customizable, you can experiment with various herbs and spices to create your own unique twist. Get ready for a culinary adventure that transforms simple ingredients into an extraordinary experience.
- Prep Time: 15 minutes
- Cook Time: 25 minutes
- Total Time: 40 minutes
- Yield: Approximately 12 servings 1x
- Category: Appetizer
- Method: Baking
- Cuisine: Mediterranean
Ingredients
- 1 (15-ounce) can of chickpeas, rinsed and drained
- 1 ½ cups cooked rice, chilled
- 1/2 cup Panko breadcrumbs (plus more for coating)
- 1/4 cup fresh parsley, finely chopped
- 2 tablespoons fresh chives, finely chopped
- 1 large egg
- 2 cloves garlic, minced
- 1 teaspoon onion powder
- 1/2 teaspoon smoked paprika
- Salt and black pepper to taste
- 2 tablespoons olive oil
Instructions
- Preheat the oven to 400°F (200°C) and line a baking sheet with parchment paper.
- In a large mixing bowl, mash the rinsed chickpeas until mostly smooth but still chunky.
- Add the chilled rice, Panko breadcrumbs, parsley, chives, garlic, onion powder, smoked paprika, salt, and pepper. Mix well.
- Incorporate the egg into the mixture using clean hands until everything is combined without overworking it.
- Chill the mixture in the refrigerator for at least 30 minutes.
- Form the mixture into balls about 1.5 inches in diameter and roll them in Panko breadcrumbs for coating.
- Arrange them on the prepared baking sheet with space between each ball and brush lightly with olive oil.
- Bake for 20-25 minutes or until golden brown and crispy.
Nutrition
- Serving Size: 3 balls (135g)
- Calories: 230
- Sugar: 2g
- Sodium: 320mg
- Fat: 8g
- Saturated Fat: 1g
- Unsaturated Fat: 5g
- Trans Fat: 0g
- Carbohydrates: 30g
- Fiber: 6g
- Protein: 10g
- Cholesterol: 35mg