Panda Express Mushroom Chicken Copycat
There’s something profoundly satisfying about recreating a beloved dish from your favorite restaurant, especially one that holds a special place in your heart. The aroma of sautéed garlic mingling with tender chicken, earthy mushrooms, and crisp zucchini fills the kitchen as you cook up this Panda Express Mushroom Chicken Copycat recipe. It’s more than just food; it’s an experience—a comforting embrace that brings back fond memories. I can almost hear the clattering of chopsticks and the laughter of friends as we dig into a communal bowl of this delightful dish. As you dive into making this recipe, I promise you’ll find that it’s not just about the flavors but also about the love and warmth that comes with sharing good food.
Now, what makes this mushroom chicken so irresistible? It strikes a perfect balance between savory and slightly sweet, enriched by the umami of mushrooms and the freshness of zucchini. Every bite is a symphony of flavors that dances on your palate—a blend so delightful you’ll want to share it with everyone you know. It’s perfect for a cozy weeknight dinner or even for impressing guests during a casual get-together. Trust me; once you taste this version, you may find yourself favoring it over takeout! So grab your apron and let’s embark on this culinary journey together.
Panda Express Mushroom Chicken Copycat: A Flavorful Adventure Awaits
This copycat recipe is not just an imitation; it’s an invitation to recreate a beloved classic right in your own kitchen! Let’s transform simple ingredients into something utterly extraordinary.
Ingredients:
As we gather our ingredients for this delicious recipe, it’s essential to appreciate each component’s role in creating the rich tapestry of flavors in our Panda Express Mushroom Chicken Copycat. Each ingredient has its purpose, contributing to the overall harmony of the dish.
- 1 pound boneless and skinless chicken breast (500 grams, thinly sliced- 1/4 inch thick): The star of our dish! Choosing boneless and skinless chicken breast ensures tenderness without excess fat, allowing it to soak up all those vibrant flavors from our marinade. Thinly slicing is crucial; it not only speeds up cooking time but also allows for better flavor absorption. When shopping for chicken, look for pieces that are firm to the touch and have no discoloration—freshness matters!
- 2 tablespoons vegetable oil: This oil is vital for stir-frying at high temperatures—it helps achieve that lovely golden sear on our chicken while providing a neutral flavor base. I recommend using oils with high smoke points like canola or grapeseed if you’re looking for alternatives. This step is paramount because proper searing locks in juices and enhances texture.
- 2 cups mushrooms (cleaned and quartered): Mushrooms add an earthy depth to our dish that’s simply irresistible! I often opt for cremini or shiitake mushrooms due to their robust flavors, but button mushrooms work just as well. When selecting mushrooms, ensure they’re firm and free from dark spots—this will guarantee maximum freshness!
- 1 large zucchini (cut into half circles): Zucchini brings brightness and color while adding essential nutrients to our meal. Plus, it cooks quickly, complementing the chicken beautifully. Look for zucchinis that are firm without soft spots for optimal results.
- 3 minced garlic cloves: Ah, garlic—the magical ingredient that elevates any dish! Minced garlic releases its oils more effectively than whole cloves, infusing our meal with aromatic goodness that’s both comforting and invigorating. Don’t rush chopping here; taking your time ensures maximum flavor release.
- 1 teaspoon minced ginger: Ginger adds warmth and spice that perfectly balances out the richer flavors in this dish. Fresh ginger is always best; its bright flavor can’t be matched by powdered versions. If you’re new to working with ginger, remember that peeling it can be easily done with a spoon!
- 2 tablespoons light soy sauce: This ingredient introduces saltiness while enhancing umami notes without overpowering other flavors—it’s crucial in Asian cooking! Opting for low-sodium varieties helps control salt levels without sacrificing taste.
- 1 tablespoon rice vinegar: Rice vinegar adds a subtle tanginess that lifts all the flavors in our dish beautifully. It’s milder than regular vinegar which makes it perfect here—don’t skip it!
- 1 tablespoon sesame oil: Oh, sesame oil—this liquid gold brings nutty richness to our sauce! Just remember, a little goes a long way; its intense flavor can dominate if used too liberally.
- 2 tablespoons corn starch: A non-negotiable when it comes to achieving that luscious sauce consistency we crave in stir-fries! Cornstarch acts as a thickening agent when combined with liquids—mixing it well ensures smooth integration without lumps.
- 1/2 cup water: Water serves as part of our sauce base—it helps dissolve other ingredients while forming that delightful glaze over everything at the end.
- 1/4 cup light soy sauce: We’ll use more soy sauce later to deepen the flavor profile even further—it really rounds out all those savory notes we’ve built up throughout cooking!
- 2 tablespoons oyster sauce: This sauce adds complexity with hints of sweetness along with umami depth; however, if you’re avoiding animal-derived products altogether, feel free to substitute with mushroom-based sauces available on the market today!
- 1 tablespoon rice vinegar: Yes again! This extra splash helps brighten everything up at the finish line while tying together all those bold elements we’ve layered throughout.
- 2 teaspoons brown sugar: Sweetness enhances key flavors here—it plays beautifully against salty notes from soy sauces while balancing overall taste profiles perfectly!
- 1 tablespoon cornstarch (for sauce): We need another helping hand from cornstarch here too—it’ll help thicken our sauce even further during cooking so every bite feels luxurious!
Now that we’ve gathered everything we need let’s move on and explore how these components come together in such a magical way!
Equipment You’ll Need:
Before diving into cooking, having the right tools can make all the difference in your kitchen experience—trust me on this one! The joy of cooking grows exponentially when you’re equipped with reliable equipment designed to make your life easier while crafting delicious meals.
- Large skillet or wok – This is where all the magic happens! A wide surface area allows heat distribution necessary for stir-frying evenly without overcrowding ingredients—which could lead them steaming instead of frying if crammed together too tightly.
- Cutting board – A sturdy cutting board provides stability while chopping or slicing vegetables efficiently without slipping around—a must-have companion as we prep fresh ingredients.
- Chef’s knife – A sharp chef’s knife is essential for precise cuts—you’ll want something comfortable yet effective at tackling various tasks like mincing garlic or slicing through tender chicken safely!
- Mixing bowls (medium & small) – Having separate mixing bowls helps streamline organization during meal prep so you’re not scrambling around looking for containers mid-recipe when timing matters most!
Now we’re ready to prepare this wonderful Panda Express Mushroom Chicken Copycat together! Are you excited? Let’s get started!
Step 1: Marinate Your Chicken
In a medium bowl combine 2 tablespoons light soy sauce, 1 tablespoon rice vinegar, 1 tablespoon sesame oil, and 2 tablespoons corn starch—this mixture creates an incredible marinade packed full of flavor that’ll help tenderize our chicken while ensuring even coating when cooked! Once you’ve whisked these ingredients together until smooth (don’t worry if some lumps remain—that’s normal), add in your thinly sliced chicken breast pieces. Gently toss everything until each piece gets coated evenly; this step truly sets up layers upon layers of flavor later on during cooking time! Allow marinating for at least 20–30 minutes (or ideally overnight) so those wonderful tastes have time to meld together beautifully before hitting heat.
Step 2: Prepare Your Sauce
While waiting patiently on marinating magic happening within your fridge (I know how hard it can be!), let’s prepare our sauce by combining ½ cup water alongside additional quantities—¼ cup light soy sauce along with 2 tablespoons oyster sauce plus another splash of rice vinegar (yep!) paired beautifully against sweetness from brown sugar mixed into 1 tablespoon cornstarch—all whisked until smooth again—it should feel velvety rich after mixing well enough! Setting aside allows us flexibility later when everything hits heat simultaneously without losing momentum—we want sizzling action happening quickly once we’re ready!
Step 3: Sear That Chicken!
Now comes one of my favorite parts—let’s get sizzling! Heat up your large skillet over high heat first before adding those precious two tablespoons vegetable oil carefully once it’s smoking hot—you’ll want maximum sear but also avoid burning anything at this point too much either so pay attention closely here! Add marinated chicken pieces into hot skillet one layer at time (no overcrowding please!)—you should hear gratifying sizzle immediately greet you upon contact which means we’re doing things right! Cook until golden brown on both sides flipping occasionally until cooked through entirely—about six minutes total should suffice depending thickness level achieved earlier during slicing stages previously discussed above already earlier…(remember patience pays off!). Once done remove cooked chicken onto clean plate setting aside momentarily as we shift focus towards veggies next…
Step 4: Stir-Fry Those Veggies!
With no time wasted let’s dive straight into adding two cups cleaned quartered mushrooms along with one large half-circle sliced zucchini directly back into same skillet where glorious aromas linger still from earlier steps taken before now—incredibly fragrant aromas waft throughout kitchen instantly uplifting spirits instantly encouraging everyone nearby wanting join feast soon ahead… Cook veggie mixture roughly three minutes max until they reach crisp-tender state where colors brighten beautifully—not mushy though please!! Stir frequently keeping eye ensuring even cooking occurs throughout entire process watching carefully till they glisten enticingly under bright stove lights illuminating scene around us gracefully reminding why love doing what do best…
Stay tuned as we bring home those final touches transforming simple components into utterly intoxicating meal ahead just moments away now friends…
Step 5: Infusing Flavor with Aromatics
Now that the chicken is perfectly seared and resting, it’s time to elevate this dish by introducing some aromatic elements that will make your kitchen smell heavenly! Reduce the heat to medium-low, which is crucial because we want to gently coax out the flavors without burning anything. In the same skillet where you cooked your chicken, add the minced garlic and ginger. Trust me on this: these two ingredients are like a warm hug for your taste buds. The garlic brings a robust, savory note while the ginger adds a slight zing that dances on your palate.
As you stir them in, take a moment to notice how they begin to sizzle and release their intoxicating fragrance into the air. This is an essential step because cooking garlic and ginger helps to mellow their sharpness while amplifying their flavor profile, creating a base for the sauce that will envelop everything in its luscious embrace. You’ll want to cook them for about one minute, stirring frequently; keep an eye on them to prevent burning—slightly browned garlic can turn bitter, which would be a shame after all your hard work! The moment you smell that delightful aroma wafting through your kitchen, you’ll know it’s time to move on.
Step 6: The Grand Assembly of Flavors
Now comes one of my favorite moments in cooking—the union of everything we’ve prepared so far! Gently reintroduce the seared chicken back into the skillet along with those beautifully sautéed aromatics. It’s like seeing old friends reunite! At this point, you may want to give everything a gentle toss or stir; don’t rush this step. Take your time to ensure each piece of chicken gets coated in those fragrant garlic and ginger flavors.
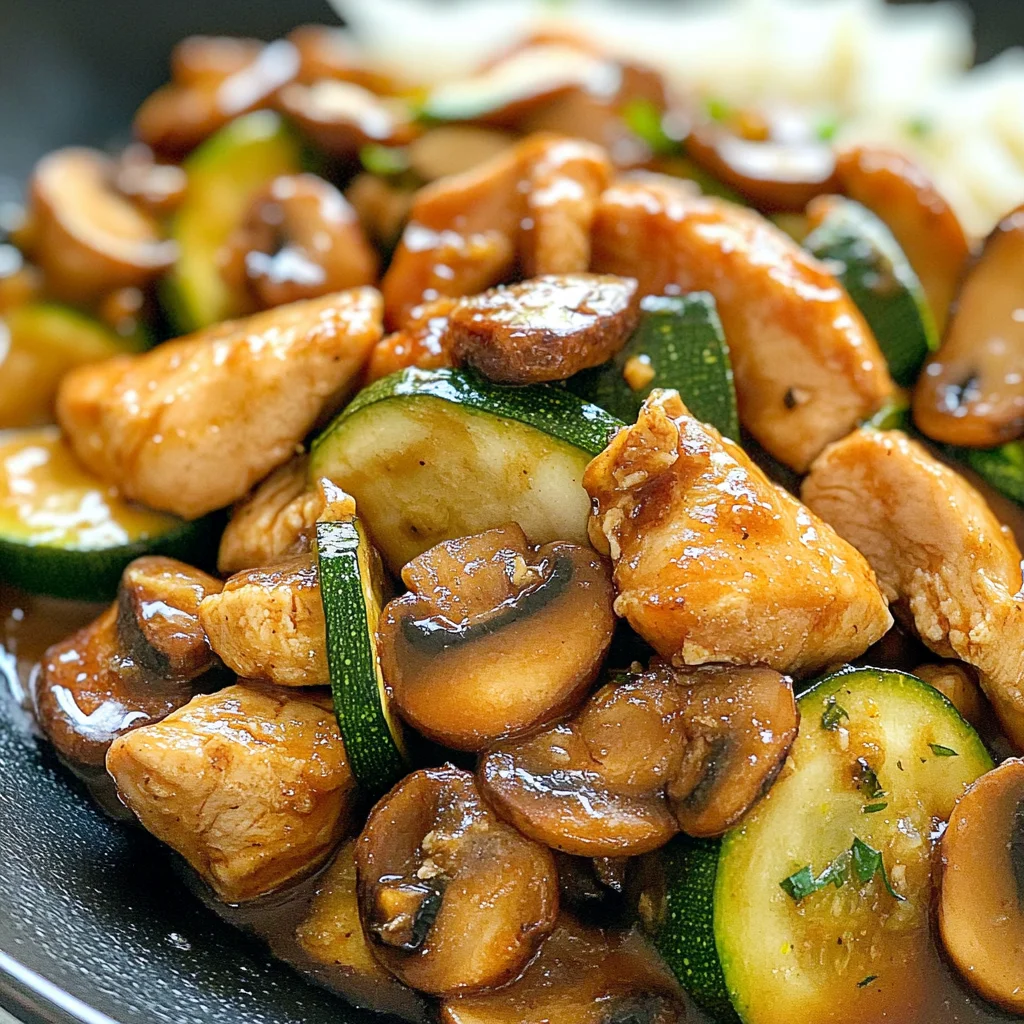
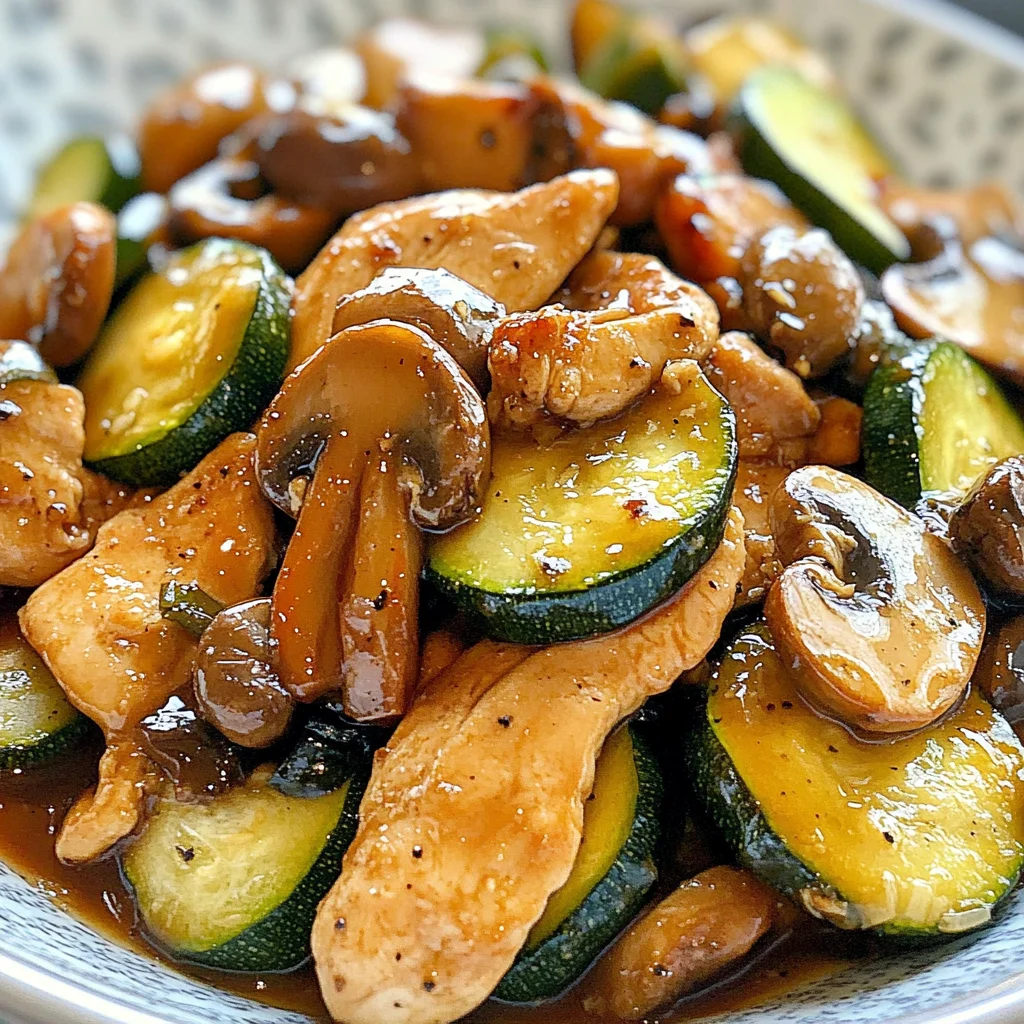
Once everything is well mixed, it’s time for the pièce de résistance: pouring in that tantalizing sauce we prepared earlier. This sauce is truly extraordinary—it’s a harmonious blend of umami from the soy sauce and oyster sauce (which you can replace with mushroom soy or another plant-based alternative if needed), tartness from rice vinegar, and just enough sweetness from brown sugar to balance out those bold flavors. Stir everything together gently but thoroughly; you want every component—chicken, mushrooms, zucchini—to be luxuriously coated in this thickening sauce. As it begins to bubble and thicken (about 2-3 minutes), you’ll notice how it transforms into a glossy finish that glistens under your kitchen lights—a visual cue that tells you you’re heading towards perfection!
Step 7: The Finishing Touches
As we reach the final stages of our Panda Express Mushroom Chicken Copycat masterpiece, it’s important not to overlook those last touches that can make all the difference. Once you’ve stirred everything together and let it simmer until thickened—this should take about another minute—you’ll notice how beautifully cohesive the dish has become. The sauce should cling lovingly to each piece of chicken and vegetable, creating what I like to call a symphony of flavors on your plate.
Now is also the perfect opportunity for a quick taste test! This isn’t just about checking seasoning; it’s an invitation for you to experience just how delicious this dish has become. If you feel it needs a little more depth or brightness, consider adding another splash of soy sauce or a pinch more sugar at this stage—small adjustments can elevate your creation even further! Once satisfied with its flavor profile, remove it from heat and prepare for plating; remember that presentation matters too!
Step 8: Serving Your Culinary Creation
Now comes perhaps one of my favorite moments: serving up this stunning dish! When plating your Panda Express Mushroom Chicken Copycat, think about color contrast and texture variety. I love serving mine over fluffy white jasmine rice or vibrant brown rice—both options complement this dish wonderfully while absorbing all those delightful juices. If you’re feeling adventurous (and I know you are!), consider garnishing with sliced green onions or toasted sesame seeds for an added crunch and freshness that will visually pop!
As you ladle generous portions onto plates, take a moment to appreciate what you’ve created—not just a meal but an experience filled with warmth and satisfaction. Serve immediately while it’s still steaming hot; trust me when I say there’s something utterly intoxicating about enjoying this dish fresh off the stove while those flavors are at their peak! Gather around with friends or family as they marvel at your culinary prowess—they won’t believe how easy it was for you to whip up such an extraordinary meal!
Final Thoughts on Your Panda Express Mushroom Chicken Copycat
Cooking isn’t merely about following recipes; it’s about sharing love through food—and I hope this Panda Express Mushroom Chicken Copycat has allowed you to do just that! With its tender chicken marinated in flavorful sauces alongside fresh vegetables bathed in aromatic spices, every bite promises joy and comfort. Remember that practice makes perfect; don’t hesitate to make tweaks based on what resonates best with your palate next time you make it!
I promise you’ll find yourself coming back again and again—not only for its ease but also because it’s truly satisfying both for body and soul. Enjoy every mouthful, my friend—you’ve earned it!
Storage and Enjoyment Tips for Your Panda Express Mushroom Chicken Copycat
Oh, the moment has arrived! Your kitchen is filled with a delightful aroma that promises to whisk you away to your favorite takeout spot. As you savor each bite of this Panda Express Mushroom Chicken Copycat, I can’t help but feel a rush of joy knowing you’re about to experience something truly special. But what happens when there are leftovers? Fear not! Let’s talk about how to preserve this deliciousness so you can enjoy it again and again.
Storing Leftover Panda Express Mushroom Chicken Copycat
To keep the magic alive, you’ll want to store any leftovers in an airtight container. Glass containers are fantastic because they don’t retain odors and are microwave-safe, but plastic works just as well if that’s what you have on hand. Make sure to refrigerate your mushroom chicken within two hours of cooking, and it will stay fresh for about 3-4 days. Now, here’s a little pro tip: if you want to maintain the chicken’s juicy texture, consider placing a slice of bread in the container. This might sound quirky, but it helps absorb excess moisture and prevents your chicken from becoming too soggy. When you reheat your dish, just gently warm it up in a skillet or microwave until heated through—trust me, the flavors will be just as vibrant as the first time around.
Freezing for Later
If you find yourself with more than one meal’s worth of this scrumptious dish (which is entirely possible because it’s so good!), freezing is an excellent option. To do this properly, allow your mushroom chicken to cool completely before transferring it into a freezer-safe container or heavy-duty freezer bag. Make sure to press out any excess air before sealing; this will help prevent freezer burn. Your copycat creation can be frozen for up to three months while still maintaining quality! When you’re ready to use it, simply thaw it overnight in the refrigerator and reheat as mentioned above. Having this delectable dish on standby means more cozy dinners without any hassle—what could be better?
Panda Express Mushroom Chicken Copycat

There’s nothing quite like the satisfaction of recreating a beloved dish from your favorite restaurant, and this Panda Express Mushroom Chicken Copycat recipe is sure to hit the spot. With tender chicken sautéed to golden perfection, earthy mushrooms, and vibrant zucchini, this dish offers a delightful balance of savory and slightly sweet flavors. The aroma of garlic and ginger fills your kitchen as you whip up this comforting meal that’s perfect for a cozy weeknight dinner or impressing guests at your next gathering. Each bite promises warmth and nostalgia, making it an experience worth sharing with friends and family. Get ready to enjoy homemade goodness that rivals takeout!
- Prep Time: 30 minutes
- Cook Time: 15 minutes
- Total Time: 45 minutes
- Yield: Serves approximately four people 1x
- Category: Dinner
- Method: Stir-frying
- Cuisine: Asian
Ingredients
- 1 pound boneless, skinless chicken breast (thinly sliced)
- 2 cups mushrooms (cleaned and quartered)
- 1 large zucchini (cut into half circles)
- 3 minced garlic cloves
- 1 teaspoon minced ginger
- 2 tablespoons light soy sauce
- 1 tablespoon rice vinegar
- 2 tablespoons vegetable oil
- 2 tablespoons corn starch
- 1/4 cup water
Instructions
- In a bowl, mix together light soy sauce, rice vinegar, sesame oil, and corn starch. Add the chicken slices and marinate for at least 30 minutes.
- Prepare the sauce by combining water, additional soy sauce, oyster sauce (or mushroom alternative), rice vinegar, brown sugar, and cornstarch in a bowl; whisk until smooth.
- Heat vegetable oil in a large skillet over high heat. Sear the marinated chicken until golden brown on both sides; remove from skillet.
- In the same skillet, stir-fry mushrooms and zucchini for about three minutes until tender-crisp.
- Add garlic and ginger; sauté until fragrant.
- Return chicken to the skillet, pour in the sauce mixture, and stir well until everything is coated and thickened.
Nutrition
- Serving Size: 1 cup (240g)
- Calories: 310
- Sugar: 6g
- Sodium: 890mg
- Fat: 10g
- Saturated Fat: 1g
- Unsaturated Fat: 8g
- Trans Fat: 0g
- Carbohydrates: 22g
- Fiber: 2g
- Protein: 27g
- Cholesterol: 85mg