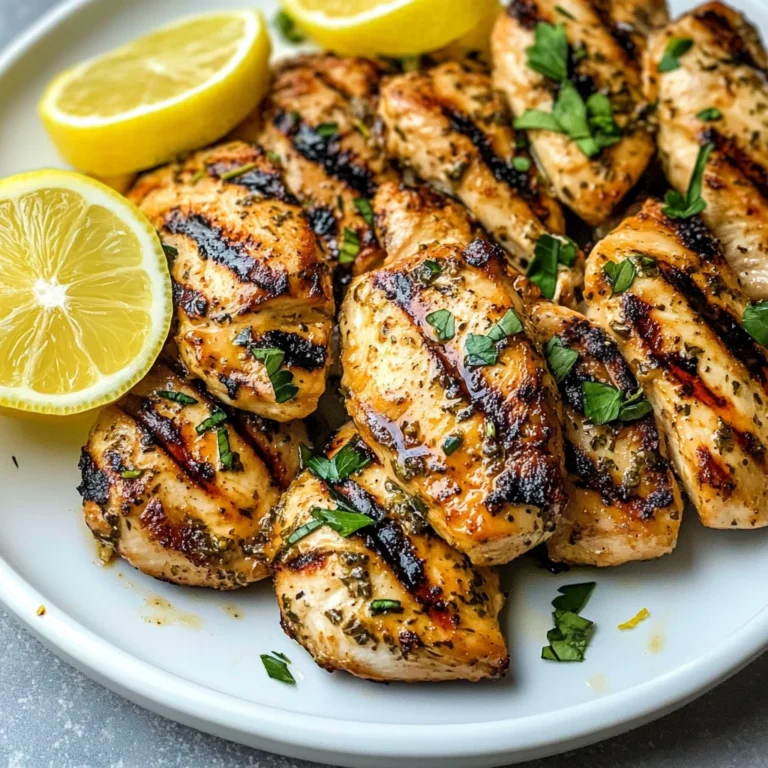
Peruvian Chicken Recipe
There’s something utterly captivating about the way food can weave its way into our lives, creating connections that are both profound and delightful. This Peruvian Chicken Recipe is more than just a meal; it’s a celebration of culture, flavor, and the simple joy of sharing good food with those we love. Imagine the aroma of marinated chicken sizzling on the grill, mingling with hints of garlic and lime, while the sun dips low in the sky. It’s an experience that transcends mere sustenance—it’s a bridge to vibrant traditions and cherished memories. As you savor each bite of this juicy chicken paired with a creamy green sauce, you’ll find yourself transported to a bustling Peruvian market or perhaps a lively family gathering where laughter fills the air. Trust me when I say this dish will become a staple in your kitchen, proving that deliciousness knows no boundaries.
This recipe is more than just a method to cook chicken; it captures the essence of Peruvian cuisine—balancing bold spices with fresh ingredients to create layers of flavor that dance on your palate. The beauty of Peruvian cooking lies in its rich heritage; it draws from indigenous traditions as well as influences from Spanish, African, and Asian cuisines. This stellar combination makes every bite not just tasty but also packed with stories and history. Perfect for summer barbecues or cozy family dinners alike, this Peruvian Chicken brings warmth and zest to any occasion. So roll up your sleeves and let’s embark on this culinary journey together!
Peruvian Chicken Recipe: A Flavorful Journey Awaits
Welcome! Today we’re diving into one of my all-time favorites: Peruvian Chicken with Creamy Green Sauce. This dish is not just about grilling chicken; it’s about embracing flavors that burst forth in every single bite. With tender chicken thighs marinated in a symphony of spices and served alongside an utterly intoxicating creamy sauce, you’re in for a treat that’s sure to impress friends and family alike.
Ingredients:
As we gather our ingredients for this culinary adventure, let’s take a moment to appreciate each component’s role in bringing this dish to life. Each ingredient contributes not just flavor but also texture and depth, ensuring that every mouthful is memorable.
- 2 pounds boneless, skinless chicken thighs: Choosing chicken thighs over breasts is crucial in this recipe because they are inherently juicier, thanks to their higher fat content. This fat keeps them moist during cooking, allowing them to soak up all those incredible flavors from the marinade beautifully. Look for thighs that have a nice pink color; avoid anything that looks gray or has an off smell. If you prefer breast meat for leaner options, I promise it’ll still be delicious—just keep an eye on cooking times as they can dry out more quickly.
- 5 cloves garlic (peeled): Garlic is truly the heart of this marinade—it infuses the chicken with its aromatic qualities while adding a depth that’s simply irreplaceable. When choosing garlic, look for firm bulbs without any soft spots or sprouting; these signs indicate freshness which translates directly into flavor richness. You might be tempted to use less garlic if you’re cautious about its potency, but don’t shy away! The roasting process mellows it beautifully and creates an utterly addictive quality.
- 1/3 cup soy sauce: This ingredient adds umami—a savory depth that’s absolutely paramount in achieving balanced flavor profiles. It acts as both a seasoning agent and part of the marinade’s liquid base. Opt for low-sodium soy sauce to control salt levels without sacrificing taste; it’s perfect for letting other flavors shine through without overwhelming your palate.
- 2 tablespoons lime juice: Fresh lime juice brings brightness and acidity that cuts through the richness of the chicken beautifully. It helps tenderize the meat while enhancing flavors—a non-negotiable step! Always choose fresh limes over bottled juice; there’s simply no comparison when it comes to taste.
- 1 tablespoon extra virgin olive oil: A drizzle of high-quality olive oil adds smooth richness to our marinade while helping keep everything moist during grilling. Look for oils labeled “extra virgin,” which means they are made from pure olives without chemical processing—a true liquid gold that elevates any dish!
- 2 teaspoons cumin: Cumin introduces earthy warmth with its nutty undertones that complement the spice profile wonderfully. It’s one of those spices that’s often overlooked but can transform a good dish into something extraordinary! When purchasing cumin, check for freshness—whole seeds last longer than ground versions—so consider buying whole cumin seeds and grinding them yourself if you want maximum flavor impact.
- 1 teaspoon paprika: Paprika offers more than just color; it lends sweetness along with subtle smokiness depending on whether you choose sweet or smoked varieties (both work here!). Look for vibrant red paprika—faded colors suggest age—and try experimenting between types as each brings unique nuances.
- 1/2 teaspoon dried oregano: Oregano adds herbal notes that brighten up our marinade while harmonizing beautifully with other spices like cumin and paprika—it’s crucial for achieving depth! Always opt for dried herbs stored properly away from light; they lose potency over time.
- Black pepper: Freshly cracked black pepper enhances everything by introducing heat and complexity—never underestimate its power! Use whole peppercorns whenever possible; freshly ground pepper bursts forth aromatic oils unavailable in pre-ground versions.
- 3 jalapeños (seeded, ribs removed and roughly chopped): These little green gems pack both heat and flavor into our marinade! By removing seeds/ribs before chopping them up, you control spiciness levels effectively—don’t worry if spicy isn’t your jam; substituting bell peppers works too!
- 1 cup fresh cilantro leaves: Cilantro adds freshness unlike anything else—it’s like nature’s bright herbaceous gift! Make sure it’s vibrant green without wilting leaves or yellowing spots; wash thoroughly before using since dirt tends to cling tightly.
- 2 green onions (chopped – green parts only): Green onions contribute mild oniony flavor plus beautiful color contrast against our grilled chicken! Chop only the green tops—the white parts can sometimes overpower dishes unless cooked first—and enjoy their delightful crunch!
- 2 cloves garlic (peeled): Yes—we’re using more garlic here! These will go into our creamy green sauce where they really shine through blending processes ahead—so don’t skimp!
- 1/2 cup mayonnaise: This luscious ingredient creates creaminess within our sauce while acting as an emulsifier so everything holds together perfectly after blending! Choose high-quality mayonnaise made from whole ingredients—or whip up your own if feeling adventurous!
- 1/4 cup Greek yogurt: Adding Greek yogurt lightens things up while providing tangy notes alongside mayo richness—talk about balance! Full-fat varieties offer richer taste compared to low-fat alternatives without sacrificing texture either way!
- 1 tablespoon lime juice: Yep—we’re adding another splash here too! This extra zing complements creamy elements beautifully & helps prevent separation later on!
- 1/2 teaspoon salt & 1/4 teaspoon black pepper: Simple yet critical seasonings round out flavors across both components seamlessly—always adjust according personal preference afterward!
- 2 tablespoons extra virgin olive oil: Finally back again—it helps bind everything together plus provides lusciousness needed when dressing salads/dipping veggies later during serving!
With these fabulous ingredients at hand, we’re ready to take on some serious culinary magic!
Equipment You’ll Need:
Before we dive into preparing this tantalizing Peruvian Chicken Recipe, let’s talk about some essential tools that’ll help us achieve success in every step along the way. While technically not ingredients themselves, having these trusty kitchen companions makes cooking smoother and far more enjoyable—all contributing toward crafting something wonderful together.
- Mixing bowl – A large mixing bowl allows ample space for marinating our chicken without worrying about spills or messes—which means less clean-up later too! Choose one made from glass or stainless steel since plastic containers may absorb odors over time causing unexpected flavors down line especially with strong seasonings involved here.
- Whisk or fork – To blend marinades thoroughly—and let me tell you—it matters greatly when making sure all those spices get evenly distributed throughout every morsel! A good whisk works wonders here but even forks can do double duty if needed too so don’t stress too much over fancy gadgets unless they inspire creativity!
- Grill pan (or outdoor grill) – This is where we’ll bring those beautiful chicken thighs alive via caramelization magic happening over high heat—yielding gorgeous char marks & intense smoky essence everyone craves at barbecue parties! If using an outdoor grill ensure cleanliness beforehand as built-up residue alters final results drastically affecting taste negatively…
- Meat thermometer – For perfectly cooked juicy chicken thighs every single time—a must-have tool ensuring safety alongside ideal textures achieved within recommended temperature range ensuring no dryness occurs whatsoever during grilling process either way should ensure satisfaction aplenty among guests gathered around table enjoying feast prepared lovingly…
Now that we have our ingredients lined up alongside trusty tools ready & waiting patiently let us embark upon preparing this delightful feast together step-by-step ensuring each detail shines brightly through resulting masterpiece crafted lovingly within kitchen today…
Step 1: Marinating Magic
First things first—the marinade is where all those gorgeous flavors start dancing together! In your mixing bowl (preferably large enough), combine 5 peeled garlic cloves alongside 1/3 cup soy sauce followed by 2 tablespoons fresh lime juice plus 1 tablespoon extra virgin olive oil next sprinkle in 2 teaspoons cumin along with 1 teaspoon paprika & ½ teaspoon dried oregano finally season generously using black pepper until fragrant aromas waft toward nose filling space around inspiring excitement already building within culinary adventure ahead…
Once combined thoroughly mix well using whisk until everything blends seamlessly creating an aromatic paste-like mixture perfect coating soon-to-be-chicken thighs waiting eagerly nearby soaking up goodness throughout process ahead… Remember—you want each piece coated generously so don’t rush this step taking time ensures maximum penetration yields results beyond expectations later down line making flavors sing harmoniously across palate after grilling completes successfully completing transformation journey begun earlier today…
Step 2: Time To Marinate
After creating our aromatic marinade masterpiece quietly nestle those beautiful boneless skinless thigh pieces inside ensuring they get well submerged beneath flavorful concoction resting comfortably within bowl leaving behind nothing untouched by magic swirling around inside container enclosing them tightly practically begging us consume later once finished absorbing all goodness present awaiting patiently till then… Cover securely allowing marination period lasting anywhere between minimum half hour ideally overnight however best results often achieved allowing flavors meld overnight creating synergy between ingredients resulting ultimately juicy tender bites exploding delightfully across taste buds…
Step 3: Prepare That Creamy Green Sauce
While marinated proteins rest cheerfully basking away waiting patiently let us shift focus onto crafting perfect accompaniment—the utterly addictive creamy green sauce accompanying grilled wonders soon arriving shortly thereafter… Begin gathering remaining ingredients now nestled safely aside earlier including remaining peeled garlic cloves along freshly chopped cilantro leaves plus jalapeño pieces awaiting transformation into velvety goodness blended harmoniously next place all these lovely elements directly within clean mixing container add generous dollop half cup mayonnaise followed closely behind by quarter cup Greek yogurt along splash additional tablespoon freshly squeezed lime juice finally season lightly sprinkling salt & black pepper hanging above waiting cheerfully join party inside bowl before reaching next stage…
Using immersion blender (or regular blender if preferred) slowly pulse everything gently until smooth consistency reached resembling liquid gold shimmering invitingly inviting excitement rise higher building anticipation awaiting tasting session soon approaching swiftly down path leading toward flavorful bliss promising promised rewards revealing themselves shortly…
Step 4: Grill Time!
Now comes one of my favorite parts—the actual grilling process itself where aromas begin wafting through air signaling something magical taking place right outside doorsteps attracting curious noses nearby wanting glimpse what’s happening behind scenes transforming raw ingredients mere moments ago now sizzling alluringly enticing everyone around drawing them closer towards irresistible scent landscape unfolding before eyes appearing oh-so-perfectly golden brown shimmering enticingly against flames licking edges bringing joy exponentially higher among participants gathered eagerly awaiting sampling tastes soon arriving shortly thereafter…
Preheat grill pan outdoors ideally high temperature allows searing action happen instantly creating crispy outer crust locking moisture inside capturing juicy tenderness throughout entire piece remaining intact preventing dryness occurring later due excessive heat exposure lingering around longer periods thus ensuring satisfaction aplenty returned unto diners joining festivities surrounding evening events unfolding magically tonight filled excitement laughter shared between friends family alike celebrating special moments crafted lovingly through dedication food prepared together earlier today infused love care poured wholeheartedly turned extraordinary experiences shared forevermore….
So fire up those grills get ready unleash culinary powers holding within reach transforming humble protein into delectable delicacies worth savoring long after final bites consumed…
Stay tuned as we continue diving deeper exploring further steps showcasing how finish off plating elegantly showcasing artistry involved presenting beautifully plated masterpiece anyone would be proud serve proudly around dinner table tonight leaving lasting impressions upon hearts souls gathered sharing laughter joy celebrating meaningful connections strengthened bonds formed lifelong memories created forever cherished surrounded experiences made through delicious food enjoyed fully together…
Step 5: Marinating the Chicken – A Flavorsome Transformation
Now that you’ve prepared your marinade, it’s time for one of the most crucial steps in this Peruvian Chicken Recipe: marinating the chicken. This isn’t just a formality; it’s where all those vibrant flavors start to meld together and penetrate into the meat, making it utterly irresistible. You’ll want to place your two pounds of boneless, skinless chicken thighs into a large bowl or a resealable plastic bag—whichever is easier for you. Pour that glorious marinade over the chicken, ensuring every piece is thoroughly coated. This step is paramount because marinating not only infuses the chicken with those intoxicating flavors from the garlic, soy sauce, and spices but also helps tenderize the meat.
Once your chicken is enveloped in this delicious concoction, cover the bowl with plastic wrap or seal the bag tightly, then pop it in the refrigerator. I recommend letting it marinate for at least 30 minutes, but if you have more time—say two to four hours—this will yield even better results! Trust me on this; allowing those spices to mingle and marry creates a symphony of flavors that transforms ordinary chicken into something truly extraordinary. The acid from the lime juice starts breaking down proteins in the chicken, which results in that juicy tenderness we all crave. Keep in mind that while a quick marinate will give you some flavor, a longer resting period allows every bite to be imbued with richness.
Step 6: Preparing Your Grill – The Art of Temperature Control
While your chicken is luxuriating in its marinade, let’s talk about preparing your grill because this is where magic happens! Whether you’re using a charcoal grill or a gas grill, achieving the right temperature is absolutely non-negotiable for creating perfectly grilled chicken. If you’re working with charcoal, light it up and let those coals burn until they’re covered with white ash—this usually takes about 15-20 minutes. For gas grills, preheat on medium-high heat for about 10-15 minutes before grilling. You want to aim for an internal temperature around 400°F to 450°F; this high heat ensures that we get those beautiful grill marks and delicious crispy bits while keeping the inside juicy.
Another tip? Make sure to oil your grill grates lightly before placing your chicken on them. This simple act serves two purposes: it helps prevent sticking and adds an extra layer of flavor as that olive oil sizzles away under high heat. Don’t rush this step! Properly heated grates will help achieve those gorgeous sear marks that not only look appetizing but also enhance flavor through caramelization—a process where sugars in food turn golden brown and develop deeper notes as they cook. Visual cues are key here; when you see smoke rising and hear a satisfying sizzle when placing your chicken on the grill, you know you’re on the right track!
Step 7: Grilling the Chicken – Embrace Your Inner Grill Master
Now comes perhaps my favorite part—the actual grilling! With everything prepped and ready to go, take your marinated chicken out of the fridge and allow it to come closer to room temperature for about 10-15 minutes before hitting that grill; this small pause helps in even cooking throughout. Place each piece of chicken onto the hot grill grates without overcrowding them; giving them space isn’t just courteous but vital for achieving that perfect sear. You should hear an exhilarating sizzle as each piece makes contact with those hot grates—it’s music to any cook’s ears!
Cook the chicken for about 6-8 minutes on each side without moving them too much; resist that urge! Flipping too often can prevent lovely char marks from forming and disrupts the cooking process. After about six minutes on one side, gently lift a piece with tongs to check for those enticing grill marks—you want them deep and caramelized but not burnt! The goal here is not only to achieve visual appeal but also to lock in moisture and flavor through searing while cooking through evenly. When cooked through, your internal temperature should ideally reach around 165°F; investing in an instant-read thermometer can be incredibly helpful here as well.
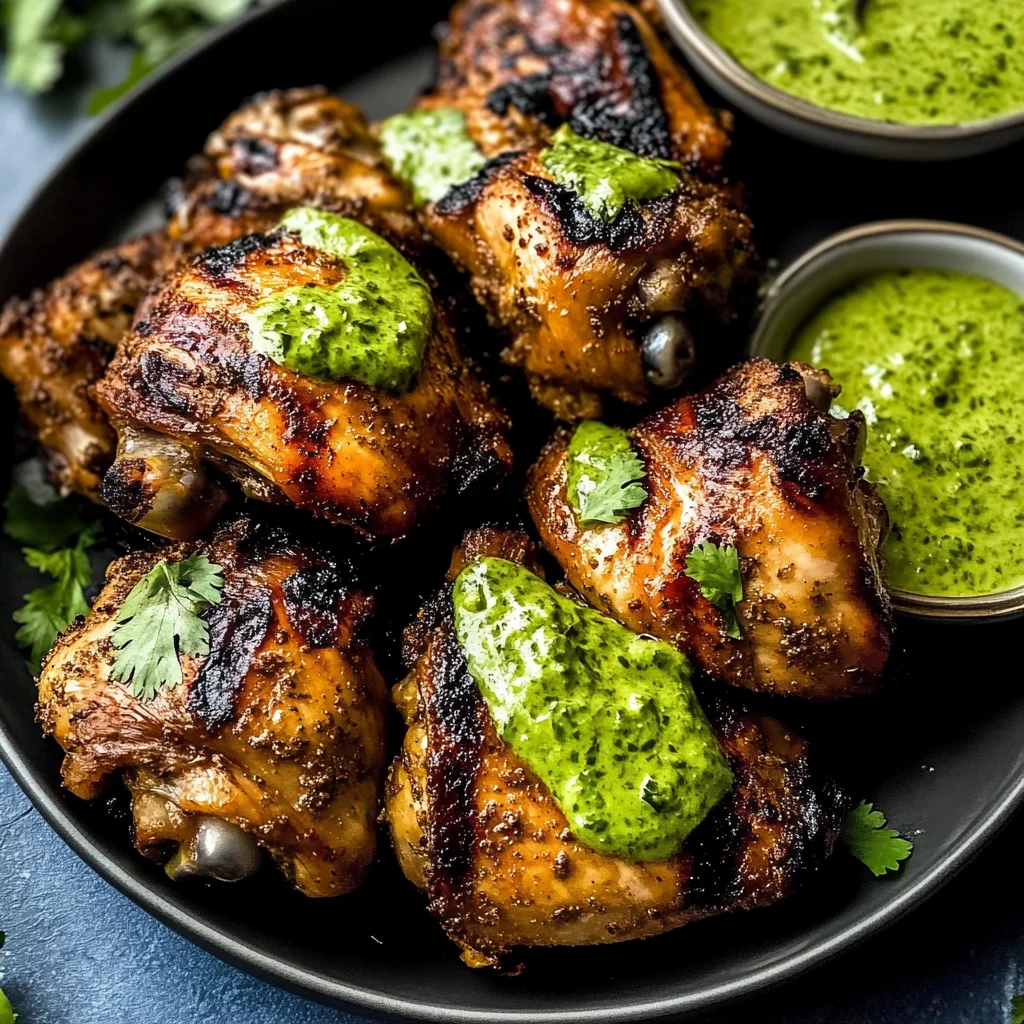
Step 8: Resting Your Chicken – Patience Equals Perfection
Once your grilled masterpieces are ready—and believe me when I say they’ll be gorgeous—you must resist slicing into them immediately! This part takes patience but trust me when I say it’s absolutely worth it; resting allows juices within each thigh to redistribute throughout the meat instead of spilling out onto your cutting board when sliced too soon. So transfer your grilled chicken onto a clean plate or cutting board and loosely cover it with foil—it keeps them warm while they rest.
Let them sit for about 5-10 minutes before diving in—this might feel like an eternity if you’re as excited as I am! But during this time, flavors deepen further as steam continues cooking them gently from within. If you’ve ever had dry grilled chicken before (and haven’t we all?), you’ll appreciate how critical this step is for ensuring optimal juiciness and tenderness—you want every bite to be profoundly satisfying! Plus, you’ll notice how beautifully fragrant they are during this time; just imagine inhaling that smoky aroma mingled with lime and garlic—that’s what makes all our hard work worthwhile!
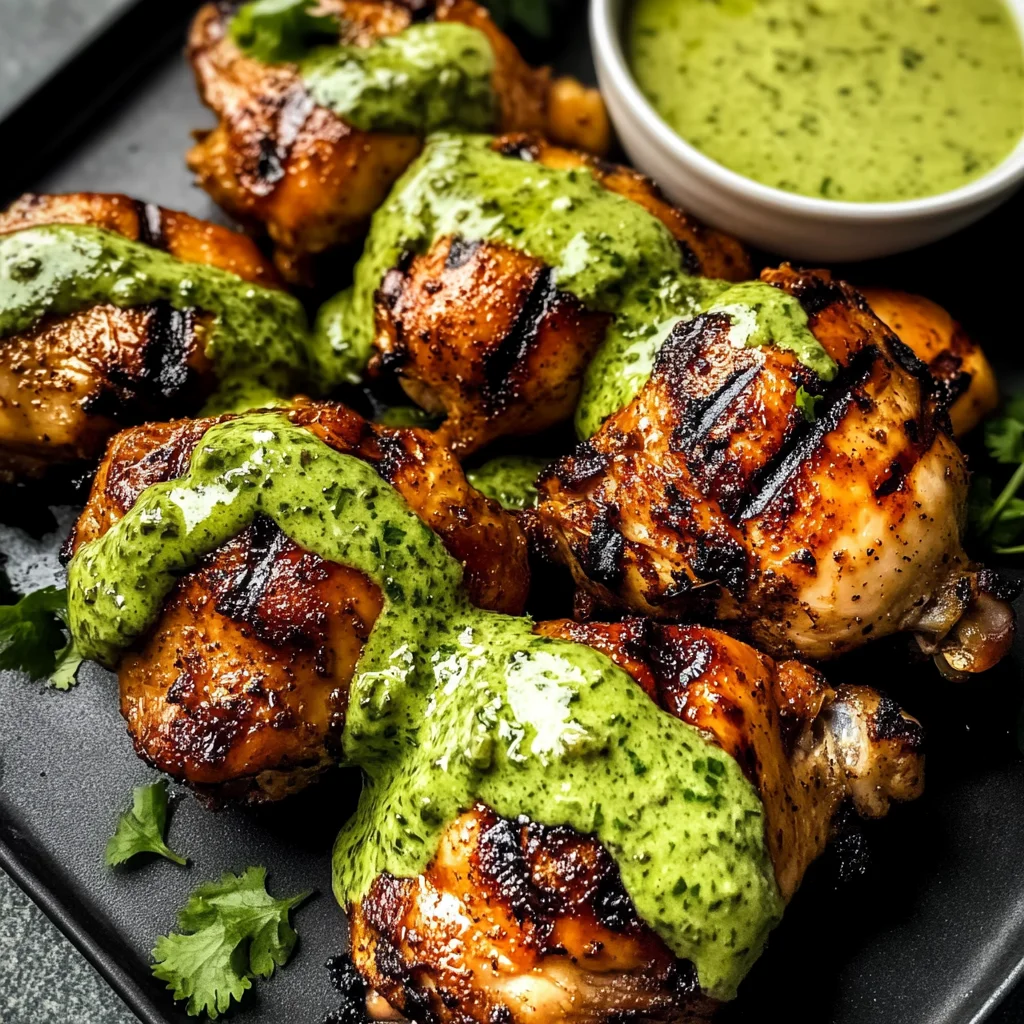
Final Touches – Creating Your Creamy Green Sauce
Now we arrive at one of my favorite elements of this Peruvian Chicken Recipe: our creamy green sauce! This sauce is so lush and vibrant—it’s like sunshine captured in a jar! Start by gathering fresh cilantro leaves along with jalapeños (don’t worry if they seem spicy—the mayonnaise balances it beautifully), green onions, garlic cloves, lime juice, salt, black pepper, Greek yogurt, and extra virgin olive oil into a food processor or blender.
I can already feel my excitement building as I think about blending these ingredients together! Pulse everything until smooth but don’t rush it; give it enough time until it’s perfectly creamy yet still vibrant green—a texture akin to liquid gold waiting to drizzle over our grilled perfection! Taste test along the way—feel free to adjust lime juice or salt according to personal preference. The result? An utterly intoxicating sauce that complements our juicy grilled chicken perfectly while adding layers upon layers of flavor!
Once prepared, keep this luscious sauce chilled in the refrigerator until you’re ready to serve—it actually gets even better after sitting for a bit as flavors meld together beautifully over time. As you plate up your succulent pieces of grilled Peruvian Chicken alongside generous dollops of this creamy green delight—I promise you’ll be transported straight into culinary heaven!
So there you have it—the complete journey through this Peruvian Chicken Recipe filled with love, excitement, and mouthwatering flavors waiting just for you! Each step has been designed not just with care but also with understanding why every little moment matters in crafting something truly special. Enjoy every bite knowing you’ve created something wonderful—your friends will be raving about this dish long after it’s gone off their plates!
Storage and Enjoyment Tips for Your Peruvian Chicken Recipe
Now that you’ve put your heart and soul into crafting this phenomenal Peruvian Chicken Recipe, it’s time to relish every bite! But what happens if you have leftovers (which is unlikely, trust me!)? Don’t fret! There are wonderful ways to enjoy this dish beyond the first serving. This chicken, with its intoxicating marinade and creamy green sauce, keeps beautifully, allowing you to savor those vibrant flavors even after your barbecue has ended.
Storing Leftover Peruvian Chicken Recipe
To store your leftover Peruvian chicken, I recommend using an airtight container to lock in all that mouthwatering flavor. Place it in the refrigerator where it will comfortably stay fresh for up to 3-4 days. If you want to maintain its delicious texture, consider placing a slice of bread in the container; it helps absorb excess moisture, keeping the chicken from drying out. When you reheat it, I promise you’ll be amazed at how the savory spices still sing through! You can microwave it gently or warm it on the stovetop over low heat with a splash of water to create steam—this way, you’ll revive that juicy goodness without sacrificing any taste.
Freezing Peruvian Chicken Recipe for Later
If you’re looking ahead and want to save some of this scrumptious dish for later enjoyment, freezing is an excellent option! To do so properly, ensure that your chicken is completely cooled before transferring it into a freezer-safe bag or container—squeeze out as much air as possible to prevent freezer burn. It can be stored in the freezer for up to 3 months. When you’re ready for a quick meal, simply thaw it overnight in the fridge and reheat as mentioned above. The convenience of having this flavor-packed chicken ready at a moment’s notice is absolutely delightful; imagine pulling it out on a busy weeknight and transforming it back into a feast with minimal effort!
Peruvian Chicken Recipe

Indulge in the vibrant flavors of Peruvian cuisine with this tantalizing Peruvian Chicken Recipe. This dish features succulent chicken thighs marinated in a zesty blend of garlic, lime, and spices, grilled to perfection and served with a creamy green sauce that adds a fresh twist. Bursting with aromatic herbs and just the right amount of heat from jalapeños, this recipe is perfect for summer barbecues or cozy family dinners. Experience the rich cultural heritage of Peru through each bite as you gather around the table with loved ones.
- Prep Time: 30 minutes
- Cook Time: 16 minutes
- Total Time: 46 minutes
- Yield: Serves approximately 4 people 1x
- Category: Dinner
- Method: Grilling
- Cuisine: Peruvian
Ingredients
- 2 pounds boneless, skinless chicken thighs
- 5 cloves garlic
- 1/3 cup low-sodium soy sauce
- 2 tablespoons fresh lime juice
- 1 tablespoon extra virgin olive oil
- 2 teaspoons cumin
- 1 teaspoon paprika
- 1/2 teaspoon dried oregano
- Black pepper to taste
- 3 jalapeños
- 1 cup fresh cilantro leaves
- 2 green onions (chopped – green parts only)
- 2 cloves garlic
- 1/2 cup mayonnaise
- 1/4 cup Greek yogurt
- 1 tablespoon lime juice
- 1/2 teaspoon salt
- 1/4 teaspoon black pepper
- 2 tablespoons extra virgin olive oil
Instructions
- In a large mixing bowl, combine garlic, soy sauce, lime juice, olive oil, cumin, paprika, oregano, black pepper, and chopped jalapeños to create the marinade.
- Add chicken thighs to the marinade and ensure they are well coated. Cover and refrigerate for at least 30 minutes or overnight for best flavor.
- While marinating, prepare the creamy green sauce by blending cilantro leaves, garlic cloves, mayonnaise, Greek yogurt, lime juice, salt, and black pepper until smooth.
- Preheat your grill (or grill pan) to medium-high heat. Lightly oil grill grates.
- Grill marinated chicken thighs for about 6-8 minutes on each side until fully cooked (internal temperature should reach 165°F). Let rest for 5-10 minutes before slicing.
- Serve warm with creamy green sauce drizzled on top.
Nutrition
- Serving Size: 1 chicken thigh (150g)
- Calories: 350
- Sugar: 2g
- Sodium: 450mg
- Fat: 20g
- Saturated Fat: 3g
- Unsaturated Fat: 16g
- Trans Fat: 0g
- Carbohydrates: 6g
- Fiber: 0g
- Protein: 36g
- Cholesterol: 120mg