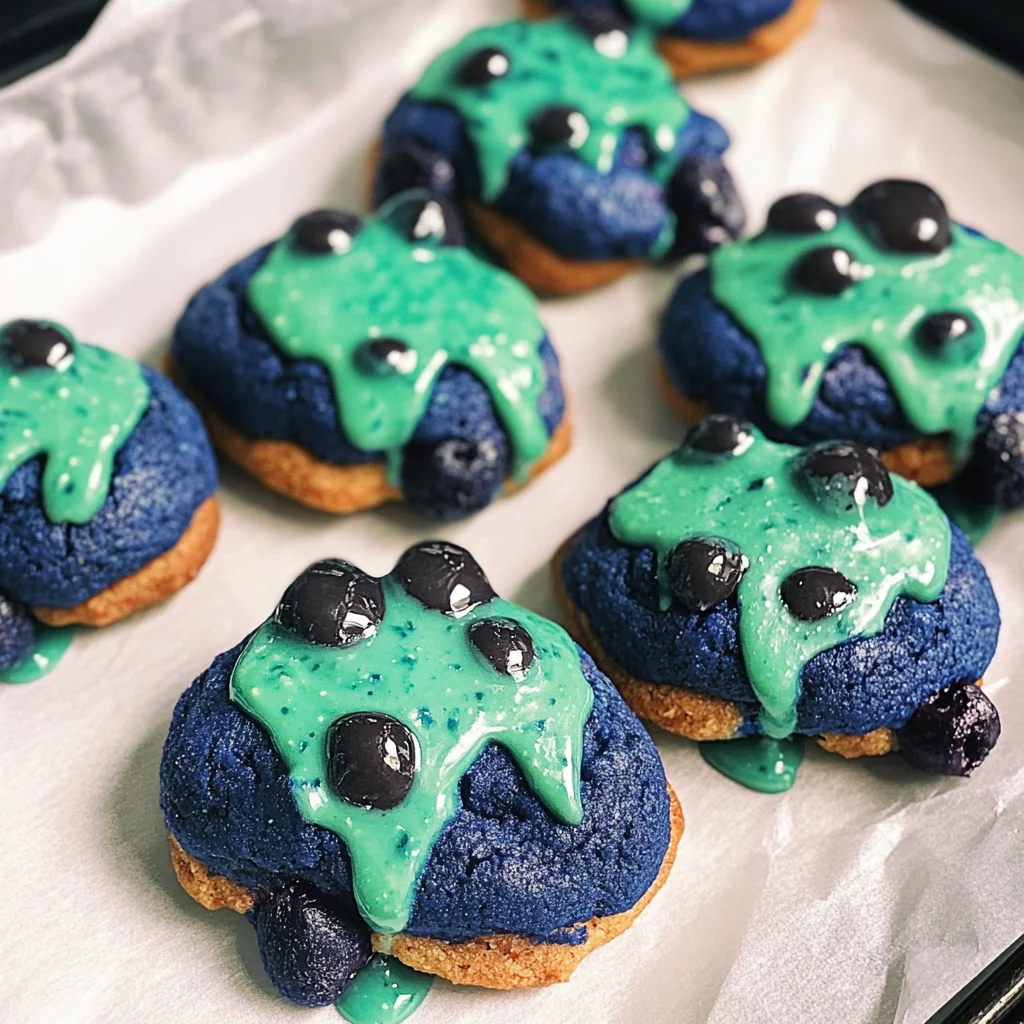
Blueberry Oddish Cookies
There’s something truly magical about baking, isn’t there? It’s not just about combining ingredients; it’s about creating something that fills the air with warmth and invites loved ones to gather around. Today, I want to share a delightful recipe that captures the essence of joy and creativity in the kitchen: Blueberry Oddish Cookies. Imagine small, adorable cookies that are soft and chewy, each bite bursting with fruity flavor thanks to both freeze-dried blueberry powder and blueberry jam. These cookies are more than just a treat; they’re a celebration of the vibrant colors and playful spirit of spring and summer. As you bake them, your kitchen will transform into a haven of sweetness, reminiscent of childhood games and sunny days spent outdoors.
When I think about these Blueberry Oddish Cookies, I’m transported back to carefree afternoons where imagination ruled—where every cookie was a new adventure waiting to happen. The whimsical shape inspired by Oddish, the beloved Pokémon character, adds an element of fun that even adults can appreciate! It’s perfect for cozy family gatherings or special occasions when you want to impress your friends with something unique yet uncomplicated. These cookies are not overly sweet; rather, they strike a perfect balance that makes them an ideal snack or dessert. Trust me when I say this recipe is easy enough for beginner bakers, but it delivers results that will have everyone raving!
Ingredients:
Now that I’ve whetted your appetite for some baking magic, let’s dive into the ingredients that will make these Blueberry Oddish Cookies come to life. Each component plays a vital role in achieving the perfect texture and flavor, so let’s explore them together.
1 ½ cups (180g) all-purpose flour. This is the backbone of your cookie dough. Flour contributes structure and stability, which is crucial for holding everything together. When selecting flour, look for one labeled as all-purpose; it has just the right protein content to give your cookies their lovely chewy consistency without being too dense or crumbly. Remember not to pack it tightly in your measuring cup—lightly spoon it in instead for accurate results.
½ teaspoon baking soda. This ingredient is essential for leavening your cookies! Baking soda reacts with acids in the mix (like our blueberry jam), producing carbon dioxide bubbles that help create a light texture as they bake. Make sure it’s fresh—an expiring box can lead to flat cookies that won’t rise properly.
½ teaspoon baking powder. Similar to baking soda but with slightly different properties, baking powder helps create an airy quality in our cookies while also providing a bit more lift. Always check the expiration date on your baking powder to ensure optimal results; old leavening agents won’t do their job effectively.
½ teaspoon salt. While it seems simple, salt is absolutely paramount! It enhances all other flavors present in the cookie dough and balances sweetness beautifully. Use fine sea salt if possible—it dissolves easily into batters and doesn’t leave any gritty texture behind.
½ cup unsalted butter (1 stick or 8 tablespoons), melted and cooled. Butter brings richness and flavor while also contributing moisture to our cookies. Melting it down ensures an even distribution throughout the dough, which creates that soft-baked texture we’re after. Just allow it time to cool before adding other ingredients because hot butter can cause eggs to scramble—yikes!
¼ cup granulated sugar (50g). This is the sweetener that provides a delightful contrast against our blueberries while also helping achieve those perfectly golden edges we adore! Granulated sugar also aids in browning during baking due to its high melting point.
⅛ cup light or dark brown sugar (25g), packed. Brown sugar adds moisture due to its molasses content, resulting in chewier cookies with depth of flavor. Light brown sugar offers a milder taste compared to dark brown sugar’s robust notes—feel free to use either based on preference!
1 teaspoon vanilla extract. Vanilla extract is like liquid gold in baking—it imparts warmth and roundness of flavor that elevates sweet treats from ordinary to extraordinary! Choose pure vanilla extract over imitation for superior taste.
1 egg. Eggs bind all ingredients together while adding richness; they also contribute structure through proteins coagulating during baking. For optimal incorporation into your dough, use eggs at room temperature if possible—they blend more seamlessly than cold eggs straight from the fridge.
1 tablespoon freeze-dried blueberry powder (6g). This ingredient is what truly sets our Blueberry Oddish Cookies apart! Freeze-dried blueberry powder infuses intense berry flavor without excess moisture—ideal for maintaining texture while amplifying fruitiness throughout each bite!
2-4 tablespoons blueberry jam (14g-42g). Our blueberry jam provides both sweetness and moisture along with additional fruity goodness! Depending on how strong you want that burst of flavor to be in each cookie, adjust this amount accordingly—but don’t skimp on this step; trust me!
*Liquid, gel, or powder food coloring (blue & green). * To achieve those iconic Oddish colors, you’ll need some food coloring! Opt for oil-based versions if working with chocolate decorations so they blend smoothly without seizing up.
1 tablespoon melted milk or dark chocolate. This acts as decorative accents on top of our cookies—trust me when I say chocolate elevates everything!
1 tablespoon melted white chocolate. Similarly used for decoration but adds contrast against darker chocolates while providing sweetness too!
Oil-based food coloring (pink/red). For any additional touches or embellishments you wish incorporate into your design—you’ll find this useful when creating vibrant colors without watering down flavors!
Having gathered all these ingredients together feels like preparing for an exciting adventure—it’s time to unleash our creativity!

Equipment You’ll Need:
Before we embark on this delicious journey together, let’s talk about the tools you’ll need at your side! Having the right equipment makes the process smoother and transforms cooking from a chore into an enjoyable experience filled with laughter and love.
A mixing bowl. A sturdy mixing bowl allows ample space for combining ingredients without creating chaos—especially since we’ll be whisking things together by hand! Glass bowls are fantastic as they allow you visually see how well combined everything is—a small bonus!
A whisk or rubber spatula. You’ll need either option here depending on what feels comfortable in your hands: whisking incorporates air into batter helping leavening agents activate fully while spatulas work wonders at scraping down sides ensuring no ingredient gets left behind.
A cookie sheet lined with parchment paper. This simple step prevents sticking while ensuring even heat distribution across each cookie as they bake away merrily in your oven!
A cooling rack. After those heavenly scents waft through your home signaling finished cookies ready for devouring…you’ll need somewhere cool where they can rest before decorating—the key here being patience allowing flavors meld together nicely post-baking!
Now you’re equipped not only with wonderful ingredients but also essential tools—all ready as we begin crafting these enchanting Blueberry Oddish Cookies together!
Preparing the Blueberry Oddish Cookies
Step 1: Mixing Dry Ingredients Together
Let’s kick off this delightful process by taking our mixing bowl—the heart of any good baking session—and adding our dry ingredients: flour, baking soda, baking powder, and salt. Whisking these components together may seem like a simple step but believe me when I tell you it’s crucial! By thoroughly combining these elements upfront before introducing wet ones ensures even distribution throughout your cookie dough later on which leads directly towards achieving uniform texture once baked—a non-negotiable aspect if we want consistent results from batch-to-batch! As you whisk away notice how effortlessly those dry particles blend together forming a harmonious mixture ready for its next partners-in-crime—the wet ingredients coming soon!
Step 2: Creaming Together Butter & Sugars
In another bowl (or simply right beside our dry mix if space allows), let’s combine our melted butter along with both granulated sugar and brown sugar until smooth—a process known as creaming where fats combine well within sugars creating air pockets necessary for fluffy textures later down line during baking stages ahead! As you stir gently try visualizing small bubbles forming within mixture—a beautiful sign indicating successful incorporation happening right before eyes here today! Don’t rush this step; take time enjoy rhythm created through mixing motions knowing every stroke brings us closer towards scrumptious outcome awaiting us shortly ahead…
Step 3: Incorporating Egg & Vanilla
Once we’ve achieved that lovely creamy consistency mentioned earlier it’s now time introduce egg alongside glorious splash vanilla extract directly into buttery-sugary goodness sitting before us patiently awaiting transformation! Stirring gently but firmly helps emulsify everything ensuring no clumps remain within batter allowing them melt seamlessly upon heating later… Isn’t science wonderful? As those flavors mingle together picture how they’ll dance joyfully upon first bites bringing forth warmth nostalgia reminiscent family gatherings lost long ago yet found again through shared culinary experiences today…
Step 4: Introducing Dry Mixture & Fruit Elements
This is where things really get exciting as we gradually fold in previously whisked dry ingredient mixture alongside freeze-dried blueberry powder followed closely by generous dollops of luscious blueberry jam added carefully spoonful-by-spoonful! I recommend using spatula here since folding motion preserves precious air pockets formed earlier allowing dough maintain soft chewiness desired once baked off perfectly golden brown edges shining brightly against vibrant purple hues peeking through beautifully inviting everyone around table join feast prepared lovingly just moments ago… Oh my heart sings at thought alone already knowing how utterly intoxicating aroma will soon fill entire house leaving mouths watering begging anticipation melt away impatiently waiting arrival final creations altogether…
With each step taken thus far leading us closer towards finish line please stay tuned because we have plenty more whimsical transformations awaiting next phase involving shaping decorating finishing touches just around corner… So grab yourself cozy spot kitchen breathe deeply soak atmosphere filled anticipation excitement promise incredible flavors dance tantalizing taste buds seeking out memories made anew today right here right now…
Stay tuned as we continue crafting these adorable Blueberry Oddish Cookies—there’s much fun ahead!
Step 5: Mixing the Wet Ingredients to Create Magic
Now that your dry ingredients are all beautifully combined, it’s time to shift our focus to the wet ingredients, which will bring moisture and flavor into our delightful Blueberry Oddish Cookies. In a separate bowl, take that glorious half cup of unsalted butter that you’ve melted and let cool just a bit — this is crucial because we don’t want to scramble the egg when we mix everything together! Add in the granulated sugar and brown sugar; trust me, this combination is what gives these cookies their wonderfully soft texture and that delicate sweetness that’s not overpowering. With a hand whisk, embrace the rhythm as you blend them together until the mixture becomes light and fluffy, about 1-2 minutes. You’re looking for a silky-smooth consistency here; it should feel like liquid gold gliding through your fingers.
Next, incorporate the vanilla extract, followed by the egg. This is an important moment—ensure your egg is at room temperature so it blends smoothly into the mixture without clumping. Whisk until everything is well combined. It might seem simple, but this step lays down the foundation for a cookie that will be profoundly satisfying with every bite. The sugars will dissolve completely into the buttery goodness, creating a luscious base for our dough. Remember to scrape down the sides of your bowl every now and then with a rubber spatula; we want every bit of those sweet flavors incorporated into our cookie dough.
Step 6: Incorporating Blueberries for That Fruity Burst
With your wet mixture ready to go, let’s introduce the stars of our show: those freeze-dried blueberry powder and blueberry jam! Sprinkle in one tablespoon of that vibrant freeze-dried blueberry powder first – it’s truly magical how it transforms our batter with both color and flavor. This powder packs a concentrated punch of blueberry essence that will infuse every nook and cranny of your cookie dough with its tart sweetness. I can already smell those blueberries wafting through my kitchen!
Next up, add in 2 to 4 tablespoons of blueberry jam depending on how fruity you’d like your cookies to be. If you’re anything like me and absolutely adore blueberries, go ahead and use those 4 tablespoons! As you fold in these two ingredients using your spatula, be gentle; we don’t want to over-mix yet because we still need to add our dry ingredients. Just fold until everything is nicely blended – think of this as gently coaxing the flavors together rather than aggressively mixing them into submission.
Step 7: Marrying Wet and Dry Ingredients
Now comes one of my favorite parts—the union of wet and dry ingredients! Carefully pour your flour mixture into the bowl containing all that deliciously sweet blueberry goodness. At this point, I find it best to use your rubber spatula again; it’s perfect for folding without deflating any air we’ve incorporated into our wet mixture. Gently fold in the flour until just combined; this means there may still be some streaks of flour visible when you’re done – that’s perfectly okay! Over-mixing at this stage can lead to tough cookies instead of soft, chewy wonders.
This step is where you want to engage all your senses. As you fold, you’ll notice how the colors meld together beautifully – from pale yellow buttercream hues tinged with purple swirls from the blueberries. The aroma? Oh my goodness—it’s intoxicating! But resist the urge to taste just yet! Trust me on this: letting it rest for at least 10 minutes after mixing will allow all those wonderful flavors to marry even further while helping with texture.
Step 8: Shaping Your Adorable Oddish Cookies
Once you’ve given your dough some time to rest (I know it feels like forever!), it’s time for shaping these little guys into their adorable forms reminiscent of Oddish from Pokémon! Preheat your oven now if you haven’t done so already to 350°F (175°C). Line two baking sheets with parchment paper or silicone mats because trust me when I say this helps prevent sticking—it’s non-negotiable if you want intact cookies!
Using a tablespoon or small cookie scoop (around two tablespoons per cookie), scoop out portions of dough onto your prepared baking sheets spaced about two inches apart—they’ll spread slightly while baking but not too much since we’ve kept them thick! These cookies bake quickly—around 11 minutes—but keep an eye on them as ovens can vary drastically in temperature. You’re looking for edges that are just beginning to turn golden brown while keeping that center soft and puffy; they should feel set but still slightly underbaked since they will continue cooking on the baking sheet even after being removed from the oven.
Final Touches: Adding Chocolate Decor
After allowing those cookies to cool on a wire rack for a few minutes (don’t rush this step; they need time!), let’s finish them off with some beautifully melted chocolate drizzle—this is where things get extra fun! Take one tablespoon each of milk or dark chocolate and white chocolate separately and melt them either in a microwave-safe bowl in short bursts (15-20 seconds) or over a double boiler if you’re feeling fancy – both methods work splendidly!
Once melted, grab your piping bags or simply use a fork dipped in either chocolate—starting with dark or milk chocolate first—and drizzle over each cooled cookie in a zig-zag pattern for visual appeal and added richness. Don’t forget about adding color—if you have some oil-based food coloring handy (in pink/red), now’s your moment! Just mix with white chocolate before drizzling for an utterly intoxicating look that will make these Blueberry Oddish Cookies pop!
And there you have it—a gorgeous batch of Blueberry Oddish Cookies fit for sharing with friends or enjoying all by yourself during those cozy evenings while watching Pokémon episodes! I promise you’ll savor every chewy bite filled with fruity flavor and love baked right into each one. Enjoy this culinary adventure; trust me—it’s worth every moment spent in joyful creation!
Storage and Enjoyment Tips for Your Blueberry Oddish Cookies
Now that you’ve created these adorable, soft, and chewy Blueberry Oddish Cookies, it’s time to revel in their delightful flavors! I can already imagine the joy on your face as you take that first bite, savoring the burst of blueberry goodness. But what happens when you have a few cookies left? You’ll be pleased to know that storing them properly is key to preserving their deliciousness, ensuring every bite remains as heavenly as the moment they came out of the oven.
Storing Leftover Blueberry Oddish Cookies
To keep your Blueberry Oddish Cookies fresh and delectable, store them in an airtight container at room temperature. This not only prevents them from drying out but lets them maintain that wonderfully soft texture we adore. When stored this way, they can last for about three to five days—though trust me, they’re so scrumptious you might find they disappear much sooner! If you want to keep them even fresher for longer, consider placing a slice of bread in the container; it’s a clever trick that keeps moisture levels just right. After these cookies have been sitting for a day or two, they still taste fantastic; the flavors meld beautifully, making each bite profoundly satisfying. When you’re ready to enjoy another cookie, just pop it in the microwave for about 10 seconds to bring back that warm, gooey bliss!
Freezing Blueberry Oddish Cookies for Later
If you find yourself with more cookies than you can munch through in a week (unlikely but possible!), freezing them is an excellent option. To freeze your Blueberry Oddish Cookies properly, allow them to cool completely before wrapping each one individually in plastic wrap or placing them in a freezer-safe bag. They will stay fresh in your freezer for up to three months without losing their delicious charm! Whenever you’re ready for a sweet treat, simply take out a cookie and let it thaw at room temperature or warm it up briefly in the microwave. The convenience this method offers is phenomenal—you’ll always have a stash of these delightful cookies ready to uplift your spirits or impress unexpected guests. So go ahead and fill your freezer with these beauties; future-you will thank present-you!
Blueberry Oddish Cookies

Indulge in delightful Blueberry Oddish Cookies—a soft treat bursting with flavor that’s easy to make. Bake today and enjoy every bite!
- Prep Time: 15 minutes
- Cook Time: 11 minutes
- Total Time: 26 minutes
- Yield: Approximately 24 cookies 1x
- Category: Dessert
- Method: Baking
- Cuisine: American
Ingredients
- 1 ½ cups all-purpose flour
- ½ teaspoon baking soda
- ½ teaspoon baking powder
- ½ teaspoon salt
- ½ cup unsalted butter, melted and cooled
- ¼ cup granulated sugar
- ⅛ cup brown sugar
- 1 teaspoon vanilla extract
- 1 egg
- 1 tablespoon freeze-dried blueberry powder
- 2–4 tablespoons blueberry jam
Instructions
- Preheat the oven to 350°F (175°C) and line two baking sheets with parchment paper.
- In a mixing bowl, combine flour, baking soda, baking powder, and salt. Whisk together until well mixed.
- In another bowl, cream together melted butter, granulated sugar, and brown sugar until smooth.
- Add the egg and vanilla extract to the butter mixture; mix until combined.
- Gradually incorporate the dry mixture into the wet mixture until just combined.
- Fold in freeze-dried blueberry powder and blueberry jam gently until evenly distributed.
- Scoop tablespoon-sized portions onto the prepared baking sheets, spacing them about two inches apart.
- Bake for 11 minutes or until edges are golden but centers remain soft.
- Allow cookies to cool on a wire rack before decorating with melted chocolate if desired.
Nutrition
- Serving Size: 1 cookie (30g)
- Calories: 120
- Sugar: 8g
- Sodium: 75mg
- Fat: 6g
- Saturated Fat: 4g
- Unsaturated Fat: 2g
- Trans Fat: 0g
- Carbohydrates: 15g
- Fiber: 0g
- Protein: 1g
- Cholesterol: 20mg