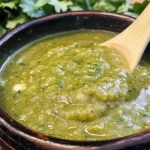
Green Enchilada Sauce Recipe
There’s something truly magical about preparing a homemade green enchilada sauce. It’s not just a recipe; it’s an experience that awakens the senses and speaks to the heart of Tex-Mex cuisine. The moment you tear the husks off those vibrant tomatillos, that fresh, zesty scent fills the air—it’s like an invitation to create something extraordinary. With every roast of the vegetables, you’re not merely cooking; you’re coaxing out deep, rich flavors that mingle together in a delightful dance. This Green Enchilada Sauce Recipe is more than just a sauce; it’s liquid gold that transforms simple ingredients into something profoundly satisfying. Trust me when I say that once you master this sauce, it will become a staple in your kitchen—a go-to for enchiladas, tacos, or even as a dip for your favorite chips.
What makes this green enchilada sauce so special is its balance of bright acidity from the tomatillos and the warmth of garlic and jalapeño. It’s an embodiment of tradition layered with innovation—perfect for cozy family dinners or lively gatherings with friends. I promise you, every spoonful is a celebration of flavor and creativity! And here’s the best part: this sauce is incredibly versatile. Whether drizzled over roasted chicken, stirred into simmering ground beef, or simply enjoyed straight from the blender (yes, I’ve done it!), it elevates any dish to new heights. So grab your apron, and let’s dive into this culinary adventure together!

Green Enchilada Sauce Recipe: A Zesty Delight
As we embark on this flavor journey, you’ll find that making this green enchilada sauce is not only straightforward but also thoroughly enjoyable. The joy lies in selecting fresh ingredients and watching them transform into a silky-smooth concoction that boasts depth and character.
Ingredients:
Let’s gather our stars! Each ingredient plays a vital role in crafting this delectable sauce, so take your time to select the best quality you can find.
- 12 large tomatillos (about 2 pounds before roasting). These little gems are the soul of our green enchilada sauce. Their unique tartness provides the perfect backdrop for flavor development after roasting. When choosing tomatillos, look for firm ones with bright green skin—avoid any that feel mushy or have brown spots. The roasting process will caramelize their natural sugars and enhance their brightness, creating a depth that is utterly intoxicating.
- 1/2 onion (cut into pieces). Onions add sweetness and complexity to our sauce as they roast down beautifully alongside our tomatillos. Use a white onion for its slightly milder flavor which complements the tanginess of tomatillos perfectly without overpowering them. Cut them into larger pieces so they can caramelize while still holding their shape.
- 1 jalapeno pepper (quartered). Adding just the right amount of heat is crucial in balancing our sauce’s flavors. The jalapeño brings warmth without overwhelming spice—feel free to remove seeds if you prefer a milder kick! Roast it alongside your other veggies to deepen its flavor profile; trust me on this one!
- 1 garlic clove. Garlic infuses everything with its wonderful aroma and savory notes; it’s non-negotiable in my kitchen! Use fresh garlic for its robust flavor profile—don’t substitute with powdered garlic here because nothing beats that fresh taste when blended into our sauce.
- 1 teaspoon kosher salt. Salt is essential—not just for seasoning but as an enhancer of flavors. It draws out moisture from ingredients during roasting and helps meld all those vibrant flavors together while blending.
- 2-inch bunch of cilantro (about 2 tablespoons chopped – optional). Cilantro adds an herbaceous freshness that can brighten up even the richest dishes! If you’re not fond of cilantro (I know some folks aren’t), feel free to leave it out—the sauce will still be deliciously vibrant without it.

Equipment You’ll Need:
Before we dive headfirst into making our scrumptious green enchilada sauce, let’s take stock of what we’ll need in our culinary toolkit to make everything run smoothly and effortlessly.
- Oven: You’ll need your oven preheated at 425 degrees Fahrenheit to achieve perfect roasting results for your vegetables! This high heat allows them to soften while developing rich caramelization—a crucial step for depth of flavor.
- Cookie sheet: A sturdy cookie sheet will be your trusty companion as we roast our tomatillos and onions. Make sure it’s lined with parchment paper if you’d like easier cleanup afterward!
- Blender: A high-speed blender (or food processor) is essential for turning those roasted vegetables into smooth liquid gold! If possible, opt for one with variable speeds so you can control how finely blended your sauce becomes.
- Cutting board & knife: You’ll want a good cutting board along with a sharp knife to chop your onions and jalapeños safely and efficiently—it makes all the difference!
Now that we have our ingredients and tools ready, let’s move forward into making this enchanting Green Enchilada Sauce Recipe!
Step 1: Preparing Your Ingredients with Love
First things first: let’s get those tomatillos ready! Start by tearing off their paper husks—this is where I often think about how nature wraps these treasures up for us! Rinse them under cool water because they tend to be sticky after being shelled; this little step ensures cleanliness before roasting begins. While you’re rinsing them off, go ahead and cut your white onion into four pieces—it doesn’t have to be perfect since they will roast down nicely anyway. And don’t forget about your jalapeño: slice off its stem before quartering it as well; that’s where all those lovely seeds live!
Step 2: Roasting Time!
Now comes one of my favorite parts—the roasting! Preheat your oven to 425 degrees Fahrenheit if you haven’t already done so; patience here pays off big time! Arrange all your prepared veggies—the tomatillos, onion pieces, and jalapeño—on that trusty cookie sheet we talked about earlier. Spread everything out so they have room to breathe—this allows moisture to escape faster leading us towards beautifully roasted veggies instead of steaming them together!
Step 3: Witnessing Transformation
Slide that cookie sheet into the hot oven and set your timer for about 20-30 minutes; keep an eye on things as they start cooking away! What you’re looking for is soft vegetables with nice charred edges—this adds such incredible depth to our final product! When ready, remove them carefully from the oven (don’t burn yourself!) then let them cool down just enough so you can handle them comfortably—about ten minutes should do.
Step 4: Blending Magic
Here comes the fun part—introducing everything into our blender! Carefully transfer all those glorious roasted veggies right in there along with that single chopped garlic clove we prepped earlier and sprinkle in one teaspoon of kosher salt too—that’s going give us great balance as we blend away! Securely place the lid on top then start blending on high speed until everything reaches an incredibly smooth consistency—about one minute should suffice but stay attentive—you want no chunky bits left behind!
Trust me when I say each step builds upon itself toward creating something utterly extraordinary—a symphony of flavors waiting patiently just outside your kitchen door! Remember though: if you’re someone who doesn’t enjoy cilantro much (we’ve all got preferences)—you can save adding it until after blending—I’ll tell you more about how later on…
Step 5: Blending the Roasted Goodness into Liquid Gold
Now that your vegetables have cooled slightly, it’s time to bring them together in a magical union of flavors. Carefully transfer all the roasted tomatillos, onion, and jalapeño into your blender. This step is crucial because blending helps to meld the flavors of the roasted ingredients into a harmonious sauce that dances on your palate. Don’t forget to add that single chopped garlic clove – it’s not just an ingredient; it’s the aromatic soul of this sauce. The salt is essential too; it enhances and elevates those vibrant flavors you painstakingly coaxed from the oven. Blend everything on high for about one minute or until you achieve a smooth, velvety texture. The transformation here is truly extraordinary—what started as simple vegetables will now become a silky puree that resembles liquid sunshine!
But wait, before we pour out our heart and soul into this sauce, let’s consider the cilantro. If you love its fresh, herbaceous flavor, go ahead and toss in a generous handful of chopped cilantro before blending again. This addition can elevate your green enchilada sauce to new heights, infusing it with freshness that brightens every bite. If cilantro isn’t your thing (I promise you, I get it!), feel free to skip this step; the sauce will still be profoundly satisfying without it!
Step 6: Seasoning to Perfection
After blending, take a moment to taste your creation—it’s like meeting an old friend after years apart! You may find that it needs just a touch more salt or perhaps a little extra zing. Remember, seasoning is an art form; it allows you to customize and elevate your green enchilada sauce recipe precisely to your liking. If you’re unsure about how much salt to add, start with a pinch and gradually increase until you find that perfect balance where all flavors sing in harmony. This process not only enhances taste but also ensures that each component shines through without overpowering one another.
Once you’ve dialed in the seasoning, feel free to give the blender one last whirl for good measure—this ensures everything is well integrated and ready for its starring role in your enchiladas. Trust me on this: a well-seasoned sauce can transform plain ingredients into something utterly intoxicating.
Step 7: Storing Your Masterpiece
Now comes an important yet often overlooked step: storage! After you’ve savored that first taste of your homemade green enchilada sauce, you’ll want to think about how best to keep this treasure fresh for future culinary adventures. Pour your vibrant sauce into a Tupperware container—preferably one with an airtight seal—to maintain its freshness. The beauty of this green enchilada sauce recipe lies in its versatility; it can stay fresh in the refrigerator for up to five days! So if you’re planning ahead or simply want to make an extra batch for those impromptu taco nights (and trust me, they will happen), this step is absolutely paramount.
If you’d like even longer-lasting bliss, consider freezing portions of the sauce in ice cube trays or freezer bags for up to two months! Imagine having that burst of flavor waiting for you at any moment—a perfect solution for quick meals or unexpected guests. Just remember to label your containers with dates; nothing feels better than pulling out a frozen gem from summer when winter feels too long!
Step 8: Final Touches Before Serving
Before you dive headfirst into assembling those delicious green enchiladas (which I know you can’t wait to do!), take a moment to warm up your green enchilada sauce gently on the stovetop over low heat. This step is so important because warming helps release those enticing aromas that fill your kitchen with comfort and joy—it’s like getting a big hug before the big meal! As you bring it up to temperature, give it a gentle stir every now and then; this not only prevents sticking but also incorporates any settled components back into the luscious mix.
You might notice some bubbling as it heats up; this bubbling indicates that flavors are intensifying and melding even further—a glorious sign of success! Once warmed through (about 5-10 minutes should do), remove it from heat and get ready for action! Trust me when I say that taking these extra steps makes all the difference between simply good and truly extraordinary enchiladas.
Next Major Phase: Crafting Your Perfect Green Enchiladas
Now that you’ve created a stunning base with this green enchilada sauce recipe, it’s time to put everything together! Get ready for an exciting adventure as we assemble delicious green enchiladas using our homemade sauce—your friends and family won’t know what hit them when they taste these beauties! Stay tuned as we explore each layer of flavor and texture in crafting these irresistible Tex Mex delights.
Storage and Enjoyment Tips for Your Green Enchilada Sauce Recipe
Now that your homemade green enchilada sauce is ready and absolutely bursting with flavor, it’s time to talk about how to preserve this liquid gold for future culinary adventures. Imagine diving into a jar of this sauce on a busy weeknight, transforming simple ingredients into a dazzling feast that will have your family or friends raving! The beauty of this recipe lies not just in its taste but in its ability to be stored and savored later. So let’s dive into the best ways to keep your sauce fresh and flavorful!
Storing Leftover Green Enchilada Sauce Recipe
When it comes to storing leftover green enchilada sauce, it’s essential to choose the right container for optimal freshness. I recommend using airtight glass containers or BPA-free plastic Tupperware, which can help keep that vibrant flavor sealed in tightly. Make sure the sauce has cooled completely before transferring it to the container; this step is crucial as it prevents condensation from forming, which can lead to unwanted moisture. Once sealed, you can pop it in the refrigerator where it will stay fresh for up to five days. If you’re worried about keeping it at its best, here’s a pro tip: place a slice of bread in the container with your sauce! It acts like a sponge, absorbing any excess moisture and ensuring your delicious creation remains just as delightful when you’re ready to use it again. And trust me, there’s nothing quite like pulling out some homemade enchilada sauce after a long day; the flavors meld beautifully over time, making each taste even more profound and satisfying.
Freezing Green Enchilada Sauce Recipe for Later
If you find yourself with extra sauce—lucky you! Freezing is an excellent option that allows you to enjoy this enchanting green enchilada sauce long after you’ve made it. To freeze properly, simply pour the cooled sauce into freezer-safe bags or containers; just make sure to leave some space at the top because liquids expand when frozen (trust me, you don’t want a messy explosion!). When frozen correctly, your green enchilada sauce will keep for about two months—perfect for those nights when cooking feels like too much effort. When you’re ready to use it, simply thaw overnight in the refrigerator or place it directly into a saucepan over low heat until warmed through. The convenience factor here cannot be overstated; imagine having this exquisite sauce at your fingertips whenever the craving strikes! You’ll be whipping up mouthwatering meals in no time.
What could be better than having such an extraordinary sauce ready to elevate any dish?
Green Enchilada Sauce Recipe
Discover the magic of homemade Green Enchilada Sauce—a vibrant, zesty blend that brings life to any Tex-Mex meal. Made with fresh tomatillos, roasted garlic, and a hint of jalapeño, this sauce is more than just a condiment; it’s a culinary experience. The bright acidity from the tomatillos and the warmth of garlic create a perfect balance that enhances enchiladas, tacos, or even acts as a delicious dip for chips. Once you master this easy recipe, it will become your go-to staple in the kitchen. With every spoonful, enjoy a celebration of flavors that invites creativity and warmth into your meals!
- Prep Time: 15 minutes
- Cook Time: 30 minutes
- Total Time: 45 minutes
- Yield: Approximately 4 servings 1x
- Category: Dinner
- Method: Roasting
- Cuisine: Tex-Mex
Ingredients
- 12 large tomatillos
- 1/2 onion
- 1 jalapeño pepper
- 1 garlic clove
- 1 teaspoon kosher salt
- Optional: 2 tablespoons chopped cilantro
Instructions
- Preheat the oven to 425°F (220°C).
- Prepare tomatillos by removing husks and rinsing them. Cut onion into quarters and jalapeño in half.
- Spread tomatillos, onion, and jalapeño on a cookie sheet. Roast for 20-30 minutes until soft and slightly charred.
- Allow roasted vegetables to cool slightly before transferring to a blender. Add garlic and salt.
- Blend on high until smooth. If desired, add chopped cilantro and blend again.
- Taste and adjust seasoning if necessary.
Nutrition
- Serving Size: 1 serving
- Calories: 35
- Sugar: 2g
- Sodium: 180mg
- Fat: 0g
- Saturated Fat: 0g
- Unsaturated Fat: 0g
- Trans Fat: 0g
- Carbohydrates: 8g
- Fiber: 2g
- Protein: 1g
- Cholesterol: 0mg