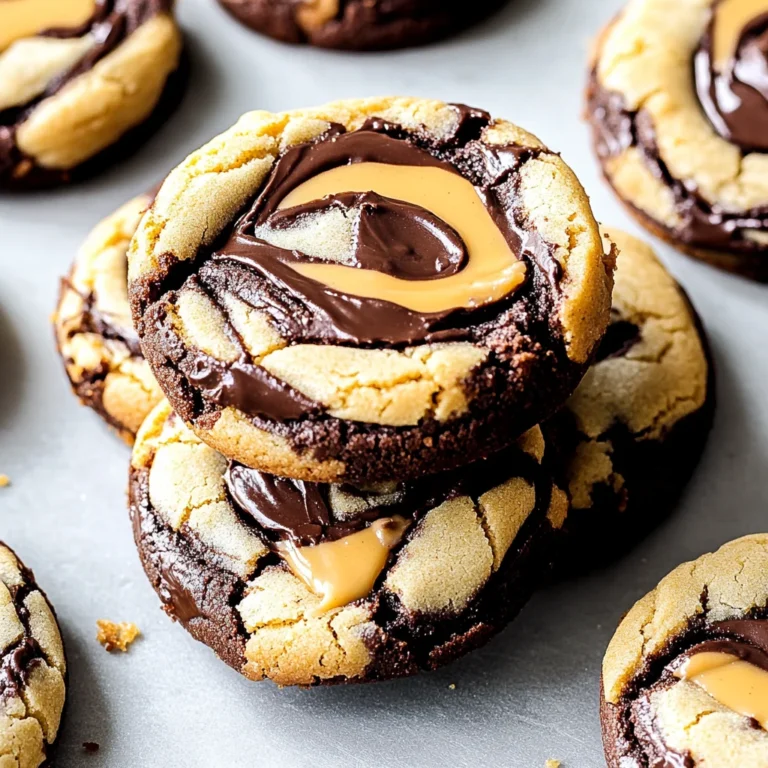
Lemon Raspberry Cookies
There’s something profoundly magical about baking that transcends the mere act of mixing flour and sugar; it’s a journey that awakens the senses and creates an experience that lingers long after the last crumb has disappeared. When I first stumbled upon the idea of Lemon Raspberry Cookies, I was captivated not only by their vibrant colors but also by the promise of their delightful flavors—sweet and tangy, light yet satisfying. This recipe isn’t just about cookies; it’s about transforming simple ingredients into a little moment of joy, a burst of sunshine on your palate reminiscent of warm summer days spent sipping raspberry lemonade. The moment you take that first bite, you’ll be transported to a world where every cookie is a celebration of life, love, and laughter.
I can’t help but feel a deep sense of nostalgia as I think about these cookies. They remind me of lazy afternoons in my grandmother’s kitchen, where we would bake together, our laughter mingling with the sweet scents wafting through the air. She always said that cooking is an expression of love, and I firmly believe that each batch of these Lemon Raspberry Cookies carries a piece of that sentiment. With every dollop of lemon juice and handful of raspberries, we’re not just following a recipe; we are weaving together memories, sharing warmth with those around us. So grab your mixing bowl and let’s embark on this delightful adventure together—because trust me, these cookies are going to bring smiles all around!
Lemon Raspberry Cookies: A Burst of Citrus Bliss
These Lemon Raspberry Cookies are soft and fluffy little clouds of sweetness with just enough tang to make them utterly addictive! Made without eggs and flourless (thanks to the magic of gluten-free flour), this recipe is perfect for everyone to enjoy—whether you’re vegan or simply looking for an egg-free treat. With the zesty kick from fresh lemons and the juicy bursts from frozen raspberries, these cookies taste like summer captured in a bite. And let’s not forget about that luscious raspberry glaze drizzled on top—it adds an extra layer of sweetness that’s simply irresistible!
Ingredients:
As we dive into this delicious recipe, let’s take a moment to appreciate each ingredient’s role in crafting these delectable cookies. Each one brings its own unique flavor and texture to the mix, creating an unforgettable symphony in every bite.
- 2 cups gluten free flour (I use a 1:1 gluten free flour with xanthan gum). This versatile ingredient acts as the backbone of our cookies, providing structure while ensuring they remain light and fluffy. When selecting your gluten-free flour blend, look for one that includes xanthan gum already mixed in; it helps mimic the binding properties found in traditional wheat flour. If you don’t have this specific blend on hand, you can create your own by combining various gluten-free flours like rice or almond flour with starches such as tapioca or potato starch.
- 1.5 teaspoons baking powder. This little powerhouse is essential for achieving that perfect rise in our cookies. Baking powder works by releasing carbon dioxide when it comes into contact with moisture and heat, which creates those delightful air pockets that contribute to a soft texture. It’s crucial to ensure your baking powder is fresh for optimal results; old baking powder may lose its potency and leave you with flat cookies.
- 1/2 teaspoon kosher salt. While it might seem counterintuitive to add salt to something sweet, this ingredient plays a pivotal role in enhancing flavors! Salt helps balance out sweetness while elevating all other ingredients involved—it’s like a secret weapon in baking! Opt for kosher salt here as its larger crystals dissolve beautifully without overpowering the other flavors.
- 1/2 cup unsalted butter (or vegan baking stick), room temperature. The choice between butter or a vegan alternative is entirely yours! Unsalted butter contributes creaminess and richness while helping our cookies achieve their delicate texture through creaming—a process where we whip air into the butter to create lightness. If using vegan butter sticks instead, opt for brands known for their quality fat content; they’ll yield similar results without compromising flavor.
- 1 1/4 cups granulated sugar. Sugar does more than just sweeten our cookies; it also influences texture by helping to create moisture during baking while contributing to browning thanks to caramelization processes at high temperatures. Granulated sugar lends itself perfectly here because it dissolves easily into the cookie dough without leaving any graininess behind.
- 2 heaping tablespoons cornstarch mixed with 3 tablespoons water. This clever mixture acts as an egg substitute! Cornstarch provides binding properties essential for holding everything together while adding chewiness without any eggy flavor whatsoever—perfectly fitting for our eggless approach!
- 3 tablespoons milk (dairy or plant-based). Milk adds moisture to our cookie dough while enhancing overall flavor complexity! Feel free to choose any type based on preference; almond milk lends nutty undertones while oat milk offers creaminess akin to cow’s milk.
- 2 tablespoons fresh squeezed lemon juice (from about 1 medium lemon). Fresh lemon juice infuses our cookies with zesty brightness—a delightful contrast against sweet elements! Opting for freshly squeezed rather than bottled ensures maximum flavor impact; plus, there’s nothing quite like savoring moments spent squeezing juice from those bright yellow beauties!
- 1 tablespoon lemon zest (from about 2 medium lemons). Zest is where all that aromatic oil resides—the essence captured within those colorful peels adds vibrant notes throughout each bite! Before juicing your lemons, gently grate off their outer skin using a microplane grater—this step amplifies citrus aromas beautifully!
- 1/2 cup frozen raspberries, chopped. Frozen raspberries burst open during baking releasing vibrant color along with tart sweetness throughout each cookie! Chopping them up lightly allows their juices to permeate evenly across dough—resulting in pockets filled with juicy goodness!
- 3 tablespoons granulated sugar (for rolling). Rolling our dough balls into this sugary coating before baking isn’t just about aesthetics—it creates slight crunchiness on exterior surfaces while simultaneously giving extra sweetness!
- 1 teaspoon lemon zest (from about 1 medium lemon). We’re doubling down on citrus joy here! Adding more zest later ensures lingering hints linger even after glazing process finishes—the perfect complement alongside tart raspberry flavors!
- 1 cup confectioners’ sugar (for glaze). Confectioners’ sugar provides that signature smooth texture we crave in glazes while effortlessly dissolving away once mixed—it’s absolutely essential if we want those beautiful drizzles atop finished cookies!
- 1-2 frozen raspberries (for glaze). Adding frozen raspberries directly into glaze mixture enriches both color & taste profiles immensely—plus they break down beautifully creating visually stunning swirls throughout icing!
- 1 tablespoon plus 1 teaspoon water (for glaze). Water helps achieve desired consistency when whisking together confectioners’ sugar & raspberry puree—too thick? Add more liquid until everything flows smoothly without clumping up too much!
Equipment You’ll Need:
Before diving headfirst into mixing up these delightful treats, let’s gather our trusty kitchen companions! Having the right tools not only makes cooking easier but also enhances your overall experience—there’s something satisfying about having everything at your fingertips.
- Mixing bowl: A large mixing bowl will serve as your workspace where all those delicious ingredients come together harmoniously! Choose one made from glass or stainless steel so you can monitor how well things mix without residue buildup interfering later stages.
- Hand mixer or stand mixer: Using either option assists greatly when creaming butter alongside sugars—we want maximum fluffiness achieved quickly without tiring out those arm muscles! If opting for manual methods instead? Arm yourself with some elbow grease & whisk vigorously until combined nicely.
- Measuring cups & spoons: Precision matters greatly when measuring dry & wet components alike—it allows flavors balance perfectly throughout baked goods forthcoming journey ahead! Invest in standard measuring tools designed specifically for both liquids/dry items—they’ll ensure accuracy every time.
- Baking sheet lined with parchment paper: Line your baking sheet before scooping out cookie dough balls onto it! Parchment prevents sticking whilst allowing even heat dispersion across surfaces beneath baked goodies—as well as making cleanup effortless afterward!
With everything gathered together seamlessly now let’s delve deeper into preparing these scrumptious Lemon Raspberry Cookies…
Step 1: Preparing Your Dough
To kick things off on this culinary adventure towards blissful cookie-making nirvana… First things first – let’s cream together our softened butter & granulated sugar until they form an airy mixture resembling fluffy clouds floating through sunny skies above us! This process known as creaming plays an instrumental role in incorporating air pockets necessary for achieving lightness within final product whilst simultaneously melding sweetness cohesively throughout entire batch created ahead…
Step 2: Incorporating Flour Mixture
Once you’ve achieved pale-colored buttery goodness post-creaming process—next step involves slowly sifting dry ingredients including gluten-free flour along with baking powder + kosher salt directly over buttery mixture waiting eagerly below… Gently fold them carefully avoiding overmixing which could lead dense-textured results instead desired lightness achieved thus far should shine through magnificently once combined fully incorporated into cohesive dough ball awaiting further delights within oven soon enough…
Step 3: Adding Cornstarch Mixture
Now comes time introducing egg substitute via cornstarch mixed previously prepared earlier alongside water… This glorious addition binds everything wonderfully allowing moisture retention ensuring chewy bites await us after they emerge golden-brown perfection freshly baked moments later… Give dough another gentle fold ensuring even distribution throughout followed closely by pouring milk along luscious squeeze fresh lemon juice directly within allowing tartness brighten every single bite ahead…
Step 4: Introducing Raspberries
Finally we arrive at pivotal moment introducing chopped frozen raspberries—their vibrant hues contrasting beautifully against creamy backdrop already formed inside bowl beckoning joyful anticipation around kitchen space nearby… Take care folding them delicately so no crushing occurs but rather maintain some shape intact resulting juicy pockets bursting forth once heated within oven creating pure bliss experienced upon biting down later…
Stay tuned friends—we’re almost ready for shaping these lovelies before sending them off towards glorious transformation happening inside hot oven awaiting patiently…
Step 5: Mix the Wet Ingredients with Love
Now that we have our dry ingredients waiting patiently, it’s time to bring the magic together by mixing in our wet ingredients. In a separate bowl, you’ll want to cream together your softened unsalted butter or vegan baking stick with the granulated sugar. You can use an electric mixer for this part, but don’t rush—take your time! Beat them together at medium speed for about 2-3 minutes until the mixture is light and fluffy. This step is crucial because creaming introduces air into the batter, which helps your cookies achieve that wonderfully soft and fluffy texture we’re after. It’s like giving your dough a warm hug!
Once you’ve achieved that delightful creaminess, it’s time to add in the cornstarch mixture you’ve prepared earlier. This will serve as our egg replacement, giving structure while keeping everything deliciously moist. Mix in the fresh lemon juice and zest next—this is where the flavor really starts to shine! The zest adds that vibrant citrus aroma that will fill your kitchen and make your heart flutter with anticipation. After everything is well combined, gently fold in those chopped frozen raspberries. I promise you, the sight of those ruby red jewels mingling with the bright yellow batter is nothing short of enchanting! Just be careful not to overmix; you want those raspberries to remain intact to create pockets of fruity goodness throughout your cookies.
Step 6: Combine Dry and Wet Ingredients
Here comes one of my favorite parts: uniting our dry and wet mixtures! Slowly add the dry ingredient mixture into your bowl of wet ingredients, using a spatula or wooden spoon. This method ensures that everything blends beautifully without risking overworking the dough—a pitfall that could lead to cookies that are more chewy than fluffy. As you mix, you’ll see the dough come together into a thick, sticky consistency reminiscent of clouds on a summer day. This is a good sign!
What you’re looking for here is a dough that holds its shape but isn’t too crumbly; if it seems too dry, don’t hesitate to add an extra splash of milk—just a tablespoon at a time until you reach that perfect consistency. Remember, every flour blend behaves differently! Once combined, let this dough rest for about 15-20 minutes at room temperature. Trust me on this: resting allows the flour to hydrate fully and gives the flavors a chance to meld together beautifully; it’s akin to letting a fine wine breathe before savoring it.
Step 7: Roll into Lemon Sugar Coating
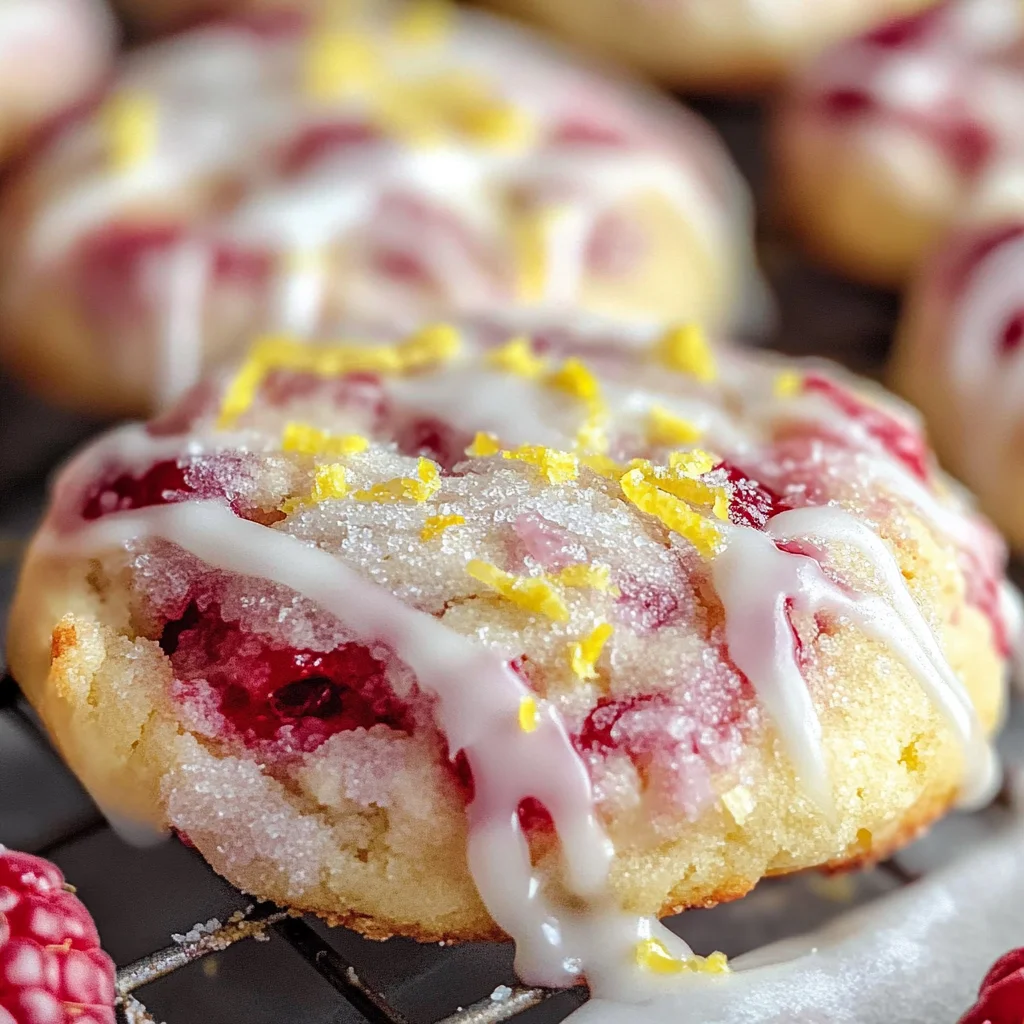
Now for some fun! Preheat your oven to 350°F (175°C) while we prepare our cookie balls for baking. Grab two shallow bowls: one for rolling in sugar and another for our lemon sugar mix (the combination of three tablespoons of granulated sugar and one teaspoon of fresh lemon zest). Take small portions of dough—about two tablespoons each—and roll them into smooth balls in your palms. As you do this, take a moment to appreciate how soft and pliable the dough feels; it should be slightly tacky but not overly sticky.
Once you’ve formed all your cookie balls, it’s time for their little sugary makeover! Roll each ball generously in the lemon sugar mixture until they are completely coated. This step isn’t just about aesthetics; this sugary exterior caramelizes beautifully during baking, providing a delightful crunch that contrasts perfectly with the soft interior. It’s like adding an extra layer of love to each cookie!
Step 8: Bake Your Cookies
With your oven preheated and cookie balls ready, it’s time for them to take their turn on the stage! Line two baking sheets with parchment paper—this prevents sticking and makes clean-up a breeze—and place your sugar-coated cookie balls about two inches apart on the sheets; they’ll spread while baking—which is absolutely paramount for achieving that pillowy shape we adore.
Bake them in your preheated oven for about 12-15 minutes, keeping an eye on them toward the end of baking. You’ll know they’re done when they begin to lightly golden at the edges but still look soft in the center—don’t worry if they seem underbaked; they’ll continue cooking after being removed from the oven due to residual heat! Let them cool on the baking sheet for about 5 minutes before transferring them to wire racks—that’s when they truly transform into their final form, cooling down yet holding onto all those tantalizing flavors.
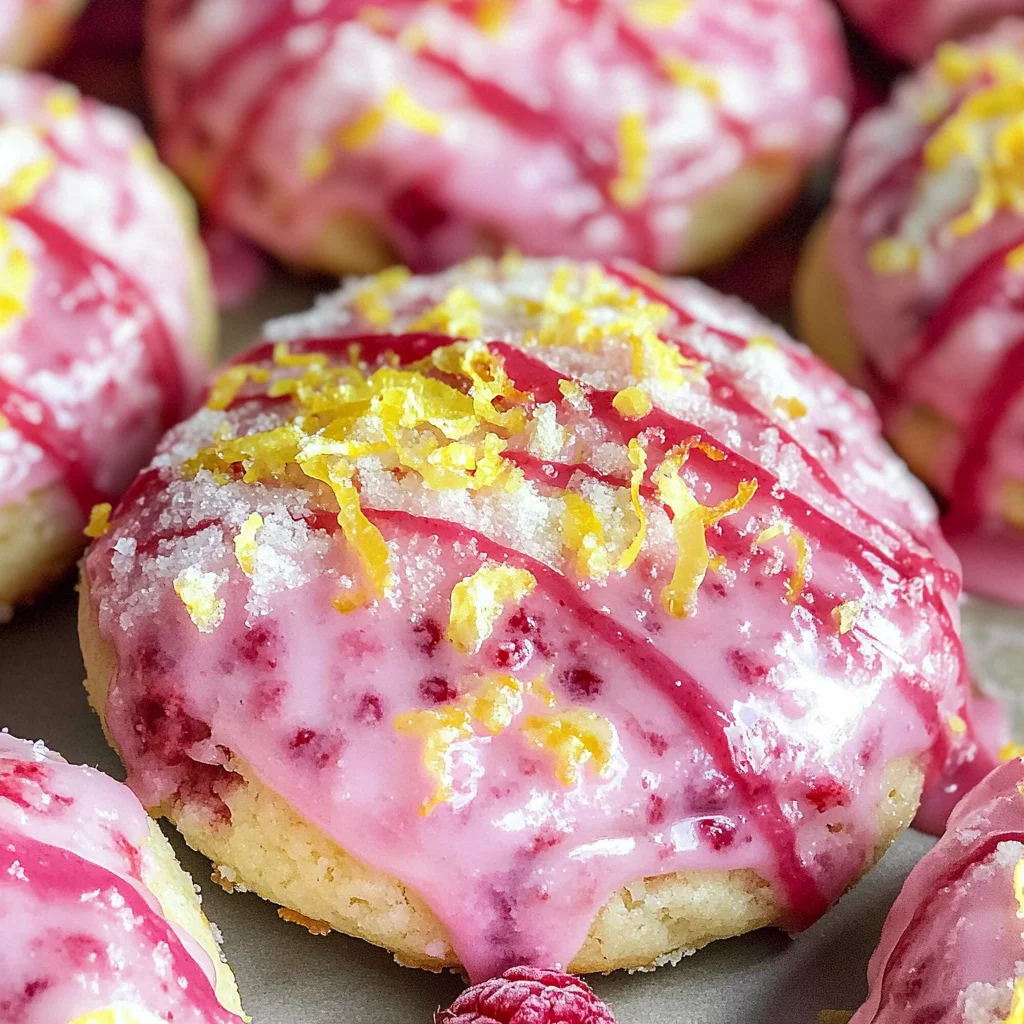
Final Touches: Drizzling with Raspberry Glaze
After allowing our lovely cookies to cool completely (which will feel like an eternity because trust me—you’ll want one right away!), it’s time for what I consider their crowning glory: the raspberry glaze! In a small mixing bowl, combine one cup of confectioners’ sugar with one tablespoon plus one teaspoon of water and smash up one or two frozen raspberries. The key here is creating a beautiful glaze that’s pourable yet thick enough to cling lovingly onto each cookie.
Once mixed—a process that should only take seconds—the glaze should resemble liquid sunshine swirled with raspberry hues. Drizzle this over each cookie using either a spoon or by transferring it into a small zip-top bag with one corner snipped off; this gives you precision while adding artistic flair! Lastly, finish off by sprinkling some extra lemon zest atop each cookie—the bright yellow zest against pink glaze creates visual delight while enhancing those citrus notes we so cherish.
And there you have it—your Lemon Raspberry Cookies are ready! Each bite promises an exhilarating dance between sweet tartness from raspberries and refreshing citrus brightness from lemons—it tastes like summer captured perfectly in cookie form! Share these beauties with friends or keep them all for yourself (I won’t tell!). Enjoy every last crumb because these cookies are not just treats; they are memories waiting to happen. Happy baking!
Storage and Enjoyment Tips for Your Lemon Raspberry Cookies
Now that your kitchen is filled with the irresistible aroma of fresh-baked Lemon Raspberry Cookies, it’s time to dive into the joy of enjoying them! But let’s not overlook the art of preserving these little treasures so you can savor their delightful flavor for days to come. Proper storage is key to maintaining their soft, fluffy texture and that vibrant burst of tangy sweetness. So grab your favorite container, and let’s talk about how to keep these beauties fresh!
Storing Leftover Lemon Raspberry Cookies
For optimal freshness, store your leftover Lemon Raspberry Cookies in an airtight container at room temperature. I recommend using a glass or plastic container with a tight-sealing lid; this will help prevent any unwanted air from sneaking in and drying them out. These cookies will stay delicious for about five days when stored properly. To maintain their soft texture, consider placing a slice of bread in the container with them—this clever trick helps to keep moisture levels balanced! Trust me on this one; the cookies will still taste as delectable as they did right out of the oven, with their sweet and tangy flavors intact. If you find yourself with extras (which is hard to believe since they’re so addictive), simply reheat them for a few seconds in the microwave before serving—this little step brings back that warm, just-baked experience that we all adore.
Freezing Lemon Raspberry Cookies for Later
If you want to extend the life of your delicious creations even further, freezing is an excellent option! Start by letting your cookies cool completely on a wire rack—this step prevents condensation from forming in your storage bag. Once cool, place them in a single layer on a baking sheet and freeze until firm. After they’ve set, transfer them into a freezer-safe bag or container, separating layers with parchment paper if stacking is necessary. They can be kept frozen for up to three months without losing that wonderful flavor! When you’re ready to indulge again, simply pull out as many cookies as you’d like and allow them to thaw at room temperature for about 30 minutes or pop them directly into the oven at a low temperature for a quick warm-up. The convenience factor here is absolutely glorious—you can whip up these cookies now and enjoy them later without any effort at all!
Lemon Raspberry Cookies

Lemon Raspberry Cookies are the perfect blend of sweet and tangy, offering a delightful treat that will brighten your day. These soft and fluffy cookies capture the essence of summer with their refreshing lemon flavor paired with juicy raspberries. Ideal for those seeking eggless or gluten-free options, this recipe is simple to follow, making it accessible for bakers of all skill levels. With a luscious raspberry glaze drizzled on top, these cookies are not only visually appealing but also irresistibly delicious. Enjoy them warm from the oven or share them at gatherings—either way, they promise to bring smiles to everyone who tries them!
- Prep Time: 20 minutes
- Cook Time: 15 minutes
- Total Time: 35 minutes
- Yield: Approximately 24 servings 1x
- Category: Dessert
- Method: Baking
- Cuisine: American
Ingredients
- 2 cups gluten-free flour
- 1.5 teaspoons baking powder
- 1/2 teaspoon kosher salt
- 1/2 cup unsalted butter or vegan baking stick
- 1 1/4 cups granulated sugar
- 2 heaping tablespoons cornstarch mixed with 3 tablespoons water
- 3 tablespoons milk (dairy or plant-based)
- 2 tablespoons fresh squeezed lemon juice
- 1 tablespoon lemon zest
- 1/2 cup frozen raspberries, chopped
- For glaze: 1 cup confectioners' sugar, 1 tablespoon plus 1 teaspoon water, and 1-2 frozen raspberries
Instructions
- Preheat your oven to 350°F (175°C). Line baking sheets with parchment paper.
- In a mixing bowl, cream together softened butter and granulated sugar until light and fluffy.
- Add the cornstarch mixture, lemon juice, and lemon zest; mix until well combined.
- Gradually incorporate the gluten-free flour, baking powder, and salt into the wet mixture until a sticky dough forms.
- Gently fold in chopped frozen raspberries.
- Roll dough into balls and coat in granular sugar before placing them on the prepared baking sheets.
- Bake for about 12-15 minutes until edges are lightly golden; let cool for a few minutes on the sheet before transferring to wire racks.
- For the glaze, combine confectioners' sugar with water and smashed raspberries, then drizzle over cooled cookies.
Nutrition
- Serving Size: 1 cookie (30g)
- Calories: 130
- Sugar: 10g
- Sodium: 65mg
- Fat: 5g
- Saturated Fat: 3g
- Unsaturated Fat: 2g
- Trans Fat: 0g
- Carbohydrates: 20g
- Fiber: 1g
- Protein: 2g
- Cholesterol: 15mg