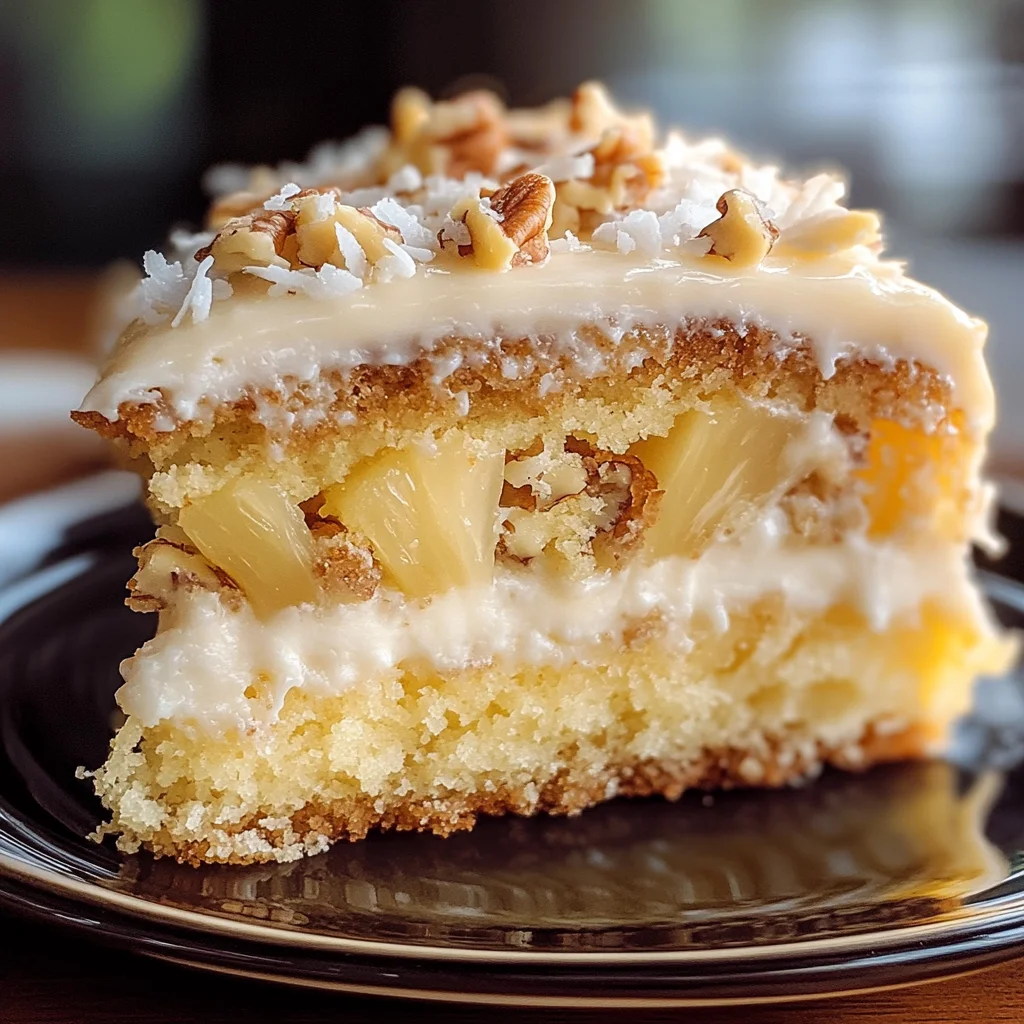
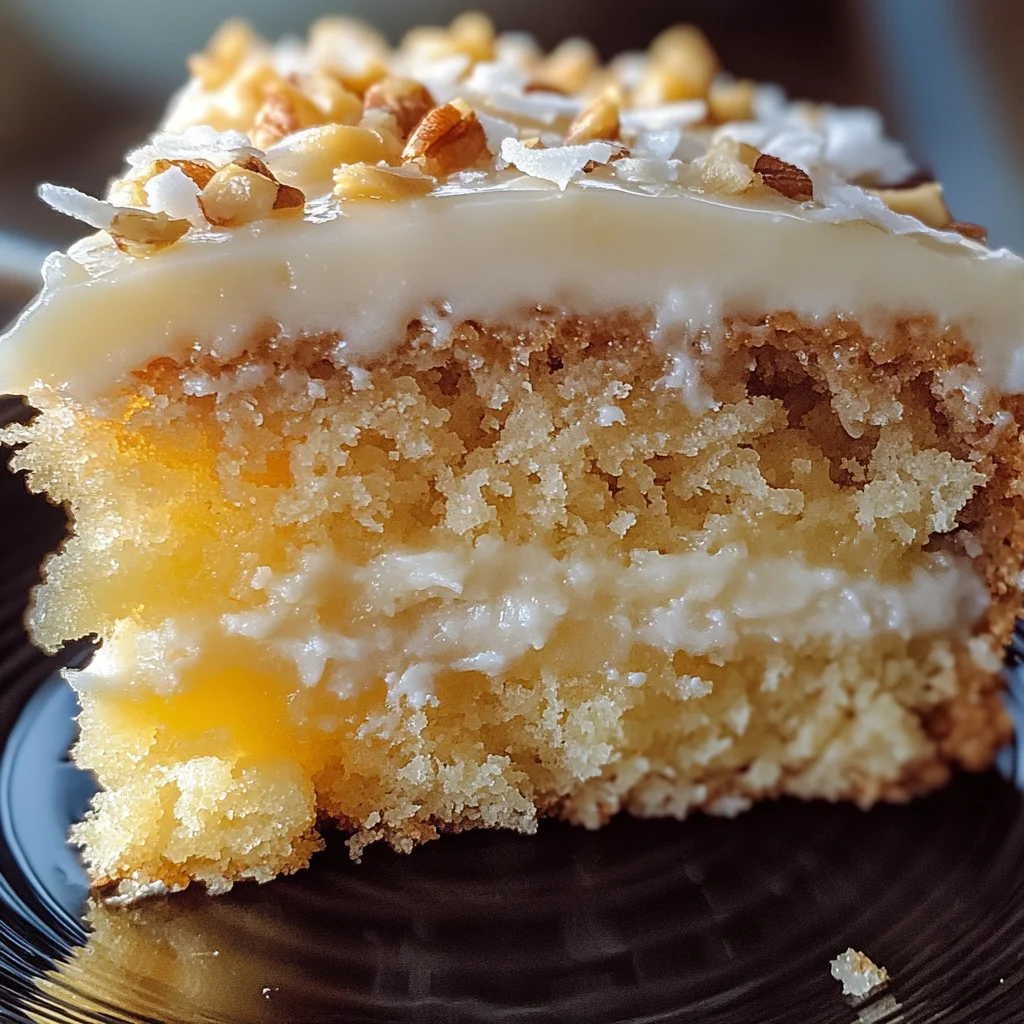
Pineapple Coconut God Bless America Cake
There’s something truly magical about a cake that transports you to sun-soaked shores and tropical breezes with every bite. The Pineapple Coconut God Bless America Cake is not just a dessert; it’s a celebration of flavors, a rich tapestry woven from the sweetness of crushed pineapple and the nutty embrace of coconut. Picture this: a luscious, moist cake that practically sings with sunshine, topped with a decadent icing that feels like a warm hug on a chilly day. This recipe is more than just food; it’s an experience—one that invites laughter, shared memories, and perhaps even a few happy tears around your dining table.
Every time I bake this cake, I’m reminded of summer gatherings filled with friends and family, where the air is fragrant with laughter and the promise of good food. It’s perfect for those patriotic holidays when we come together to celebrate our nation, but trust me when I say it shines at potlucks or any gathering where you want to impress your loved ones. The combination of sweet crushed pineapple and velvety coconut-pecan icing creates a harmony that dances on your palate—a truly extraordinary balance that will leave everyone asking for seconds (or thirds!).
Pineapple Coconut God Bless America Cake: A Tropical Delight for Every Occasion
Let’s dive into making this remarkable cake together! It may seem like there are several steps involved, but I promise you, each one is essential in creating the ultimate tropical experience right in your kitchen. So grab your mixing bowls and let’s create something beautiful!
Ingredients:
As we embark on this culinary adventure, let’s talk about the ingredients that will bring our Pineapple Coconut God Bless America Cake to life. Each element plays a crucial role in crafting the perfect blend of flavors and textures.
- 1 (20 oz) can crushed pineapple, with juices. This isn’t just any canned fruit; it’s the star of our show! The sweetness and moisture from the crushed pineapple infuse every crumb of this cake with tropical flavor. When selecting your can, look for pineapple packed in juice rather than syrup for a fresher taste. The juices add depth to our batter and ensure an ultra-moist texture that will have people raving long after the last slice is gone.
- 2 large eggs. Eggs serve as both a binder and leavener in our cake recipe. They contribute richness while helping to stabilize the structure as it bakes—this is crucial for achieving that tender crumb we’re all dreaming about! Make sure they’re at room temperature before mixing; this small step helps them emulsify better into the batter.
- 1/4 cup vegetable oil. This ingredient might seem simple, but don’t underestimate its power! Vegetable oil ensures our cake remains moist without adding any heavy flavor—perfect for letting those tropical notes shine through. If you’re feeling adventurous, you can even swap half of it for melted coconut oil to enhance that coconut flavor!
- 1 cup granulated sugar & 1/2 cup brown sugar. Combining these two types of sugar gives us the best of both worlds: granulated sugar contributes sweetness without overpowering flavors, while brown sugar adds moisture and depth thanks to its molasses content. Together they create a balanced sweetness that perfectly complements our fruity base.
- 2 cups all-purpose flour. This is essential for structure—the backbone of our cake! When measuring flour, be sure to spoon it into your measuring cup rather than scooping directly from the bag; this prevents compacting and ensures accuracy in your measurements leading to the perfect rise.
- 2 teaspoons baking soda & 1/2 teaspoon salt. Baking soda acts as our leavening agent here—it reacts with acidity from my beloved pineapple juice to create those delightful air bubbles in our batter! Salt enhances all the flavors present in our cake and balances out sweetness beautifully; never skip it!
- 1 (12 oz) can evaporated milk. This creamy ingredient gives us richness without weighing down our cake as heavy cream might do. It also adds moisture—remember how important that is for texture! Look for full-fat evaporated milk if possible for even creamier results.
- 1 cup (2 sticks) unsalted butter, softened to room temperature. Butter is key to creating flavor and moisture in baked goods—it’s what makes everything taste so deliciously rich! Ensure it’s softened properly before use so it can cream well with sugars later on; cold butter won’t blend effectively.
- 1 1/2 cups shredded coconut & 1 cup pecans, roughly chopped and toasted. These two ingredients together give us texture and flavor dimensions that make each bite special! Shredded coconut adds chewiness while toasted pecans introduce nuttiness—a match made in heaven! Toasting pecans before adding them brings out their natural oils and intensifies their flavor; trust me—it’s absolutely non-negotiable!
- 1 teaspoon vanilla extract & 1/4 teaspoon salt. Pure vanilla extract elevates everything we bake—it adds warmth and complexity that’s hard to beat! Always opt for pure over imitation whenever possible for richer results; you’ll notice such a difference! And remember—the tiny pinch of extra salt here rounds out all those lovely flavors beautifully.
Equipment You’ll Need:
Before we dive into baking, let’s gather some essential tools that will make our process smoother and more enjoyable! Having the right equipment not only makes things easier but also ensures success every step of the way.
- 9×13-inch baking dish – This classic size is perfect for sheet cakes like ours! It allows even heat distribution during baking which helps achieve that wonderfully fluffy texture we want throughout every bite.
- Mixing bowls (various sizes) – You’ll need at least one large bowl for mixing your wet ingredients together first before incorporating dry ones—having multiple sizes on hand streamlines prep work!
- Whisk or electric mixer – While whisking by hand works fine (and builds upper arm strength), an electric mixer saves time and effort especially when creaming butter & sugars together—trust me; you’ll thank yourself later!
- Spatula or wooden spoon – For folding dry ingredients into wet mixtures gently without overmixing—this gives us airy cakes instead dense bricks!
Preparing the Pineapple Coconut God Bless America Cake
Step 1: Preheat Your Oven
Let’s kick things off by preheating your oven to 350°F (175°C). This step isn’t just a formality—starting off with an adequately heated oven ensures consistent baking results throughout! While that warms up, grease your 9×13-inch baking dish thoroughly so nothing sticks when it comes time to serve this beauty up!
Step 2: Mix Your Wet Ingredients
In a large mixing bowl, combine the crushed pineapple along with its juices (don’t forget those flavorful liquids!), eggs, vegetable oil, granulated sugar, and brown sugar all at once. Using either an electric mixer or whisk by hand works well here too—just mix until everything blends seamlessly together without overdoing it (we don’t want tough cakes!). Keep an eye out as colors meld together beautifully—you’ll know you’ve got it right when there are no streaks left behind!
Step 3: Incorporate Dry Ingredients
Now comes one of my favorite parts: gently fold in flour along with baking soda and salt using either spatula or wooden spoon until they disappear completely into wet mixture below them—don’t overmix though because gluten development could lead us astray from light fluffiness we desire! As soon as incorporated fully—that’s when magic happens!
Step 4: Pour Batter Into Pan
Pour this gorgeous batter evenly into prepared baking dish—it should already start smelling divine by now thanks to pineapples mingling within doughy goodness awaiting its turn inside hot oven next door! Spread out evenly across surface gently so it bakes uniformly—prepare yourself because soon enough there’ll be heavenly aromas wafting through kitchen inviting everyone nearby closer…
Now let’s continue creating this stunning masterpiece as we move through each subsequent step toward frosting perfection next…
Creating the Magic: Baking Your Perfect Pineapple Coconut God Bless America Cake
Step 5: Pouring and Spreading the Batter
Now that you’ve crafted a beautiful mixture filled with tropical vibes, it’s time to transfer this luscious batter into your prepared baking dish. This step may seem simple, but the way you pour and spread can greatly influence the cake’s texture. Gently pour the batter into the greased 9×13-inch baking pan, allowing it to cascade in a smooth, steady stream. Use a spatula to help guide any stubborn bits that might cling to the bowl—don’t leave any deliciousness behind! Once the batter is in place, take your spatula and carefully spread it evenly across the dish. This is crucial because an even surface ensures that each slice bakes uniformly; if one part of your cake is thicker than another, it can lead to uneven cooking, resulting in some parts being dry while others are perfectly moist.
As you spread, you’ll notice the batter is thick and somewhat luxurious with those flecks of pineapple peeking through—this is exactly what you want! Trust me on this: don’t rush this step; take your time to ensure everything is level. If you’ve done it right, you should be left with a lovely canvas ready for baking. Now, let’s get this beauty into the oven!
Step 6: Baking to Perfection
With your batter now in the oven preheated at 350°F (175°C), it’s time for some magic to happen. The baking process will take about 35 to 40 minutes, but here’s where patience pays off. As the cake bakes, you’ll experience an intoxicating aroma wafting through your kitchen—sweet and slightly tropical, thanks to the pineapple mingling with that lovely sugar. But how do you know when it’s ready? The best way is by using a toothpick or skewer; insert it into the center of the cake once around 35 minutes have passed. If it comes out clean or with just a few moist crumbs clinging to it, you’re golden!
During this time, don’t be tempted to open that oven door too often; each peek releases heat that can cause uneven baking or even collapse your cake. Instead, keep an eye on its color—it should turn a lovely golden hue all around. And remember that every oven has its quirks; if yours tends to run hot or cold, adjust accordingly. I promise you—the moment it’s out of the oven and starting to cool down will be absolutely exhilarating!
Step 7: Whipping Up That Irresistible Icing
While your cake is enjoying its time in the oven and transforming into a golden piece of heaven, it’s absolutely paramount that we prepare our icing so it can complement our cake beautifully. Grab a medium-sized saucepan and set it over medium heat—this will help melt everything together smoothly without scorching any ingredients. Add in your evaporated milk along with two sticks of unsalted butter and one and a half cups of sugar. As these elements mingle over heat, stir gently until the butter melts completely and starts creating little bubbles around the edges of your saucepan—this indicates it’s simmering just right.
Now comes one of my favorite parts: adding shredded coconut and toasted pecans! These two ingredients are not just decorations; they’re pivotal in transforming our icing from basic to extraordinary. The coconut adds that tropical flair while providing delightful chewiness against the rich buttery base—it’s like a mini-vacation for your taste buds! Toasting pecans beforehand deepens their flavor through caramelization—this nutty richness will elevate every bite of your cake immensely. After stirring in these heavenly ingredients along with vanilla extract and salt—a pinch here makes all difference—allow this mixture to simmer gently for about 5-7 minutes until thickened slightly but not too much; you’re aiming for a pourable consistency here.
Step 8: Drizzling on That Decadent Topping
As soon as your cake emerges from the oven with that perfect golden crust—oh my goodness! Just look at how inviting it looks—you’ll want to dive right in! But hold on just a moment; while it’s still warm (not hot!), grab that gorgeous icing you’ve made and give it one last stir before pouring generously over your cake. This timing couldn’t be more important; pouring warm icing onto warm cake allows those flavors to meld beautifully while ensuring every nook and cranny gets coated in this divine mixture.
Take care as you drizzle—I recommend using a ladle or spoon so you can control where each delicious drop lands. It’s truly mesmerizing watching it soak into those warm layers before cooling down into an utterly intoxicating topping! You should see some luscious pools forming around the edges—the more icing there is, trust me when I say it only adds depth upon depth of flavor as everything settles together beautifully during cooling.
Step 9: Cooling Down – The Sweetest Anticipation
Now comes possibly one of the hardest yet most rewarding steps: allowing our Pineapple Coconut God Bless America Cake to cool down before slicing into it! As tempting as it may be—and oh believe me when I say I’ve been there—patience here is non-negotiable for achieving optimal texture and flavor integration. Letting this beauty rest allows all those rich flavors time to harmonize deeply within each layer while also ensuring that every slice remains intact instead of crumbling apart.
Allow about 30 minutes for cooling at room temperature if you can resist diving straight in! Keep an eye on how things progress; once it’s cool enough yet still slightly warm—it’ll be perfectly ready for slicing up into generous squares full of sunshine-y goodness! Serve at room temperature for an indulgent finish or slightly warmed up (heavenly!). Picture yourself surrounded by friends or family sharing stories over slices of this incredible dessert—it’s not just food; it’s love served on a plate!
Conclusion:
As we wrap up our journey through baking this delightful Pineapple Coconut God Bless America Cake, I hope you feel as excited about making this recipe as I do sharing it! There’s something undeniably special about combining tropical flavors with classic Southern charm that elevates this dessert beyond ordinary cakes. Each slice offers a symphony of textures—the moist crumb from the pineapple and the nutty crunch from toasted pecans—pairing perfectly with that luscious coconut icing which feels like pure liquid gold on your taste buds. It’s not just a cake; it’s an experience steeped in flavor and warmth.
This recipe is truly a must-try because it provides not only incredible taste but also joy during its creation. Whether you’re hosting a summer barbecue, celebrating a holiday with loved ones, or simply treating yourself on an ordinary Tuesday, this cake shines brightly on any occasion. Picture yourself pulling this beauty from the oven; the golden crust beckons as you pour over that rich icing while its intoxicating scent fills your home—a moment of pure bliss every time.
Imagine savoring one of these scrumptious slices with your morning coffee or perhaps pairing it with a scoop of dairy-free vanilla ice cream for an afternoon pick-me-up that brings sunshine into your day! For an even more decadent experience, try serving each piece alongside fresh tropical fruits like mango or kiwi—they complement those coconut notes brilliantly!
Feeling adventurous? This recipe is wonderfully adaptable too! You could swap out pecans for walnuts if that’s what you have on hand; mix in some chopped macadamia nuts for an even nuttier finish; or add some zest from lime or orange for an extra citrusy kick that dances delightfully on your palate. Every variation offers something new while still capturing that heavenly essence we adore about our Pineapple Coconut God Bless America Cake. So roll up those sleeves, get baking, and please share your creations—I can’t wait to hear how yours turns out!
Pineapple Coconut God Bless America Cake
Pineapple Coconut God Bless America Cake is a tropical delight that captures the essence of sun-kissed shores and joyful gatherings. With each bite, you’re treated to the moist sweetness of crushed pineapple paired with the nutty richness of coconut. This cake is perfect for any occasion, from festive celebrations to casual potlucks. Topped with a luscious coconut-pecan icing, it’s not just dessert; it’s a heartfelt experience that brings friends and family together around the table. Easy to make and even easier to enjoy, this cake promises to leave everyone asking for seconds!
- Prep Time: 20 minutes
- Cook Time: 35–40 minutes
- Total Time: 0 hours
- Yield: Approximately 15 servings 1x
- Category: Dessert
- Method: Baking
- Cuisine: Tropical
Ingredients
- 1 (20 oz) can crushed pineapple, with juices
- 2 large eggs
- 1/4 cup vegetable oil
- 1 cup granulated sugar
- 1/2 cup brown sugar
- 2 cups all-purpose flour
- 2 teaspoons baking soda
- 1/2 teaspoon salt
- 1 (12 oz) can evaporated milk
- 1 cup (2 sticks) unsalted butter, softened to room temperature
- 1 1/2 cups shredded coconut
- 1 cup pecans, roughly chopped and toasted
- 1 teaspoon vanilla extract
Instructions
- Preheat your oven to 350°F (175°C). Grease a 9×13-inch baking dish.
- In a large mixing bowl, combine crushed pineapple with juices, eggs, vegetable oil, granulated sugar, and brown sugar. Mix until blended.
- Gently fold in flour, baking soda, and salt until just combined.
- Pour the batter into the prepared baking dish and spread evenly.
- Bake for 35 to 40 minutes or until a toothpick inserted comes out clean.
- While the cake bakes, prepare the icing: In a saucepan over medium heat, melt evaporated milk, butter, and sugar together until bubbling. Stir in shredded coconut and toasted pecans; simmer for about 5 minutes.
- Drizzle warm icing over the warm cake once it’s out of the oven.
Nutrition
- Serving Size: 1 slice (85g)
- Calories: 320
- Sugar: 22g
- Sodium: 180mg
- Fat: 16g
- Saturated Fat: 10g
- Unsaturated Fat: 6g
- Trans Fat: 0g
- Carbohydrates: 40g
- Fiber: 2g
- Protein: 4g
- Cholesterol: 50mg