Simple Dark Chocolate Pumpkin Tart
There’s something incredibly magical about the autumn season that pulls at my heartstrings, and one of the simplest joys during this time is creating delightful treats that embody the essence of fall. The air becomes crisp, leaves turn gold and crimson, and the warm scent of pumpkin spices wafts through homes, inviting everyone to gather around the kitchen. Today, I’m thrilled to share with you my beloved recipe for a Simple Dark Chocolate Pumpkin Tart. This dessert is more than just a dish; it’s an experience, a perfect blend of rich chocolate and the comforting warmth of pumpkin pie spices that creates a symphony of flavors dancing on your palate. Trust me when I say that every bite offers a hug in dessert form!
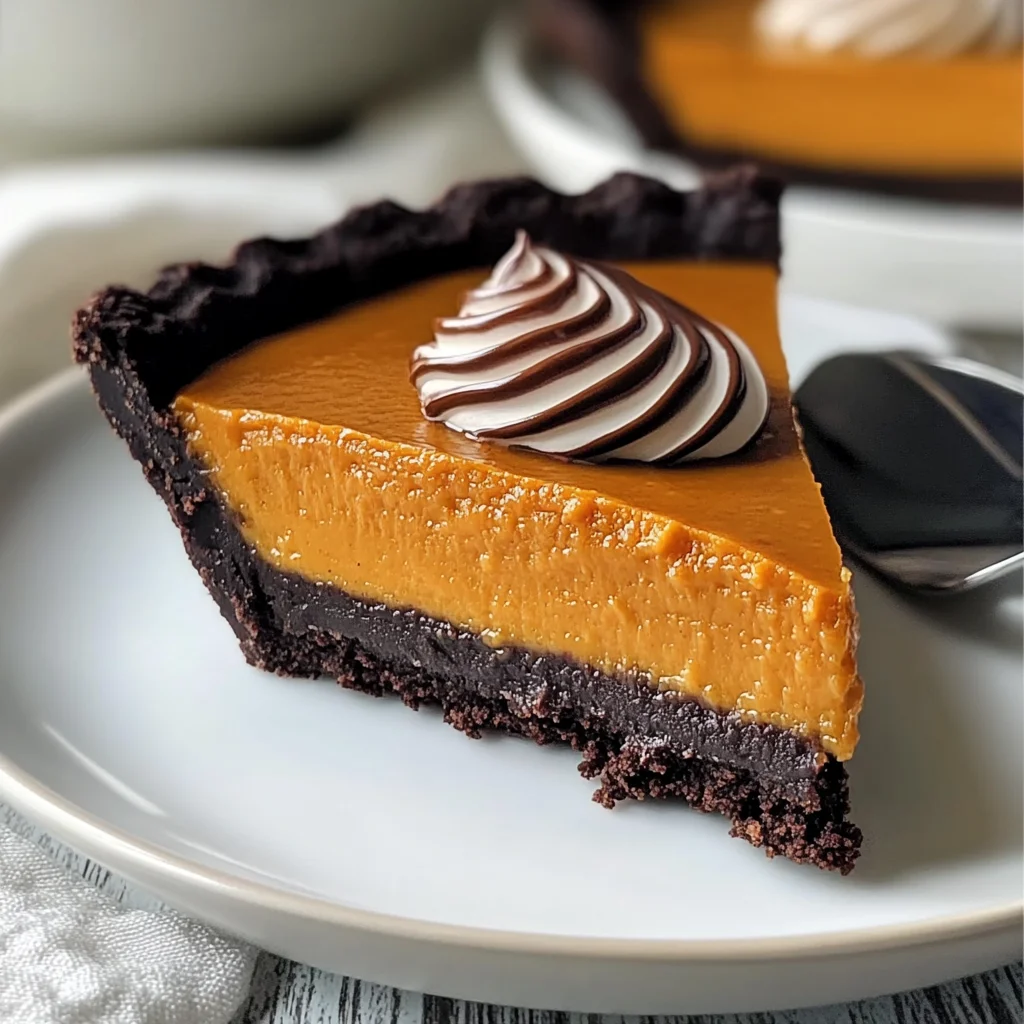
Picture this: you slice into the tart, revealing a luscious filling nestled within a decadent chocolate crust, each piece promising to transport you straight to your happy place. The combination of dark cocoa and pumpkin is truly extraordinary; it’s not just about the sweet notes but also about that hint of bitterness from the chocolate which beautifully complements the earthy sweetness of pumpkin. This tart is perfect for cozy gatherings with friends or family, or even as a lovely treat for yourself after a long day. It’s like wrapping yourself in your favorite blanket while sipping on hot cider — pure bliss!
Simple Dark Chocolate Pumpkin Tart: A Dessert Worth Sharing
Now that we’ve set the stage for this delightful creation, let’s dive into making our Simple Dark Chocolate Pumpkin Tart together! As you embark on this culinary journey, remember that cooking is not just about following steps but rather about connecting with what you’re making. Each ingredient plays its part in creating something beautiful and delicious, so let’s give them the love they deserve.

Ingredients:
As we gather our ingredients, take a moment to appreciate each one and how it contributes to our tart’s magic. This recipe calls for simple yet essential pantry staples that will come together to create exquisite flavors.
- 1 cup all-purpose flour. The backbone of our crust! All-purpose flour provides just the right amount of structure without being too heavy or dense, allowing us to create that tender base we desire in our tart crust. Look for high-quality flour with good protein content; it helps achieve that perfect texture we want. If you’re feeling adventurous, you can substitute half with whole wheat flour for added depth and nutrition without compromising flavor.
- 1/2 cup unsweetened dark cocoa powder. This ingredient gives our crust its deep chocolaty hue and rich flavor profile. It’s essential to use unsweetened cocoa powder here rather than sweetened varieties, as we want to control the sweetness ourselves while enhancing that luxurious chocolate taste. Choose Dutch-process cocoa if you prefer a smoother flavor; it will make your crust even more decadent!
- 3/4 cup white sugar. Sugar doesn’t just sweeten but also aids in achieving that perfectly balanced tart filling while contributing to browning during baking—a crucial factor when it comes to flavor development! Ensure you’re using granulated sugar for consistent texture throughout; it’s vital because we’re going for smoothness in our filling.
- 1/2 tsp kosher salt. Salt enhances flavors—this is absolutely paramount! A pinch lifts all those wonderful taste notes in both the crust and filling, helping each bite sing harmoniously on your taste buds. Kosher salt is preferred here due to its larger crystals which dissolve nicely without overwhelming sweetness.
- 1/2 cup unsalted butter, melted. Butter brings richness and moisture into our crust while also aiding in binding everything together beautifully—the hallmark of any great tart! Using unsalted butter gives you control over the saltiness of your recipe since we’ve already added kosher salt separately.
- 1 can (15 oz) pure pumpkin. This is where the heart of fall lies! Pure pumpkin adds moisture along with its natural sweetness and earthy flavor while giving us those classic autumn vibes we’re craving. Always opt for pure pumpkin puree instead of pumpkin pie filling as it allows us full control over spices and sweetness.
- 1 can (14 oz) sweetened condensed milk. This creamy liquid gold adds richness and a level of sweetness that’s simply irresistible—it acts as both sweetener and binder in our filling! If you’re looking for alternatives, coconut cream can be used for a non-dairy option without sacrificing creaminess.
- 1 large egg. Eggs are crucial for binding ingredients together; they give structure and stability to our filling once baked while imparting a delightful richness—trust me when I say this step is non-negotiable!
- 1 tsp pumpkin pie spice. This enchanting blend brings warmth and complexity—think cinnamon, nutmeg, ginger—it’s like autumn encapsulated in one little teaspoon! You could easily make your own blend at home or buy pre-mixed varieties from trusted brands.
- 1/4 tsp kosher salt (again!). Just like before, this little pinch will elevate flavors within our filling too—don’t skip it!
Now that we’ve gathered all these wonderful ingredients brimming with potential, let’s move on to ensuring we have all the right tools at hand!
Equipment You’ll Need:
Having the right tools makes all the difference when creating something magical in your kitchen! While these may not be ingredients per se, consider them essential partners in bringing your Simple Dark Chocolate Pumpkin Tart to life.
- 9-inch round tart pan with removable bottom – This tool is key because it allows easy removal of your beautifully baked tart without damaging its delicate structure—a true lifesaver when presenting at gatherings! If you don’t have one handy, feel free to use any pie dish; just keep in mind it might affect baking time slightly.
- Mixing bowls (various sizes) – You’ll need at least two mixing bowls: one for combining dry ingredients and another for wet ones. Using separate bowls prevents clumping while ensuring even mixing—plus who doesn’t love having colorful bowls lined up on their counter?
- Whisk – A trusty whisk will help incorporate air into your mixtures effectively—this step makes sure everything blends smoothly without lumps lurking around in our filling!
- Rubber spatula or wooden spoon – Here’s where you’ll channel all those positive cooking vibes! These tools ensure nothing goes wasted as we scrape down bowls or mix ingredients thoroughly.
- Baking sheet – Placing your tart pan atop this sheet catches any drips during baking—a smart move preventing oven messes! Plus it helps distribute heat evenly across your dish.
With our ingredients prepped and equipment ready at hand, let’s dive into preparing this beautiful Simple Dark Chocolate Pumpkin Tart together!
Step 1: Preheating Your Haven
First things first: let’s get that oven preheated to 425°F (220°C). Preheating ensures an even bake right from go—this is crucial as we want our crust cooked perfectly before adding that luscious filling later on! While that’s happening, spray a 9-inch round tart pan with non-stick cooking spray; trust me when I say this step will save you tears later when trying to remove your masterpiece from its mold! Set aside this prepared pan while you focus on crafting your chocolatey crust.
Step 2: Combining Dry Ingredients
In a large mixing bowl—preferably one that’s big enough so things don’t get messy—whisk together 1 cup all-purpose flour, ½ cup unsweetened dark cocoa powder, ¾ cup white sugar, and ½ teaspoon kosher salt until well combined. Creating this well-blended mixture ensures every bite has consistent flavor throughout; no one wants pockets of bitter cocoa or undissolved sugar ruining their dessert experience! Once that’s done making sure everything looks uniform (I like using my hands towards the end), make a well in the center of these dry ingredients before proceeding onto melting butter next—it’ll feel more intuitive once you see how everything comes together!
Step 3: Creating Your Crust Dough
Now comes my favorite part: pouring in that melted butter into our dry mixture! It should be warm but not steaming hot—that’s key here because if it’s too hot it’ll cook eggs prematurely if they accidentally touch later on down line during assembly stages—and stir everything until it forms crumbly dough resembling wet sand—that’s where you’ll know you’ve succeeded so far! Don’t rush through mixing; take care ensuring every grain absorbs some buttery goodness—it’ll make sense once it’s pressed firmly into shape later on!
Step 4: Pressing Into Shape
Next up? Time to create our base by pressing this chocolate dough evenly across both bottom & sides of prepared pan gently yet firmly until smooth & level all around—you don’t want gaps or cracks forming during baking causing leakage issues later down line trust me—I’ve been there before myself! Place this filled pan atop baking sheet before sliding into preheated oven allowing it bake away joyfully at high heat for precisely ten minutes—a quick bake keeps things crisp & pleasant avoiding mushy bottoms after adding fillings later on down line…
Now take a deep breath—you’re doing wonderfully so far—and let’s cool off while preparing delicious spiced pumpkin filling next!
Stay tuned as we continue building upon these rich layers…
Step 5: Pouring in the Liquid Gold
Now comes the moment when your kitchen will start to fill with an utterly intoxicating aroma that promises warmth and comfort. With the crust cooled and ready, it’s time to prepare our tantalizing filling. In a clean mixing bowl—because we want everything fresh and fabulous—add in the pure pumpkin, sweetened condensed milk, your large egg, and the delightful pumpkin pie spice. I can almost hear the whispers of fall as you whisk these ingredients together! The pure pumpkin is not just a star ingredient; it brings moisture, flavor, and that vibrant orange hue that makes this tart visually stunning.
As you whisk, think about how each element interacts—the sweetened condensed milk adds a luscious creaminess while also balancing out the natural earthiness of the pumpkin. The egg acts as a binding agent, crucial for achieving that perfectly set filling, while the pumpkin pie spice infuses everything with nostalgic warmth. You want this mixture to be completely smooth and harmonious because any lumps will disrupt the glorious texture we’re aiming for. This step is absolutely paramount; it ensures that each slice delivers a creamy bite bursting with flavor. Once you’ve achieved that velvety consistency, it’s time to gently pour this liquid gold into your cooled chocolate crust, watching it settle into all those nooks and crannies like a warm hug.
Step 6: Baking to Perfection
With your tart assembled, it’s time for the magic of baking to unfold. Slip your tart pan into the preheated oven at 425°F, allowing those flavors to meld and transform. Initially baking at this higher temperature is crucial; it helps set the filling quickly so that you lock in that rich custard-like texture we’re after. Set your timer for 10 minutes—this is where patience pays off! As it bakes, keep an eye on it; you might notice a few bubbles forming on top—this is normal and indicates that your filling is heating through properly.
After those first ten minutes are up, lower the oven temperature to 350°F. This transition is vital as it allows for gentle cooking, ensuring that your tart cooks evenly without burning or overcooking. Continue baking for another 25-30 minutes; during this time, you’ll see the center of your tart begin to firm up while still retaining a slight jiggle when moved gently—a sign of readiness without being too wobbly! To test doneness accurately, insert a toothpick into the center; if it comes out clean or with just a few moist crumbs attached, congratulations—you’ve nailed it! Remember not to rush this step; allowing those flavors to deepen during baking will yield something truly extraordinary.
Step 7: Cooling Down for Flavor Development
Once baked to perfection, resist the urge to dive right in! Allowing your Simple Dark Chocolate Pumpkin Tart to cool in its pan for at least one hour is essential—this resting period lets everything settle beautifully together. As it cools down slowly, you’ll find that flavors deepens further while creating a firmer structure that’s key for slicing later on. I often find myself peeking at my tart during this cooling phase, inhaling deeply as those enchanting aromas waft through my kitchen.
This cooling step may feel excruciatingly slow if you’re eager to taste your creation (trust me—I’ve been there!), but think of it as an exercise in patience where rewards await! If you were to cut into this tart too soon, you’d risk having a gooey filling spill out onto your plate—oh no! The cooling process allows all those beautiful ingredients to come together cohesively in each slice, giving you that satisfying bite everyone will rave about.
Step 8: The Final Flourish
When the hour has passed (or however long you could wait!), it’s time for final touches before serving up slices of joy. Carefully remove your tart from its pan by gently pushing up on that removable bottom—it’s like unveiling a masterpiece! Take a moment here—the contrast between the dark chocolate crust and golden pumpkin filling is truly breathtaking and deserves appreciation after all that effort.
For an extra touch of indulgence—though entirely optional—you can serve each slice with a dollop of homemade whipped cream or even some coconut whipped topping if you’re looking for dairy-free options! A sprinkle of cinnamon or nutmeg on top will elevate its visual appeal while tying back into those cozy autumnal spices we love so much. Remember: presentation matters; taking care with these small details shows how much love went into making this dessert!
As you gather around with friends or family—or maybe just indulge solo (no judgment here!)—I promise you’ll feel every bite resonate with warmth and satisfaction. This Simple Dark Chocolate Pumpkin Tart isn’t just dessert; it’s an experience filled with memories waiting to be made!
Enjoy Every Moment!
So there you have it—a luscious Simple Dark Chocolate Pumpkin Tart that’s not only easy to make but also profoundly satisfying in every way imaginable. Each step along this journey brought us closer not just to dessert but also created moments worth savoring—and I hope you’ll share them too! Whether served at holiday gatherings or simply enjoyed with loved ones over coffee on a crisp afternoon, may each bite remind you of home-cooked love and joy shared around the table. Happy baking!
Storage and Enjoyment Tips for Your Simple Dark Chocolate Pumpkin Tart
Now that your kitchen is filled with the heavenly aroma of the Simple Dark Chocolate Pumpkin Tart, it’s time to relish this creation! I can already envision you slicing into that glossy, spiced filling nestled in its decadent chocolate crust, all while the excitement of sharing it with loved ones fills the air. But what happens if you have some leftovers? Fear not! This tart is just as delightful the next day—and I’m here to share all my tips for keeping its magic alive.
Storing Leftover Simple Dark Chocolate Pumpkin Tart
To store your delectable Simple Dark Chocolate Pumpkin Tart, begin by placing it in an airtight container; this will help maintain its freshness and prevent any pesky fridge odors from seeping in. If you don’t have a suitable container, you can also wrap it tightly in plastic wrap—just be sure to protect that beautiful topping! Ideally, keep your tart refrigerated, where it will stay delicious for about three to four days. A little pro tip from my kitchen: if you want to keep the crust crisp, add a slice of bread inside the container. This little trick absorbs excess moisture and helps maintain that delightful texture. After storage, when you take a slice out, you’ll find that the flavors have matured beautifully—like fine wine! If you’re craving warmth, gently reheating it in the oven for just a few minutes will bring back that freshly baked goodness that melts your heart.
Freezing Simple Dark Chocolate Pumpkin Tart for Later
If you’ve made more than you can eat or are simply planning ahead for a special occasion, freezing your Simple Dark Chocolate Pumpkin Tart is an incredible option! To freeze properly, first let the tart cool completely; then, wrap it tightly in plastic wrap followed by aluminum foil to prevent freezer burn. It can be frozen for up to three months—how convenient is that? When you’re ready to indulge again, simply transfer it from the freezer to the fridge overnight to thaw slowly. You can even pop it back into a preheated oven for a short while if you want that fresh-baked aroma wafting through your home once more. Freezing this tart allows you to create moments of joy whenever you desire without added stress; just imagine pulling out your homemade dessert during a cozy gathering or holiday celebration!
Simple Dark Chocolate Pumpkin Tart
Indulge in the cozy flavors of autumn with our Simple Dark Chocolate Pumpkin Tart. This dessert beautifully marries rich dark chocolate with the warm, inviting spice of pumpkin, creating a treat that’s perfect for gatherings or a delightful personal indulgence. The decadent chocolate crust cradles a velvety pumpkin filling that brings comfort with every bite. Ideal for holiday celebrations or simply to enjoy on a crisp evening, this tart not only satisfies your sweet tooth but also wraps you in the warmth of fall. Get ready to impress your friends and family with this easy yet elegant dessert!
- Prep Time: 20 minutes
- Cook Time: 40 minutes
- Total Time: 1 hour
- Yield: Serves approximately 8
- Category: Dessert
- Method: Baking
- Cuisine: American
Ingredients
- 1 cup all-purpose flour
- ½ cup unsweetened dark cocoa powder
- ¾ cup granulated sugar
- ½ tsp kosher salt
- ½ cup unsalted butter, melted
- 1 can (15 oz) pure pumpkin puree
- 1 can (14 oz) sweetened condensed milk
- 1 large egg
- 1 tsp pumpkin pie spice
- ¼ tsp kosher salt
Instructions
- Preheat oven to 425°F (220°C). Spray a 9-inch round tart pan with non-stick spray.
- In a large bowl, whisk together flour, cocoa powder, sugar, and salt. Make a well in the center.
- Pour melted butter into the dry mixture and mix until crumbly. Press into the bottom and sides of the prepared tart pan.
- Bake crust for 10 minutes; remove from oven and cool slightly.
- In another bowl, whisk together pumpkin puree, sweetened condensed milk, egg, pumpkin pie spice, and additional salt until smooth.
- Pour filling into cooled crust and bake at 350°F (175°C) for 25-30 minutes until set with a slight jiggle.
- Cool for at least one hour before serving.
Nutrition
- Serving Size: 1 slice (105g)
- Calories: 330
- Sugar: 22g
- Sodium: 150mg
- Fat: 16g
- Saturated Fat: 10g
- Unsaturated Fat: 6g
- Trans Fat: 0g
- Carbohydrates: 42g
- Fiber: 3g
- Protein: 4g
- Cholesterol: 45mg